Inicio rápido de Python
Organiza tus páginas con colecciones
Guarda y categoriza el contenido según tus preferencias.
En este proyecto, aprenderás a implementar una solución simple
de Glassware que muestra la funcionalidad principal de la API de Google Mirror.
Para ver una demostración completamente funcional del proyecto de inicio rápido, ve a
https://glass-python-starter-demo.appspot.com.
De lo contrario, continúa leyendo para ver cómo implementar tu propia versión.
Descargar en GitHub
Requisitos previos
El SDK de App Engine para Python:
El proyecto de inicio rápido de Python se implementa con App Engine. Necesitas
el SDK de Python para App Engine
para desarrollar y, luego, implementar tu proyecto.
Ejecuta el instalador si corresponde para tu plataforma o extrae el archivo ZIP
en un lugar conveniente.
Crea una instancia de Google App Engine
Deberás alojar el proyecto de inicio rápido en una instancia de Google App Engine:
- Ve a http://appspot.com.
- Haz clic en Crear aplicación y crea una instancia pública de Google App Engine alojada en
appspot.com
.
- Asígnale un Identificador de aplicación a la aplicación y deja la autenticación Abierta para todo Google.
Usuarios de cuentas. Necesitarás el identificador de aplicación más adelante para configurar el proyecto de inicio rápido.
Cómo crear un proyecto en la Consola de APIs de Google
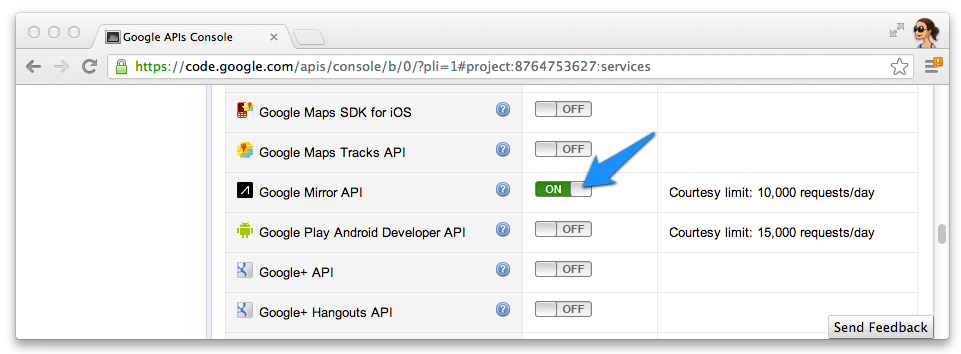
A continuación, habilita el acceso a la API de Google Mirror:
- Ve a la Consola de APIs de Google y crea un proyecto de API nuevo.
- Haz clic en Servicios y habilita la API de Google Mirror para tu proyecto nuevo.

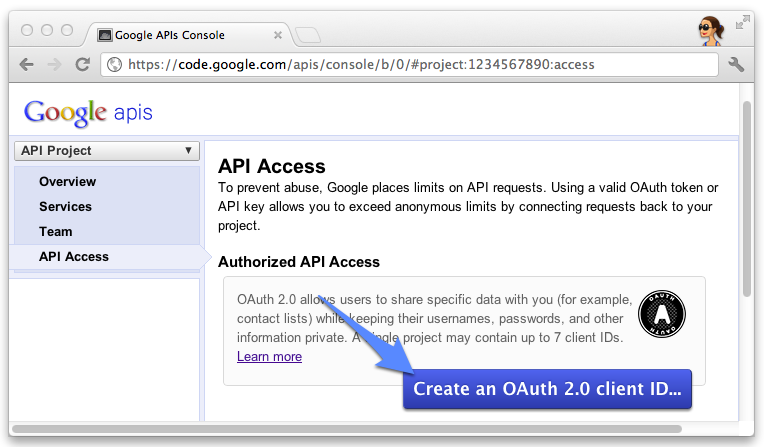
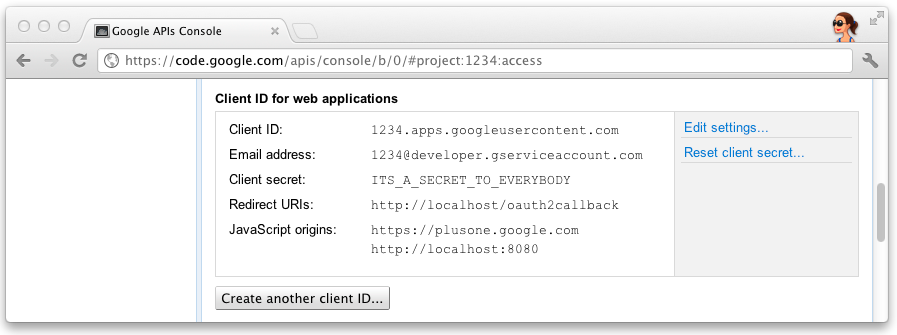
- Haz clic en Acceso a la API y crea un ID de cliente de OAuth 2.0 para una aplicación web.

- Especifica el nombre y el ícono del producto para tu Glassware. Estos campos aparecen en el permiso de OAuth
pantalla que se presenta a los usuarios.

- Selecciona Aplicación web y especifica cualquier valor para el nombre de host, como
localhost
.

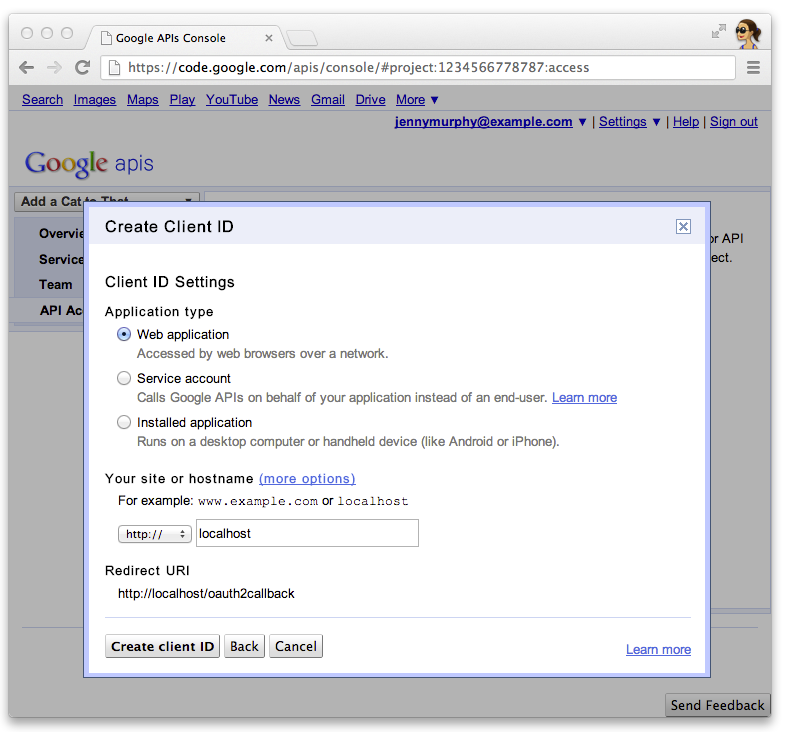
- Haz clic en Edit settings... para que el ID de cliente especifique los URI de redireccionamiento. Especificar
http://localhost:8080/oauth2callback
y la URL de devolución de llamada de App Engine
por ejemplo, https://myappengineinstance.appspot.com/oauth2callback
.

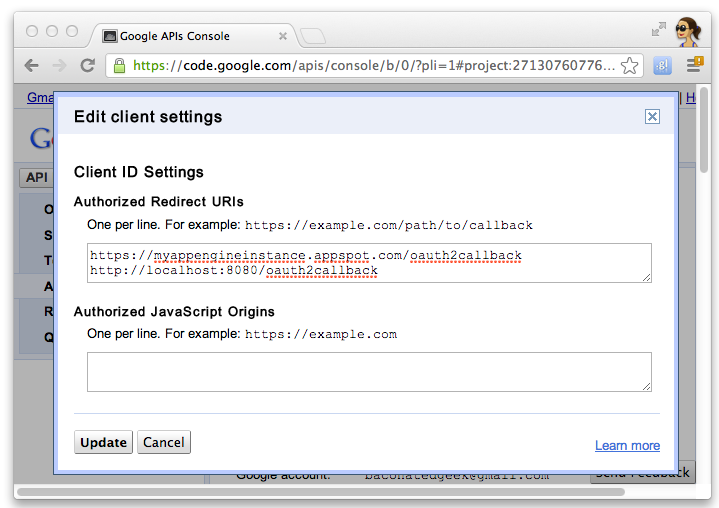
- Toma nota del ID de cliente y el secreto de la Consola de APIs de Google. Necesitarás
para configurar el proyecto de inicio rápido.

Configurar el proyecto
Configura el proyecto de Inicio rápido para usar la información de tu cliente de API:
- Ingresa tu ID de cliente y secreto en
client_secrets.json
:
{
"web": {
"client_id": "1234.apps.googleusercontent.com",
"client_secret": "ITS_A_SECRET_TO_EVERYBODY",
"redirect_uris": [
],
"auth_uri": "https://accounts.google.com/o/oauth2/auth",
"token_uri": "https://accounts.google.com/o/oauth2/token"
}
}
- Genera un archivo
session.secret
para almacenar las cookies de sesión:
$ python -c "import os; print os.urandom(64)" > session.secret
- Edita
app.yaml
para ingresar el ID de la aplicación de App Engine:
application: your_app_engine_application_id
version: 1
runtime: python27
api_version: 1
threadsafe: true
...
Implementa el proyecto
Presiona el botón azul Implementar en la interfaz de inicio de la GUI de App Engine o ejecuta esta shell
para implementar el código:
$ appcfg.py --oauth2 update .
Salvo que se indique lo contrario, el contenido de esta página está sujeto a la licencia Atribución 4.0 de Creative Commons, y los ejemplos de código están sujetos a la licencia Apache 2.0. Para obtener más información, consulta las políticas del sitio de Google Developers. Java es una marca registrada de Oracle o sus afiliados.
Última actualización: 2025-07-25 (UTC)
[null,null,["Última actualización: 2025-07-25 (UTC)"],[[["\u003cp\u003eThis project provides a simple implementation of Glassware demonstrating the core functionality of the Google Mirror API.\u003c/p\u003e\n"],["\u003cp\u003eTo run the project, you need the App Engine SDK for Python, a Google App Engine instance, and a Google APIs Console project with the Google Mirror API enabled.\u003c/p\u003e\n"],["\u003cp\u003eConfiguration involves setting up your client ID and secret, generating a session secret file, and updating the \u003ccode\u003eapp.yaml\u003c/code\u003e with your App Engine application ID.\u003c/p\u003e\n"],["\u003cp\u003eDeploy the project using the App Engine Launcher GUI or the \u003ccode\u003eappcfg.py\u003c/code\u003e command-line tool.\u003c/p\u003e\n"]]],[],null,["# Python Quick Start\n\nThis project shows you how to implement a simple\npiece of Glassware that demos the major functionality of the Google Mirror API.\n\nTo see a fully-working demo of the quick start project, go to\n[https://glass-python-starter-demo.appspot.com](https://glass-java-starter-demo.appspot.com).\nOtherwise, read on to see how to deploy your own version.\n\n[Download on GitHub](https://github.com/googleglass/mirror-quickstart-python)\n\nPrerequisites\n-------------\n\n[The App Engine SDK for Python](/appengine/downloads#Google_App_Engine_SDK_for_Python) -\nThe Python quick start project is implemented using App Engine. You need\nthe Python App Engine SDK to develop and deploy your project.\nRun the installer if appropriate for your platform, or extract the zip file\nin a convenient place.\n\nCreating a Google App Engine instance\n-------------------------------------\n\nYou'll need to host the quick start project on an instance of Google App Engine:\n\n1. Go to \u003chttp://appspot.com\u003e.\n2. Click **Create Application** and create a public Google App Engine instance hosted on `appspot.com`.\n3. Give the application an **Application Identifier** and leave the authentication **Open to all Google\n Accounts users**. You'll need the application identifier later to configure the quick start project.\n\nCreating a Google APIs Console project\n--------------------------------------\n\nNext, enable access to the Google Mirror API:\n\n1. Go to the [Google APIs console](https://code.google.com/apis/console/) and create a new API project.\n2. Click **Services** and enable the Google Mirror API for your new project.\n3. Click **API Access** and create an OAuth 2.0 client ID for a web application.\n4. Specify the product name and icon for your Glassware. These fields appear on the OAuth grant screen presented to your users.\n5. Select **Web application** and specify any value for the hostname, such as `localhost`\n6. Click **Edit settings...** for the client ID to specify redirect URIs. Specify `http://localhost:8080/oauth2callback` and the callback URL for your App Engine instance, for example, `https://myappengineinstance.appspot.com/oauth2callback`.\n7. Make note of the client ID and secret from the Google APIs Console. You'll need it to configure the quick start project.\n\nConfiguring the project\n-----------------------\n\nConfigure the Quick Start project to use your API client information:\n\n1. Enter your client ID and secret in `client_secrets.json`: \n\n ```python\n {\n \"web\": {\n \"client_id\": \"1234.apps.googleusercontent.com\",\n \"client_secret\": \"ITS_A_SECRET_TO_EVERYBODY\",\n \"redirect_uris\": [\n ],\n \"auth_uri\": \"https://accounts.google.com/o/oauth2/auth\",\n \"token_uri\": \"https://accounts.google.com/o/oauth2/token\"\n }\n }\n ```\n2. Generate a `session.secret` file to store session cookies: \n\n ```python\n $ python -c \"import os; print os.urandom(64)\" \u003e session.secret\n ```\n3. Edit `app.yaml` to enter your App Engine application ID: \n\n ```python\n application: your_app_engine_application_id\n version: 1\n runtime: python27\n api_version: 1\n threadsafe: true\n ...\n ```\n\nDeploying the project\n---------------------\n\nPress the blue **Deploy** button in the App Engine Launch GUI interface or run this shell\ncommand to deploy your code: \n\n $ appcfg.py --oauth2 update ."]]