Démarrage rapide pour Python
Restez organisé à l'aide des collections
Enregistrez et classez les contenus selon vos préférences.
Ce projet vous montre comment implémenter
Une solution Glassware qui illustre les principales fonctionnalités de l'API Google Mirror.
Pour voir une démonstration complète du projet de démarrage rapide, accédez à
https://glass-python-starter-demo.appspot.com.
Sinon, poursuivez la lecture pour savoir comment déployer votre propre version.
Télécharger sur GitHub
Prérequis
SDK App Engine pour Python :
Le projet de démarrage rapide Python est mis en œuvre à l'aide d'App Engine. Vous devez
le SDK Python App Engine pour développer et déployer votre projet.
Exécutez le programme d'installation s'il est adapté à votre plate-forme ou extrayez le fichier ZIP.
à un endroit pratique.
Créer une instance Google App Engine
Vous devez héberger le projet de démarrage rapide sur une instance de Google App Engine:
- Accédez à http://appspot.com.
- Cliquez sur Créer une application, puis créez une instance publique Google App Engine hébergée sur
appspot.com
.
- Attribuez à l'application un identifiant d'application et laissez le champ d'authentification Ouvert à tous les utilisateurs de Google
Comptes utilisateur. Vous aurez besoin de l'identifiant d'application ultérieurement pour configurer le projet de démarrage rapide.
Création d'un projet dans la console Google APIs
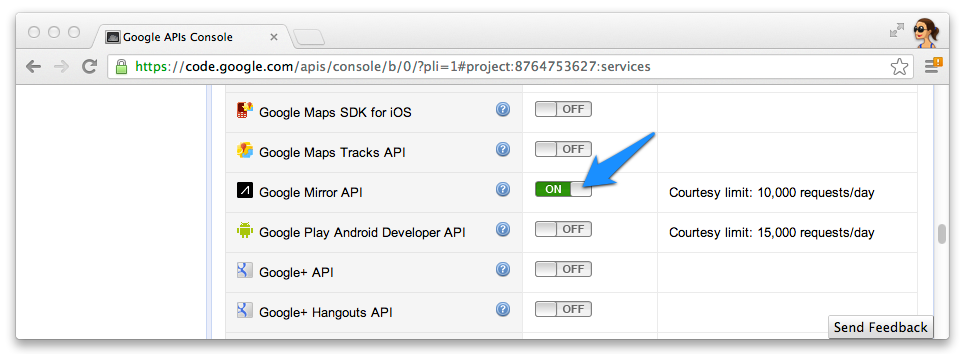
Ensuite, activez l'accès à l'API Google Mirror:
- Accédez à la console d'API Google et créez un projet d'API.
- Cliquez sur Services et activez l'API Google Mirror pour votre nouveau projet.

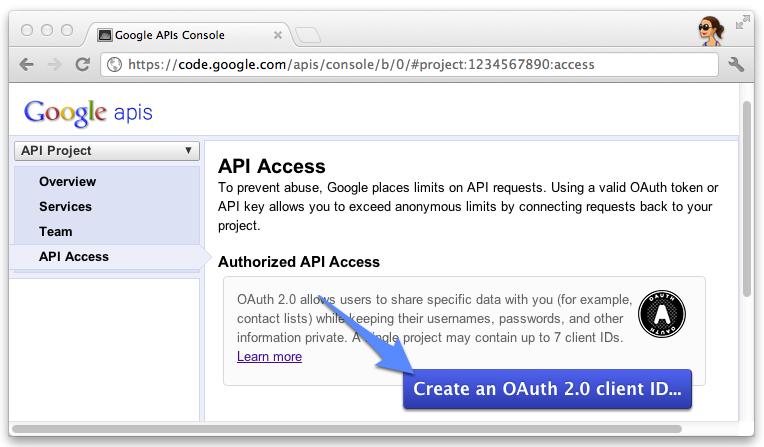
- Cliquez sur Accès à l'API et créez un ID client OAuth 2.0 pour une application Web.

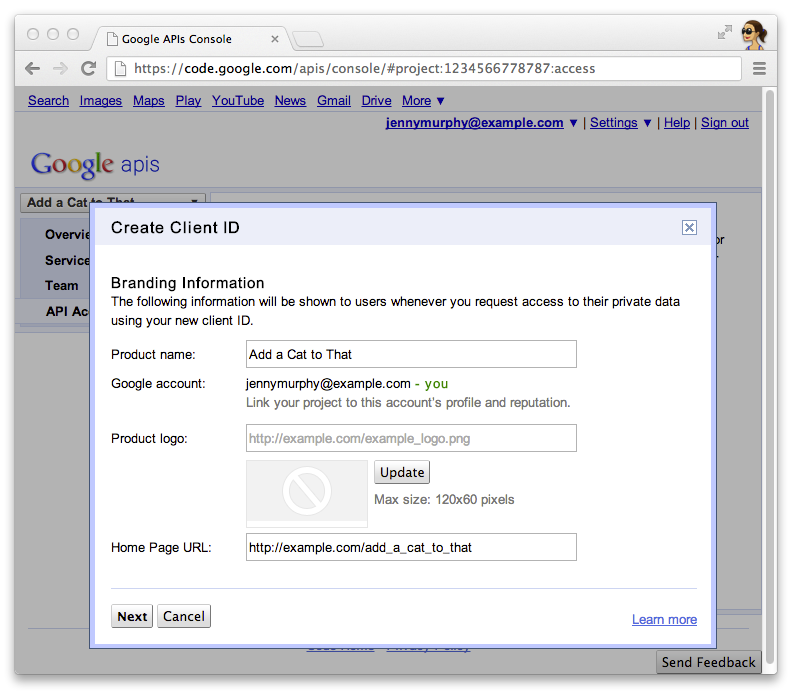
- Indiquez le nom et l'icône du produit Glassware. Ces champs apparaissent sur l'authentification OAuth
à l'écran présenté
à vos utilisateurs.

- Sélectionnez Application Web, puis spécifiez une valeur pour le nom d'hôte, par exemple
localhost
.

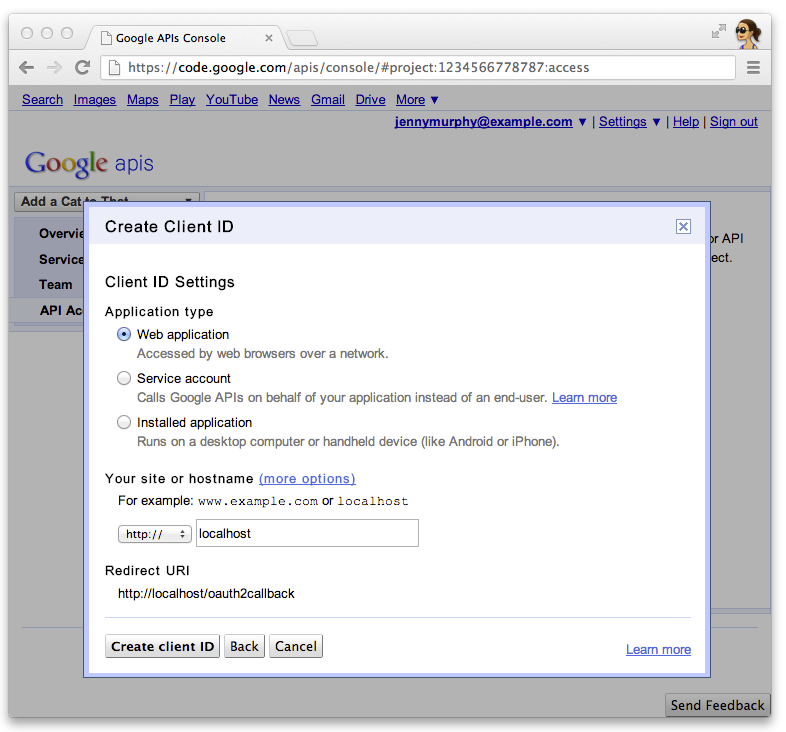
- Cliquez sur Modifier les paramètres... pour l'ID client afin de spécifier les URI de redirection. Préciser
http://localhost:8080/oauth2callback
et l'URL de rappel pour App Engine
(par exemple, https://myappengineinstance.appspot.com/oauth2callback
).

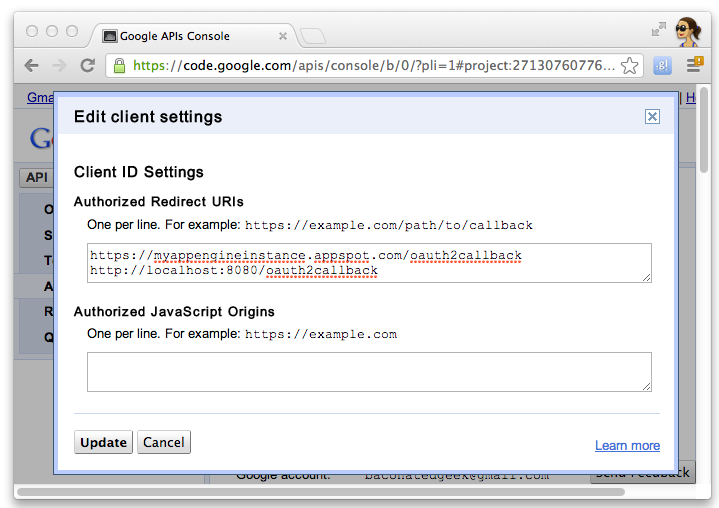
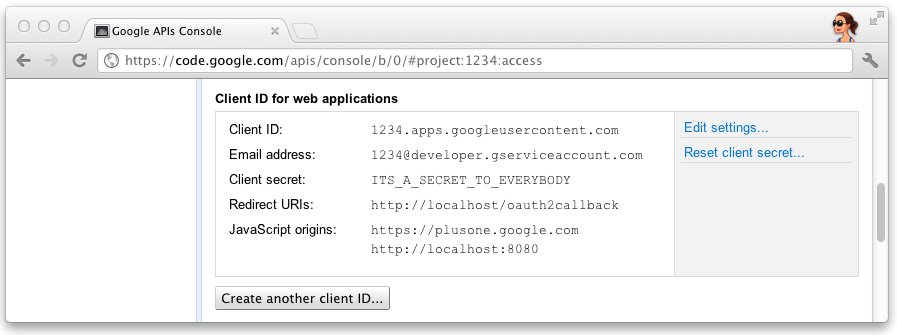
- Notez l'ID client et le code secret à partir de la console Google APIs. Vous aurez besoin des éléments suivants :
pour configurer le projet de démarrage rapide.

Configurer le projet
Configurez le projet de démarrage rapide pour qu'il utilise les informations de votre client API:
- Saisissez votre ID client et votre code secret dans
client_secrets.json
:
{
"web": {
"client_id": "1234.apps.googleusercontent.com",
"client_secret": "ITS_A_SECRET_TO_EVERYBODY",
"redirect_uris": [
],
"auth_uri": "https://accounts.google.com/o/oauth2/auth",
"token_uri": "https://accounts.google.com/o/oauth2/token"
}
}
- Générez un fichier
session.secret
pour stocker les cookies de session:
$ python -c "import os; print os.urandom(64)" > session.secret
- Modifiez
app.yaml
pour saisir votre ID d'application App Engine:
application: your_app_engine_application_id
version: 1
runtime: python27
api_version: 1
threadsafe: true
...
Déployer le projet
Appuyez sur le bouton bleu Déployer dans l'interface de lancement de l'IUG d'App Engine ou exécutez cette interface système.
pour déployer votre code:
$ appcfg.py --oauth2 update .
Sauf indication contraire, le contenu de cette page est régi par une licence Creative Commons Attribution 4.0, et les échantillons de code sont régis par une licence Apache 2.0. Pour en savoir plus, consultez les Règles du site Google Developers. Java est une marque déposée d'Oracle et/ou de ses sociétés affiliées.
Dernière mise à jour le 2025/07/25 (UTC).
[null,null,["Dernière mise à jour le 2025/07/25 (UTC)."],[[["\u003cp\u003eThis project provides a simple implementation of Glassware demonstrating the core functionality of the Google Mirror API.\u003c/p\u003e\n"],["\u003cp\u003eTo run the project, you need the App Engine SDK for Python, a Google App Engine instance, and a Google APIs Console project with the Google Mirror API enabled.\u003c/p\u003e\n"],["\u003cp\u003eConfiguration involves setting up your client ID and secret, generating a session secret file, and updating the \u003ccode\u003eapp.yaml\u003c/code\u003e with your App Engine application ID.\u003c/p\u003e\n"],["\u003cp\u003eDeploy the project using the App Engine Launcher GUI or the \u003ccode\u003eappcfg.py\u003c/code\u003e command-line tool.\u003c/p\u003e\n"]]],[],null,["# Python Quick Start\n\nThis project shows you how to implement a simple\npiece of Glassware that demos the major functionality of the Google Mirror API.\n\nTo see a fully-working demo of the quick start project, go to\n[https://glass-python-starter-demo.appspot.com](https://glass-java-starter-demo.appspot.com).\nOtherwise, read on to see how to deploy your own version.\n\n[Download on GitHub](https://github.com/googleglass/mirror-quickstart-python)\n\nPrerequisites\n-------------\n\n[The App Engine SDK for Python](/appengine/downloads#Google_App_Engine_SDK_for_Python) -\nThe Python quick start project is implemented using App Engine. You need\nthe Python App Engine SDK to develop and deploy your project.\nRun the installer if appropriate for your platform, or extract the zip file\nin a convenient place.\n\nCreating a Google App Engine instance\n-------------------------------------\n\nYou'll need to host the quick start project on an instance of Google App Engine:\n\n1. Go to \u003chttp://appspot.com\u003e.\n2. Click **Create Application** and create a public Google App Engine instance hosted on `appspot.com`.\n3. Give the application an **Application Identifier** and leave the authentication **Open to all Google\n Accounts users**. You'll need the application identifier later to configure the quick start project.\n\nCreating a Google APIs Console project\n--------------------------------------\n\nNext, enable access to the Google Mirror API:\n\n1. Go to the [Google APIs console](https://code.google.com/apis/console/) and create a new API project.\n2. Click **Services** and enable the Google Mirror API for your new project.\n3. Click **API Access** and create an OAuth 2.0 client ID for a web application.\n4. Specify the product name and icon for your Glassware. These fields appear on the OAuth grant screen presented to your users.\n5. Select **Web application** and specify any value for the hostname, such as `localhost`\n6. Click **Edit settings...** for the client ID to specify redirect URIs. Specify `http://localhost:8080/oauth2callback` and the callback URL for your App Engine instance, for example, `https://myappengineinstance.appspot.com/oauth2callback`.\n7. Make note of the client ID and secret from the Google APIs Console. You'll need it to configure the quick start project.\n\nConfiguring the project\n-----------------------\n\nConfigure the Quick Start project to use your API client information:\n\n1. Enter your client ID and secret in `client_secrets.json`: \n\n ```python\n {\n \"web\": {\n \"client_id\": \"1234.apps.googleusercontent.com\",\n \"client_secret\": \"ITS_A_SECRET_TO_EVERYBODY\",\n \"redirect_uris\": [\n ],\n \"auth_uri\": \"https://accounts.google.com/o/oauth2/auth\",\n \"token_uri\": \"https://accounts.google.com/o/oauth2/token\"\n }\n }\n ```\n2. Generate a `session.secret` file to store session cookies: \n\n ```python\n $ python -c \"import os; print os.urandom(64)\" \u003e session.secret\n ```\n3. Edit `app.yaml` to enter your App Engine application ID: \n\n ```python\n application: your_app_engine_application_id\n version: 1\n runtime: python27\n api_version: 1\n threadsafe: true\n ...\n ```\n\nDeploying the project\n---------------------\n\nPress the blue **Deploy** button in the App Engine Launch GUI interface or run this shell\ncommand to deploy your code: \n\n $ appcfg.py --oauth2 update ."]]