התחלה מהירה ב-Python
קל לארגן דפים בעזרת אוספים
אפשר לשמור ולסווג תוכן על סמך ההעדפות שלך.
בפרויקט הזה תראו איך להטמיע מודל
חלק מ-Glassware שמדגים את הפונקציונליות העיקרית של Google Mirror API.
כדי לראות הדגמה תקינה של הפרויקט להתחלה מהירה, צריך לעבור אל
https://glass-python-starter-demo.appspot.com.
אם לא, כדאי להמשיך לקרוא כדי ללמוד איך לפרוס גרסה משלכם.
הורדה מ-GitHub
דרישות מוקדמות
The App Engine SDK for Python –
הפרויקט של Python להתחלה מהירה מוטמע באמצעות App Engine. צריך
את Python App Engine SDK כדי לפתח ולפרוס את הפרויקט.
צריך להריץ את מנהל ההתקנה אם זה מתאים לפלטפורמה שלכם, או לחלץ את קובץ ה-ZIP
במקום נוח.
יצירת מופע של Google App Engine
צריך לארח את פרויקט ההתחלה המהירה במופע של Google App Engine:
- עוברים אל http://appspot.com.
- לוחצים על Create Application (יצירת אפליקציה) ויוצרים מופע ציבורי של Google App Engine שמתארח ב-
appspot.com
.
- נותנים לאפליקציה מזהה אפליקציה ומשאירים את הגדרת האימות פתוחה לכל Google
משתמשים בחשבונות. יהיה צורך במזהה האפליקציה בשלב מאוחר יותר כדי להגדיר את הפרויקט להתחלה מהירה.
יצירת פרויקט במסוף Google APIs
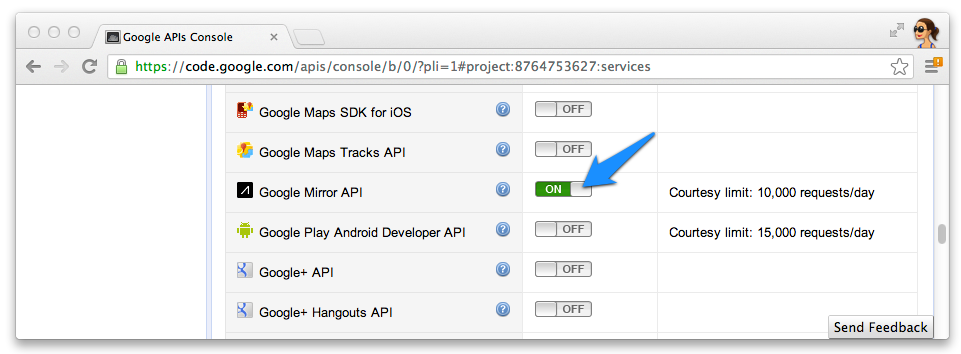
לאחר מכן, מאפשרים גישה ל-Google Mirror API:
- נכנסים אל מסוף Google APIs ויוצרים פרויקט API חדש.
- לוחצים על שירותים ומפעילים את Google Mirror API בפרויקט החדש.

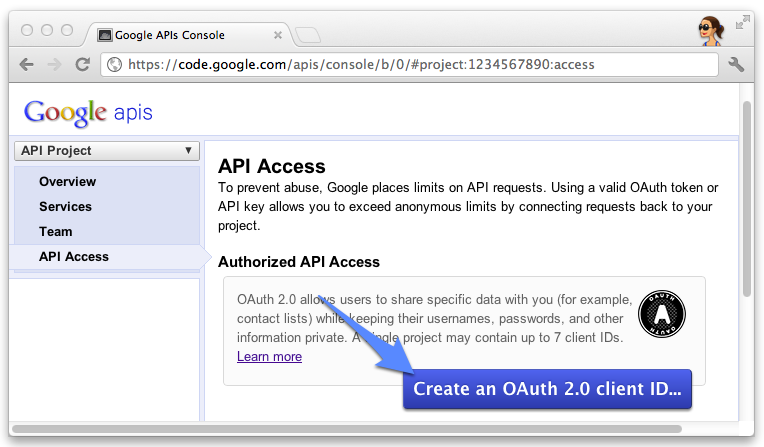
- לוחצים על API Access (גישה ל-API) ויוצרים מזהה לקוח ב-OAuth 2.0 לאפליקציית אינטרנט.

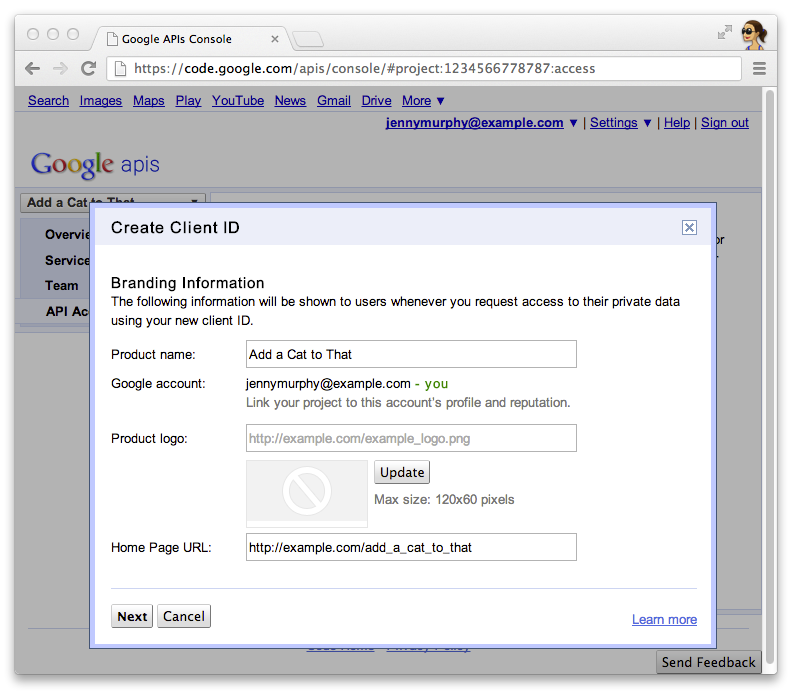
- יש לציין את השם והסמל של המוצר Glassware. השדות האלה מופיעים בבקשת ה-OAuth
של המסך שמוצג למשתמשים.

- בוחרים באפשרות Web application ומציינים ערך כלשהו עבור שם המארח, למשל
localhost
.

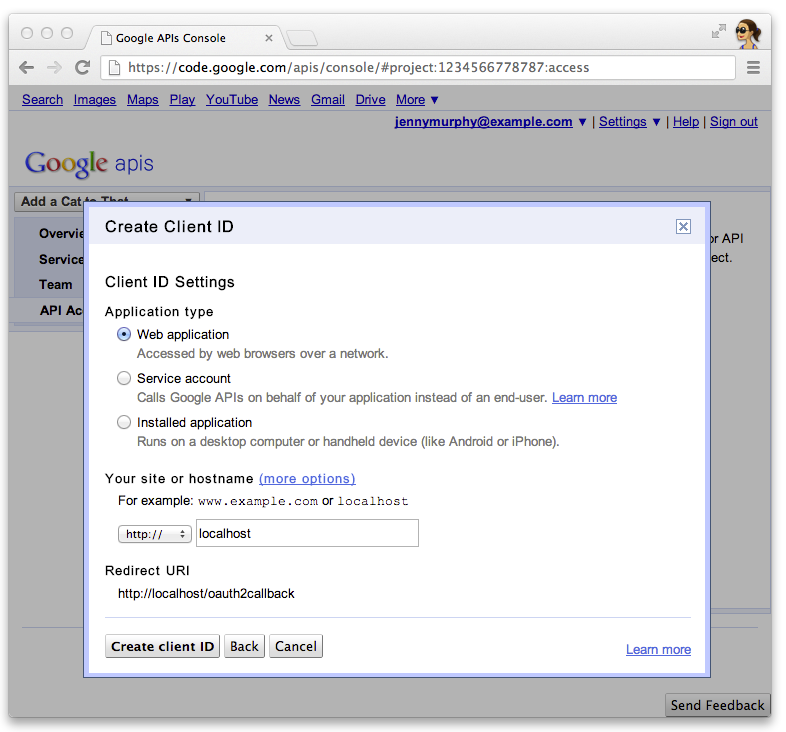
- כדי לציין מזהי URI להפניה אוטומטית, לוחצים על עריכת הגדרות... עבור מזהה הלקוח. יש לפרט
http://localhost:8080/oauth2callback
וכתובת ה-URL לקריאה חוזרת (callback) של App Engine
למשל, https://myappengineinstance.appspot.com/oauth2callback
.

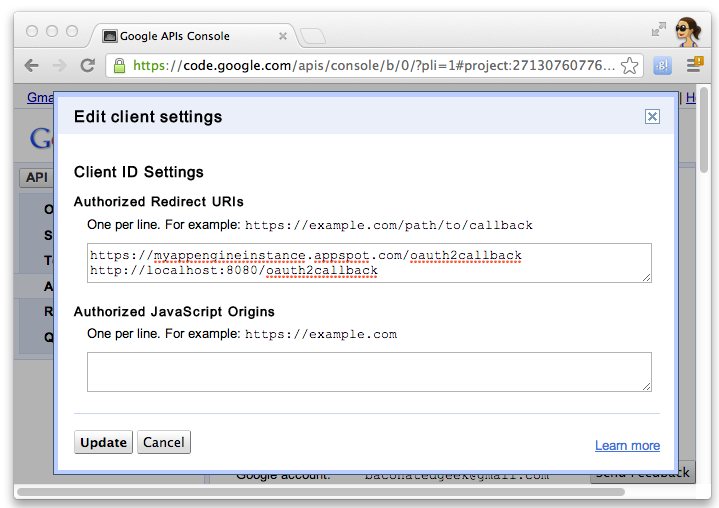
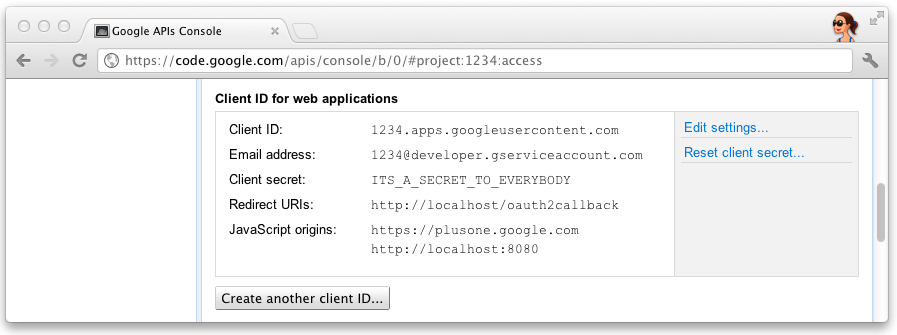
- מומלץ לרשום את מזהה הלקוח ואת הסוד ב-Google APIs Console. יש צורך
כדי להגדיר את הפרויקט להתחלה מהירה.

הגדרת הפרויקט
מגדירים בפרויקט 'התחלה מהירה' שימוש בפרטי לקוח ה-API:
- צריך להזין את מזהה הלקוח והסוד ב-
client_secrets.json
:
{
"web": {
"client_id": "1234.apps.googleusercontent.com",
"client_secret": "ITS_A_SECRET_TO_EVERYBODY",
"redirect_uris": [
],
"auth_uri": "https://accounts.google.com/o/oauth2/auth",
"token_uri": "https://accounts.google.com/o/oauth2/token"
}
}
- יוצרים קובץ
session.secret
לשמירת קובצי Cookie של סשן:
$ python -c "import os; print os.urandom(64)" > session.secret
- עורכים את
app.yaml
כדי להזין את מזהה האפליקציה של App Engine:
application: your_app_engine_application_id
version: 1
runtime: python27
api_version: 1
threadsafe: true
...
פריסת הפרויקט
לוחצים על הלחצן הכחול Deploy (פריסה) בממשק ה-GUI של App Engine Launch או מפעילים את המעטפת הזו.
כדי לפרוס את הקוד:
$ appcfg.py --oauth2 update .
אלא אם צוין אחרת, התוכן של דף זה הוא ברישיון Creative Commons Attribution 4.0 ודוגמאות הקוד הן ברישיון Apache 2.0. לפרטים, ניתן לעיין במדיניות האתר Google Developers. Java הוא סימן מסחרי רשום של חברת Oracle ו/או של השותפים העצמאיים שלה.
עדכון אחרון: 2025-07-25 (שעון UTC).
[null,null,["עדכון אחרון: 2025-07-25 (שעון UTC)."],[[["\u003cp\u003eThis project provides a simple implementation of Glassware demonstrating the core functionality of the Google Mirror API.\u003c/p\u003e\n"],["\u003cp\u003eTo run the project, you need the App Engine SDK for Python, a Google App Engine instance, and a Google APIs Console project with the Google Mirror API enabled.\u003c/p\u003e\n"],["\u003cp\u003eConfiguration involves setting up your client ID and secret, generating a session secret file, and updating the \u003ccode\u003eapp.yaml\u003c/code\u003e with your App Engine application ID.\u003c/p\u003e\n"],["\u003cp\u003eDeploy the project using the App Engine Launcher GUI or the \u003ccode\u003eappcfg.py\u003c/code\u003e command-line tool.\u003c/p\u003e\n"]]],[],null,["# Python Quick Start\n\nThis project shows you how to implement a simple\npiece of Glassware that demos the major functionality of the Google Mirror API.\n\nTo see a fully-working demo of the quick start project, go to\n[https://glass-python-starter-demo.appspot.com](https://glass-java-starter-demo.appspot.com).\nOtherwise, read on to see how to deploy your own version.\n\n[Download on GitHub](https://github.com/googleglass/mirror-quickstart-python)\n\nPrerequisites\n-------------\n\n[The App Engine SDK for Python](/appengine/downloads#Google_App_Engine_SDK_for_Python) -\nThe Python quick start project is implemented using App Engine. You need\nthe Python App Engine SDK to develop and deploy your project.\nRun the installer if appropriate for your platform, or extract the zip file\nin a convenient place.\n\nCreating a Google App Engine instance\n-------------------------------------\n\nYou'll need to host the quick start project on an instance of Google App Engine:\n\n1. Go to \u003chttp://appspot.com\u003e.\n2. Click **Create Application** and create a public Google App Engine instance hosted on `appspot.com`.\n3. Give the application an **Application Identifier** and leave the authentication **Open to all Google\n Accounts users**. You'll need the application identifier later to configure the quick start project.\n\nCreating a Google APIs Console project\n--------------------------------------\n\nNext, enable access to the Google Mirror API:\n\n1. Go to the [Google APIs console](https://code.google.com/apis/console/) and create a new API project.\n2. Click **Services** and enable the Google Mirror API for your new project.\n3. Click **API Access** and create an OAuth 2.0 client ID for a web application.\n4. Specify the product name and icon for your Glassware. These fields appear on the OAuth grant screen presented to your users.\n5. Select **Web application** and specify any value for the hostname, such as `localhost`\n6. Click **Edit settings...** for the client ID to specify redirect URIs. Specify `http://localhost:8080/oauth2callback` and the callback URL for your App Engine instance, for example, `https://myappengineinstance.appspot.com/oauth2callback`.\n7. Make note of the client ID and secret from the Google APIs Console. You'll need it to configure the quick start project.\n\nConfiguring the project\n-----------------------\n\nConfigure the Quick Start project to use your API client information:\n\n1. Enter your client ID and secret in `client_secrets.json`: \n\n ```python\n {\n \"web\": {\n \"client_id\": \"1234.apps.googleusercontent.com\",\n \"client_secret\": \"ITS_A_SECRET_TO_EVERYBODY\",\n \"redirect_uris\": [\n ],\n \"auth_uri\": \"https://accounts.google.com/o/oauth2/auth\",\n \"token_uri\": \"https://accounts.google.com/o/oauth2/token\"\n }\n }\n ```\n2. Generate a `session.secret` file to store session cookies: \n\n ```python\n $ python -c \"import os; print os.urandom(64)\" \u003e session.secret\n ```\n3. Edit `app.yaml` to enter your App Engine application ID: \n\n ```python\n application: your_app_engine_application_id\n version: 1\n runtime: python27\n api_version: 1\n threadsafe: true\n ...\n ```\n\nDeploying the project\n---------------------\n\nPress the blue **Deploy** button in the App Engine Launch GUI interface or run this shell\ncommand to deploy your code: \n\n $ appcfg.py --oauth2 update ."]]