Avvio rapido Python
Mantieni tutto organizzato con le raccolte
Salva e classifica i contenuti in base alle tue preferenze.
Questo progetto mostra come implementare una semplice
parte di Glassware che dimostra le principali funzionalità dell'API Google Mirror.
Per vedere una demo completa del progetto ad avvio rapido, vai a
https://glass-python-starter-demo.appspot.com.
In caso contrario, continua a leggere per scoprire come eseguire il deployment della tua versione.
Scarica su GitHub
Prerequisiti
SDK di App Engine per Python -
Il progetto di avvio rapido Python viene implementato utilizzando App Engine. Ti servono
l'SDK Python di App Engine per sviluppare ed eseguire il deployment del tuo progetto.
Esegui il programma di installazione, se appropriato per la tua piattaforma, oppure estrai il file ZIP
in una posizione comoda.
Creazione di un'istanza di Google App Engine
Dovrai ospitare il progetto di avvio rapido su un'istanza di Google App Engine:
- Vai a http://appspot.com.
- Fai clic su Crea applicazione e crea un'istanza pubblica di Google App Engine ospitata su
appspot.com
.
- Assegna all'applicazione un identificatore applicazione e lascia l'autenticazione Aperta a tutti Google
Utenti con account. In un secondo momento avrai bisogno dell'identificatore dell'applicazione per configurare il progetto di avvio rapido.
Creazione di un progetto nella console API di Google
Successivamente, abilita l'accesso all'API Google Mirror:
- Vai alla console API di Google e crea un nuovo progetto API.
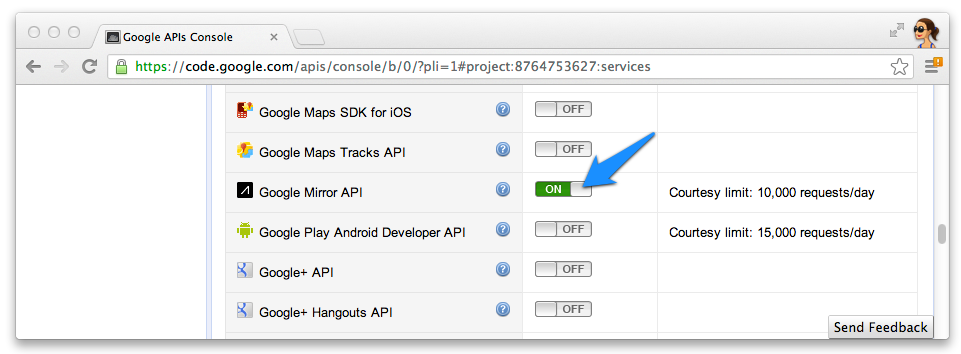
- Fai clic su Servizi e abilita l'API Google Mirror per il tuo nuovo progetto.

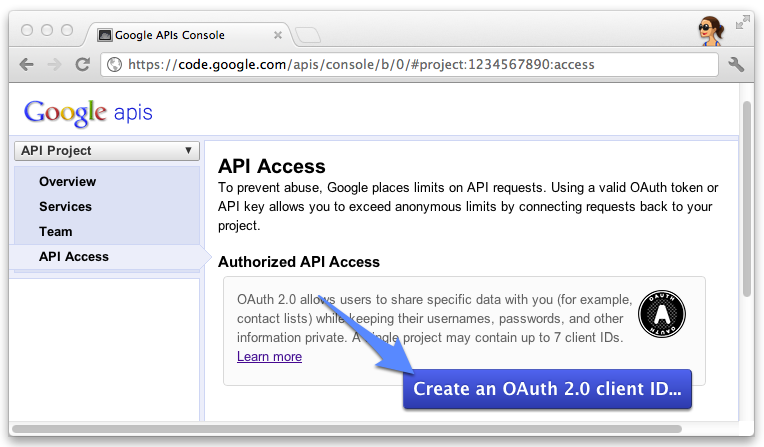
- Fai clic su Accesso API e crea un ID client OAuth 2.0 per un'applicazione web.

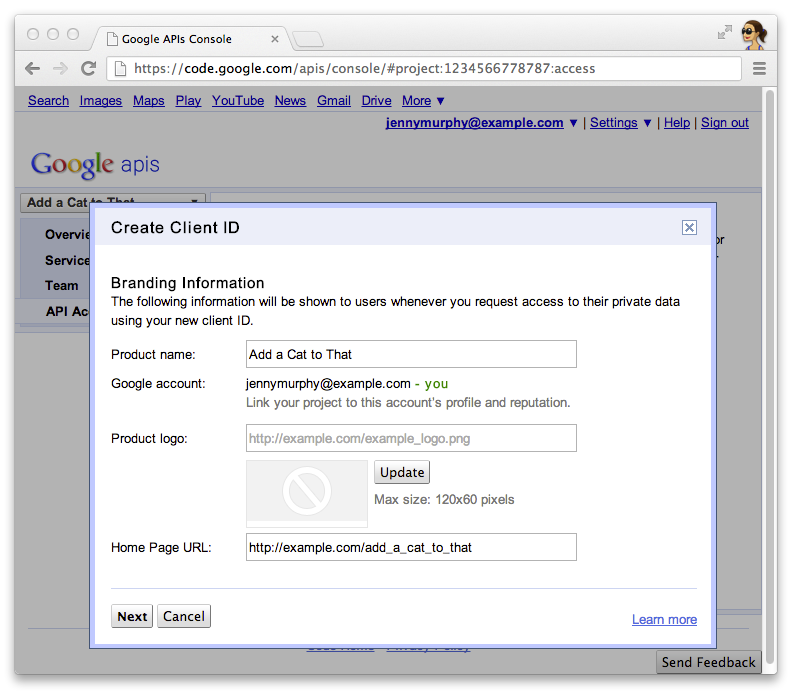
- Specifica il nome e l'icona del prodotto Glassware. Questi campi vengono visualizzati nella concessione OAuth
ai tuoi utenti.

- Seleziona Web application (Applicazione web) e specifica un qualsiasi valore per il nome host, ad esempio
localhost

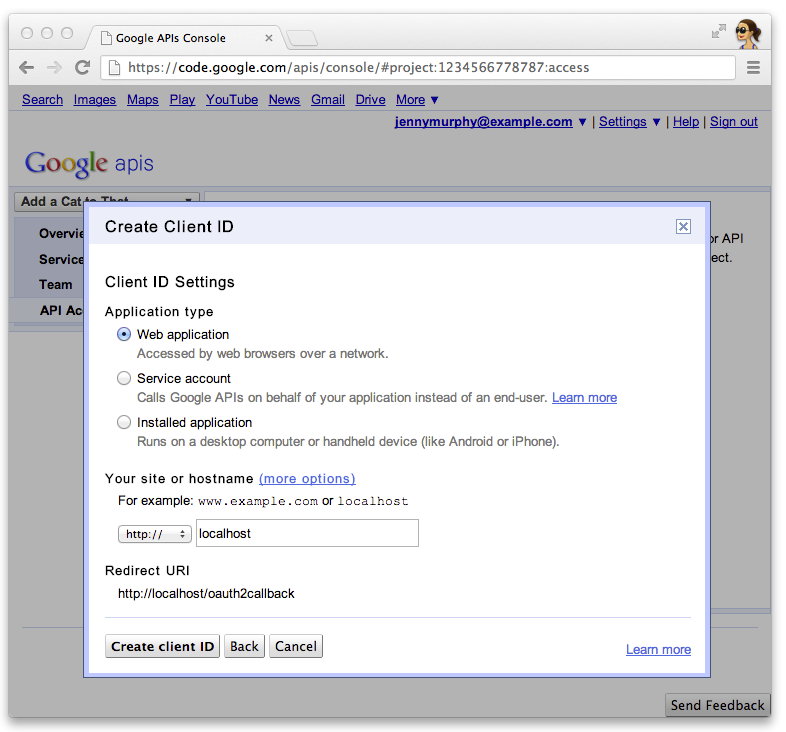
- Fai clic su Modifica impostazioni... per l'ID client in modo da specificare gli URI di reindirizzamento. Specifica
http://localhost:8080/oauth2callback
e l'URL di callback per App Engine
ad esempio https://myappengineinstance.appspot.com/oauth2callback
.

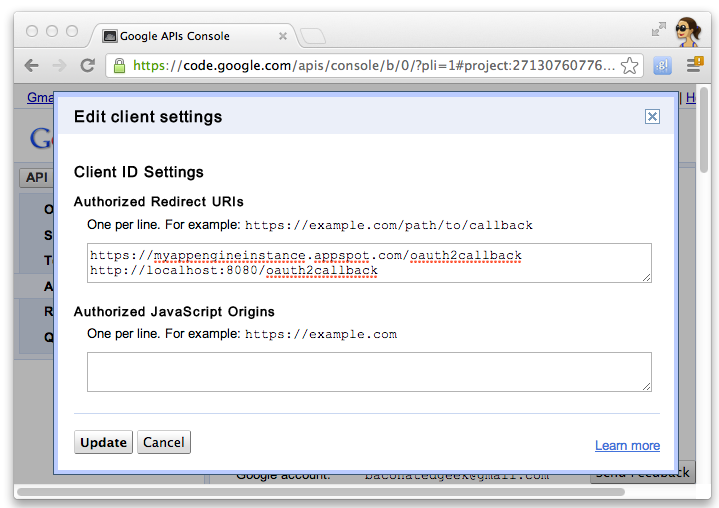
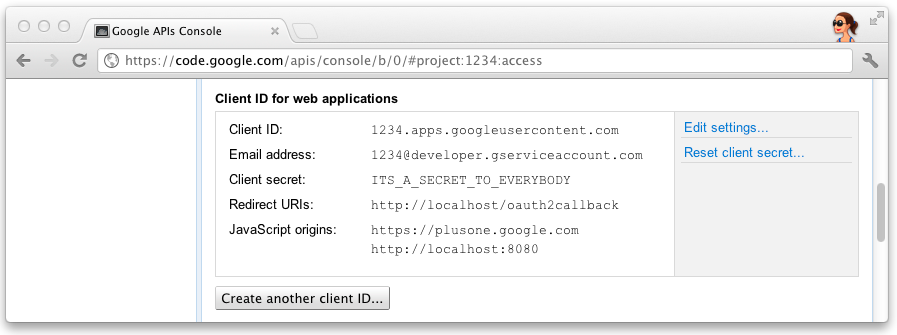
- Prendi nota dell'ID client e del secret dalla console API di Google. Ti serviranno
per configurare il progetto di avvio rapido.

Configurazione del progetto
Configura il progetto Avvio rapido per utilizzare le informazioni del client API:
- Inserisci il tuo ID client e il tuo secret in
client_secrets.json
:
{
"web": {
"client_id": "1234.apps.googleusercontent.com",
"client_secret": "ITS_A_SECRET_TO_EVERYBODY",
"redirect_uris": [
],
"auth_uri": "https://accounts.google.com/o/oauth2/auth",
"token_uri": "https://accounts.google.com/o/oauth2/token"
}
}
- Genera un file
session.secret
per memorizzare i cookie di sessione:
$ python -c "import os; print os.urandom(64)" > session.secret
- Modifica
app.yaml
per inserire l'ID applicazione App Engine:
application: your_app_engine_application_id
version: 1
runtime: python27
api_version: 1
threadsafe: true
...
Deployment del progetto
Premi il pulsante blu Esegui il deployment nell'interfaccia della GUI di avvio di App Engine o esegui questa shell
per eseguire il deployment del tuo codice:
$ appcfg.py --oauth2 update .
Salvo quando diversamente specificato, i contenuti di questa pagina sono concessi in base alla licenza Creative Commons Attribution 4.0, mentre gli esempi di codice sono concessi in base alla licenza Apache 2.0. Per ulteriori dettagli, consulta le norme del sito di Google Developers. Java è un marchio registrato di Oracle e/o delle sue consociate.
Ultimo aggiornamento 2025-07-25 UTC.
[null,null,["Ultimo aggiornamento 2025-07-25 UTC."],[[["\u003cp\u003eThis project provides a simple implementation of Glassware demonstrating the core functionality of the Google Mirror API.\u003c/p\u003e\n"],["\u003cp\u003eTo run the project, you need the App Engine SDK for Python, a Google App Engine instance, and a Google APIs Console project with the Google Mirror API enabled.\u003c/p\u003e\n"],["\u003cp\u003eConfiguration involves setting up your client ID and secret, generating a session secret file, and updating the \u003ccode\u003eapp.yaml\u003c/code\u003e with your App Engine application ID.\u003c/p\u003e\n"],["\u003cp\u003eDeploy the project using the App Engine Launcher GUI or the \u003ccode\u003eappcfg.py\u003c/code\u003e command-line tool.\u003c/p\u003e\n"]]],[],null,["# Python Quick Start\n\nThis project shows you how to implement a simple\npiece of Glassware that demos the major functionality of the Google Mirror API.\n\nTo see a fully-working demo of the quick start project, go to\n[https://glass-python-starter-demo.appspot.com](https://glass-java-starter-demo.appspot.com).\nOtherwise, read on to see how to deploy your own version.\n\n[Download on GitHub](https://github.com/googleglass/mirror-quickstart-python)\n\nPrerequisites\n-------------\n\n[The App Engine SDK for Python](/appengine/downloads#Google_App_Engine_SDK_for_Python) -\nThe Python quick start project is implemented using App Engine. You need\nthe Python App Engine SDK to develop and deploy your project.\nRun the installer if appropriate for your platform, or extract the zip file\nin a convenient place.\n\nCreating a Google App Engine instance\n-------------------------------------\n\nYou'll need to host the quick start project on an instance of Google App Engine:\n\n1. Go to \u003chttp://appspot.com\u003e.\n2. Click **Create Application** and create a public Google App Engine instance hosted on `appspot.com`.\n3. Give the application an **Application Identifier** and leave the authentication **Open to all Google\n Accounts users**. You'll need the application identifier later to configure the quick start project.\n\nCreating a Google APIs Console project\n--------------------------------------\n\nNext, enable access to the Google Mirror API:\n\n1. Go to the [Google APIs console](https://code.google.com/apis/console/) and create a new API project.\n2. Click **Services** and enable the Google Mirror API for your new project.\n3. Click **API Access** and create an OAuth 2.0 client ID for a web application.\n4. Specify the product name and icon for your Glassware. These fields appear on the OAuth grant screen presented to your users.\n5. Select **Web application** and specify any value for the hostname, such as `localhost`\n6. Click **Edit settings...** for the client ID to specify redirect URIs. Specify `http://localhost:8080/oauth2callback` and the callback URL for your App Engine instance, for example, `https://myappengineinstance.appspot.com/oauth2callback`.\n7. Make note of the client ID and secret from the Google APIs Console. You'll need it to configure the quick start project.\n\nConfiguring the project\n-----------------------\n\nConfigure the Quick Start project to use your API client information:\n\n1. Enter your client ID and secret in `client_secrets.json`: \n\n ```python\n {\n \"web\": {\n \"client_id\": \"1234.apps.googleusercontent.com\",\n \"client_secret\": \"ITS_A_SECRET_TO_EVERYBODY\",\n \"redirect_uris\": [\n ],\n \"auth_uri\": \"https://accounts.google.com/o/oauth2/auth\",\n \"token_uri\": \"https://accounts.google.com/o/oauth2/token\"\n }\n }\n ```\n2. Generate a `session.secret` file to store session cookies: \n\n ```python\n $ python -c \"import os; print os.urandom(64)\" \u003e session.secret\n ```\n3. Edit `app.yaml` to enter your App Engine application ID: \n\n ```python\n application: your_app_engine_application_id\n version: 1\n runtime: python27\n api_version: 1\n threadsafe: true\n ...\n ```\n\nDeploying the project\n---------------------\n\nPress the blue **Deploy** button in the App Engine Launch GUI interface or run this shell\ncommand to deploy your code: \n\n $ appcfg.py --oauth2 update ."]]