Python – krótki przewodnik
Zadbaj o dobrą organizację dzięki kolekcji
Zapisuj i kategoryzuj treści zgodnie ze swoimi preferencjami.
W tym projekcie pokazujemy, jak wdrożyć prostą
Google Glassware, który demonstruje główne funkcje interfejsu Google Mirror API.
Aby zobaczyć w pełni sprawną wersję demonstracyjną projektu szybkiego startu, otwórz stronę
https://glass-python-starter-demo.appspot.com.
W przeciwnym razie zapoznaj się z dalszymi informacjami o tym, jak wdrożyć własną wersję.
Pobierz z GitHub
Wymagania wstępne
Pakiet SDK App Engine dla Pythona –
Projekt szybkiego startu w Pythonie jest wdrażany za pomocą App Engine. Potrzebujesz
za pomocą pakietu SDK App Engine w języku Python i wdrożyć swój projekt.
W razie potrzeby uruchom instalatora Twojej platformy lub rozpakuj plik ZIP.
w dogodnym miejscu.
Tworzenie instancji Google App Engine
Musisz hostować projekt szybkiego startu w instancji Google App Engine:
- Wejdź na http://appspot.com.
- Kliknij Utwórz aplikację i utwórz publiczną instancję Google App Engine hostowaną w środowisku
appspot.com
.
- Podaj aplikacji Identyfikator aplikacji i pozostaw ustawienie uwierzytelniania Otwarte dla wszystkich Google
użytkowników kont. Identyfikator aplikacji będzie potrzebny później do skonfigurowania projektu szybkiego startu.
Tworzenie projektu w Konsoli interfejsów API Google
Następnie włącz dostęp do interfejsu Google Mirror API:
- Otwórz konsolę interfejsów API Google i utwórz nowy projekt API.
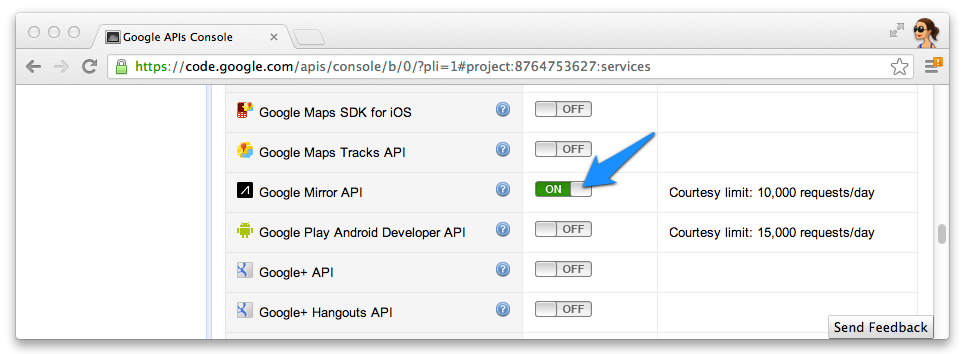
- Kliknij Usługi i włącz Google Mirror API dla swojego nowego projektu.

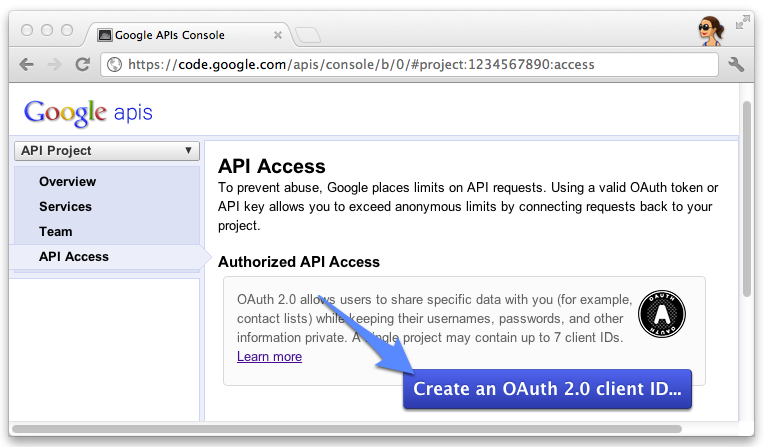
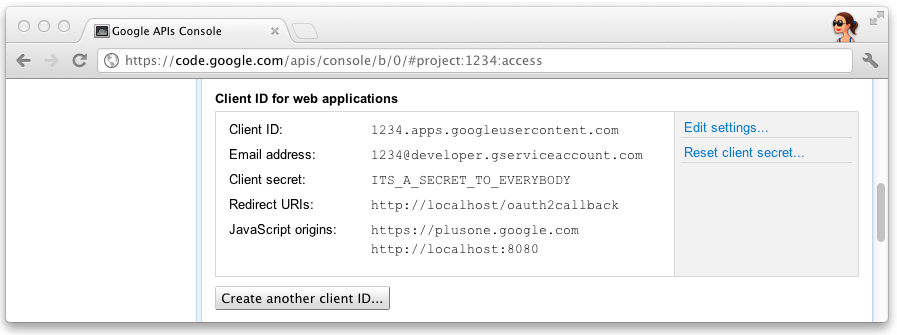
- Kliknij Dostęp do interfejsu API i utwórz identyfikator klienta OAuth 2.0 dla aplikacji internetowej.

- Podaj nazwę i ikonę produktu Glassware. Te pola pojawiają się na uwierzytelnieniu przez OAuth
wyświetlany użytkownikom.

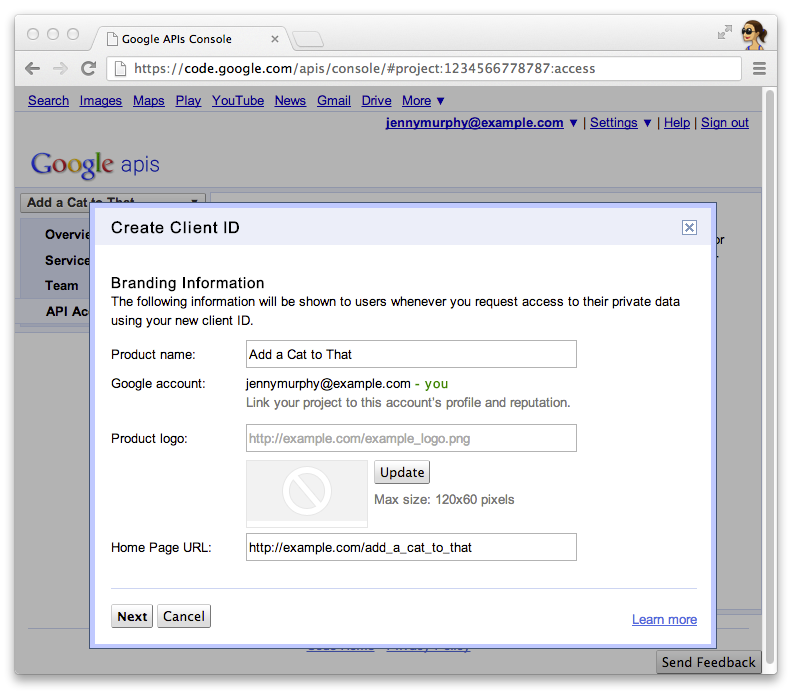
- Wybierz Aplikacja internetowa i określ dowolną wartość nazwy hosta, np.
localhost

- Kliknij Edytuj ustawienia... obok identyfikatora klienta, aby określić identyfikatory URI przekierowania. Określ
http://localhost:8080/oauth2callback
i URL wywołania zwrotnego dla App Engine
na przykład https://myappengineinstance.appspot.com/oauth2callback
.

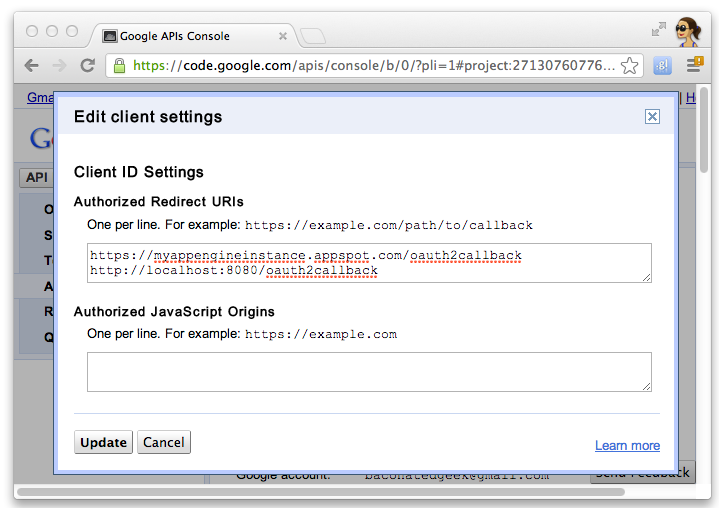
- Zapisz identyfikator klienta i klucz tajny z konsoli interfejsów API Google. Potrzebujesz
w celu skonfigurowania projektu szybkiego startu.

Konfiguruję projekt
Skonfiguruj projekt Szybki start tak, aby korzystał z informacji o kliencie interfejsu API:
- Wpisz swój identyfikator klienta i tajny klucz w
client_secrets.json
:
{
"web": {
"client_id": "1234.apps.googleusercontent.com",
"client_secret": "ITS_A_SECRET_TO_EVERYBODY",
"redirect_uris": [
],
"auth_uri": "https://accounts.google.com/o/oauth2/auth",
"token_uri": "https://accounts.google.com/o/oauth2/token"
}
}
- Wygeneruj plik
session.secret
do przechowywania plików cookie sesji:
$ python -c "import os; print os.urandom(64)" > session.secret
- Edytuj
app.yaml
, aby wpisać identyfikator aplikacji App Engine:
application: your_app_engine_application_id
version: 1
runtime: python27
api_version: 1
threadsafe: true
...
Wdrażanie projektu
Kliknij niebieski przycisk Wdróż w interfejsie GUI uruchamiania App Engine lub uruchom tę powłokę.
aby wdrożyć kod:
$ appcfg.py --oauth2 update .
O ile nie stwierdzono inaczej, treść tej strony jest objęta licencją Creative Commons – uznanie autorstwa 4.0, a fragmenty kodu są dostępne na licencji Apache 2.0. Szczegółowe informacje na ten temat zawierają zasady dotyczące witryny Google Developers. Java jest zastrzeżonym znakiem towarowym firmy Oracle i jej podmiotów stowarzyszonych.
Ostatnia aktualizacja: 2025-07-25 UTC.
[null,null,["Ostatnia aktualizacja: 2025-07-25 UTC."],[[["\u003cp\u003eThis project provides a simple implementation of Glassware demonstrating the core functionality of the Google Mirror API.\u003c/p\u003e\n"],["\u003cp\u003eTo run the project, you need the App Engine SDK for Python, a Google App Engine instance, and a Google APIs Console project with the Google Mirror API enabled.\u003c/p\u003e\n"],["\u003cp\u003eConfiguration involves setting up your client ID and secret, generating a session secret file, and updating the \u003ccode\u003eapp.yaml\u003c/code\u003e with your App Engine application ID.\u003c/p\u003e\n"],["\u003cp\u003eDeploy the project using the App Engine Launcher GUI or the \u003ccode\u003eappcfg.py\u003c/code\u003e command-line tool.\u003c/p\u003e\n"]]],[],null,["# Python Quick Start\n\nThis project shows you how to implement a simple\npiece of Glassware that demos the major functionality of the Google Mirror API.\n\nTo see a fully-working demo of the quick start project, go to\n[https://glass-python-starter-demo.appspot.com](https://glass-java-starter-demo.appspot.com).\nOtherwise, read on to see how to deploy your own version.\n\n[Download on GitHub](https://github.com/googleglass/mirror-quickstart-python)\n\nPrerequisites\n-------------\n\n[The App Engine SDK for Python](/appengine/downloads#Google_App_Engine_SDK_for_Python) -\nThe Python quick start project is implemented using App Engine. You need\nthe Python App Engine SDK to develop and deploy your project.\nRun the installer if appropriate for your platform, or extract the zip file\nin a convenient place.\n\nCreating a Google App Engine instance\n-------------------------------------\n\nYou'll need to host the quick start project on an instance of Google App Engine:\n\n1. Go to \u003chttp://appspot.com\u003e.\n2. Click **Create Application** and create a public Google App Engine instance hosted on `appspot.com`.\n3. Give the application an **Application Identifier** and leave the authentication **Open to all Google\n Accounts users**. You'll need the application identifier later to configure the quick start project.\n\nCreating a Google APIs Console project\n--------------------------------------\n\nNext, enable access to the Google Mirror API:\n\n1. Go to the [Google APIs console](https://code.google.com/apis/console/) and create a new API project.\n2. Click **Services** and enable the Google Mirror API for your new project.\n3. Click **API Access** and create an OAuth 2.0 client ID for a web application.\n4. Specify the product name and icon for your Glassware. These fields appear on the OAuth grant screen presented to your users.\n5. Select **Web application** and specify any value for the hostname, such as `localhost`\n6. Click **Edit settings...** for the client ID to specify redirect URIs. Specify `http://localhost:8080/oauth2callback` and the callback URL for your App Engine instance, for example, `https://myappengineinstance.appspot.com/oauth2callback`.\n7. Make note of the client ID and secret from the Google APIs Console. You'll need it to configure the quick start project.\n\nConfiguring the project\n-----------------------\n\nConfigure the Quick Start project to use your API client information:\n\n1. Enter your client ID and secret in `client_secrets.json`: \n\n ```python\n {\n \"web\": {\n \"client_id\": \"1234.apps.googleusercontent.com\",\n \"client_secret\": \"ITS_A_SECRET_TO_EVERYBODY\",\n \"redirect_uris\": [\n ],\n \"auth_uri\": \"https://accounts.google.com/o/oauth2/auth\",\n \"token_uri\": \"https://accounts.google.com/o/oauth2/token\"\n }\n }\n ```\n2. Generate a `session.secret` file to store session cookies: \n\n ```python\n $ python -c \"import os; print os.urandom(64)\" \u003e session.secret\n ```\n3. Edit `app.yaml` to enter your App Engine application ID: \n\n ```python\n application: your_app_engine_application_id\n version: 1\n runtime: python27\n api_version: 1\n threadsafe: true\n ...\n ```\n\nDeploying the project\n---------------------\n\nPress the blue **Deploy** button in the App Engine Launch GUI interface or run this shell\ncommand to deploy your code: \n\n $ appcfg.py --oauth2 update ."]]