Guia de início rápido do Python
Mantenha tudo organizado com as coleções
Salve e categorize o conteúdo com base nas suas preferências.
Este projeto mostra como implementar uma implementação
parte do Glassware que demonstra a principal funcionalidade da API Google Mirror.
Para ver uma demonstração completa do projeto de início rápido, acesse
https://glass-python-starter-demo.appspot.com.
Caso contrário, continue lendo para saber como implantar sua própria versão.
Fazer o download no GitHub
Pré-requisitos
SDK do App Engine para Python -
O projeto de início rápido do Python é implementado com o App Engine. Você precisa
o SDK do App Engine para Python para desenvolver e implantar o projeto.
Execute o instalador, se apropriado para sua plataforma, ou extraia o arquivo ZIP
em um lugar conveniente.
Como criar uma instância do Google App Engine
Você precisará hospedar o projeto de início rápido em uma instância do Google App Engine:
- Acesse http://appspot.com.
- Clique em Criar aplicativo e crie uma instância pública do Google App Engine hospedada em
appspot.com
.
- Forneça um Identificador de aplicativo ao aplicativo e deixe a autenticação como Aberta a todos os usuários do Google
Contas de usuários. Você vai precisar do identificador do aplicativo mais tarde para configurar o projeto de início rápido.
Como criar um projeto do Console de APIs do Google
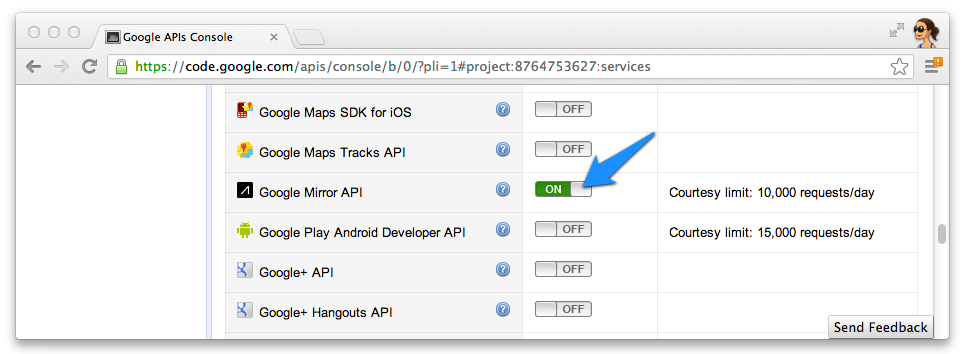
Em seguida, ative o acesso à API Google Mirror:
- Vá para o Console de APIs do Google e crie um novo projeto de API.
- Clique em Serviços e ative a API Google Mirror para o novo projeto.

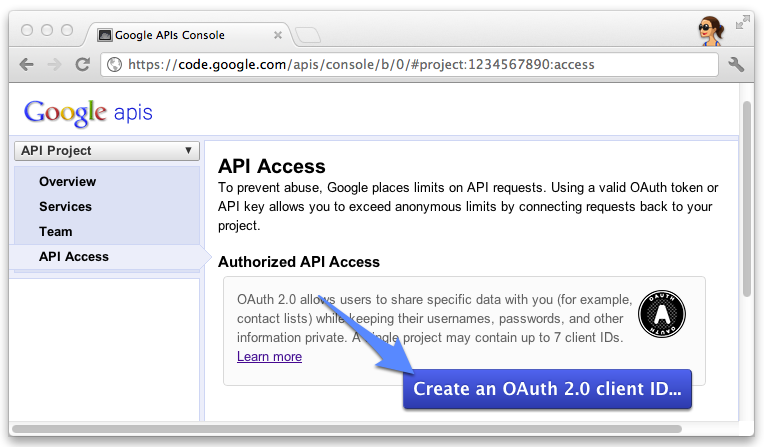
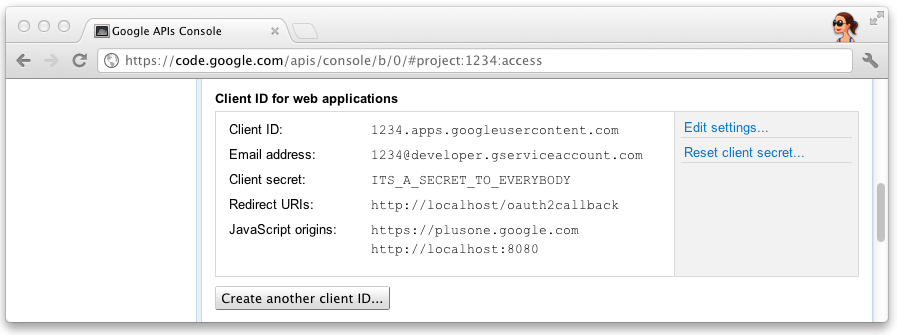
- Clique em Acesso à API e crie um ID do cliente OAuth 2.0 para um aplicativo da Web.

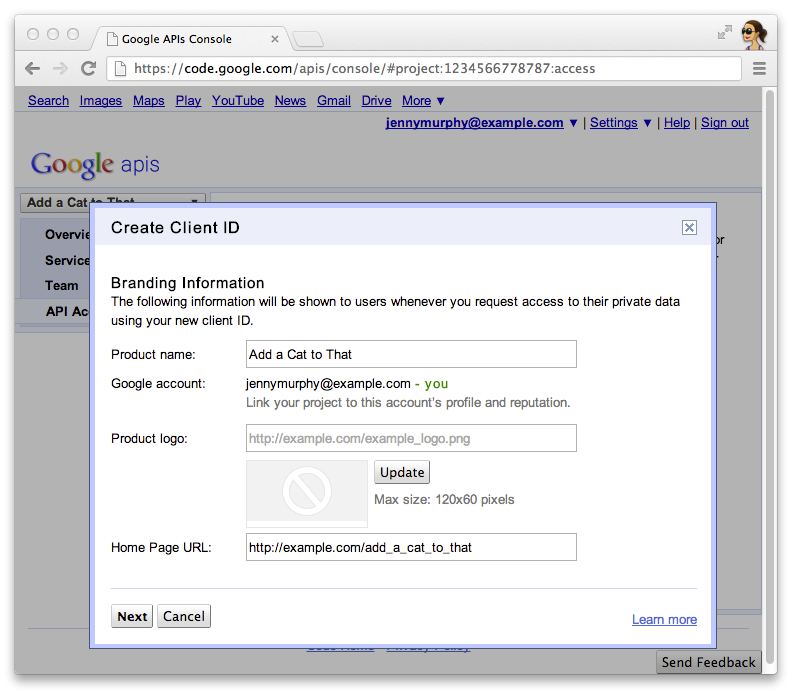
- Especifique o nome e o ícone do produto do Glassware. Esses campos aparecem na permissão de acesso OAuth
é apresentada aos usuários.

- Selecione Aplicativo da Web e especifique qualquer valor para o nome do host, como
localhost

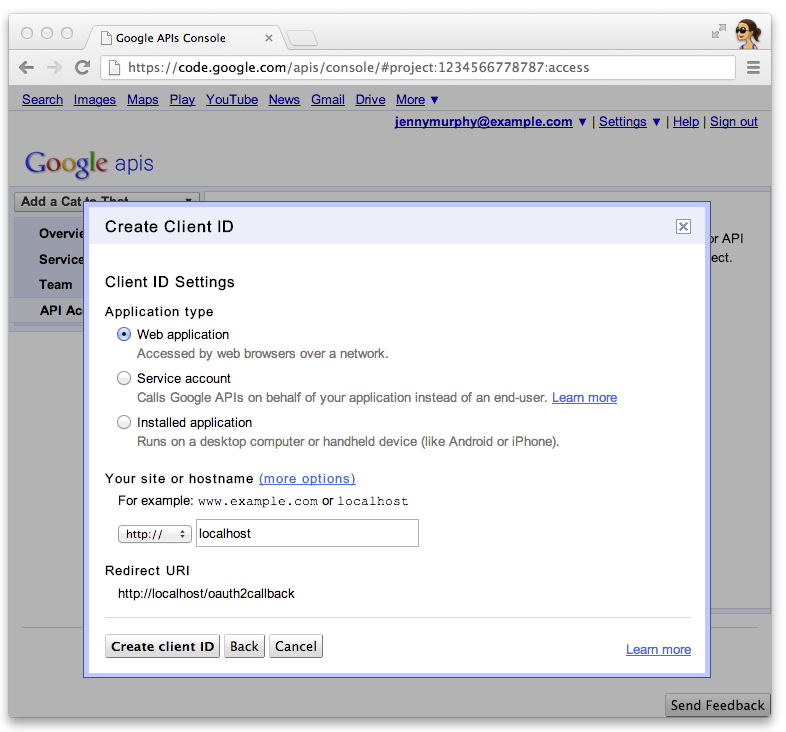
- Clique em Editar configurações... no ID do cliente para especificar URIs de redirecionamento. Especificar
http://localhost:8080/oauth2callback
e o URL de callback do App Engine
instância, por exemplo, https://myappengineinstance.appspot.com/oauth2callback
.

- Anote o ID e a chave secreta do cliente do Console de APIs do Google. Você precisará
para configurar o projeto de início rápido.

Configurar o projeto
Configure o projeto de início rápido para usar as informações do cliente da API:
- Insira o ID e a chave secreta do cliente em
client_secrets.json
:
{
"web": {
"client_id": "1234.apps.googleusercontent.com",
"client_secret": "ITS_A_SECRET_TO_EVERYBODY",
"redirect_uris": [
],
"auth_uri": "https://accounts.google.com/o/oauth2/auth",
"token_uri": "https://accounts.google.com/o/oauth2/token"
}
}
- Gere um arquivo
session.secret
para armazenar os cookies de sessão:
$ python -c "import os; print os.urandom(64)" > session.secret
- Edite
app.yaml
para inserir o ID do aplicativo do App Engine:
application: your_app_engine_application_id
version: 1
runtime: python27
api_version: 1
threadsafe: true
...
Como implantar o projeto
Pressione o botão azul Implantar na interface de inicialização da GUI do App Engine ou execute este shell.
para implantar seu código:
$ appcfg.py --oauth2 update .
Exceto em caso de indicação contrária, o conteúdo desta página é licenciado de acordo com a Licença de atribuição 4.0 do Creative Commons, e as amostras de código são licenciadas de acordo com a Licença Apache 2.0. Para mais detalhes, consulte as políticas do site do Google Developers. Java é uma marca registrada da Oracle e/ou afiliadas.
Última atualização 2025-07-25 UTC.
[null,null,["Última atualização 2025-07-25 UTC."],[[["\u003cp\u003eThis project provides a simple implementation of Glassware demonstrating the core functionality of the Google Mirror API.\u003c/p\u003e\n"],["\u003cp\u003eTo run the project, you need the App Engine SDK for Python, a Google App Engine instance, and a Google APIs Console project with the Google Mirror API enabled.\u003c/p\u003e\n"],["\u003cp\u003eConfiguration involves setting up your client ID and secret, generating a session secret file, and updating the \u003ccode\u003eapp.yaml\u003c/code\u003e with your App Engine application ID.\u003c/p\u003e\n"],["\u003cp\u003eDeploy the project using the App Engine Launcher GUI or the \u003ccode\u003eappcfg.py\u003c/code\u003e command-line tool.\u003c/p\u003e\n"]]],[],null,["# Python Quick Start\n\nThis project shows you how to implement a simple\npiece of Glassware that demos the major functionality of the Google Mirror API.\n\nTo see a fully-working demo of the quick start project, go to\n[https://glass-python-starter-demo.appspot.com](https://glass-java-starter-demo.appspot.com).\nOtherwise, read on to see how to deploy your own version.\n\n[Download on GitHub](https://github.com/googleglass/mirror-quickstart-python)\n\nPrerequisites\n-------------\n\n[The App Engine SDK for Python](/appengine/downloads#Google_App_Engine_SDK_for_Python) -\nThe Python quick start project is implemented using App Engine. You need\nthe Python App Engine SDK to develop and deploy your project.\nRun the installer if appropriate for your platform, or extract the zip file\nin a convenient place.\n\nCreating a Google App Engine instance\n-------------------------------------\n\nYou'll need to host the quick start project on an instance of Google App Engine:\n\n1. Go to \u003chttp://appspot.com\u003e.\n2. Click **Create Application** and create a public Google App Engine instance hosted on `appspot.com`.\n3. Give the application an **Application Identifier** and leave the authentication **Open to all Google\n Accounts users**. You'll need the application identifier later to configure the quick start project.\n\nCreating a Google APIs Console project\n--------------------------------------\n\nNext, enable access to the Google Mirror API:\n\n1. Go to the [Google APIs console](https://code.google.com/apis/console/) and create a new API project.\n2. Click **Services** and enable the Google Mirror API for your new project.\n3. Click **API Access** and create an OAuth 2.0 client ID for a web application.\n4. Specify the product name and icon for your Glassware. These fields appear on the OAuth grant screen presented to your users.\n5. Select **Web application** and specify any value for the hostname, such as `localhost`\n6. Click **Edit settings...** for the client ID to specify redirect URIs. Specify `http://localhost:8080/oauth2callback` and the callback URL for your App Engine instance, for example, `https://myappengineinstance.appspot.com/oauth2callback`.\n7. Make note of the client ID and secret from the Google APIs Console. You'll need it to configure the quick start project.\n\nConfiguring the project\n-----------------------\n\nConfigure the Quick Start project to use your API client information:\n\n1. Enter your client ID and secret in `client_secrets.json`: \n\n ```python\n {\n \"web\": {\n \"client_id\": \"1234.apps.googleusercontent.com\",\n \"client_secret\": \"ITS_A_SECRET_TO_EVERYBODY\",\n \"redirect_uris\": [\n ],\n \"auth_uri\": \"https://accounts.google.com/o/oauth2/auth\",\n \"token_uri\": \"https://accounts.google.com/o/oauth2/token\"\n }\n }\n ```\n2. Generate a `session.secret` file to store session cookies: \n\n ```python\n $ python -c \"import os; print os.urandom(64)\" \u003e session.secret\n ```\n3. Edit `app.yaml` to enter your App Engine application ID: \n\n ```python\n application: your_app_engine_application_id\n version: 1\n runtime: python27\n api_version: 1\n threadsafe: true\n ...\n ```\n\nDeploying the project\n---------------------\n\nPress the blue **Deploy** button in the App Engine Launch GUI interface or run this shell\ncommand to deploy your code: \n\n $ appcfg.py --oauth2 update ."]]