Быстрый старт Python
Оптимизируйте свои подборки
Сохраняйте и классифицируйте контент в соответствии со своими настройками.
В этом проекте показано, как реализовать простую программу Glassware, демонстрирующую основные функции API Google Mirror.
Чтобы увидеть полностью работающую демонстрацию проекта быстрого запуска, перейдите по адресу https://glass-python-starter-demo.appspot.com . В противном случае читайте дальше, чтобы узнать, как развернуть собственную версию.
Скачать на GitHub
Предварительные условия
App Engine SDK для Python . Проект быстрого запуска Python реализован с помощью App Engine. Для разработки и развертывания проекта вам понадобится Python App Engine SDK. Запустите установщик, если он подходит для вашей платформы, или распакуйте zip-файл в удобное место.
Создание экземпляра Google App Engine
Вам потребуется разместить проект быстрого запуска на экземпляре Google App Engine:
- Перейдите на http://appspot.com .
- Нажмите «Создать приложение» и создайте общедоступный экземпляр Google App Engine, размещенный на
appspot.com
. - Дайте приложению идентификатор приложения и оставьте аутентификацию открытой для всех пользователей учетных записей Google . Идентификатор приложения понадобится вам позже, чтобы настроить проект быстрого запуска.
Создание проекта консоли API Google
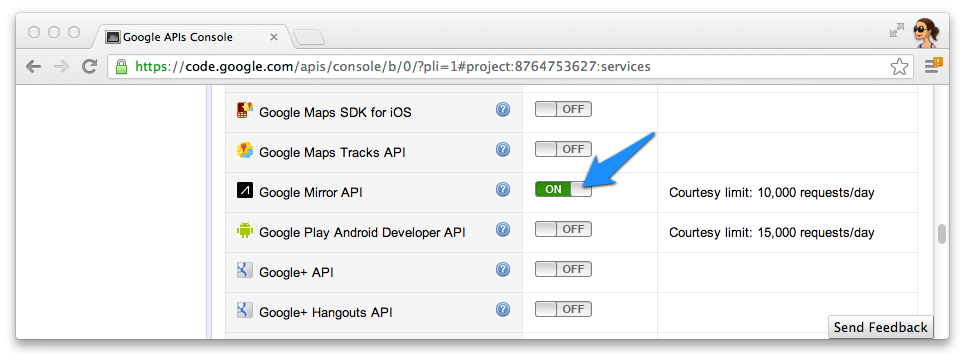
Далее включите доступ к API Google Mirror:
- Перейдите в консоль Google API и создайте новый проект API.
- Нажмите «Службы» и включите API Google Mirror для вашего нового проекта.

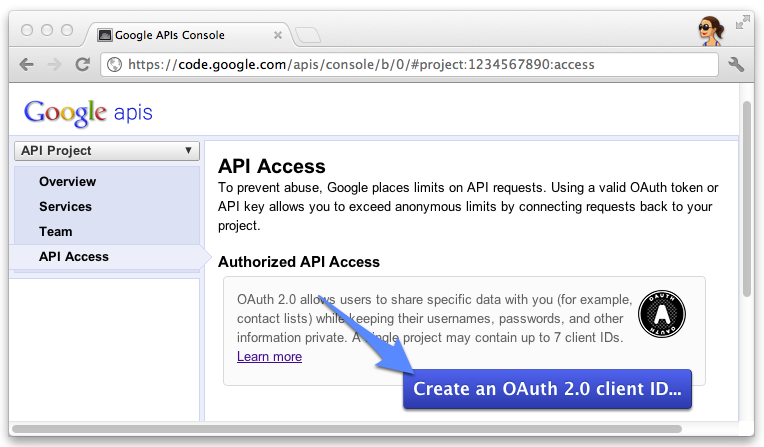
- Нажмите «Доступ к API» и создайте идентификатор клиента OAuth 2.0 для веб-приложения.

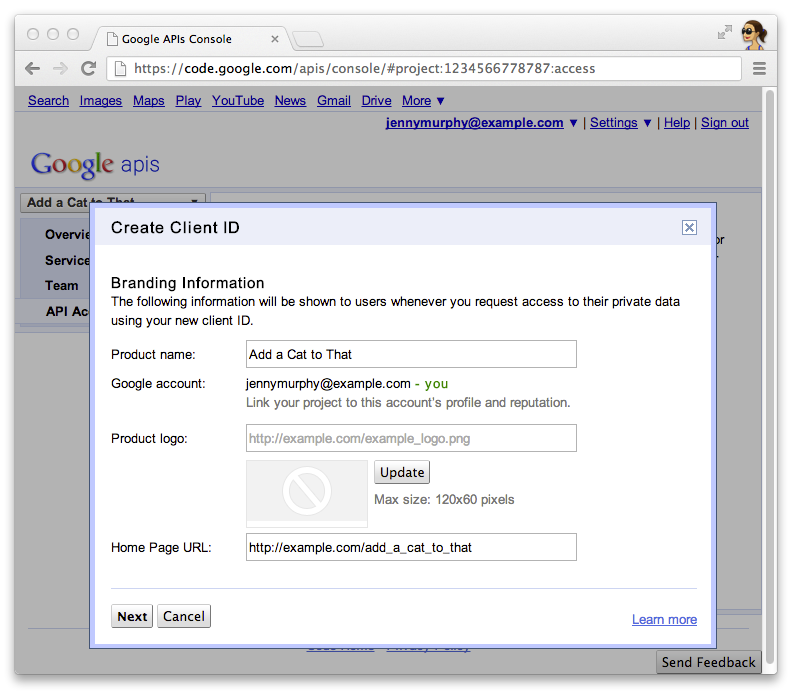
- Укажите название продукта и значок для вашей посуды. Эти поля отображаются на экране предоставления OAuth, представленном вашим пользователям.

- Выберите веб-приложение и укажите любое значение имени хоста, например
localhost

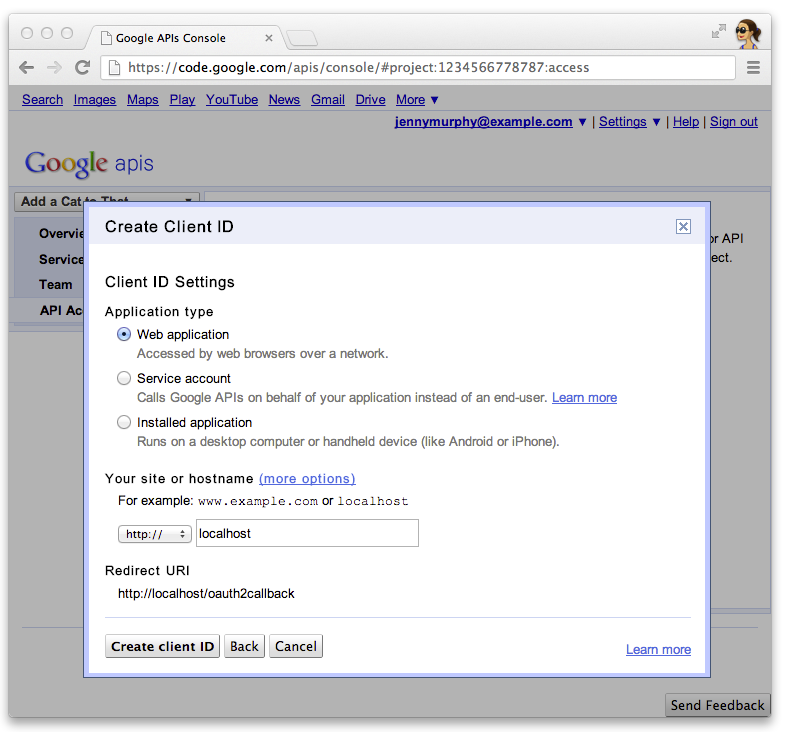
- Нажмите Изменить настройки... для идентификатора клиента, чтобы указать URI перенаправления. Укажите
http://localhost:8080/oauth2callback
и URL-адрес обратного вызова для вашего экземпляра App Engine, например https://myappengineinstance.appspot.com/oauth2callback
. 
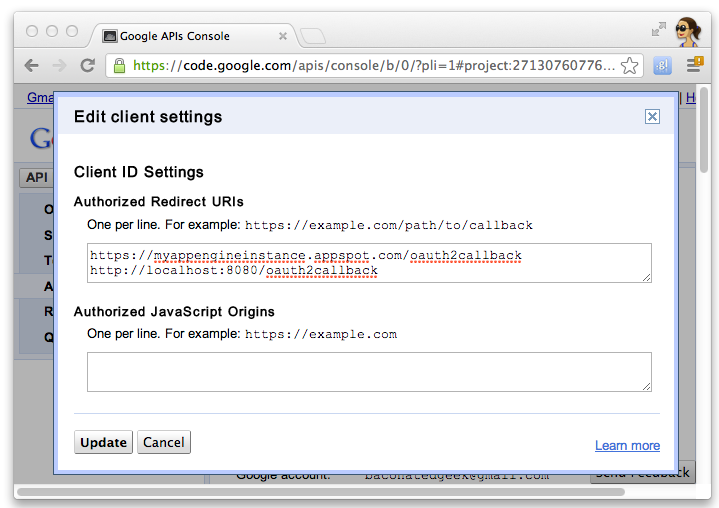
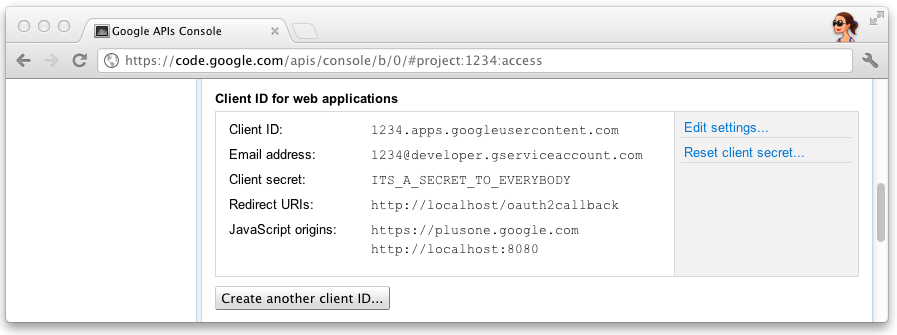
- Запишите идентификатор клиента и секретный ключ из консоли API Google. Он понадобится вам для настройки проекта быстрого запуска.

Настройка проекта
Настройте проект быстрого запуска для использования информации вашего клиента API:
- Введите свой идентификатор клиента и секрет в
client_secrets.json
: {
"web": {
"client_id": "1234.apps.googleusercontent.com",
"client_secret": "ITS_A_SECRET_TO_EVERYBODY",
"redirect_uris": [
],
"auth_uri": "https://accounts.google.com/o/oauth2/auth",
"token_uri": "https://accounts.google.com/o/oauth2/token"
}
}
- Создайте файл
session.secret
для хранения файлов cookie сеанса: $ python -c "import os; print os.urandom(64)" > session.secret
- Отредактируйте
app.yaml
, введя идентификатор приложения App Engine: application: your_app_engine_application_id
version: 1
runtime: python27
api_version: 1
threadsafe: true
...
Развертывание проекта
Нажмите синюю кнопку «Развернуть» в графическом интерфейсе запуска App Engine или запустите следующую команду оболочки, чтобы развернуть код:
$ appcfg.py --oauth2 update .
Если не указано иное, контент на этой странице предоставляется по лицензии Creative Commons "С указанием авторства 4.0", а примеры кода – по лицензии Apache 2.0. Подробнее об этом написано в правилах сайта. Java – это зарегистрированный товарный знак корпорации Oracle и ее аффилированных лиц.
Последнее обновление: 2025-07-24 UTC.
[null,null,["Последнее обновление: 2025-07-24 UTC."],[[["\u003cp\u003eThis project provides a simple implementation of Glassware demonstrating the core functionality of the Google Mirror API.\u003c/p\u003e\n"],["\u003cp\u003eTo run the project, you need the App Engine SDK for Python, a Google App Engine instance, and a Google APIs Console project with the Google Mirror API enabled.\u003c/p\u003e\n"],["\u003cp\u003eConfiguration involves setting up your client ID and secret, generating a session secret file, and updating the \u003ccode\u003eapp.yaml\u003c/code\u003e with your App Engine application ID.\u003c/p\u003e\n"],["\u003cp\u003eDeploy the project using the App Engine Launcher GUI or the \u003ccode\u003eappcfg.py\u003c/code\u003e command-line tool.\u003c/p\u003e\n"]]],[],null,["# Python Quick Start\n\nThis project shows you how to implement a simple\npiece of Glassware that demos the major functionality of the Google Mirror API.\n\nTo see a fully-working demo of the quick start project, go to\n[https://glass-python-starter-demo.appspot.com](https://glass-java-starter-demo.appspot.com).\nOtherwise, read on to see how to deploy your own version.\n\n[Download on GitHub](https://github.com/googleglass/mirror-quickstart-python)\n\nPrerequisites\n-------------\n\n[The App Engine SDK for Python](/appengine/downloads#Google_App_Engine_SDK_for_Python) -\nThe Python quick start project is implemented using App Engine. You need\nthe Python App Engine SDK to develop and deploy your project.\nRun the installer if appropriate for your platform, or extract the zip file\nin a convenient place.\n\nCreating a Google App Engine instance\n-------------------------------------\n\nYou'll need to host the quick start project on an instance of Google App Engine:\n\n1. Go to \u003chttp://appspot.com\u003e.\n2. Click **Create Application** and create a public Google App Engine instance hosted on `appspot.com`.\n3. Give the application an **Application Identifier** and leave the authentication **Open to all Google\n Accounts users**. You'll need the application identifier later to configure the quick start project.\n\nCreating a Google APIs Console project\n--------------------------------------\n\nNext, enable access to the Google Mirror API:\n\n1. Go to the [Google APIs console](https://code.google.com/apis/console/) and create a new API project.\n2. Click **Services** and enable the Google Mirror API for your new project.\n3. Click **API Access** and create an OAuth 2.0 client ID for a web application.\n4. Specify the product name and icon for your Glassware. These fields appear on the OAuth grant screen presented to your users.\n5. Select **Web application** and specify any value for the hostname, such as `localhost`\n6. Click **Edit settings...** for the client ID to specify redirect URIs. Specify `http://localhost:8080/oauth2callback` and the callback URL for your App Engine instance, for example, `https://myappengineinstance.appspot.com/oauth2callback`.\n7. Make note of the client ID and secret from the Google APIs Console. You'll need it to configure the quick start project.\n\nConfiguring the project\n-----------------------\n\nConfigure the Quick Start project to use your API client information:\n\n1. Enter your client ID and secret in `client_secrets.json`: \n\n ```python\n {\n \"web\": {\n \"client_id\": \"1234.apps.googleusercontent.com\",\n \"client_secret\": \"ITS_A_SECRET_TO_EVERYBODY\",\n \"redirect_uris\": [\n ],\n \"auth_uri\": \"https://accounts.google.com/o/oauth2/auth\",\n \"token_uri\": \"https://accounts.google.com/o/oauth2/token\"\n }\n }\n ```\n2. Generate a `session.secret` file to store session cookies: \n\n ```python\n $ python -c \"import os; print os.urandom(64)\" \u003e session.secret\n ```\n3. Edit `app.yaml` to enter your App Engine application ID: \n\n ```python\n application: your_app_engine_application_id\n version: 1\n runtime: python27\n api_version: 1\n threadsafe: true\n ...\n ```\n\nDeploying the project\n---------------------\n\nPress the blue **Deploy** button in the App Engine Launch GUI interface or run this shell\ncommand to deploy your code: \n\n $ appcfg.py --oauth2 update ."]]