คู่มือเริ่มต้นฉบับย่อสำหรับ Python
จัดทุกอย่างให้เป็นระเบียบอยู่เสมอด้วยคอลเล็กชัน
บันทึกและจัดหมวดหมู่เนื้อหาตามค่ากำหนดของคุณ
โครงการนี้จะแสดงให้คุณเห็นวิธีการนำ
กลาสแวร์ตัวหนึ่งที่สาธิตฟังก์ชันการทำงานหลักๆ ของ Google Mirror API
ดูการสาธิตการใช้งานฉบับย่อของโปรเจ็กต์คู่มือเริ่มต้นได้ที่
https://glass-python-starter-demo.appspot.com.
หรืออ่านต่อไปเพื่อดูวิธีทำให้เวอร์ชันของคุณใช้งานได้
ดาวน์โหลดบน GitHub
ข้อกำหนดเบื้องต้น
App Engine SDK สำหรับ Python -
มีการใช้งานโปรเจ็กต์คู่มือเริ่มต้นฉบับย่อสำหรับ Python โดยใช้ App Engine คุณต้องมี
Python App Engine SDK เพื่อพัฒนาและทำให้โปรเจ็กต์ของคุณใช้งานได้
เรียกใช้โปรแกรมติดตั้งตามความเหมาะสมสำหรับแพลตฟอร์มของคุณ หรือแตกไฟล์ ZIP
ในที่ที่สะดวก
การสร้างอินสแตนซ์ Google App Engine
คุณจะต้องโฮสต์โปรเจ็กต์เริ่มต้นอย่างรวดเร็วบนอินสแตนซ์ของ Google App Engine โดยทำดังนี้
- ไปที่ http://appspot.com
- คลิก Create Application และสร้างอินสแตนซ์ Google App Engine สาธารณะที่โฮสต์บน
appspot.com
- กำหนดตัวระบุแอปพลิเคชันให้กับแอปพลิเคชันและปล่อยให้การตรวจสอบสิทธิ์เปิดให้กับ Google ทั้งหมด
ผู้ใช้บัญชี คุณจะต้องใช้ตัวระบุแอปพลิเคชันในภายหลังเพื่อกำหนดค่าโปรเจ็กต์เริ่มต้นอย่างรวดเร็ว
การสร้างโปรเจ็กต์คอนโซล Google APIs
ถัดไป ให้เปิดใช้งานการเข้าถึง Google Mirror API โดยทำดังนี้
- ไปที่คอนโซล Google API แล้วสร้างโปรเจ็กต์ API ใหม่
- คลิกบริการและเปิดใช้ Google Mirror API สำหรับโปรเจ็กต์ใหม่

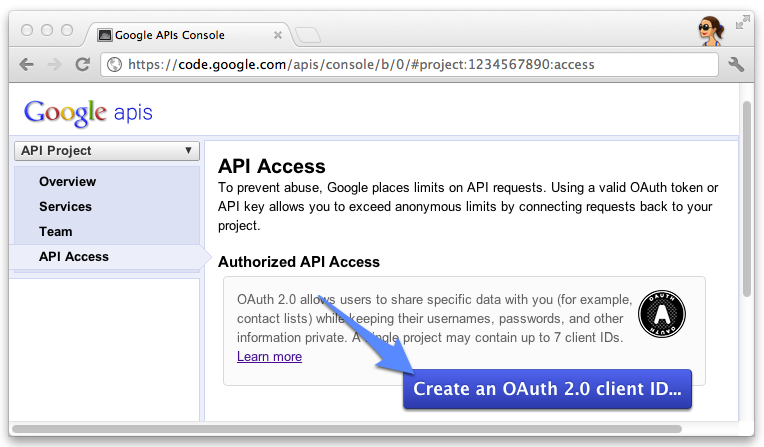
- คลิกการเข้าถึง API และสร้างรหัสไคลเอ็นต์ OAuth 2.0 สำหรับเว็บแอปพลิเคชัน

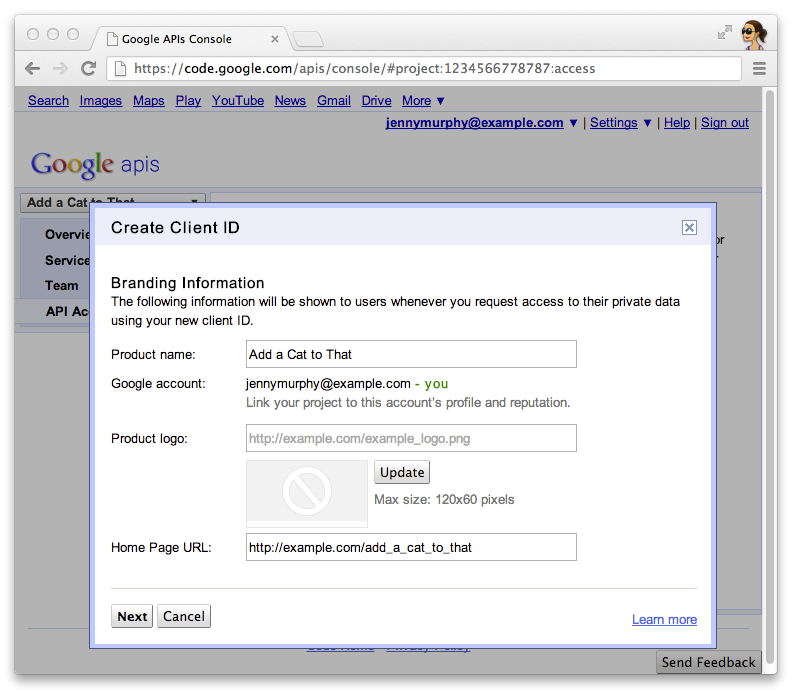
- ระบุชื่อและไอคอนผลิตภัณฑ์สำหรับ Glassware ของคุณ ช่องเหล่านี้ปรากฏบนการให้สิทธิ์ OAuth
ที่แสดงให้ผู้ใช้เห็น

- เลือกเว็บแอปพลิเคชัน แล้วระบุค่าสำหรับชื่อโฮสต์ เช่น
localhost

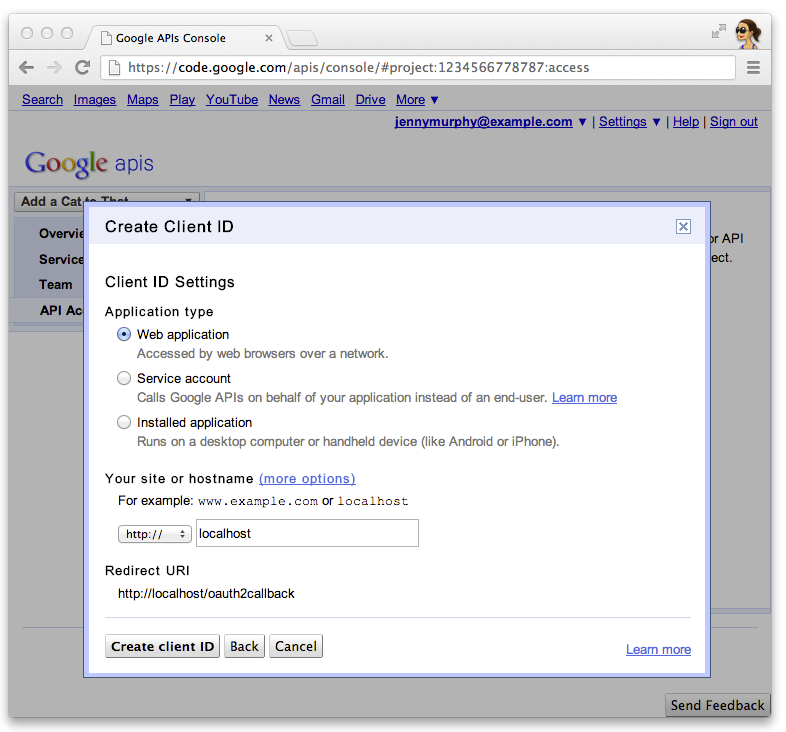
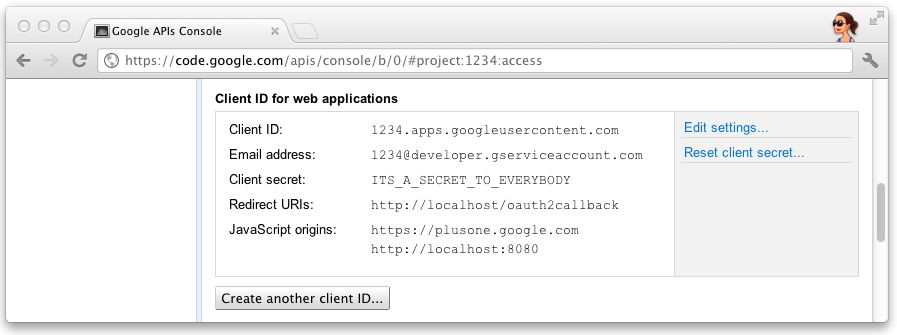
- คลิกแก้ไขการตั้งค่า... สำหรับรหัสไคลเอ็นต์เพื่อระบุ URI การเปลี่ยนเส้นทาง ระบุ
http://localhost:8080/oauth2callback
และ URL ติดต่อกลับสำหรับ App Engine ของคุณ
เช่น https://myappengineinstance.appspot.com/oauth2callback

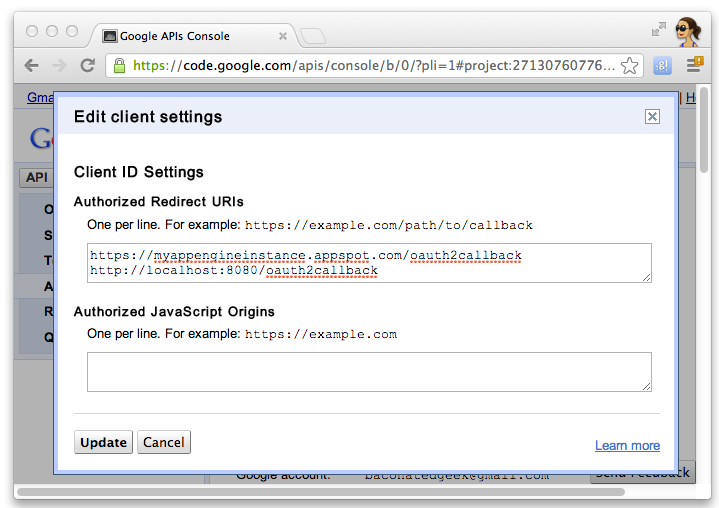
- จดบันทึกรหัสไคลเอ็นต์และข้อมูลลับจากคอนโซล Google APIs คุณจะต้องมี
เพื่อกำหนดค่าโปรเจ็กต์เริ่มต้นอย่างรวดเร็ว

กำลังกำหนดค่าโปรเจ็กต์
กำหนดค่าโปรเจ็กต์ Quick Start เพื่อใช้ข้อมูลไคลเอ็นต์ API โดยทำดังนี้
- ป้อนรหัสไคลเอ็นต์และรหัสลับใน
client_secrets.json
:
{
"web": {
"client_id": "1234.apps.googleusercontent.com",
"client_secret": "ITS_A_SECRET_TO_EVERYBODY",
"redirect_uris": [
],
"auth_uri": "https://accounts.google.com/o/oauth2/auth",
"token_uri": "https://accounts.google.com/o/oauth2/token"
}
}
- สร้างไฟล์
session.secret
เพื่อจัดเก็บคุกกี้เซสชัน
$ python -c "import os; print os.urandom(64)" > session.secret
- แก้ไข
app.yaml
เพื่อป้อนรหัสแอปพลิเคชันของ App Engine:
application: your_app_engine_application_id
version: 1
runtime: python27
api_version: 1
threadsafe: true
...
การทำให้โปรเจ็กต์ใช้งานได้
กดปุ่มสีฟ้าทำให้ใช้งานได้ในอินเทอร์เฟซ GUI การเปิดตัว App Engine หรือเรียกใช้เชลล์นี้
เพื่อทำให้โค้ดของคุณใช้งานได้:
$ appcfg.py --oauth2 update .
เนื้อหาของหน้าเว็บนี้ได้รับอนุญาตภายใต้ใบอนุญาตที่ต้องระบุที่มาของครีเอทีฟคอมมอนส์ 4.0 และตัวอย่างโค้ดได้รับอนุญาตภายใต้ใบอนุญาต Apache 2.0 เว้นแต่จะระบุไว้เป็นอย่างอื่น โปรดดูรายละเอียดที่นโยบายเว็บไซต์ Google Developers Java เป็นเครื่องหมายการค้าจดทะเบียนของ Oracle และ/หรือบริษัทในเครือ
อัปเดตล่าสุด 2025-07-25 UTC
[null,null,["อัปเดตล่าสุด 2025-07-25 UTC"],[[["\u003cp\u003eThis project provides a simple implementation of Glassware demonstrating the core functionality of the Google Mirror API.\u003c/p\u003e\n"],["\u003cp\u003eTo run the project, you need the App Engine SDK for Python, a Google App Engine instance, and a Google APIs Console project with the Google Mirror API enabled.\u003c/p\u003e\n"],["\u003cp\u003eConfiguration involves setting up your client ID and secret, generating a session secret file, and updating the \u003ccode\u003eapp.yaml\u003c/code\u003e with your App Engine application ID.\u003c/p\u003e\n"],["\u003cp\u003eDeploy the project using the App Engine Launcher GUI or the \u003ccode\u003eappcfg.py\u003c/code\u003e command-line tool.\u003c/p\u003e\n"]]],[],null,["# Python Quick Start\n\nThis project shows you how to implement a simple\npiece of Glassware that demos the major functionality of the Google Mirror API.\n\nTo see a fully-working demo of the quick start project, go to\n[https://glass-python-starter-demo.appspot.com](https://glass-java-starter-demo.appspot.com).\nOtherwise, read on to see how to deploy your own version.\n\n[Download on GitHub](https://github.com/googleglass/mirror-quickstart-python)\n\nPrerequisites\n-------------\n\n[The App Engine SDK for Python](/appengine/downloads#Google_App_Engine_SDK_for_Python) -\nThe Python quick start project is implemented using App Engine. You need\nthe Python App Engine SDK to develop and deploy your project.\nRun the installer if appropriate for your platform, or extract the zip file\nin a convenient place.\n\nCreating a Google App Engine instance\n-------------------------------------\n\nYou'll need to host the quick start project on an instance of Google App Engine:\n\n1. Go to \u003chttp://appspot.com\u003e.\n2. Click **Create Application** and create a public Google App Engine instance hosted on `appspot.com`.\n3. Give the application an **Application Identifier** and leave the authentication **Open to all Google\n Accounts users**. You'll need the application identifier later to configure the quick start project.\n\nCreating a Google APIs Console project\n--------------------------------------\n\nNext, enable access to the Google Mirror API:\n\n1. Go to the [Google APIs console](https://code.google.com/apis/console/) and create a new API project.\n2. Click **Services** and enable the Google Mirror API for your new project.\n3. Click **API Access** and create an OAuth 2.0 client ID for a web application.\n4. Specify the product name and icon for your Glassware. These fields appear on the OAuth grant screen presented to your users.\n5. Select **Web application** and specify any value for the hostname, such as `localhost`\n6. Click **Edit settings...** for the client ID to specify redirect URIs. Specify `http://localhost:8080/oauth2callback` and the callback URL for your App Engine instance, for example, `https://myappengineinstance.appspot.com/oauth2callback`.\n7. Make note of the client ID and secret from the Google APIs Console. You'll need it to configure the quick start project.\n\nConfiguring the project\n-----------------------\n\nConfigure the Quick Start project to use your API client information:\n\n1. Enter your client ID and secret in `client_secrets.json`: \n\n ```python\n {\n \"web\": {\n \"client_id\": \"1234.apps.googleusercontent.com\",\n \"client_secret\": \"ITS_A_SECRET_TO_EVERYBODY\",\n \"redirect_uris\": [\n ],\n \"auth_uri\": \"https://accounts.google.com/o/oauth2/auth\",\n \"token_uri\": \"https://accounts.google.com/o/oauth2/token\"\n }\n }\n ```\n2. Generate a `session.secret` file to store session cookies: \n\n ```python\n $ python -c \"import os; print os.urandom(64)\" \u003e session.secret\n ```\n3. Edit `app.yaml` to enter your App Engine application ID: \n\n ```python\n application: your_app_engine_application_id\n version: 1\n runtime: python27\n api_version: 1\n threadsafe: true\n ...\n ```\n\nDeploying the project\n---------------------\n\nPress the blue **Deploy** button in the App Engine Launch GUI interface or run this shell\ncommand to deploy your code: \n\n $ appcfg.py --oauth2 update ."]]