Python 快速入门
使用集合让一切井井有条
根据您的偏好保存内容并对其进行分类。
本项目将展示如何实现简单的
Glassware 中演示了 Google Mirror API 的主要功能。
要查看快速入门项目的功能完备的演示,请访问
https://glass-python-starter-demo.appspot.com.
否则,请继续阅读以了解如何部署您自己的版本。
在 GitHub 上下载
前提条件
Python 版 App Engine SDK -
Python 快速入门项目使用 App Engine 实现。您需要
Python App Engine SDK 来开发和部署您的项目。
运行适用于您的平台的安装程序,或解压 zip 文件
放在方便的位置
创建 Google App Engine 实例
您需要在 Google App Engine 实例上托管快速入门项目:
- 转到 http://appspot.com。
- 点击创建应用,创建一个在
appspot.com
上托管的公共 Google App Engine 实例。
- 为应用提供应用标识符,并让身份验证向所有 Google 开放
账号用户。您稍后需要使用应用标识符来配置快速入门项目。
创建 Google API 控制台项目
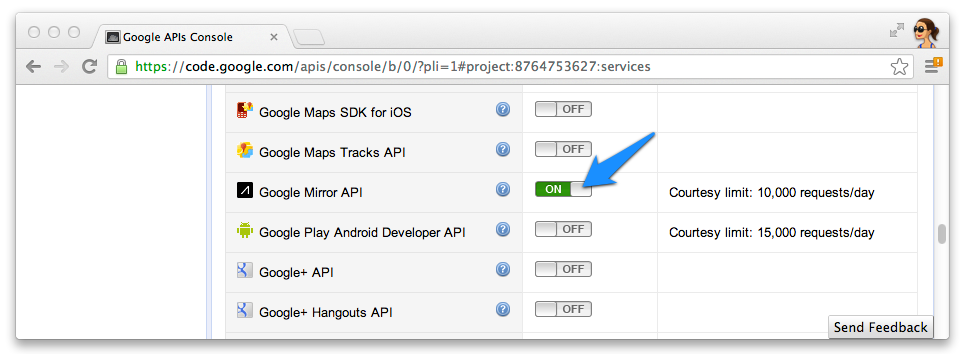
接下来,启用对 Google Mirror API 的访问权限:
- 转至 Google API 控制台并新建一个 API 项目。
- 点击服务,然后为新项目启用 Google Mirror API。

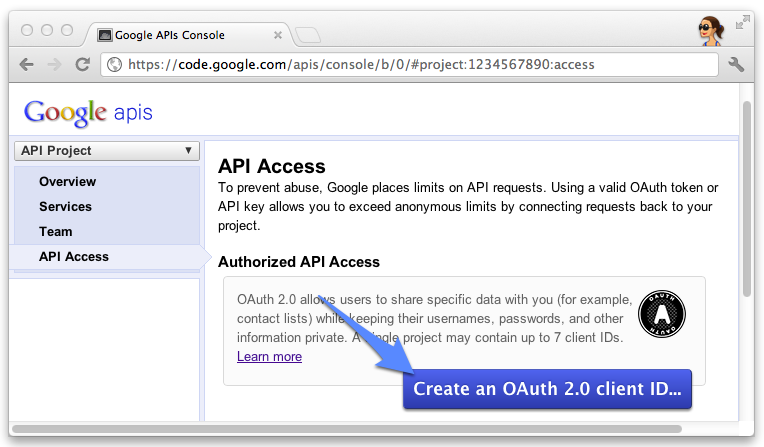
- 点击 API 访问权限,然后为 Web 应用创建 OAuth 2.0 客户端 ID。

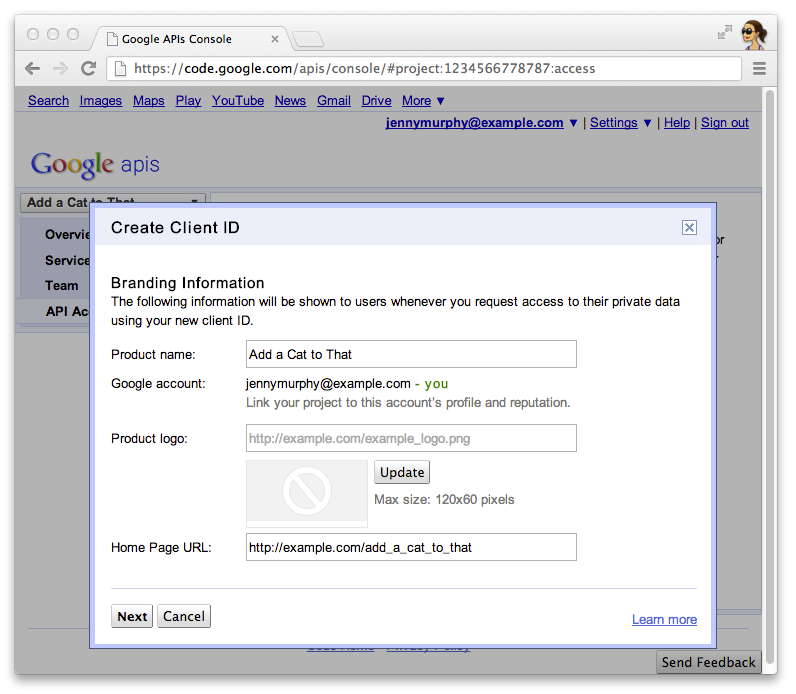
- 指定 Glassware 的产品名称和图标。这些字段显示在 OAuth 授权中
呈现给用户的屏幕

- 选择 Web 应用,然后为主机名指定任意值,例如
localhost

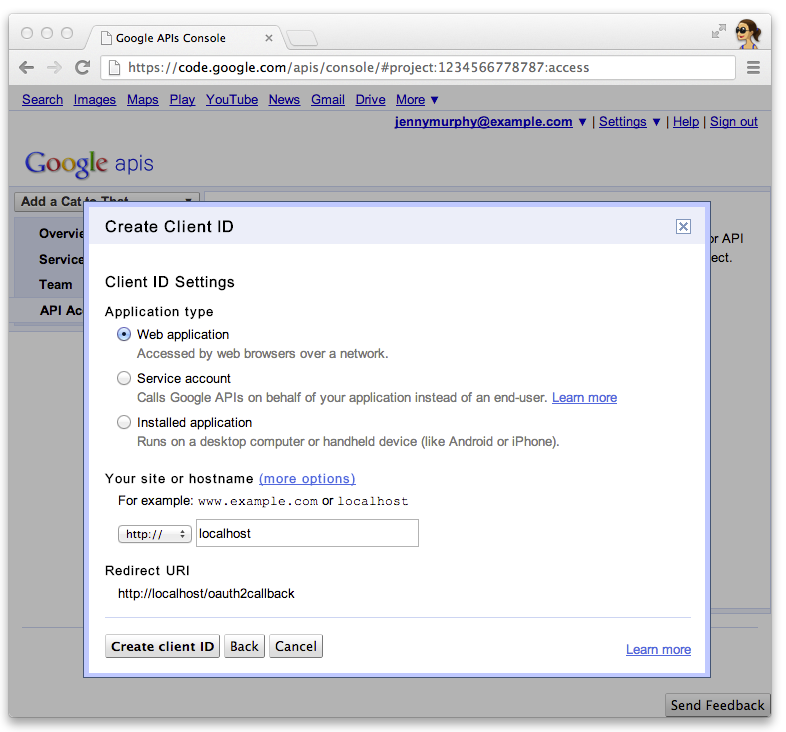
- 点击客户端 ID 对应的 Edit settings... 可指定重定向 URI。指定
http://localhost:8080/oauth2callback
以及 App Engine 的回调网址
例如 https://myappengineinstance.appspot.com/oauth2callback
。

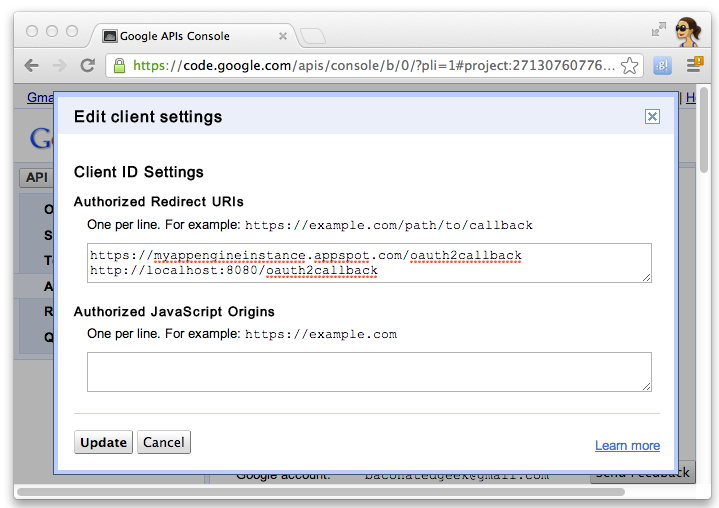
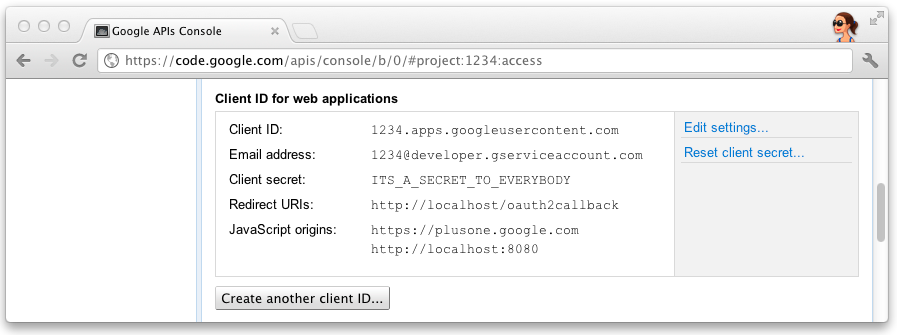
- 记下 Google API 控制台中的客户端 ID 和密钥。所需设备
以配置快速入门项目。

配置项目
将快速入门项目配置为使用您的 API 客户端信息:
- 在
client_secrets.json
中输入您的客户端 ID 和密钥:
{
"web": {
"client_id": "1234.apps.googleusercontent.com",
"client_secret": "ITS_A_SECRET_TO_EVERYBODY",
"redirect_uris": [
],
"auth_uri": "https://accounts.google.com/o/oauth2/auth",
"token_uri": "https://accounts.google.com/o/oauth2/token"
}
}
- 生成
session.secret
文件以存储会话 Cookie:
$ python -c "import os; print os.urandom(64)" > session.secret
- 修改
app.yaml
以输入您的 App Engine 应用 ID:
application: your_app_engine_application_id
version: 1
runtime: python27
api_version: 1
threadsafe: true
...
部署项目
按 App Engine 启动 GUI 界面中的蓝色部署按钮,或运行此 shell
命令来部署代码:
$ appcfg.py --oauth2 update .
如未另行说明,那么本页面中的内容已根据知识共享署名 4.0 许可获得了许可,并且代码示例已根据 Apache 2.0 许可获得了许可。有关详情,请参阅 Google 开发者网站政策。Java 是 Oracle 和/或其关联公司的注册商标。
最后更新时间 (UTC):2025-07-25。
[null,null,["最后更新时间 (UTC):2025-07-25。"],[[["\u003cp\u003eThis project provides a simple implementation of Glassware demonstrating the core functionality of the Google Mirror API.\u003c/p\u003e\n"],["\u003cp\u003eTo run the project, you need the App Engine SDK for Python, a Google App Engine instance, and a Google APIs Console project with the Google Mirror API enabled.\u003c/p\u003e\n"],["\u003cp\u003eConfiguration involves setting up your client ID and secret, generating a session secret file, and updating the \u003ccode\u003eapp.yaml\u003c/code\u003e with your App Engine application ID.\u003c/p\u003e\n"],["\u003cp\u003eDeploy the project using the App Engine Launcher GUI or the \u003ccode\u003eappcfg.py\u003c/code\u003e command-line tool.\u003c/p\u003e\n"]]],[],null,["# Python Quick Start\n\nThis project shows you how to implement a simple\npiece of Glassware that demos the major functionality of the Google Mirror API.\n\nTo see a fully-working demo of the quick start project, go to\n[https://glass-python-starter-demo.appspot.com](https://glass-java-starter-demo.appspot.com).\nOtherwise, read on to see how to deploy your own version.\n\n[Download on GitHub](https://github.com/googleglass/mirror-quickstart-python)\n\nPrerequisites\n-------------\n\n[The App Engine SDK for Python](/appengine/downloads#Google_App_Engine_SDK_for_Python) -\nThe Python quick start project is implemented using App Engine. You need\nthe Python App Engine SDK to develop and deploy your project.\nRun the installer if appropriate for your platform, or extract the zip file\nin a convenient place.\n\nCreating a Google App Engine instance\n-------------------------------------\n\nYou'll need to host the quick start project on an instance of Google App Engine:\n\n1. Go to \u003chttp://appspot.com\u003e.\n2. Click **Create Application** and create a public Google App Engine instance hosted on `appspot.com`.\n3. Give the application an **Application Identifier** and leave the authentication **Open to all Google\n Accounts users**. You'll need the application identifier later to configure the quick start project.\n\nCreating a Google APIs Console project\n--------------------------------------\n\nNext, enable access to the Google Mirror API:\n\n1. Go to the [Google APIs console](https://code.google.com/apis/console/) and create a new API project.\n2. Click **Services** and enable the Google Mirror API for your new project.\n3. Click **API Access** and create an OAuth 2.0 client ID for a web application.\n4. Specify the product name and icon for your Glassware. These fields appear on the OAuth grant screen presented to your users.\n5. Select **Web application** and specify any value for the hostname, such as `localhost`\n6. Click **Edit settings...** for the client ID to specify redirect URIs. Specify `http://localhost:8080/oauth2callback` and the callback URL for your App Engine instance, for example, `https://myappengineinstance.appspot.com/oauth2callback`.\n7. Make note of the client ID and secret from the Google APIs Console. You'll need it to configure the quick start project.\n\nConfiguring the project\n-----------------------\n\nConfigure the Quick Start project to use your API client information:\n\n1. Enter your client ID and secret in `client_secrets.json`: \n\n ```python\n {\n \"web\": {\n \"client_id\": \"1234.apps.googleusercontent.com\",\n \"client_secret\": \"ITS_A_SECRET_TO_EVERYBODY\",\n \"redirect_uris\": [\n ],\n \"auth_uri\": \"https://accounts.google.com/o/oauth2/auth\",\n \"token_uri\": \"https://accounts.google.com/o/oauth2/token\"\n }\n }\n ```\n2. Generate a `session.secret` file to store session cookies: \n\n ```python\n $ python -c \"import os; print os.urandom(64)\" \u003e session.secret\n ```\n3. Edit `app.yaml` to enter your App Engine application ID: \n\n ```python\n application: your_app_engine_application_id\n version: 1\n runtime: python27\n api_version: 1\n threadsafe: true\n ...\n ```\n\nDeploying the project\n---------------------\n\nPress the blue **Deploy** button in the App Engine Launch GUI interface or run this shell\ncommand to deploy your code: \n\n $ appcfg.py --oauth2 update ."]]