החשבונות מקושרים באמצעות תהליכים מרומזים וקודי הרשאה של OAuth 2.0, בהתאם לתקנים המקובלים בתחום. השירות צריך לתמוך בנקודות קצה של הרשאה והחלפת אסימונים שתואמות ל-OAuth 2.0.
בתהליך העקיף, Google פותחת את נקודת הקצה (endpoint) של ההרשאה בדפדפן של המשתמש. אחרי הכניסה, מחזירים ל-Google אסימון גישה לטווח ארוך. טוקן הגישה הזה נכלל עכשיו בכל בקשה שנשלחת מ-Google.
בתהליך הרשאה באמצעות קוד, נדרשים שני נקודות קצה:
נקודת הקצה של ההרשאה, שבה מוצג ממשק המשתמש של הכניסה למשתמשים שעדיין לא מחוברים. נקודת הקצה להרשאה יוצרת גם קוד הרשאה לטווח קצר כדי לתעד את הסכמת המשתמשים לגישה המבוקשת.
נקודת הקצה החלפת אסימונים, שאחראית לשני סוגים של החלפות:
- מחליפה קוד הרשאה באסימון רענון לטווח ארוך ובאסימון גישה לטווח קצר. המרות כאלה מתרחשות כשהמשתמש עובר את תהליך קישור החשבון.
- המרת אסימון רענון לטווח ארוך באסימון גישה לטווח קצר. ההחלפה הזו מתרחשת כש-Google זקוקה לאסימון גישה חדש כי התוקף של האסימון הקודם פג.
בחירת תהליך OAuth 2.0
אמנם קל יותר להטמיע את התהליך המשתמע, אבל Google ממליצה שלא יהיה תאריך תפוגה לטוקני הגישה שהונפקו בתהליך המשתמע. הסיבה לכך היא שהמשתמש נדרש לקשר מחדש את החשבון שלו אחרי שתוקף האסימון פג בתהליך המשתמעות. אם אתם צריכים שתוקף האסימון יפוג, מומלץ מאוד להשתמש במקום זאת בתהליך של הרשאה לקוד.
הנחיות עיצוב
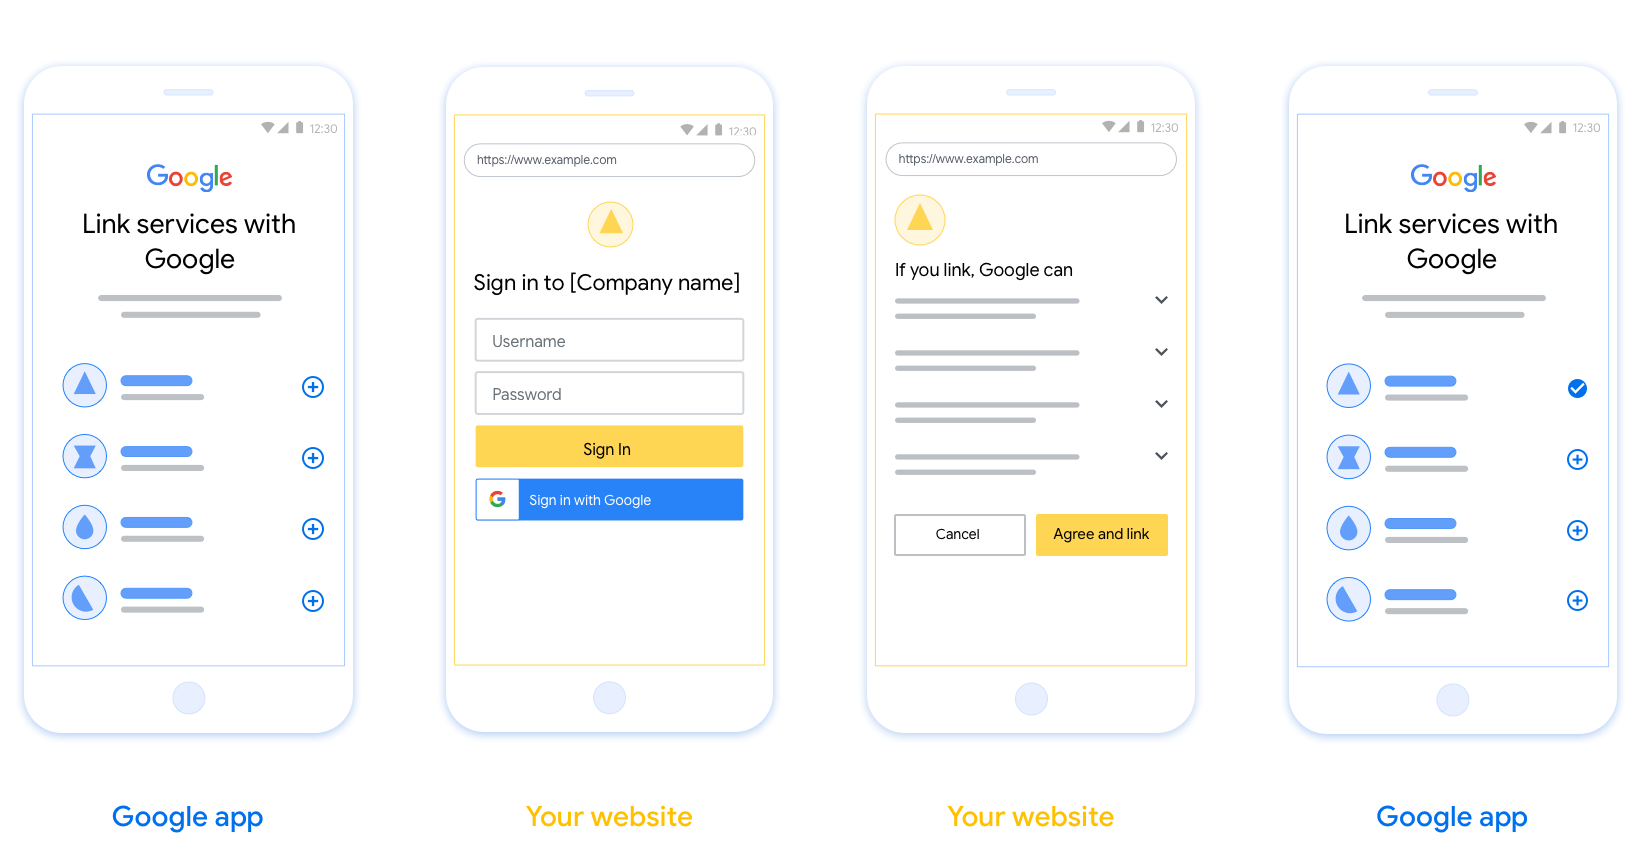
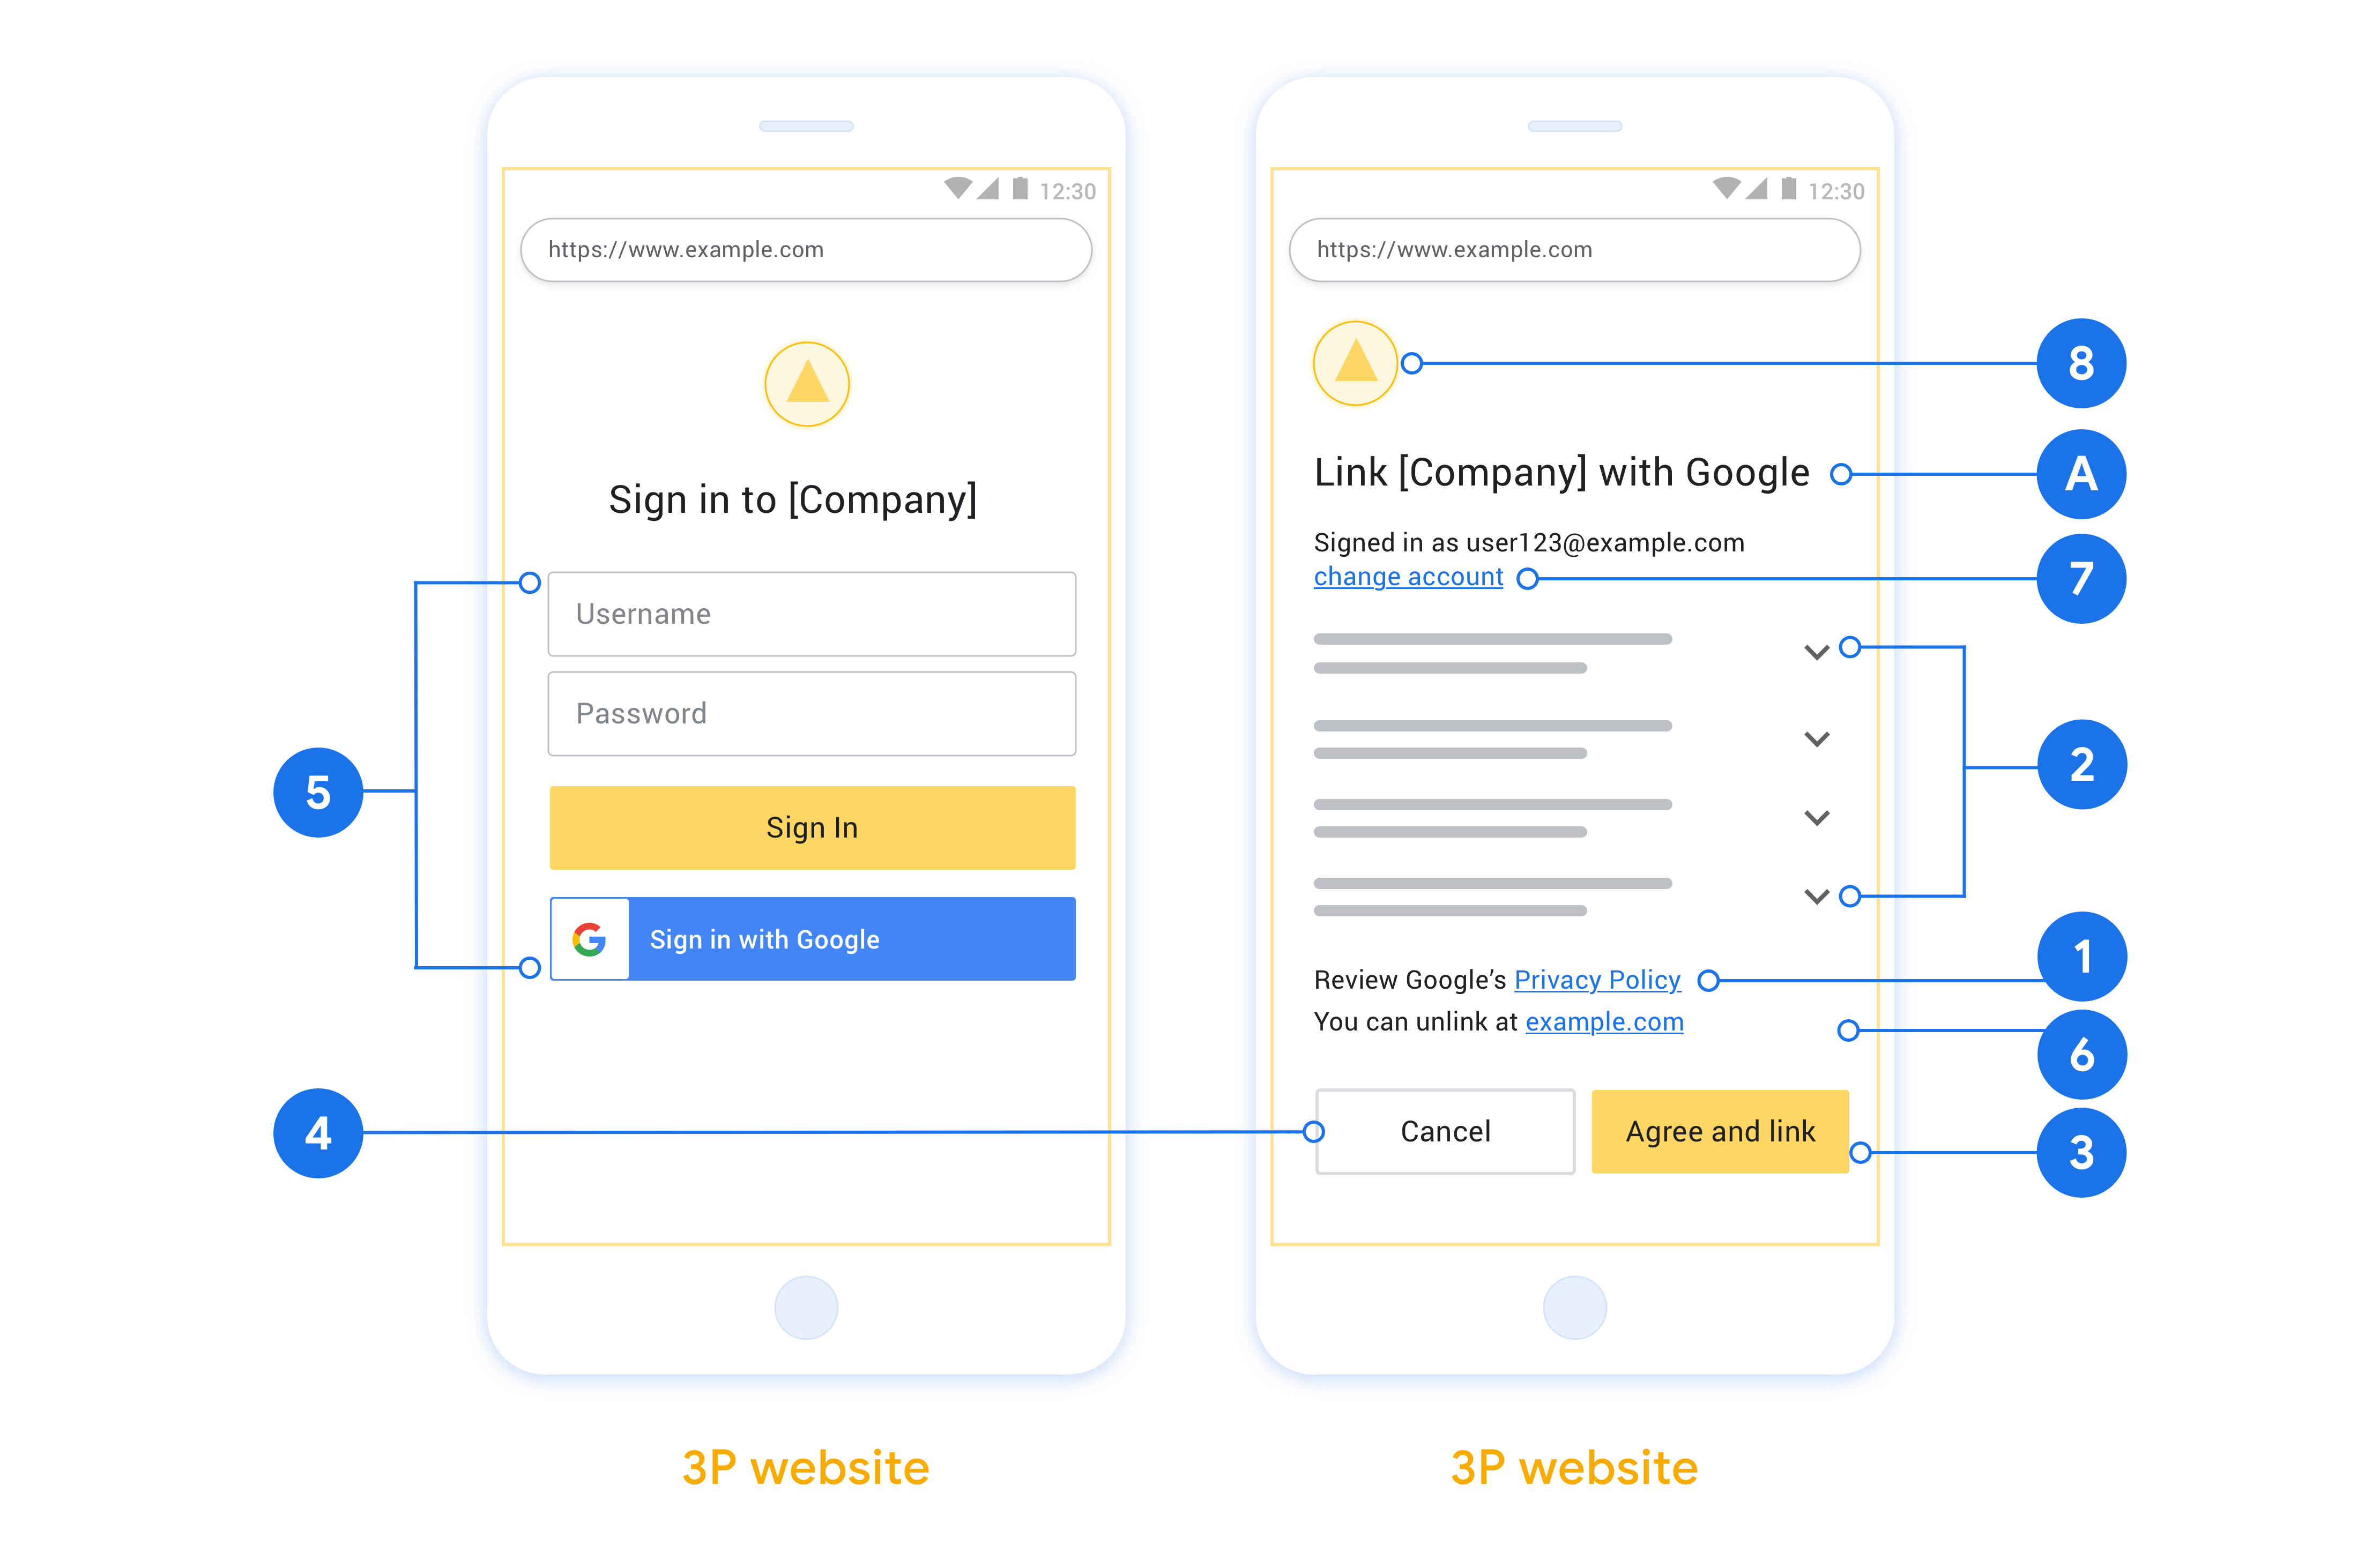
בקטע הזה מתוארות הדרישות וההמלצות לגבי העיצוב של מסך המשתמש שאתם מארחים בתהליכי הקישור של OAuth. אחרי שהאפליקציה של Google קוראת לאפליקציה, הפלטפורמה מציגה למשתמש מסך הסכמה לכניסה לדף של Google ולקישור חשבונות. המשתמש מופנה חזרה לאפליקציה של Google אחרי שהסכים לקישור החשבונות.
דרישות
- עליך לציין שחשבון המשתמש יקושר ל-Google, לא למוצר ספציפי של Google, כמו Google Home או Google Assistant.
המלצות
מומלץ לבצע את הפעולות הבאות:
הצגת מדיניות הפרטיות של Google צריך לכלול קישור למדיניות הפרטיות של Google במסך ההסכמה.
נתונים לשיתוף. חשוב להשתמש בשפה ברורה ותמציתית כדי להסביר למשתמשים אילו נתונים Google צריכה מהם ולמה.
קריאה ברורה לפעולה עליכם לציין במסך ההסכמה קריאה ברורה לפעולה, למשל 'מסכים/ה וקישור'. הסיבה לכך היא שהמשתמשים צריכים להבין אילו נתונים הם נדרשים לשתף עם Google כדי לקשר את החשבונות שלהם.
אפשרות לבטל צריך לספק למשתמשים אפשרות לחזור אחורה או לבטל, אם הם בוחרים לא לקשר.
תהליך כניסה נקי. חשוב לוודא שלמשתמשים יש שיטה ברורה לכניסה לחשבון Google, כמו שדות של שם המשתמש והסיסמה או כניסה באמצעות חשבון Google.
היכולת לבטל את הקישור. להציע למשתמשים מנגנון לביטול הקישור, כמו כתובת URL להגדרות החשבון שלהם בפלטפורמה שלכם. לחלופין, אפשר לכלול קישור לחשבון Google שבו המשתמשים יכולים לנהל את החשבון המקושר.
יכולת לשנות את חשבון המשתמש כדאי להציע למשתמשים שיטה להחלפת החשבונות. האפשרות הזו שימושית במיוחד אם למשתמשים יש כמה חשבונות.
- אם משתמש צריך לסגור את מסך ההסכמה כדי לעבור לחשבון אחר, צריך לשלוח ל-Google הודעת שגיאה שניתן לשחזור כדי שהמשתמש יוכל להיכנס לחשבון הרצוי באמצעות קישור OAuth והתהליך המשתמע.
מוסיפים את הלוגו שלכם. להציג את הלוגו של החברה במסך ההסכמה. השתמשו בהנחיות הסגנון שלכם כדי למקם את הלוגו. אם רוצים להציג גם את הלוגו של Google, אפשר לעיין במאמר סמלי לוגו וסימנים מסחריים.
יצירת הפרויקט
כדי ליצור את הפרויקט לשימוש בקישור לחשבון:
- לוחצים על יצירת פרויקט.
- מזינים שם או מאשרים את ההצעה שנוצרה.
- מאשרים או עורכים את השדות שנותרו.
- לוחצים על יצירה.
כדי לראות את מזהה הפרויקט:
- מחפשים את הפרויקט בטבלה בדף הנחיתה. מזהה הפרויקט מופיע בעמודה ID.
הגדרת מסך ההסכמה של OAuth
תהליך קישור חשבון Google כולל מסך הסכמה שבו מוצגת למשתמש האפליקציה שמבקשת גישה לנתונים שלו, סוג הנתונים שהיא מבקשת והתנאים הרלוונטיים. תצטרכו להגדיר את מסך ההסכמה ל-OAuth לפני שתפיקו מזהה לקוח של Google API.
- פותחים את הדף מסך ההסכמה ל-OAuth ב-Google APIs Console.
- אם מתבקשים, בוחרים את הפרויקט שיצרתם.
בדף 'מסך הסכמה ל-OAuth', ממלאים את הטופס ולוחצים על הלחצן 'שמירה'.
שם האפליקציה: שם האפליקציה שמבקשת הסכמה. השם צריך לשקף במדויק את האפליקציה שלכם ולהיות זהה לשם האפליקציה שמוצג למשתמשים במקומות אחרים. שם האפליקציה יוצג במסך ההסכמה לקישור החשבון.
הלוגו של האפליקציה: תמונה במסך ההסכמה שתעזור למשתמשים לזהות את האפליקציה שלכם. הלוגו מוצג במסך ההסכמה לקישור החשבון ובהגדרות החשבון
כתובת אימייל לתמיכה: כדי שהמשתמשים יוכלו ליצור איתכם קשר עם שאלות לגבי הסכמתם.
היקפים של ממשקי Google API: היקפים מאפשרים לאפליקציה שלכם לגשת לנתונים פרטיים של המשתמשים ב-Google. במקרה השימוש של קישור חשבון Google, היקף ברירת המחדל (אימייל, פרופיל, openid) מספיק, ואין צורך להוסיף היקפים רגישים. בדרך כלל מומלץ לבקש היקפי הרשאה באופן מצטבר, בזמן שנדרשת גישה, ולא מראש. מידע נוסף
דומיינים מורשים: כדי להגן עליכם ועל המשתמשים שלכם, Google מאפשרת רק לאפליקציות שעוברות אימות באמצעות OAuth להשתמש בדומיינים מורשים. הקישורים לאפליקציות שלכם צריכים להתארח בדומיינים מורשים. מידע נוסף
קישור לדף הבית של האפליקציה: דף הבית של האפליקציה. הן חייבות להתארח בדומיין מורשה.
קישור למדיניות הפרטיות של האפליקציה: מוצג במסך ההסכמה לקישור חשבון Google. הן חייבות להתארח בדומיין מורשה.
קישור לתנאים ולהגבלות של האפליקציה (אופציונלי): הקישור חייב להיות מאוחסן בדומיין מורשה.

איור 1. מסך הסכמה לקישור חשבון Google לאפליקציה פיקטיבית, Tunery
בודקים את 'סטטוס האימות'. אם האפליקציה שלכם צריכה אימות, לוחצים על הלחצן 'שליחה לאימות' כדי לשלוח את האפליקציה לאימות. פרטים נוספים זמינים במאמר בנושא דרישות האימות של OAuth.
הטמעת שרת OAuth
כדי לתמוך בזרם הענקת גישה משתמע ב-OAuth 2.0, השירות יוצר הרשאה נקודת הקצה שזמינה ב-HTTPS. נקודת הקצה (endpoint) הזו אחראית לאימות קבלת הסכמה מהמשתמשים לצורך גישה לנתונים. נקודת הקצה של ההרשאה שמציג ממשק משתמש לכניסה למשתמשים שעדיין לא מחוברים לחשבון, להסכים להרשאת הגישה המבוקשת.
כאשר אפליקציה של Google צריכה לשלוח קריאה לאחד מממשקי ה-API המורשים של השירות שלכם: Google משתמשת בנקודת הקצה הזו כדי לקבל מהמשתמשים הרשאה לקרוא לממשקי ה-API האלה בשמם.
בסשן זרם הענקת גישה משתמע ב-OAuth 2.0 ש-Google יזמה, התהליך הבא:
- Google פותחת את נקודת הקצה להרשאה בדפדפן של המשתמש. נכנס לחשבון, אם הוא עדיין לא מחובר, ומעניק ל-Google הרשאה לגשת לנתונים שלהם באמצעות ה-API, אם הוא עדיין לא העניק הרשאה.
- השירות שלכם יוצר אסימון גישה ומחזיר אותו אל Google. כדי לעשות את זה, צריך להפנות את דפדפן המשתמש בחזרה ל-Google עם הגישה האסימון שמצורף לבקשה.
- Google קוראת לממשקי ה-API של השירות ומצרפת את אסימון הגישה עם בכל בקשה. השירות שלך מאמת שאסימון הגישה מעניק ל-Google הרשאה לגשת ל-API ואז משלימה את הקריאה ל-API.
טיפול בבקשות הרשאה
כשאפליקציה של Google צריכה לבצע קישור חשבונות דרך OAuth 2.0 זרם הענקת גישה משתמע, Google שולחת את המשתמש לנקודת הקצה (endpoint) של ההרשאה עם בקשה שכוללת את הפרמטרים הבאים:
| פרמטרים של נקודת קצה להרשאה | |
|---|---|
client_id |
מזהה הלקוח שהקצית ל-Google. |
redirect_uri |
כתובת ה-URL שאליה שולחים את התגובה לבקשה הזו. |
state |
ערך של ניהול חשבונות שמועבר אל Google ללא שינוי URI להפניה אוטומטית. |
response_type |
סוג הערך שיוחזר בתשובה. ל-OAuth 2.0 משתמע
סוג התגובה הוא תמיד token. |
user_locale |
הגדרת השפה בחשבון Google בקטע RFC5646 שמשמש להתאמה לשוק המקומי של התוכן בשפה המועדפת על המשתמש. |
לדוגמה, אם נקודת הקצה להרשאה זמינה ב-
https://myservice.example.com/auth, בקשה עשויה להיראות כך:
GET https://myservice.example.com/auth?client_id=GOOGLE_CLIENT_ID&redirect_uri=REDIRECT_URI&state=STATE_STRING&response_type=token&user_locale=LOCALE
כדי שנקודת הקצה להרשאה תטפל בבקשות כניסה, צריך לבצע את הפעולות הבאות שלבים:
צריך לאמת את הערכים
client_idו-redirect_uriכדי למנוע הענקת גישה לאפליקציות לקוח לא מכוונות או שהוגדרו באופן שגוי:- צריך לוודא שה-
client_idתואם למזהה הלקוח שהוקצו ל-Google. - מוודאים שכתובת ה-URL שצוינה ב-
redirect_uriנראה כך:https://oauth-redirect.googleusercontent.com/r/YOUR_PROJECT_ID https://oauth-redirect-sandbox.googleusercontent.com/r/YOUR_PROJECT_ID
- צריך לוודא שה-
לבדוק אם המשתמש נכנס לשירות. אם המשתמש לא חתום להשלים את תהליך הכניסה או ההרשמה לשירות.
יוצרים אסימון גישה שבו Google תשתמש כדי לגשת ל-API. אסימון גישה יכול להיות כל ערך מחרוזת, אבל הוא חייב לייצג באופן ייחודי את למשתמש וללקוח שבשבילם האסימון מיועד והם חייבים להיות ניתנים לניחוש.
לשלוח תגובת HTTP שמפנה מחדש את דפדפן המשתמש לכתובת ה-URL צוין על ידי הפרמטר
redirect_uri. יש לכלול את כל את הפרמטרים הבאים בקטע של כתובת ה-URL:access_token: אסימון הגישה שיצרתם כרגעtoken_type: המחרוזתbearerstate: ערך המצב ללא שינוי מהמקור בקשה
הדוגמה הבאה היא של כתובת ה-URL שתתקבל:
https://oauth-redirect.googleusercontent.com/r/YOUR_PROJECT_ID#access_token=ACCESS_TOKEN&token_type=bearer&state=STATE_STRING
ה-handler של Google להפניה אוטומטית מסוג OAuth 2.0 של Google מקבל את אסימון הגישה ומאשר
שהערך של state לא השתנה. לאחר ש-Google קיבלה
אסימון הגישה של השירות שלך, Google מצרפת את האסימון לשיחות הבאות
לממשקי ה-API של השירותים שלכם.
טיפול בבקשות למידע על משתמשים
נקודת הקצה של userinfo היא משאב מוגן ב-OAuth 2.0 שמחזיר תלונות לגבי המשתמש המקושר. ההטמעה והאירוח של נקודת הקצה של userinfo הם אופציונליים, חוץ מאשר בתרחישים הבאים לדוגמה:
- כניסה לחשבון המקושר באמצעות Google One Tap.
- מינוי פשוט וקל ב-AndroidTV.
אחרי שהאחזור של אסימון הגישה מנקודת הקצה של האסימון מתבצע, Google שולחת בקשה לנקודת הקצה (endpoint) של userinfo כדי לאחזר פרטי פרופיל בסיסיים של המשתמש המקושר.
| כותרות של בקשות של נקודות קצה של userinfo | |
|---|---|
Authorization header |
אסימון הגישה מסוג נושא. |
לדוגמה, אם נקודת הקצה של Userinfo זמינה
https://myservice.example.com/userinfo, בקשה עשויה להיראות כך:
GET /userinfo HTTP/1.1
Host: myservice.example.com
Authorization: Bearer ACCESS_TOKEN
כדי שנקודת הקצה של userinfo תטפל בבקשות, מבצעים את השלבים הבאים:
- מחלצים את אסימון הגישה מהכותרת Authorization ומחזירים מידע עבור המשתמש שמשויך לאסימון הגישה.
- אם אסימון הגישה לא חוקי, צריך להחזיר שגיאה מסוג HTTP 401 מאושר עם שימוש בכותרת התגובה
WWW-Authenticate. דוגמה לתגובה עם שגיאה של userinfo:HTTP/1.1 401 Unauthorized WWW-Authenticate: error="invalid_token", error_description="The Access Token expired"
אם אסימון הגישה תקין, מוחזר ותגובת HTTP 200 עם אובייקט ה-JSON הבא בגוף ה-HTTPS תגובה:
{ "sub": "USER_UUID", "email": "EMAIL_ADDRESS", "given_name": "FIRST_NAME", "family_name": "LAST_NAME", "name": "FULL_NAME", "picture": "PROFILE_PICTURE", }תגובה של נקודת הקצה של userinfo subמזהה ייחודי שמזהה את המשתמש במערכת שלכם. emailכתובת האימייל של המשתמש. given_nameאופציונלי: השם הפרטי של המשתמש. family_nameאופציונלי: שם המשפחה של המשתמש. nameאופציונלי: השם המלא של המשתמש. pictureאופציונלי: תמונת פרופיל של המשתמש.
אימות ההטמעה
אפשר לאמת את ההטמעה באמצעות הכלי OAuth 2.0 Playground.
בכלי, מבצעים את הפעולות הבאות:
- לוחצים על Configuration (הגדרה) כדי לפתוח את חלון ההגדרה של OAuth 2.0.
- בשדה תהליך OAuth, בוחרים באפשרות צד הלקוח.
- בשדה נקודות קצה של OAuth, בוחרים באפשרות בהתאמה אישית.
- מציינים את נקודת הקצה (endpoint) של OAuth 2.0 ואת מזהה הלקוח שהקציתם ל-Google בשדות המתאימים.
- בקטע שלב 1, לא בוחרים היקפי גישה של Google. במקום זאת, צריך להשאיר את השדה הזה ריק או להקליד היקף תקין לשרת (או מחרוזת שרירותית אם לא משתמשים בהיקפים של OAuth). בסיום, לוחצים על Authorize API.
- בקטעים שלב 2 ושלב 3, מבצעים את התהליך OAuth 2.0 ומוודאים שכל שלב פועל כמו שצריך.
אפשר לאמת את ההטמעה באמצעות הכלי הדגמה של קישור לחשבון Google.
בכלי, מבצעים את השלבים הבאים:
- לוחצים על הלחצן כניסה באמצעות חשבון Google.
- בוחרים את החשבון שרוצים לקשר.
- מזינים את מזהה השירות.
- אפשר להזין היקף אחד או יותר שלגביו רוצים לבקש גישה.
- לוחצים על התחלת הדגמה.
- כשמופיעה הבקשה, מאשרים את האפשרות להביע הסכמה לדחיית בקשת הקישור.
- מוודאים שאתם מופנים מחדש לפלטפורמה שלכם.