Konta są łączone za pomocą standardowych w branży przepływów niejawnych i kodów autoryzacji OAuth 2.0. Twoja usługa musi obsługiwać punkty końcowe autoryzacji i wymiany tokenów zgodne z OAuth 2.0.
W procesie domyślnym Google otwiera Twój punkt końcowy autoryzacji w przeglądarce użytkownika. Po zalogowaniu się zwracasz do Google długotrwały token dostępu. Ten token dostępu jest teraz dołączany do każdego żądania wysyłanego z Google.
W przepływie kodu autoryzacji musisz użyć 2 punktów końcowych:
Punkt końcowy autoryzacji, który wyświetla interfejs logowania użytkownikom, którzy nie są jeszcze zalogowani. Punkt końcowy autoryzacji tworzy też krótkotrwały kod autoryzacji, aby zarejestrować zgodę użytkownika na żądany dostęp.
Punkt końcowy wymiany tokenów, który odpowiada za 2 rodzaje wymiany:
- Wymienia kod autoryzacji na długotrwały token odświeżania i token dostępu o ograniczonym czasie ważności. Wymiana ta następuje, gdy użytkownik przechodzi przez proces łączenia kont.
- Wymiana długoterminowego tokena odświeżania na krótkoterminowy token dostępu. Wymiana ta ma miejsce, gdy Google potrzebuje nowego tokena dostępu, ponieważ poprzedni wygasł.
Wybierz przepływ OAuth 2.0
Chociaż przepływ domyślnie jest prostszy do wdrożenia, Google zaleca, aby tokeny dostępu wydane w ramach procesu niejawnego nigdy nie wygasały. Dzieje się tak, ponieważ użytkownik musi ponownie połączyć swoje konto po wygaśnięciu tokena w ramach procesu niejawnego. Jeśli ze względów bezpieczeństwa potrzebujesz tokenu z terminem ważności, zdecydowanie zalecamy użycie przepływu kodu autoryzacji.
Wskazówki dotyczące wyglądu
W tej sekcji znajdziesz wymagania dotyczące projektu i zalecenia dotyczące ekranu użytkownika, który hostujesz w ramach procesów łączenia OAuth. Gdy wywoła go aplikacja Google, Twoja platforma wyświetli użytkownikowi stronę logowania do Google i ekran z prośbą o zgodę na połączenie kont. Po wyrażeniu zgody na połączenie kont użytkownik zostaje przekierowany z powrotem do aplikacji Google.
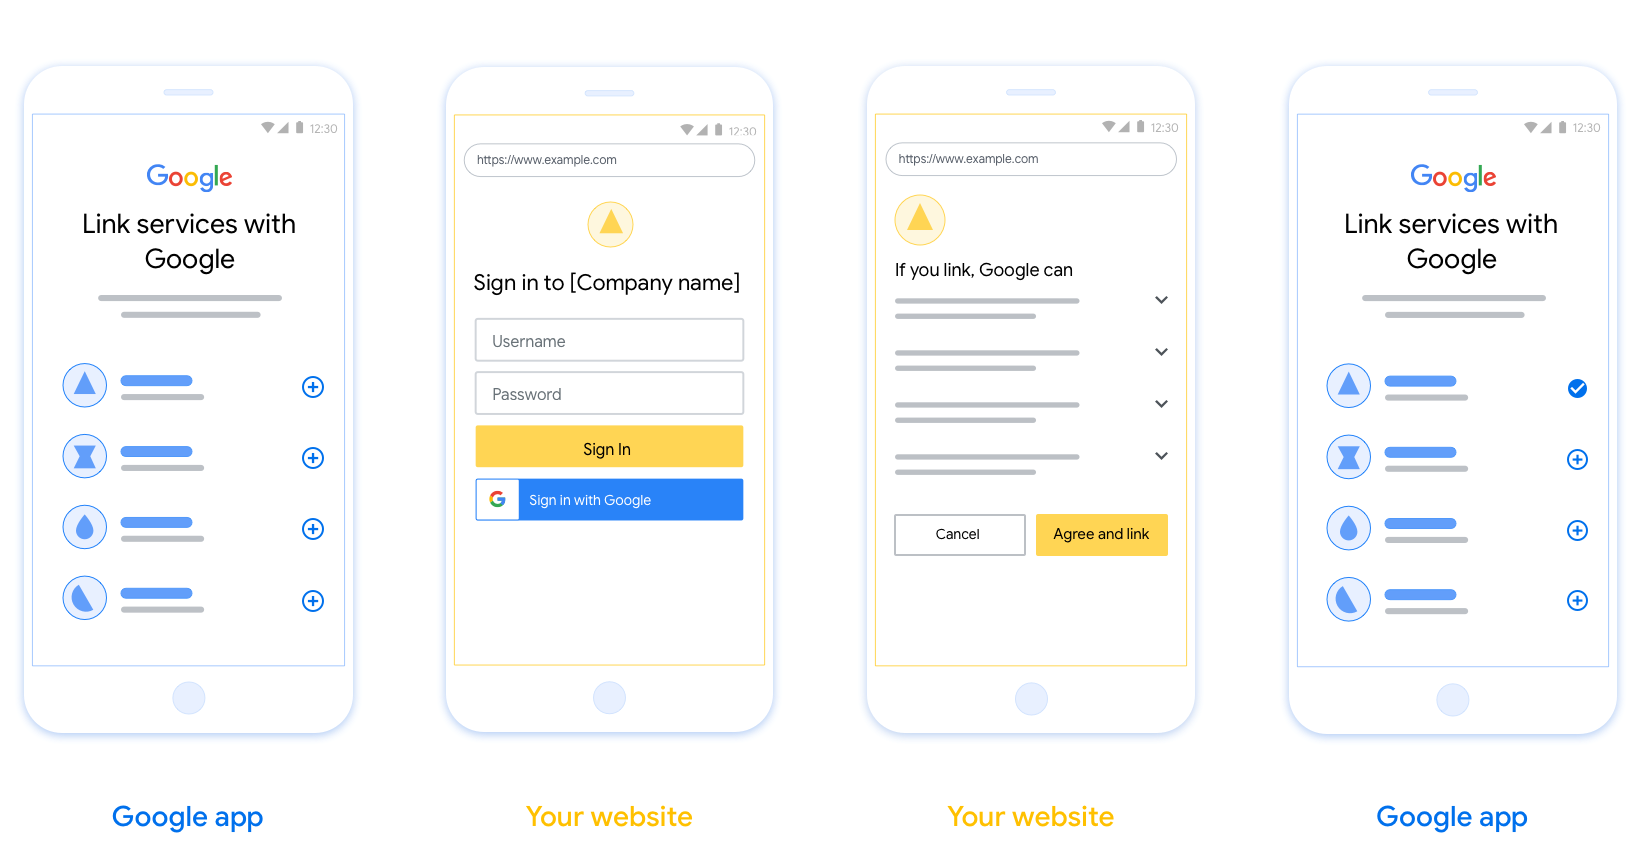
Wymagania
- Musisz poinformować, że konto użytkownika zostanie połączone z Google, a nie z konkretną usługą Google, taką jak Google Home czy Asystent Google.
Rekomendacje
Zalecamy wykonanie tych czynności:
Wyświetlanie Polityki prywatności Google Dodaj link do Polityki prywatności Google na ekranie zgody.
Dane do udostępnienia. Używaj jasnego i zwięzłego języka, aby poinformować użytkownika, jakich danych wymaga Google i dlaczego.
Wyraźne wezwanie do działania. Na ekranie z prośbą o zgodę umieść wyraźne wezwanie do działania, np. „Zgadzam się i chcę połączyć”. Użytkownicy muszą wiedzieć, jakie dane muszą udostępnić Google, aby połączyć swoje konta.
Możliwość anulowania. zapewnienie użytkownikom możliwości powrotu do poprzedniego ekranu lub anulowania połączenia, jeśli nie chcą go nawiązać;
Jednoznaczny proces logowania. Zadbaj o to, aby użytkownicy mieli jasną metodę logowania się na konto Google, np. pola na nazwę użytkownika i hasło lub przycisk Zaloguj się przez Google.
Możliwość odłączenia. Udostępnij użytkownikom mechanizm umożliwiający odłączenie konta, np. adres URL do ustawień konta na Twojej platformie. Możesz też dołączyć link do konta Google, na którym użytkownicy mogą zarządzać połączonym kontem.
Możliwość zmiany konta użytkownika. Zaproponuj użytkownikom sposób przełączania kont. Jest to szczególnie korzystne, jeśli użytkownicy mają tendencję do tworzenia wielu kont.
- Jeśli użytkownik musi zamknąć ekran akceptacji, aby przełączyć się na inne konto, prześlij do Google nieodwracalny błąd, aby użytkownik mógł zalogować się na odpowiednie konto za pomocą linkowania OAuth i przepływu utajonego.
Dołącz logo. Wyświetlać logo firmy na ekranie zgody. Umieść logo na podstawie wytycznych dotyczących stylu. Jeśli chcesz wyświetlać też logo Google, zapoznaj się z artykułem Logotypy i znaki towarowe.

创建项目
如需创建使用账号关联的项目,请执行以下操作:
- 点击 Create project。
- 输入名称或接受生成的建议。
- 确认或修改所有剩余字段。
- 点击创建。
如需查看项目 ID,请执行以下操作:
- 在着陆页的表格中找到您的项目。项目 ID 会显示在 ID 列中。
配置 OAuth 权限请求页面
Google 账号关联流程包含一个权限请求页面,该页面会告知用户哪个应用在请求访问其数据、请求访问哪些类型的数据,以及适用的条款。您需要先配置 OAuth 权限请求页面,然后才能生成 Google API 客户端 ID。
- 打开 Google API 控制台的 OAuth 同意屏幕页面。
- 如果出现提示,请选择您刚刚创建的项目。
在“OAuth 同意屏幕”页面上,填写表单,然后点击“保存”按钮。
应用名称:征求用户同意的应用的名称。名称应准确反映您的应用,并与用户在其他位置看到的应用名称保持一致。应用名称将显示在账号关联权限请求界面上。
应用徽标:权限请求页面上显示的一张图片,用以让用户认出您的应用。徽标会显示在账号关联权限请求页面和账号设置中
支持电子邮件地址:供用户就其同意问题与您联系。
Google API 的范围:借助范围,您的应用可以访问用户的非公开 Google 数据。对于 Google 账号关联使用情形,默认范围(电子邮件地址、个人资料、openid)就足够了,您无需添加任何敏感范围。一般来说,最佳做法是在需要访问权限时逐步请求权限范围,而不是提前请求。了解详情。
已获授权的网域:为了保护您和您的用户,Google 只允许使用 OAuth 进行身份验证的应用使用已获授权的网域。应用的链接必须托管在已获授权的网域上。了解详情。
应用首页链接:应用的首页。必须托管在已获授权的网域上。
应用隐私权政策链接:显示在 Google 账号关联意见征求界面上。必须托管在已获授权的网域上。
应用服务条款链接(可选):必须托管在已获授权的网域上。
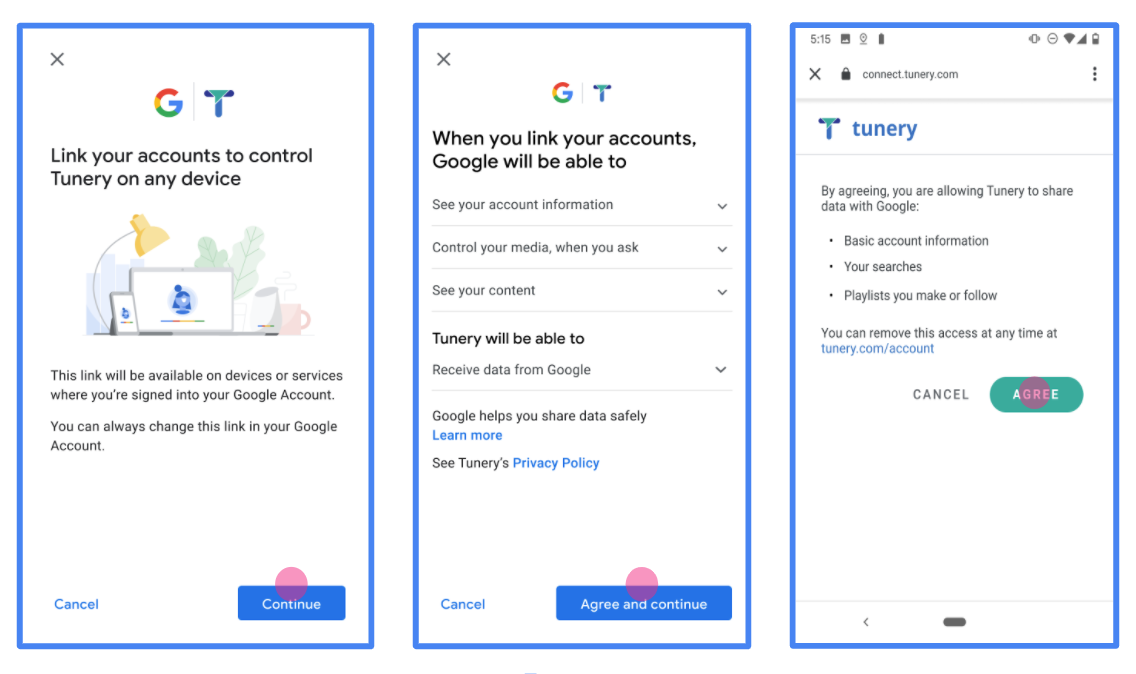
图 1. 虚构应用 Tunery 的 Google 账号关联意见征求界面
查看“验证状态”,如果您的应用需要验证,请点击“提交以供验证”按钮,提交应用以供验证。如需了解详情,请参阅 OAuth 验证要求。
Wdrożenie serwera OAuth
An OAuth 2.0 server implementation of the authorization code flow consists of two endpoints, which your service makes available by HTTPS. The first endpoint is the authorization endpoint, which is responsible for finding or obtaining consent from users for data access. The authorization endpoint presents a sign-in UI to your users that aren't already signed in and records consent to the requested access. The second endpoint is the token exchange endpoint, which is used to obtain encrypted strings, called tokens, that authorize a user to access your service.
When a Google application needs to call one of your service's APIs, Google uses these endpoints together to get permission from your users to call these APIs on their behalf.
An OAuth 2.0 authorization code flow session initiated by Google has the following flow:
- Google opens your authorization endpoint in the user's browser. If the flow started on a voice-only device for an Action, Google transfers the execution to a phone.
- The user signs in, if not signed in already, and grants Google permission to access their data with your API, if they haven't already granted permission.
- Your service creates an authorization code and returns it to Google. To do so, redirect the user's browser back to Google with the authorization code attached to the request.
- Google sends the authorization code to your token exchange endpoint, which verifies the authenticity of the code and returns an access token and a refresh token. The access token is a short-lived token that your service accepts as credentials to access APIs. The refresh token is a long-lived token that Google can store and use to acquire new access tokens when they expire.
- After the user has completed the account linking flow, every subsequent request sent from Google contains an access token.
Handle authorization requests
When you need to perform account linking using the OAuth 2.0 authorization code flow, Google sends the user to your authorization endpoint with a request that includes the following parameters:
| Authorization endpoint parameters | |
|---|---|
client_id |
The Client ID you assigned to Google. |
redirect_uri |
The URL to which you send the response to this request. |
state |
A bookkeeping value that is passed back to Google unchanged in the redirect URI. |
scope |
Optional: A space-delimited set of scope strings that specify the data Google is requesting authorization for. |
response_type |
The type of value to return in the response. For the OAuth 2.0
authorization code flow, the response type is always code.
|
user_locale |
The Google Account language setting in RFC5646 format, used to localize your content in the user's preferred language. |
For example, if your authorization endpoint is available at
https://myservice.example.com/auth, a request might look like the following:
GET https://myservice.example.com/auth?client_id=GOOGLE_CLIENT_ID&redirect_uri=REDIRECT_URI&state=STATE_STRING&scope=REQUESTED_SCOPES&response_type=code&user_locale=LOCALE
For your authorization endpoint to handle sign-in requests, do the following steps:
- Verify that the
client_idmatches the Client ID you assigned to Google, and that theredirect_urimatches the redirect URL provided by Google for your service. These checks are important to prevent granting access to unintended or misconfigured client apps. If you support multiple OAuth 2.0 flows, also confirm that theresponse_typeiscode. - Check if the user is signed in to your service. If the user isn't signed in, complete your service's sign-in or sign-up flow.
- Generate an authorization code for Google to use to access your API. The authorization code can be any string value, but it must uniquely represent the user, the client the token is for, and the code's expiration time, and it must not be guessable. You typically issue authorization codes that expire after approximately 10 minutes.
- Confirm that the URL specified by the
redirect_uriparameter has the following form:https://oauth-redirect.googleusercontent.com/r/YOUR_PROJECT_ID https://oauth-redirect-sandbox.googleusercontent.com/r/YOUR_PROJECT_ID
- Redirect the user's browser to the URL specified by the
redirect_uriparameter. Include the authorization code you just generated and the original, unmodified state value when you redirect by appending thecodeandstateparameters. The following is an example of the resulting URL:https://oauth-redirect.googleusercontent.com/r/YOUR_PROJECT_ID?code=AUTHORIZATION_CODE&state=STATE_STRING
Handle token exchange requests
Your service's token exchange endpoint is responsible for two kinds of token exchanges:
- Exchange authorization codes for access tokens and refresh tokens
- Exchange refresh tokens for access tokens
Token exchange requests include the following parameters:
| Token exchange endpoint parameters | |
|---|---|
client_id |
A string that identifies the request origin as Google. This string must be registered within your system as Google's unique identifier. |
client_secret |
A secret string that you registered with Google for your service. |
grant_type |
The type of token being exchanged. It's either
authorization_code or refresh_token. |
code |
When grant_type=authorization_code, this parameter is the
code Google received from either your sign-in or token exchange
endpoint. |
redirect_uri |
When grant_type=authorization_code, this parameter is the
URL used in the initial authorization request. |
refresh_token |
When grant_type=refresh_token, this parameter is the
refresh token Google received from your token exchange endpoint. |
Exchange authorization codes for access tokens and refresh tokens
After the user signs in and your authorization endpoint returns a short-lived authorization code to Google, Google sends a request to your token exchange endpoint to exchange the authorization code for an access token and a refresh token.
For these requests, the value of grant_type is authorization_code, and the
value of code is the value of the authorization code you previously granted
to Google. The following is an example of a request to exchange an
authorization code for an access token and a refresh token:
POST /token HTTP/1.1
Host: oauth2.example.com
Content-Type: application/x-www-form-urlencoded

client_id=GOOGLE_CLIENT_ID&client_secret=GOOGLE_CLIENT_SECRET&grant_type=authorization_code&code=AUTHORIZATION_CODE&redirect_uri=REDIRECT_URI
To exchange authorization codes for an access token and a refresh token, your
token exchange endpoint responds to POST requests by executing the following
steps:
- Verify that the
client_ididentifies the request origin as an authorized origin, and that theclient_secretmatches the expected value. - Verify that the authorization code is valid and not expired, and that the client ID specified in the request matches the client ID associated with the authorization code.
- Confirm that the URL specified by the
redirect_uriparameter is identical to the value used in the initial authorization request. - If you can't verify all of the above criteria, return an HTTP
400 Bad Request error with
{"error": "invalid_grant"}as the body. - Otherwise, use the user ID from the authorization code to generate a refresh token and an access token. These tokens can be any string value, but they must uniquely represent the user and the client the token is for, and they must not be guessable. For access tokens, also record the expiration time of the token, which is typically an hour after you issue the token. Refresh tokens don't expire.
- Return the following JSON object in the body of the HTTPS response:
{
"token_type": "Bearer",
"access_token": "ACCESS_TOKEN",
"refresh_token": "REFRESH_TOKEN",
"expires_in": SECONDS_TO_EXPIRATION
}
Google stores the access token and the refresh token for the user and records the expiration of the access token. When the access token expires, Google uses the refresh token to get a new access token from your token exchange endpoint.
Exchange refresh tokens for access tokens
When an access token expires, Google sends a request to your token exchange endpoint to exchange a refresh token for a new access token.
For these requests, the value of grant_type is refresh_token, and the value
of refresh_token is the value of the refresh token you previously granted to
Google. The following is an example of a request to exchange a refresh token
for an access token:
POST /token HTTP/1.1
Host: oauth2.example.com
Content-Type: application/x-www-form-urlencoded

client_id=GOOGLE_CLIENT_ID&client_secret=GOOGLE_CLIENT_SECRET&grant_type=refresh_token&refresh_token=REFRESH_TOKEN
To exchange a refresh token for an access token, your token exchange endpoint
responds to POST requests by executing the following steps:
- Verify that the
client_ididentifies the request origin as Google, and that theclient_secretmatches the expected value. - Verify that the refresh token is valid, and that the client ID specified in the request matches the client ID associated with the refresh token.
- If you can't verify all of the above criteria, return an HTTP 400
Bad Request error with
{"error": "invalid_grant"}as the body. - Otherwise, use the user ID from the refresh token to generate an access token. These tokens can be any string value, but they must uniquely represent the user and the client the token is for, and they must not be guessable. For access tokens, also record the expiration time of the token, typically an hour after you issue the token.
- Return the following JSON object in the body of the HTTPS
response:
{
"token_type": "Bearer",
"access_token": "ACCESS_TOKEN",
"expires_in": SECONDS_TO_EXPIRATION
}
处理 userinfo 请求
userinfo 端点是受 OAuth 2.0 保护的资源,会返回关联用户的声明。实现和托管 userinfo 端点是可选的,但以下用例除外:
从您的令牌端点成功检索到访问令牌后,Google 会向您的 userinfo 端点发送请求,以检索关联用户的基本个人资料信息。
| userinfo 端点请求标头 | |
|---|---|
Authorization header |
Bearer 类型的访问令牌。 |
例如,如果您的 userinfo 端点可通过
https://myservice.example.com/userinfo 时,请求可能如下所示:
GET /userinfo HTTP/1.1
Host: myservice.example.com
Authorization: Bearer ACCESS_TOKEN
为了让 userinfo 端点能够处理请求,请执行以下步骤:
- 从 Authorization 标头中提取访问令牌,并返回与访问令牌相关联的用户的信息。
- 如果访问令牌无效,则使用
WWW-Authenticate响应标头返回 HTTP 401 Unauthorized 错误。下面是一个 userinfo 错误响应示例:HTTP/1.1 401 Unauthorized WWW-Authenticate: error="invalid_token", error_description="The Access Token expired"
如果访问令牌有效,则返回 HTTPS 正文中包含以下 JSON 对象的 HTTP 200 响应 回答:
{ "sub": "USER_UUID", "email": "EMAIL_ADDRESS", "given_name": "FIRST_NAME", "family_name": "LAST_NAME", "name": "FULL_NAME", "picture": "PROFILE_PICTURE", }userinfo 端点响应 sub系统中用于识别用户的唯一 ID。 email用户的电子邮件地址。 given_name可选:用户的名字。 family_name可选:用户的姓氏。 name可选:用户的全名。 picture可选:用户的个人资料照片。
Weryfikowanie implementacji
您可以使用 OAuth 2.0 Playground 工具验证您的实现。
在该工具中,执行以下步骤:
- 点击配置 以打开 OAuth 2.0 配置窗口。
- 在 OAuth flow 字段中,选择 Client-side(客户端)。
- 在 OAuth 端点字段中,选择自定义。
- 在相应字段中指定您的 OAuth 2.0 端点和您分配给 Google 的客户端 ID。
- 在第 1 步部分,不要选择任何 Google 范围。请将此字段留空或输入对服务器有效的范围(如果您不使用 OAuth 范围,则可以输入任意字符串)。完成后,点击授权 API。
- 在 Step 2 和 Step 3 部分中,完成 OAuth 2.0 流程,并验证每个步骤是否按预期运行。
您可以使用 Google 账号关联演示版工具验证您的实现。
在该工具中,执行以下步骤:
- 点击使用 Google 账号登录按钮。
- 选择您要关联的账号。
- 输入服务 ID。
- (可选)输入您要请求访问权限的一个或多个范围。
- 点击开始演示。
- 当系统提示时,请确认您同意或拒绝关联请求。
- 确认您已被重定向到您的平台。