使用业界标准 OAuth 2.0 隐式和授权代码流程关联账号。您的服务必须支持符合 OAuth 2.0 标准的授权和令牌交换端点。
在隐式流程中,Google 会在用户的浏览器中打开您的授权端点。成功登录后,您将向 Google 返回一个长期访问令牌。现在,此访问令牌会包含在 Google 发送的每个请求中。
在授权代码流程中,您需要两个端点:
授权端点,用于向尚未登录的用户显示登录界面。授权端点还会创建一个短期授权代码,以记录用户对所请求访问权限的同意情况。
令牌交换端点,负责两种类型的交换:
- 使用授权代码换取长期有效的刷新令牌和短期有效的访问令牌。当用户完成账号关联流程时,就会发生此交换。
- 将长期有效的刷新令牌换成短期有效的访问令牌。当 Google 需要新的访问令牌(因为现有访问令牌已过期)时,就会发生这种交换。
选择 OAuth 2.0 流程
虽然隐式流程更易于实现,但 Google 建议通过隐式流程签发的访问令牌永不过期。这是因为,在隐式流程中,令牌过期后,系统会强制用户重新关联其账号。如果您出于安全考虑需要令牌过期,我们强烈建议您改用授权码流程。
设计准则
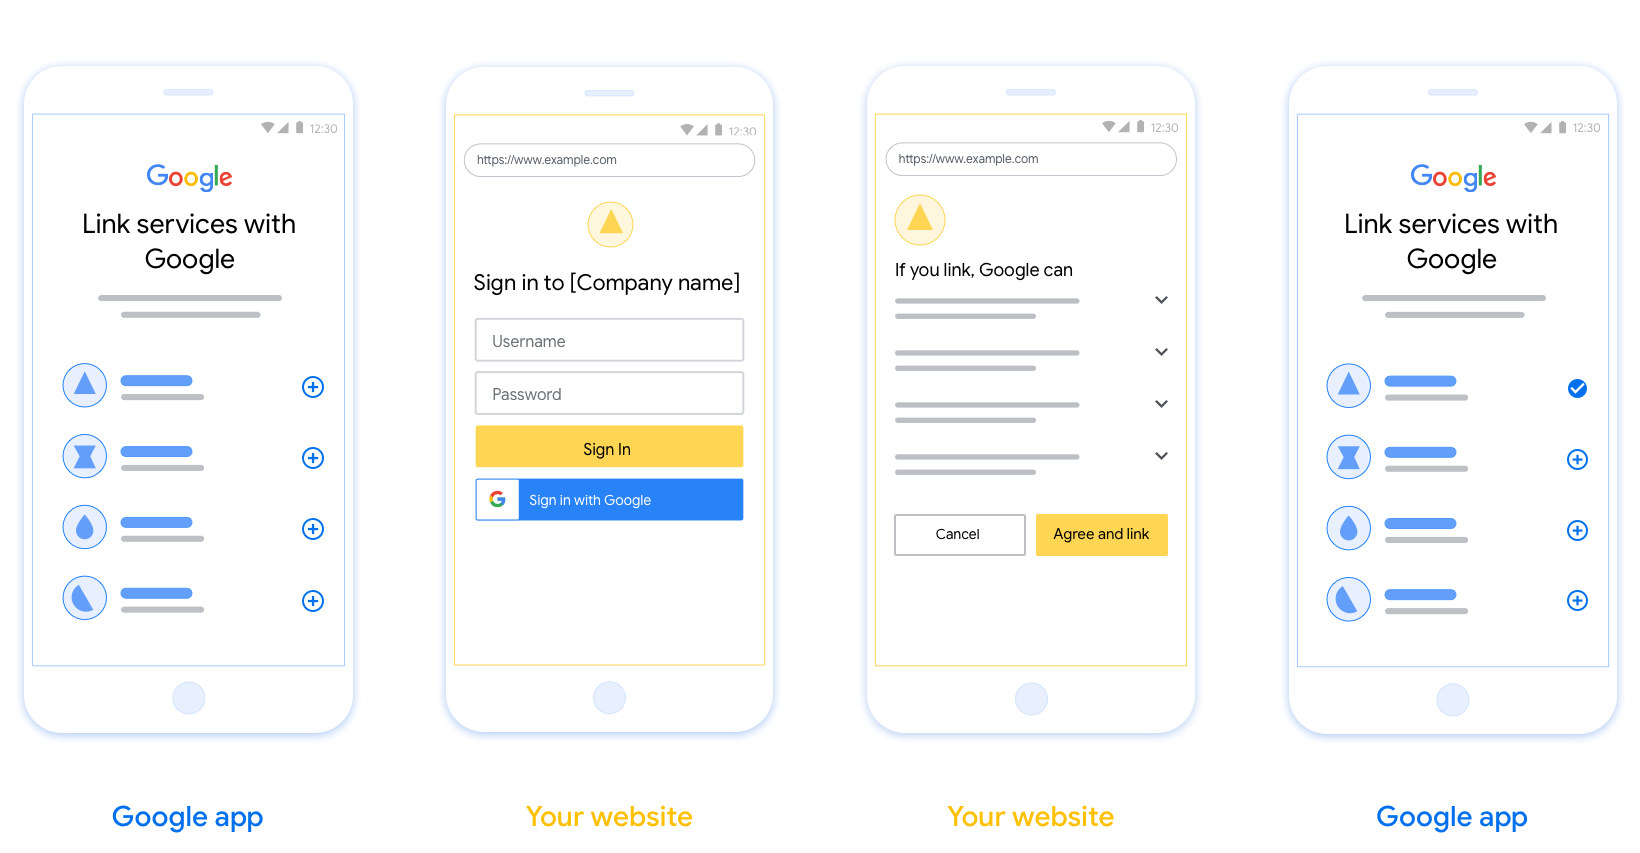
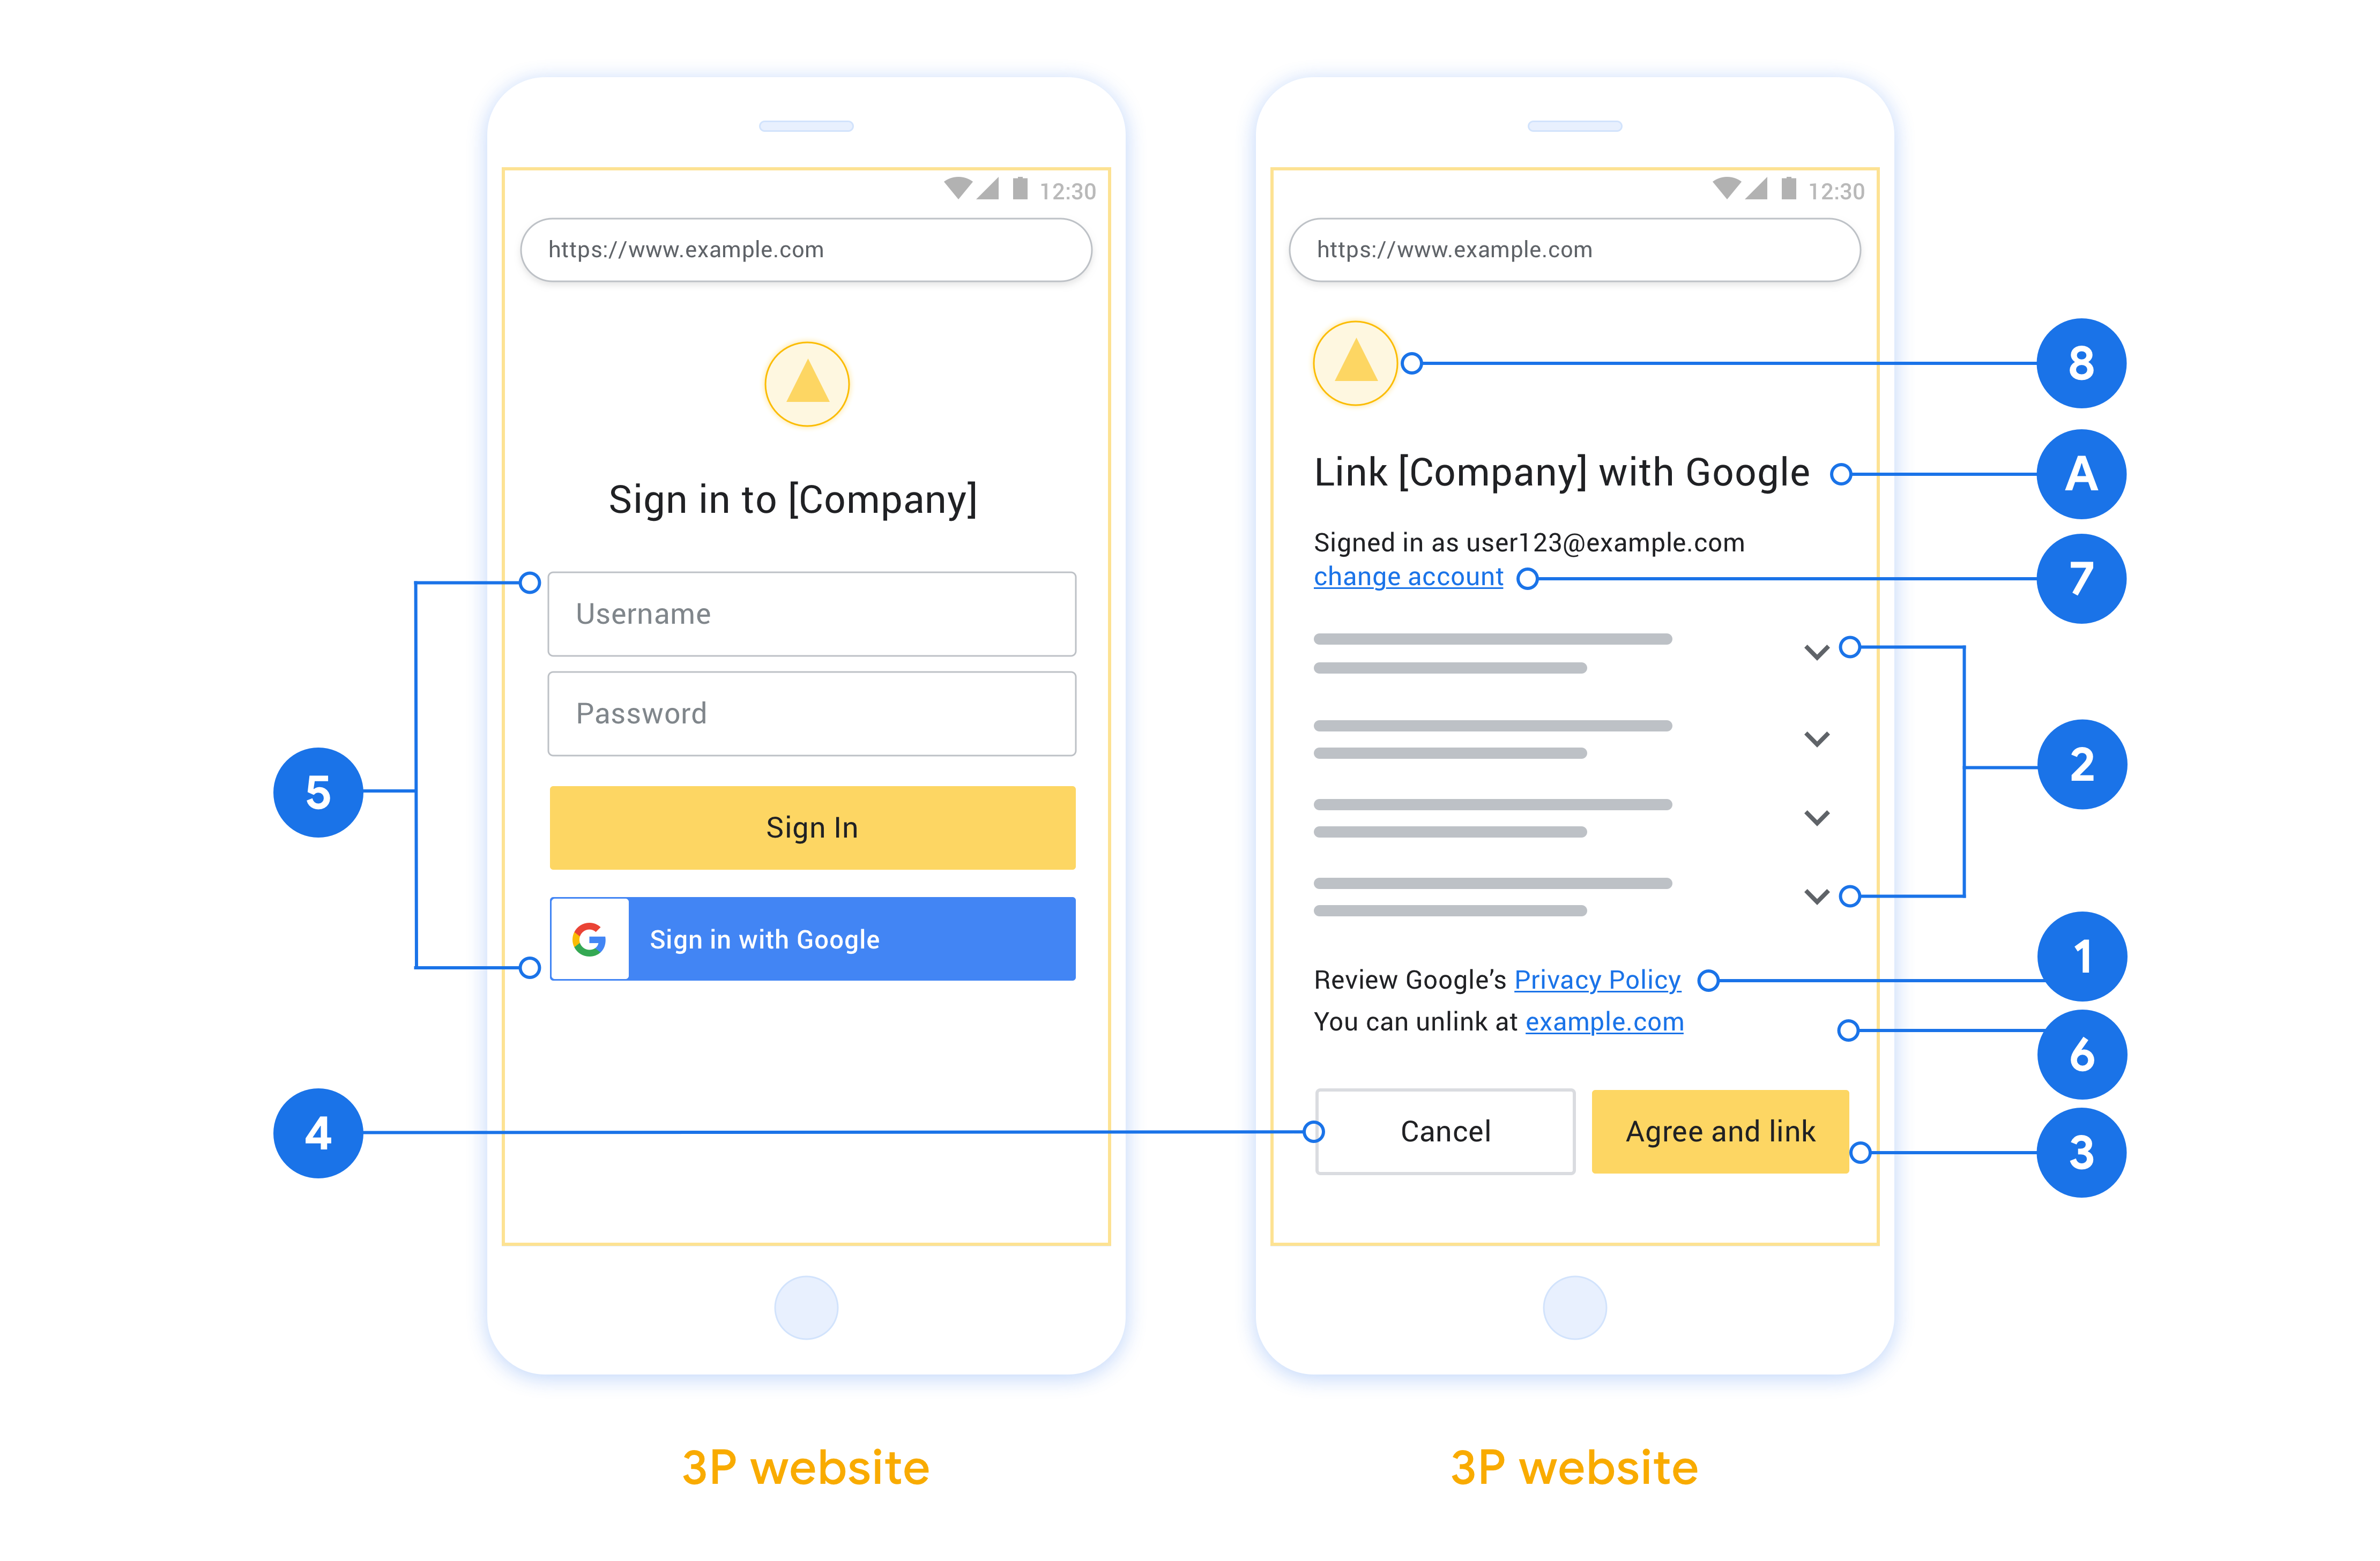
本部分介绍了您为 OAuth 关联流程托管的用户屏幕的设计要求和建议。在 Google 应用调用该 API 后,您的平台会向用户显示登录 Google 页面和账号关联意见征求界面。同意关联账号后,系统会将用户重定向回 Google 的应用。
要求
- 您必须说明用户的账号将与 Google 相关联,而非 Google Home 或 Google 助理等特定 Google 产品相关联。
建议
建议您执行以下操作:
显示 Google 的隐私权政策。在同意屏幕上添加指向 Google 隐私权政策的链接。
要共享的数据。使用清晰简洁的语言告知用户 Google 需要哪些用户数据以及原因。
添加醒目的号召性用语。在用户同意页面上提供明确的号召性用语,例如“同意并关联”。这是因为用户需要了解他们需要与 Google 分享哪些数据才能关联账号。
可以取消。为用户提供返回或取消链接的途径,如果用户选择不进行关联。
明确的登录流程。确保用户有明确的 Google 账号登录方法,例如用户名和密码字段或使用 Google 账号登录。
能够解除关联。提供一种可让用户解除关联的机制,例如指向您平台上账号设置的网址。或者,您也可以添加指向 Google 账号的链接,以便用户管理其关联的账号。
能够更改用户账号。建议用户切换账号的方法。如果用户通常拥有多个账号,这种做法尤为有益。
- 如果用户必须关闭意见征求界面才能切换账号,请向 Google 发送可恢复的错误,以便用户可以使用 OAuth 关联和隐式流程登录所需的账号。
添加您的徽标。在意见征求页面上显示您的公司徽标。 按照您的样式准则放置徽标。如果您还想显示 Google 的徽标,请参阅徽标和商标。
创建项目
如需创建使用账号关联的项目,请执行以下操作:
- 点击 Create project。
- 输入名称或接受生成的建议。
- 确认或修改所有剩余字段。
- 点击创建。
如需查看项目 ID,请执行以下操作:
- 在着陆页的表格中找到您的项目。项目 ID 会显示在 ID 列中。
配置 OAuth 权限请求页面
Google 账号关联流程包含一个权限请求页面,该页面会告知用户哪个应用在请求访问其数据、请求访问哪些类型的数据,以及适用的条款。您需要先配置 OAuth 权限请求页面,然后才能生成 Google API 客户端 ID。
- 打开 Google API 控制台的 OAuth 同意屏幕页面。
- 如果出现提示,请选择您刚刚创建的项目。
在“OAuth 同意屏幕”页面上,填写表单,然后点击“保存”按钮。
应用名称:征求用户同意的应用的名称。名称应准确反映您的应用,并与用户在其他位置看到的应用名称保持一致。应用名称将显示在账号关联权限请求界面上。
应用徽标:权限请求页面上显示的一张图片,用以让用户认出您的应用。徽标会显示在账号关联权限请求页面和账号设置中
支持电子邮件地址:供用户就其同意问题与您联系。
Google API 的范围:借助范围,您的应用可以访问用户的非公开 Google 数据。对于 Google 账号关联使用情形,默认范围(电子邮件地址、个人资料、openid)就足够了,您无需添加任何敏感范围。一般来说,最佳做法是在需要访问权限时逐步请求权限范围,而不是提前请求。了解详情。
已获授权的网域:为了保护您和您的用户,Google 只允许使用 OAuth 进行身份验证的应用使用已获授权的网域。应用的链接必须托管在已获授权的网域上。了解详情。
应用首页链接:应用的首页。必须托管在已获授权的网域上。
应用隐私权政策链接:显示在 Google 账号关联意见征求界面上。必须托管在已获授权的网域上。
应用服务条款链接(可选):必须托管在已获授权的网域上。
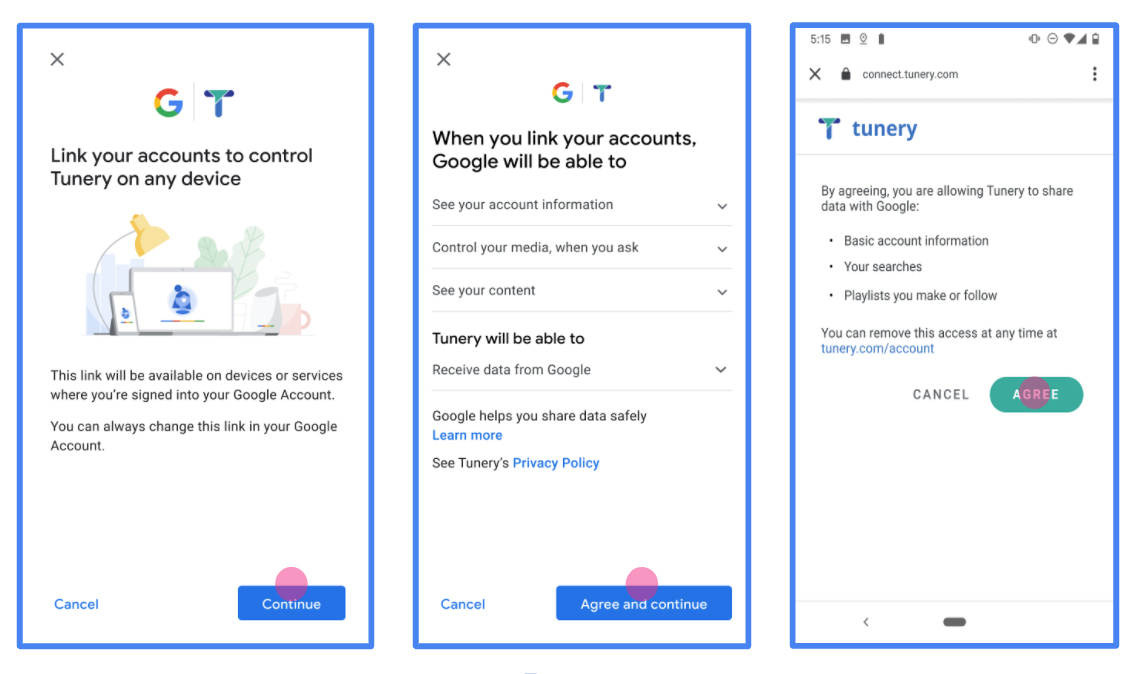
图 1. 虚构应用 Tunery 的 Google 账号关联意见征求界面
查看“验证状态”,如果您的应用需要验证,请点击“提交以供验证”按钮,提交应用以供验证。如需了解详情,请参阅 OAuth 验证要求。
实现 OAuth 服务器
To support the OAuth 2.0 implicit flow, your service makes an authorization endpoint available by HTTPS. This endpoint is responsible for authentication and obtaining consent from users for data access. The authorization endpoint presents a sign-in UI to your users that aren't already signed in and records consent to the requested access.
When a Google application needs to call one of your service's authorized APIs, Google uses this endpoint to get permission from your users to call these APIs on their behalf.
A typical OAuth 2.0 implicit flow session initiated by Google has the following flow:
- Google opens your authorization endpoint in the user's browser. The user signs in, if not signed in already, and grants Google permission to access their data with your API, if they haven't already granted permission.
- Your service creates an access token and returns it to Google. To do so, redirect the user's browser back to Google with the access token attached to the request.
- Google calls your service's APIs and attaches the access token with each request. Your service verifies that the access token grants Google authorization to access the API and then completes the API call.
Handle authorization requests
When a Google application needs to perform account linking via an OAuth 2.0 implicit flow, Google sends the user to your authorization endpoint with a request that includes the following parameters:
| Authorization endpoint parameters | |
|---|---|
client_id |
The client ID you assigned to Google. |
redirect_uri |
The URL to which you send the response to this request. |
state |
A bookkeeping value that is passed back to Google unchanged in the redirect URI. |
response_type |
The type of value to return in the response. For the OAuth 2.0 implicit
flow, the response type is always token. |
user_locale |
The Google Account language setting in RFC5646 format used to localize your content in the user's preferred language. |
For example, if your authorization endpoint is available at
https://myservice.example.com/auth, a request might look like the following:
GET https://myservice.example.com/auth?client_id=GOOGLE_CLIENT_ID&redirect_uri=REDIRECT_URI&state=STATE_STRING&response_type=token&user_locale=LOCALE
For your authorization endpoint to handle sign-in requests, do the following steps:
Verify the
client_idandredirect_urivalues to prevent granting access to unintended or misconfigured client apps:- Confirm that the
client_idmatches the client ID you assigned to Google. - Confirm that the URL specified by the
redirect_uriparameter has the following form:https://oauth-redirect.googleusercontent.com/r/YOUR_PROJECT_ID https://oauth-redirect-sandbox.googleusercontent.com/r/YOUR_PROJECT_ID
- Confirm that the
Check if the user is signed in to your service. If the user isn't signed in, complete your service's sign-in or sign-up flow.
Generate an access token for Google to use to access your API. The access token can be any string value, but it must uniquely represent the user and the client the token is for and must not be guessable.
Send an HTTP response that redirects the user's browser to the URL specified by the
redirect_uriparameter. Include all of the following parameters in the URL fragment:access_token: The access token you just generatedtoken_type: The stringbearerstate: The unmodified state value from the original request
The following is an example of the resulting URL:
https://oauth-redirect.googleusercontent.com/r/YOUR_PROJECT_ID#access_token=ACCESS_TOKEN&token_type=bearer&state=STATE_STRING
Google's OAuth 2.0 redirect handler receives the access token and confirms
that the state value hasn't changed. After Google has obtained an
access token for your service, Google attaches the token to subsequent calls
to your service APIs.
处理 userinfo 请求
userinfo 端点是受 OAuth 2.0 保护的资源,会返回关联用户的声明。实现和托管 userinfo 端点是可选的,但以下用例除外:
从您的令牌端点成功检索到访问令牌后,Google 会向您的 userinfo 端点发送请求,以检索关联用户的基本个人资料信息。
| userinfo 端点请求标头 | |
|---|---|
Authorization header |
Bearer 类型的访问令牌。 |
例如,如果您的 userinfo 端点可通过
https://myservice.example.com/userinfo 时,请求可能如下所示:
GET /userinfo HTTP/1.1
Host: myservice.example.com
Authorization: Bearer ACCESS_TOKEN
为了让 userinfo 端点能够处理请求,请执行以下步骤:
- 从 Authorization 标头中提取访问令牌,并返回与访问令牌相关联的用户的信息。
- 如果访问令牌无效,则使用
WWW-Authenticate响应标头返回 HTTP 401 Unauthorized 错误。下面是一个 userinfo 错误响应示例:HTTP/1.1 401 Unauthorized WWW-Authenticate: error="invalid_token", error_description="The Access Token expired"
如果访问令牌有效,则返回 HTTPS 正文中包含以下 JSON 对象的 HTTP 200 响应 回答:
{ "sub": "USER_UUID", "email": "EMAIL_ADDRESS", "given_name": "FIRST_NAME", "family_name": "LAST_NAME", "name": "FULL_NAME", "picture": "PROFILE_PICTURE", }userinfo 端点响应 sub系统中用于识别用户的唯一 ID。 email用户的电子邮件地址。 given_name可选:用户的名字。 family_name可选:用户的姓氏。 name可选:用户的全名。 picture可选:用户的个人资料照片。
验证您的实现
您可以使用 OAuth 2.0 Playground 工具验证您的实现。
在该工具中,执行以下步骤:
- 点击配置 以打开 OAuth 2.0 配置窗口。
- 在 OAuth flow 字段中,选择 Client-side(客户端)。
- 在 OAuth 端点字段中,选择自定义。
- 在相应字段中指定您的 OAuth 2.0 端点和您分配给 Google 的客户端 ID。
- 在第 1 步部分,不要选择任何 Google 范围。请将此字段留空或输入对服务器有效的范围(如果您不使用 OAuth 范围,则可以输入任意字符串)。完成后,点击授权 API。
- 在 Step 2 和 Step 3 部分中,完成 OAuth 2.0 流程,并验证每个步骤是否按预期运行。
您可以使用 Google 账号关联演示版工具验证您的实现。
在该工具中,执行以下步骤:
- 点击使用 Google 账号登录按钮。
- 选择您要关联的账号。
- 输入服务 ID。
- (可选)输入您要请求访问权限的一个或多个范围。
- 点击开始演示。
- 当系统提示时,请确认您同意或拒绝关联请求。
- 确认您已被重定向到您的平台。