Hesaplar, endüstri standardı OAuth 2.0 dolaylı ve yetkilendirme kodu akışları kullanılarak bağlanır. Hizmetiniz, OAuth 2.0 uyumlu yetkilendirme ve jeton değişimi uç noktalarını desteklemelidir.
In the implicit flow, Google opens your authorization endpoint in the user's browser. After successful sign in, you return a long-lived access token to Google. This access token is now included in every request sent from Google.
In the authorization code flow, you need two endpoints:
The authorization endpoint, which presents the sign-in UI to your users that aren't already signed in. The authorization endpoint also creates a short-lived authorization code to record users' consent to the requested access.
The token exchange endpoint, which is responsible for two types of exchanges:
- Exchanges an authorization code for a long-lived refresh token and a short-lived access token. This exchange happens when the user goes through the account linking flow.
- Exchanges a long-lived refresh token for a short-lived access token. This exchange happens when Google needs a new access token because the one it had expired.
Choose an OAuth 2.0 flow
Although the implicit flow is simpler to implement, Google recommends that access tokens issued by the implicit flow never expire. This is because the user is forced to link their account again after a token expires with the implicit flow. If you need token expiration for security reasons, we strongly recommend that you use the authorization code flow instead.
Design guidelines
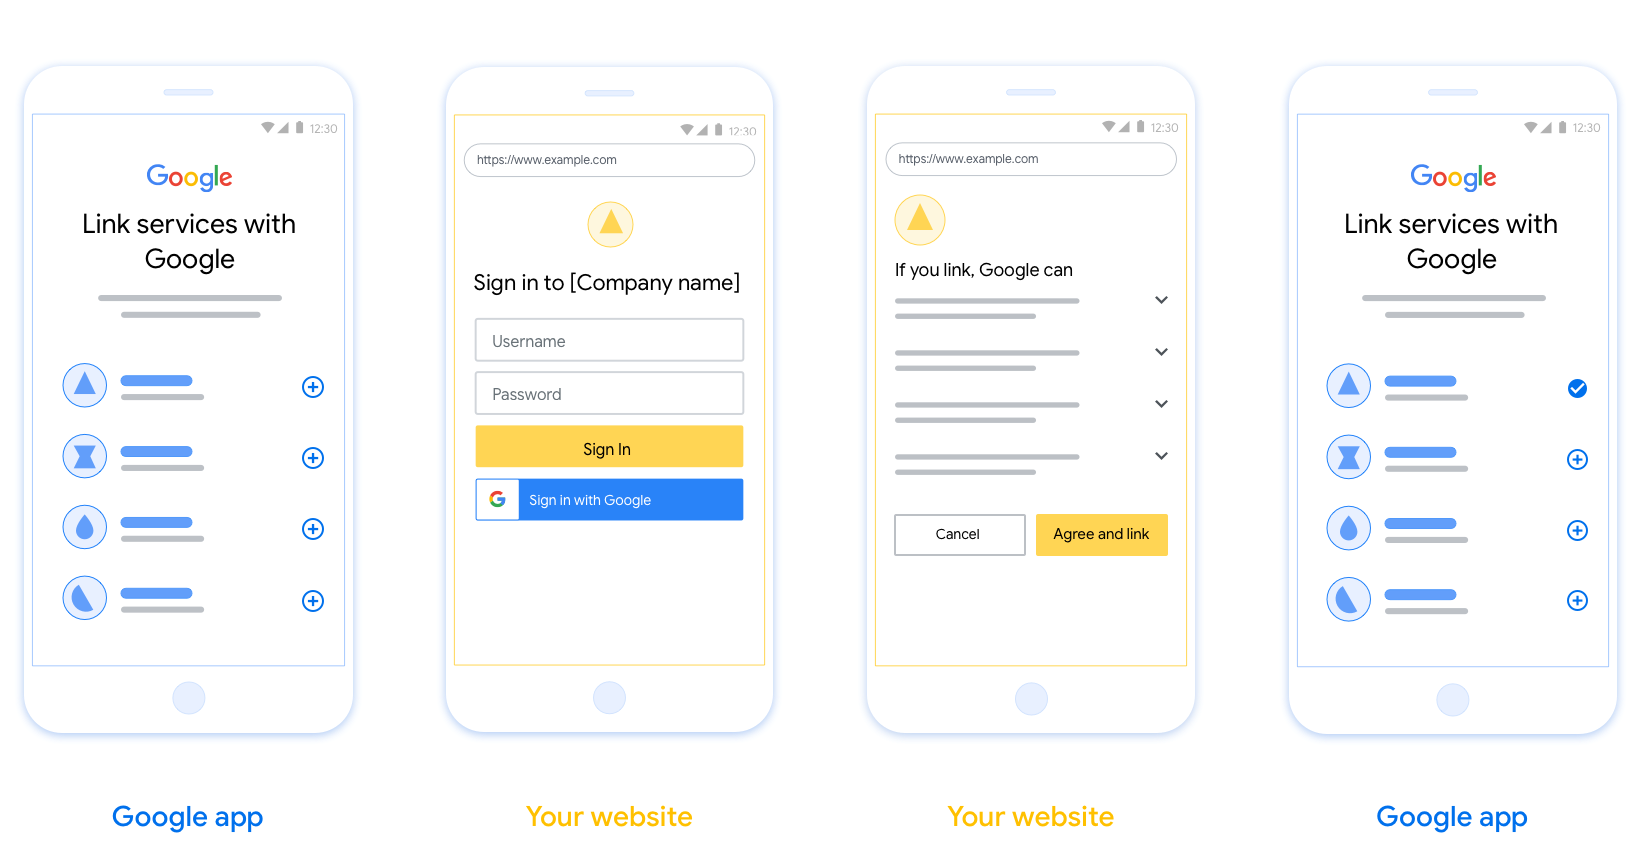
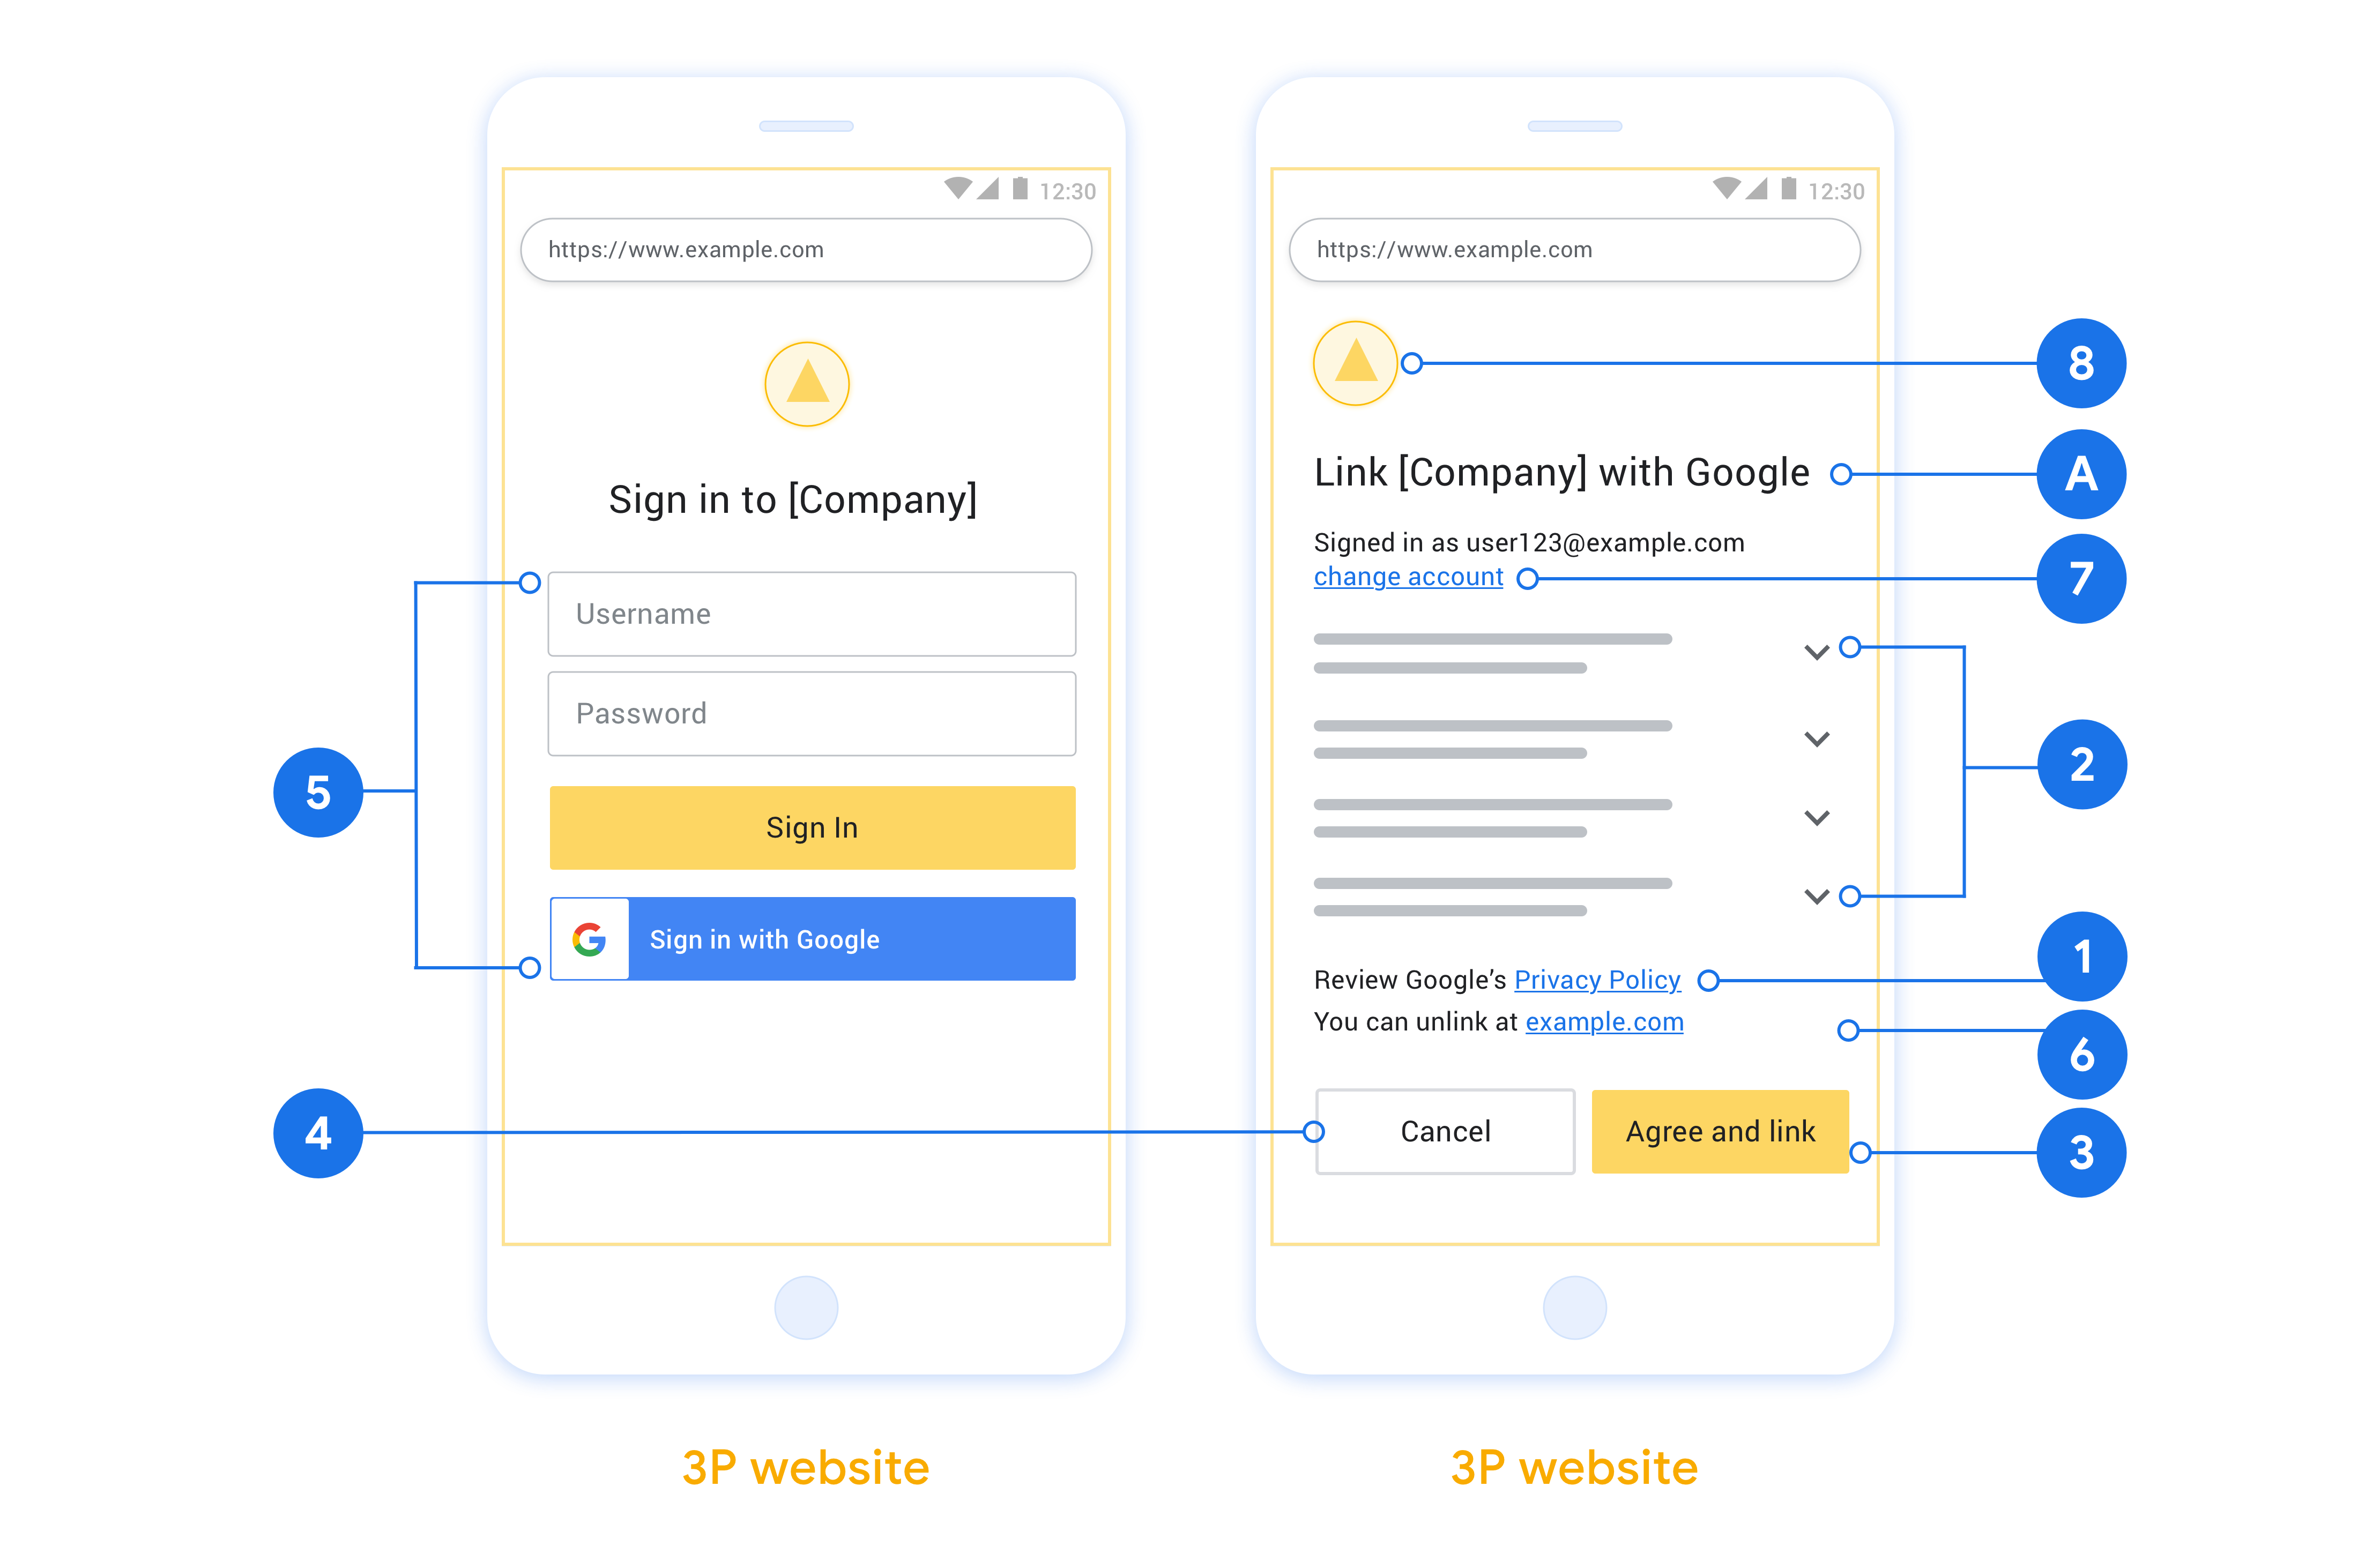
This section describes the design requirements and recommendations for the user screen that you host for OAuth linking flows. After it's called by Google's app, your platform displays a sign in to Google page and account linking consent screen to the user. The user is directed back to Google's app after giving their consent to link accounts.
Requirements
- You must communicate that the user’s account will be linked to Google, not a specific Google product like Google Home or Google Assistant.
Recommendations
We recommend that you do the following:
Display Google's Privacy Policy. Include a link to Google’s Privacy Policy on the consent screen.
Data to be shared. Use clear and concise language to tell the user what data of theirs Google requires and why.
Clear call-to-action. State a clear call-to-action on your consent screen, such as “Agree and link.” This is because users need to understand what data they're required to share with Google to link their accounts.
Ability to cancel. Provide a way for users to go back or cancel, if they choose not to link.
Clear sign-in process. Ensure that users have clear method for signing in to their Google account, such as fields for their username and password or Sign in with Google.
Ability to unlink. Offer a mechanism for users to unlink, such as a URL to their account settings on your platform. Alternatively, you can include a link to Google Account where users can manage their linked account.
Ability to change user account. Suggest a method for users to switch their account(s). This is especially beneficial if users tend to have multiple accounts.
- If a user must close the consent screen to switch accounts, send a recoverable error to Google so the user can sign in to the desired account with OAuth linking and the implicit flow.
Include your logo. Display your company logo on the consent screen. Use your style guidelines to place your logo. If you wish to also display Google's logo, see Logos and trademarks.
Create the project
To create your project to use account linking:
Configure your OAuth Consent Screen
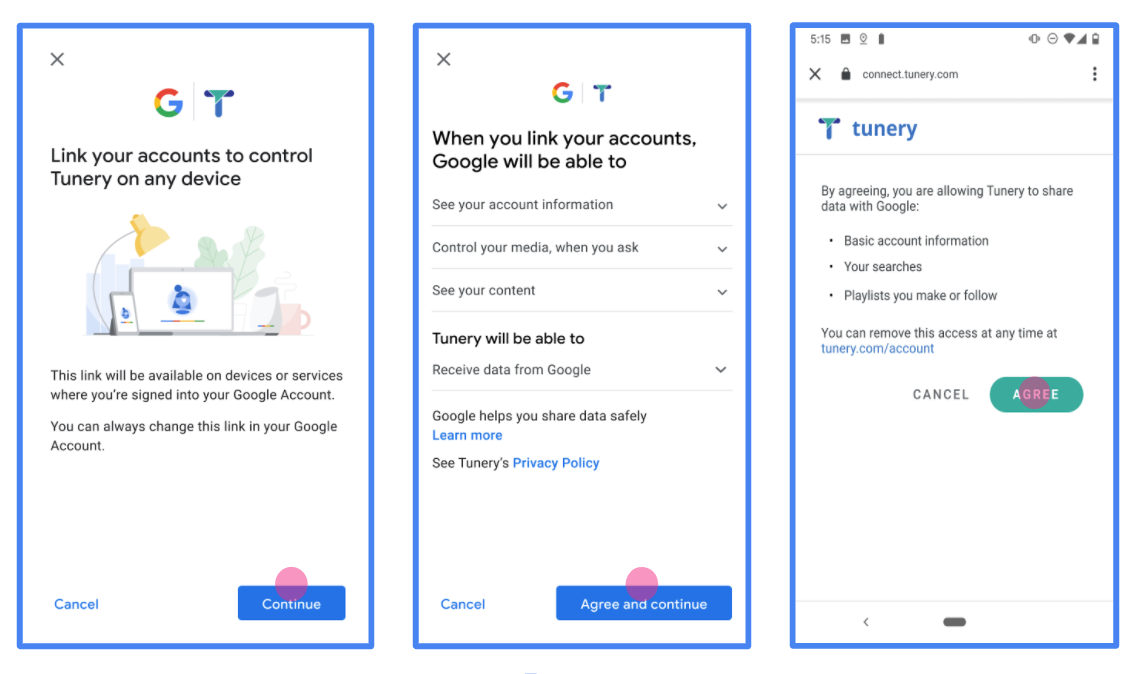
The Google Account Linking process includes a consent screen which tells users the application requesting access to their data, what kind of data they are asking for and the terms that apply. You will need to configure your OAuth consent screen before generating a Google API client ID.
- Open the OAuth consent screen page of the Google APIs console.
- If prompted, select the project you just created.
On the "OAuth consent screen" page, fill out the form and click the “Save” button.
Application name: The name of the application asking for consent. The name should accurately reflect your application and be consistent with the application name users see elsewhere. The application name will be shown on the Account Linking consent screen.
Application logo: An image on the consent screen that will help users recognize your app. The logo is shown on Account linking consent screen and on account settings
Support email: For users to contact you with questions about their consent.
Scopes for Google APIs: Scopes allow your application to access your user's private Google data. For the Google Account Linking use case, default scope (email, profile, openid) is sufficient, you don’t need to add any sensitive scopes. It is generally a best practice to request scopes incrementally, at the time access is required, rather than up front. Learn more.
Authorized domains: To protect you and your users, Google only allows applications that authenticate using OAuth to use Authorized Domains. Your applications' links must be hosted on Authorized Domains. Learn more.
Application Homepage link: Home page for your application. Must be hosted on an Authorized Domain.
Application Privacy Policy link: Shown on Google Account Linking consent screen. Must be hosted on an Authorized Domain.
Application Terms of Service link (Optional): Must be hosted on an Authorized Domain.
Figure 1. Google Account Linking Consent Screen for a fictitious Application, Tunery
Check "Verification Status", if your application needs verification then click the "Submit For Verification" button to submit your application for verification. Refer to OAuth verification requirements for details.
OAuth sunucunuzu uygulama
OAuth 2.0 dolaylı akışını desteklemek için hizmetiniz bir yetkilendirme yapar uç nokta ile kullanılabilir. Bu uç nokta, kimlik doğrulama ve güvenlikten ve verilere erişim için kullanıcılardan izin alınması gerekir. Yetkilendirme uç noktası Henüz oturum açmamış kullanıcılarınıza bir oturum açma kullanıcı arayüzü sunar ve istenen erişim için izin verin.
Bir Google uygulamasının, hizmetinizin yetkili API'lerinden birini çağırması gerektiğinde Google, bu API'leri çağırmak amacıyla kullanıcılarınızdan izin almak için bu uç noktayı kullanır oluşturabilirsiniz.
Google tarafından başlatılan tipik bir OAuth 2.0 örtülü akış oturumunda, takip eden akış:
- Google, yetkilendirme uç noktanızı kullanıcının tarayıcısında açar. İlgili içeriği oluşturmak için kullanılan kullanıcı oturum açmış değilse oturum açar ve Google'a şunu yapması için izin verir: Henüz izin vermediyse verilerine API'nizle erişme.
- Hizmetiniz bir erişim jetonu oluşturur ve bu jetonu Google'a dokunun. Bunun için, kullanıcının tarayıcısını yeniden erişim iznine sahip Google'a yönlendirin. isteğe ekli jeton.
- Google, hizmetinizin API'lerini çağırır ve erişim jetonunu dikkat edin. Hizmetiniz, erişim jetonunun Google'a ve ardından API çağrısını tamamlar.
Yetkilendirme isteklerini işleme
Bir Google uygulamasının, OAuth 2.0 aracılığıyla hesap bağlama işlemi gerçekleştirmesi gerektiğinde gizli akış kullanıyorsanız Google, kullanıcıyı bir isteği gönderin:
Yetkilendirme uç noktası parametreleri | |
---|---|
client_id |
Google'a atadığınız istemci kimliği. |
redirect_uri |
Bu isteğe yanıt gönderdiğiniz URL. |
state |
yönlendirme URI'si. |
response_type |
Yanıtta döndürülecek değerin türü. OAuth 2.0 dolaylı için
akışında, yanıt türü her zaman token olur. |
user_locale |
Google Hesabı dil ayarı RFC5646 biçimi, içeriğinizi kullanıcının tercih ettiği dilde yerelleştirmek için kullanılır. |
Örneğin, yetkilendirme uç noktanız
https://myservice.example.com/auth
, talep aşağıdaki gibi görünebilir:
GET https://myservice.example.com/auth?client_id=GOOGLE_CLIENT_ID&redirect_uri=REDIRECT_URI&state=STATE_STRING&response_type=token&user_locale=LOCALE
Yetkilendirme uç noktanızın oturum açma isteklerini işlemesi için aşağıdakileri yapın için şu adımları izleyin:
Aşağıdaki işlemler için
client_id
veredirect_uri
değerlerini doğrulayın: istenmeyen veya yanlış yapılandırılmış istemci uygulamalarına erişim verilmesini önleyin:client_id
değerinin, kullandığınız istemci kimliğiyle eşleştiğini doğrulayın Google'a atanmıştır.redirect_uri
tarafından belirtilen URL'yi doğrulayın parametresi aşağıdaki biçimdedir:https://oauth-redirect.googleusercontent.com/r/YOUR_PROJECT_ID https://oauth-redirect-sandbox.googleusercontent.com/r/YOUR_PROJECT_ID
Kullanıcının hizmetinizde oturum açıp açmadığını kontrol edin. Kullanıcı oturum açmamışsa hizmetinizin oturum açma veya kaydolma akışını tamamlayın.
Google'ın API'nize erişmek için kullanacağı bir erişim jetonu oluşturun. İlgili içeriği oluşturmak için kullanılan erişim jetonu herhangi bir dize değeri olabilir, ancak jetonun ait olduğu ve tahmin edilememesi gerekir.
Kullanıcının tarayıcısını URL'ye yönlendiren bir HTTP yanıtı gönderme
redirect_uri
parametresiyle belirtilir. Aşağıdakilerin tümünü dahil edin: aşağıdaki parametreleri kullanabilirsiniz:access_token
: Az önce oluşturduğunuz erişim jetonutoken_type
:bearer
dizesistate
: Orijinal durumdaki değiştirilmemiş durum değeri istek
Sonuçta elde edilen URL'nin bir örneği aşağıda verilmiştir:
https://oauth-redirect.googleusercontent.com/r/YOUR_PROJECT_ID#access_token=ACCESS_TOKEN&token_type=bearer&state=STATE_STRING
Google'ın OAuth 2.0 yönlendirme işleyicisi, erişim jetonunu alır ve
state
değerinin değişmediğinden emin olun. Google,
hizmetiniz için erişim jetonu kullanıyorsanız Google, jetonu sonraki çağrılara ekler
kullanıma sunun.
Handle userinfo requests
The userinfo endpoint is an OAuth 2.0 protected resource that return claims about the linked user. Implementing and hosting the userinfo endpoint is optional, except for the following use cases:
- Linked Account Sign-In with Google One Tap.
- Frictionless subscription on AndroidTV.
After the access token has been successfully retrieved from your token endpoint, Google sends a request to your userinfo endpoint to retrieve basic profile information about the linked user.
userinfo endpoint request headers | |
---|---|
Authorization header |
The access token of type Bearer. |
For example, if your userinfo endpoint is available at
https://myservice.example.com/userinfo
, a request might look like the following:
GET /userinfo HTTP/1.1 Host: myservice.example.com Authorization: Bearer ACCESS_TOKEN
For your userinfo endpoint to handle requests, do the following steps:
- Extract access token from the Authorization header and return information for the user associated with the access token.
- If the access token is invalid, return an HTTP 401 Unauthorized error with using the
WWW-Authenticate
Response Header. Below is an example of a userinfo error response: If a 401 Unauthorized, or any other unsuccessful error response is returned during the linking process, the error will be non-recoverable, the retrieved token will be discarded and the user will have to initiate the linking process again.HTTP/1.1 401 Unauthorized WWW-Authenticate: error="invalid_token", error_description="The Access Token expired"
If the access token is valid, return and HTTP 200 response with the following JSON object in the body of the HTTPS response:
If your userinfo endpoint returns an HTTP 200 success response, the retrieved token and claims are registered against the user's Google account.{ "sub": "USER_UUID", "email": "EMAIL_ADDRESS", "given_name": "FIRST_NAME", "family_name": "LAST_NAME", "name": "FULL_NAME", "picture": "PROFILE_PICTURE", }
userinfo endpoint response sub
A unique ID that identifies the user in your system. email
Email address of the user. given_name
Optional: First name of the user. family_name
Optional: Last name of the user. name
Optional: Full name of the user. picture
Optional: Profile picture of the user.
Uygulamanızı doğrulama
You can validate your implementation by using the OAuth 2.0 Playground tool.
In the tool, do the following steps:
- Click Configuration to open the OAuth 2.0 Configuration window.
- In the OAuth flow field, select Client-side.
- In the OAuth Endpoints field, select Custom.
- Specify your OAuth 2.0 endpoint and the client ID you assigned to Google in the corresponding fields.
- In the Step 1 section, don't select any Google scopes. Instead, leave this field blank or type a scope valid for your server (or an arbitrary string if you don't use OAuth scopes). When you're done, click Authorize APIs.
- In the Step 2 and Step 3 sections, go through the OAuth 2.0 flow and verify that each step works as intended.
You can validate your implementation by using the Google Account Linking Demo tool.
In the tool, do the following steps:
- Click the Sign-in with Google button.
- Choose the account you'd like to link.
- Enter the service ID.
- Optionally enter one or more scopes that you will request access for.
- Click Start Demo.
- When prompted, confirm that you may consent and deny the linking request.
- Confirm that you are redirected to your platform.