账号关联使用行业标准 OAuth 2.0 授权代码流程。
适用于代理的 OAuth 2.1 和 PKCE
对于无状态 AI 代理和多模态流水线,建议强制执行 OAuth 2.1。
- PKCE(用于代码交换的证明密钥):必须用于保护授权代码流程,防止拦截攻击。
- 无隐式流程:隐式流程会在网址中公开访问令牌,这对于代理环境而言是一种安全风险。
您的服务必须支持符合 OAuth 2.0/2.1 标准的授权和令牌交换端点。
Create the project
To create your project to use account linking:
- Go to the Google API Console.
- Click Create project.
- Enter a name or accept the generated suggestion.
- Confirm or edit any remaining fields.
- Click Create.
To view your project ID:
- Go to the Google API Console.
- Find your project in the table on the landing page. The project ID appears in the ID column.
Configure your OAuth Consent Screen
The Google Account Linking process includes a consent screen which tells users the application requesting access to their data, what kind of data they are asking for and the terms that apply. You will need to configure your OAuth consent screen before generating a Google API client ID.
- Open the OAuth consent screen page of the Google APIs console.
- If prompted, select the project you just created.
On the "OAuth consent screen" page, fill out the form and click the “Save” button.
Application name: The name of the application asking for consent. The name should accurately reflect your application and be consistent with the application name users see elsewhere. The application name will be shown on the Account Linking consent screen.
Application logo: An image on the consent screen that will help users recognize your app. The logo is shown on Account linking consent screen and on account settings
Support email: For users to contact you with questions about their consent.
Scopes for Google APIs: Scopes allow your application to access your user's private Google data. For the Google Account Linking use case, default scope (email, profile, openid) is sufficient, you don’t need to add any sensitive scopes. It is generally a best practice to request scopes incrementally, at the time access is required, rather than up front. Learn more.
Authorized domains: To protect you and your users, Google only allows applications that authenticate using OAuth to use Authorized Domains. Your applications' links must be hosted on Authorized Domains. Learn more.
Application Homepage link: Home page for your application. Must be hosted on an Authorized Domain.
Application Privacy Policy link: Shown on Google Account Linking consent screen. Must be hosted on an Authorized Domain.
Application Terms of Service link (Optional): Must be hosted on an Authorized Domain.
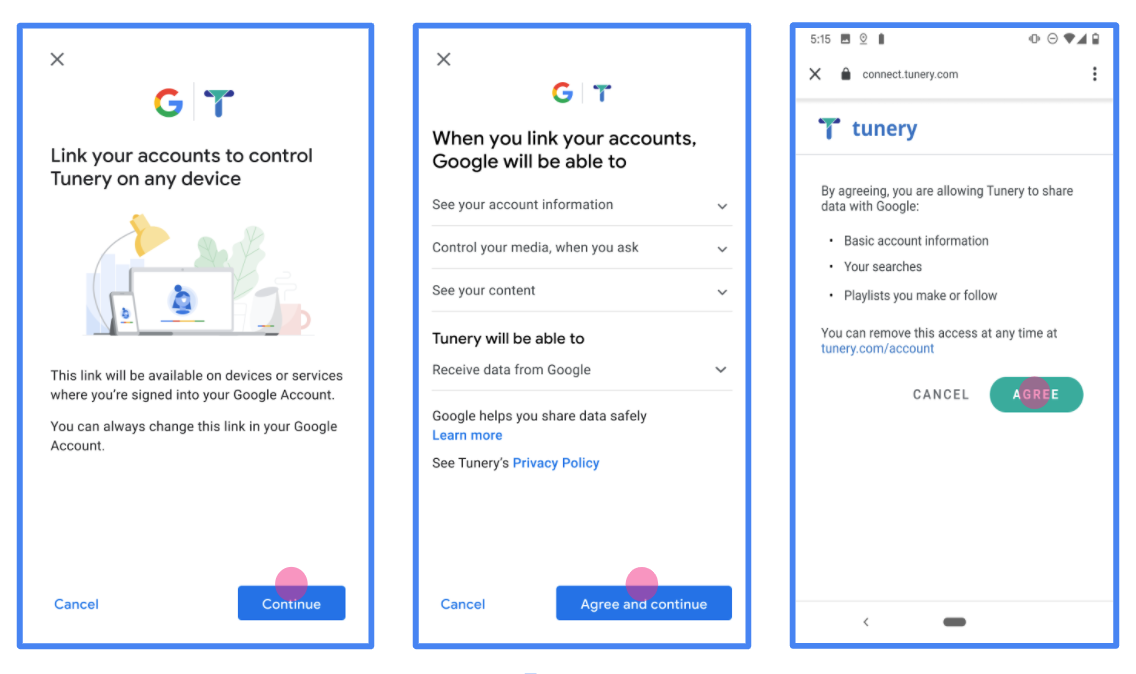
Figure 1. Google Account Linking Consent Screen for a fictitious Application, Tunery
Check "Verification Status", if your application needs verification then click the "Submit For Verification" button to submit your application for verification. Refer to OAuth verification requirements for details.
实现 OAuth 服务器
OAuth 2.0 服务器的 授权代码流程实现包含两个端点,您的服务通过 HTTPS 提供这两个端点。第一个端点是授权端点,负责查找用户或征得用户同意以获取数据访问权限。授权端点会向尚未登录的用户显示登录界面,并记录用户对所请求访问权限的同意情况。第二个端点是令牌交换端点,用于获取加密字符串(称为令牌),这些令牌授权用户访问您的服务。
当 Google 应用需要调用您服务的某个 API 时,Google 会同时使用这些端点,以获取用户授权代表他们调用这些 API。
Google 账号关联:OAuth 授权代码流程
以下序列图详细介绍了用户、Google 和您服务的端点之间的交互。
角色和职责
下表定义了 Google 账号关联 (GAL) OAuth 流程中参与者的角色和职责。请注意,在 GAL 中,Google 充当 OAuth 客户端 ,而您的服务充当 身份/服务提供方 。
| 参与者 / 组件 | GAL 角色 | 职责 |
|---|---|---|
| Google 应用 / 服务器 | OAuth 客户端 | 发起流程,接收授权代码,将其交换为 令牌,并安全地存储这些令牌以访问您服务的 API。 |
| 您的授权端点 | 授权服务器 | 对用户进行身份验证,并征得用户同意与 Google 分享其数据访问权限。 |
| 您的令牌交换端点 | 授权服务器 | 验证授权代码和刷新令牌,并向 Google 服务器颁发访问 令牌。 |
| Google 重定向 URI | 回调端点 | 接收来自您的授权服务的用户重定向,其中包含
code 和 state 值。 |
由 Google 发起的 OAuth 2.0 授权代码流程会话具有以下流程:
- Google 在用户的浏览器中打开您的授权端点。如果流程是在仅支持语音的设备上为 Action 启动的,Google 会将执行转移到手机。
- 用户登录(如果尚未登录),并授予 Google 权限以使用您的 API 访问其数据(如果尚未授予权限)。
- 您的服务会创建 授权代码并将其返回给 Google。为此,请将用户的浏览器重定向回 Google,并将授权代码附加到请求中。
- Google 会将授权代码发送到您的令牌交换端点,该端点会验证代码的真实性并返回 访问令牌和 刷新令牌。访问令牌是一种短期令牌,您的服务会将其作为访问 API 的凭据。刷新令牌是一种长期令牌,Google 可以存储该令牌,并在访问令牌过期时使用它来获取新的访问令牌。
- 用户完成账号关联流程后,Google 发送的每个后续请求都包含访问令牌。
实现方案
请按照以下步骤实现授权代码流程。
第 1 步:处理授权请求
当 Google 发起账号关联时,它会将用户重定向到您的授权端点。如需了解详细的协议合同和参数要求,请参阅授权端点。
如需处理请求,请执行以下操作:
验证请求:
- 确认
client_id与分配给 Google 的客户端 ID 相匹配。 - 确认
redirect_uri与预期的 Google 重定向 网址:none https://oauth-redirect.googleusercontent.com/r/YOUR_PROJECT_ID https://oauth-redirect-sandbox.googleusercontent.com/r/YOUR_PROJECT_ID相匹配 - 验证
response_type是否为code。
- 确认
对用户进行身份验证:
- 检查用户是否已登录您的服务。
- 如果用户未登录,请提示他们完成您的登录或注册流程。
生成授权代码:
- 创建与用户和客户端关联的唯一且难以猜测的授权代码。
- 将代码设置为在约 10 分钟后过期。
重定向回 Google:
- 将浏览器重定向到
redirect_uri中提供的网址。 - 附加以下查询参数:
code:您生成的授权代码。state:从 Google 收到的未修改的状态值。
- 将浏览器重定向到
第 2 步:处理令牌交换请求
您的令牌交换端点会处理两种类型的请求:将代码交换为令牌,以及刷新过期的访问令牌。如需了解详细的协议合同和参数要求,请参阅令牌交换端点。
A. 将授权代码交换为令牌
当 Google 收到授权代码时,它会调用您的令牌交换端点 (POST) 以检索令牌。
验证请求:
- 验证
client_id和client_secret。 - 验证授权代码是否有效且未过期。
- 确认
redirect_uri与第 1 步中使用的值相匹配。 - 如果验证失败,则返回 HTTP
400 Bad Request,并返回{"error": "invalid_grant"}。
- 验证
颁发令牌:
- 生成长期有效的
refresh_token和短期有效的access_token(通常为 1 小时)。 - 返回 HTTP
200 OK,并返回标准 JSON 令牌响应。
- 生成长期有效的
B. 刷新访问令牌
当访问令牌过期时,Google 会使用刷新令牌请求新的访问令牌。
验证请求:
- 验证
client_id、client_secret和refresh_token。 - 如果验证失败,则返回 HTTP
400 Bad Request,并返回{"error": "invalid_grant"}。
- 验证
颁发新的访问令牌:
- 生成新的短期有效的
access_token。 - 返回 HTTP
200 OK,并返回 JSON 令牌响应(可以选择包含新的刷新令牌)。
- 生成新的短期有效的
Handle userinfo requests
The userinfo endpoint is an OAuth 2.0 protected resource that return claims about the linked user. Implementing and hosting the userinfo endpoint is optional, except for the following use cases:
- Linked Account Sign-In with Google One Tap.
- Frictionless subscription on AndroidTV.
After the access token has been successfully retrieved from your token endpoint, Google sends a request to your userinfo endpoint to retrieve basic profile information about the linked user.
| userinfo endpoint request headers | |
|---|---|
Authorization header |
The access token of type Bearer. |
For example, if your userinfo endpoint is available at
https://myservice.example.com/userinfo, a request might look like the following:
GET /userinfo HTTP/1.1
Host: myservice.example.com
Authorization: Bearer ACCESS_TOKEN
For your userinfo endpoint to handle requests, do the following steps:
- Extract access token from the Authorization header and return information for the user associated with the access token.
- If the access token is invalid, return an HTTP 401 Unauthorized error with using the
WWW-AuthenticateResponse Header. Below is an example of a userinfo error response:HTTP/1.1 401 Unauthorized WWW-Authenticate: error="invalid_token", error_description="The Access Token expired"
If the access token is valid, return and HTTP 200 response with the following JSON object in the body of the HTTPS response:
{ "sub": "USER_UUID", "email": "EMAIL_ADDRESS", "given_name": "FIRST_NAME", "family_name": "LAST_NAME", "name": "FULL_NAME", "picture": "PROFILE_PICTURE", }userinfo endpoint response subA unique ID that identifies the user in your system. emailEmail address of the user. given_nameOptional: First name of the user. family_nameOptional: Last name of the user. nameOptional: Full name of the user. pictureOptional: Profile picture of the user.
验证您的实现
You can validate your implementation by using the OAuth 2.0 Playground tool.
In the tool, do the following steps:
- Click Configuration to open the OAuth 2.0 Configuration window.
- In the OAuth flow field, select Client-side.
- In the OAuth Endpoints field, select Custom.
- Specify your OAuth 2.0 endpoint and the client ID you assigned to Google in the corresponding fields.
- In the Step 1 section, don't select any Google scopes. Instead, leave this field blank or type a scope valid for your server (or an arbitrary string if you don't use OAuth scopes). When you're done, click Authorize APIs.
- In the Step 2 and Step 3 sections, go through the OAuth 2.0 flow and verify that each step works as intended.
You can validate your implementation by using the Google Account Linking Demo tool.
In the tool, do the following steps:
- Click the Sign in with Google button.
- Choose the account you'd like to link.
- Enter the service ID.
- Optionally enter one or more scopes that you will request access for.
- Click Start Demo.
- When prompted, confirm that you may consent and deny the linking request.
- Confirm that you are redirected to your platform.