Konten werden über die branchenüblichen impliziten und Autorisierungscode-Vorgänge für OAuth 2.0 verknüpft. Ihr Dienst muss OAuth 2.0-konforme Autorisierungs- und Token-Austauschendpunkte unterstützen.
Beim impliziten Ablauf öffnet Google Ihren Autorisierungsendpunkt im Browser des Nutzers. Nach der erfolgreichen Anmeldung geben Sie ein langlebiges Zugriffstoken an Google zurück. Dieses Zugriffstoken ist jetzt in jeder Anfrage enthalten, die von Google gesendet wird.
Für den Ablauf mit Autorisierungscode sind zwei Endpunkte erforderlich:
Den Autorisierungsendpunkt, der noch nicht angemeldeten Nutzern die Anmelde-UI anzeigt. Der Autorisierungsendpunkt erstellt auch einen kurzlebigen Autorisierungscode, um die Einwilligung der Nutzer in den angeforderten Zugriff zu erfassen.
Der Token-Austausch-Endpunkt, der für zwei Arten von Anzeigenplattformen verantwortlich ist:
- Hier wird ein Autorisierungscode gegen ein langlebiges Aktualisierungstoken und ein kurzlebiges Zugriffstoken eingetauscht. Dieser Austausch erfolgt, wenn der Nutzer die Kontoverknüpfung durchläuft.
- Ein langlebiges Aktualisierungstoken wird gegen ein kurzlebiges Zugriffstoken eingetauscht. Dieser Austausch erfolgt, wenn Google ein neues Zugriffstoken benötigt, weil das vorherige abgelaufen ist.
OAuth 2.0-Vorgang auswählen
Der implizite Ablauf ist zwar einfacher zu implementieren, Google empfiehlt jedoch, dass die über den impliziten Ablauf ausgestellten Zugriffstokens nie ablaufen. Das liegt daran, dass der Nutzer beim impliziten Ablauf gezwungen wird, sein Konto noch einmal zu verknüpfen, nachdem ein Token abgelaufen ist. Wenn Sie aus Sicherheitsgründen ein Ablaufdatum für Tokens benötigen, empfehlen wir Ihnen dringend, stattdessen den Ablaufvorgang für Autorisierungscodes zu verwenden.
Gestaltungsrichtlinien
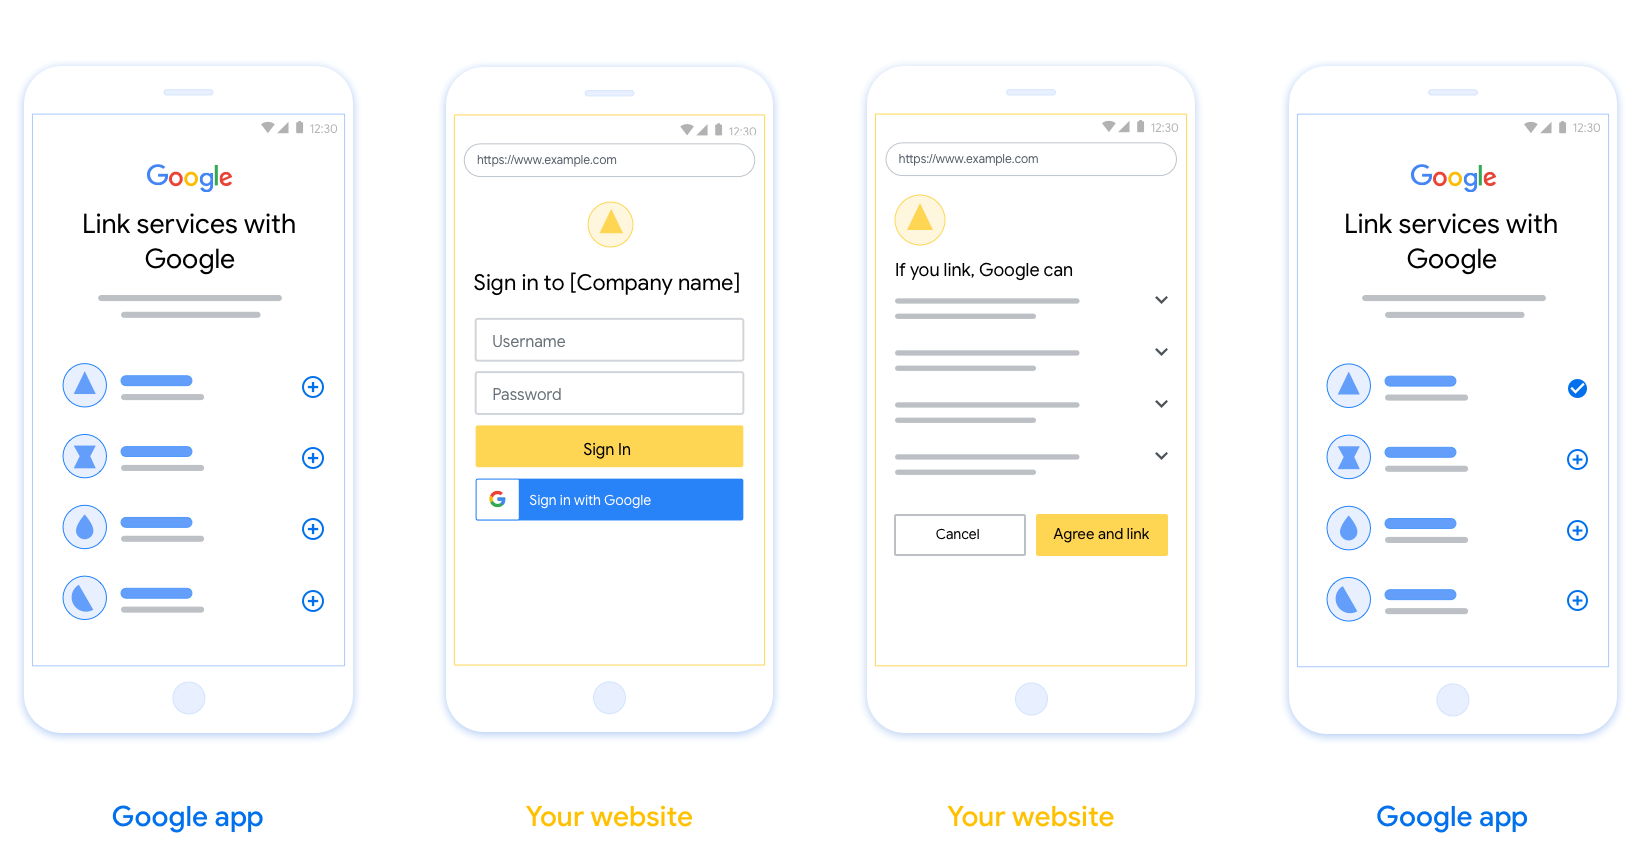
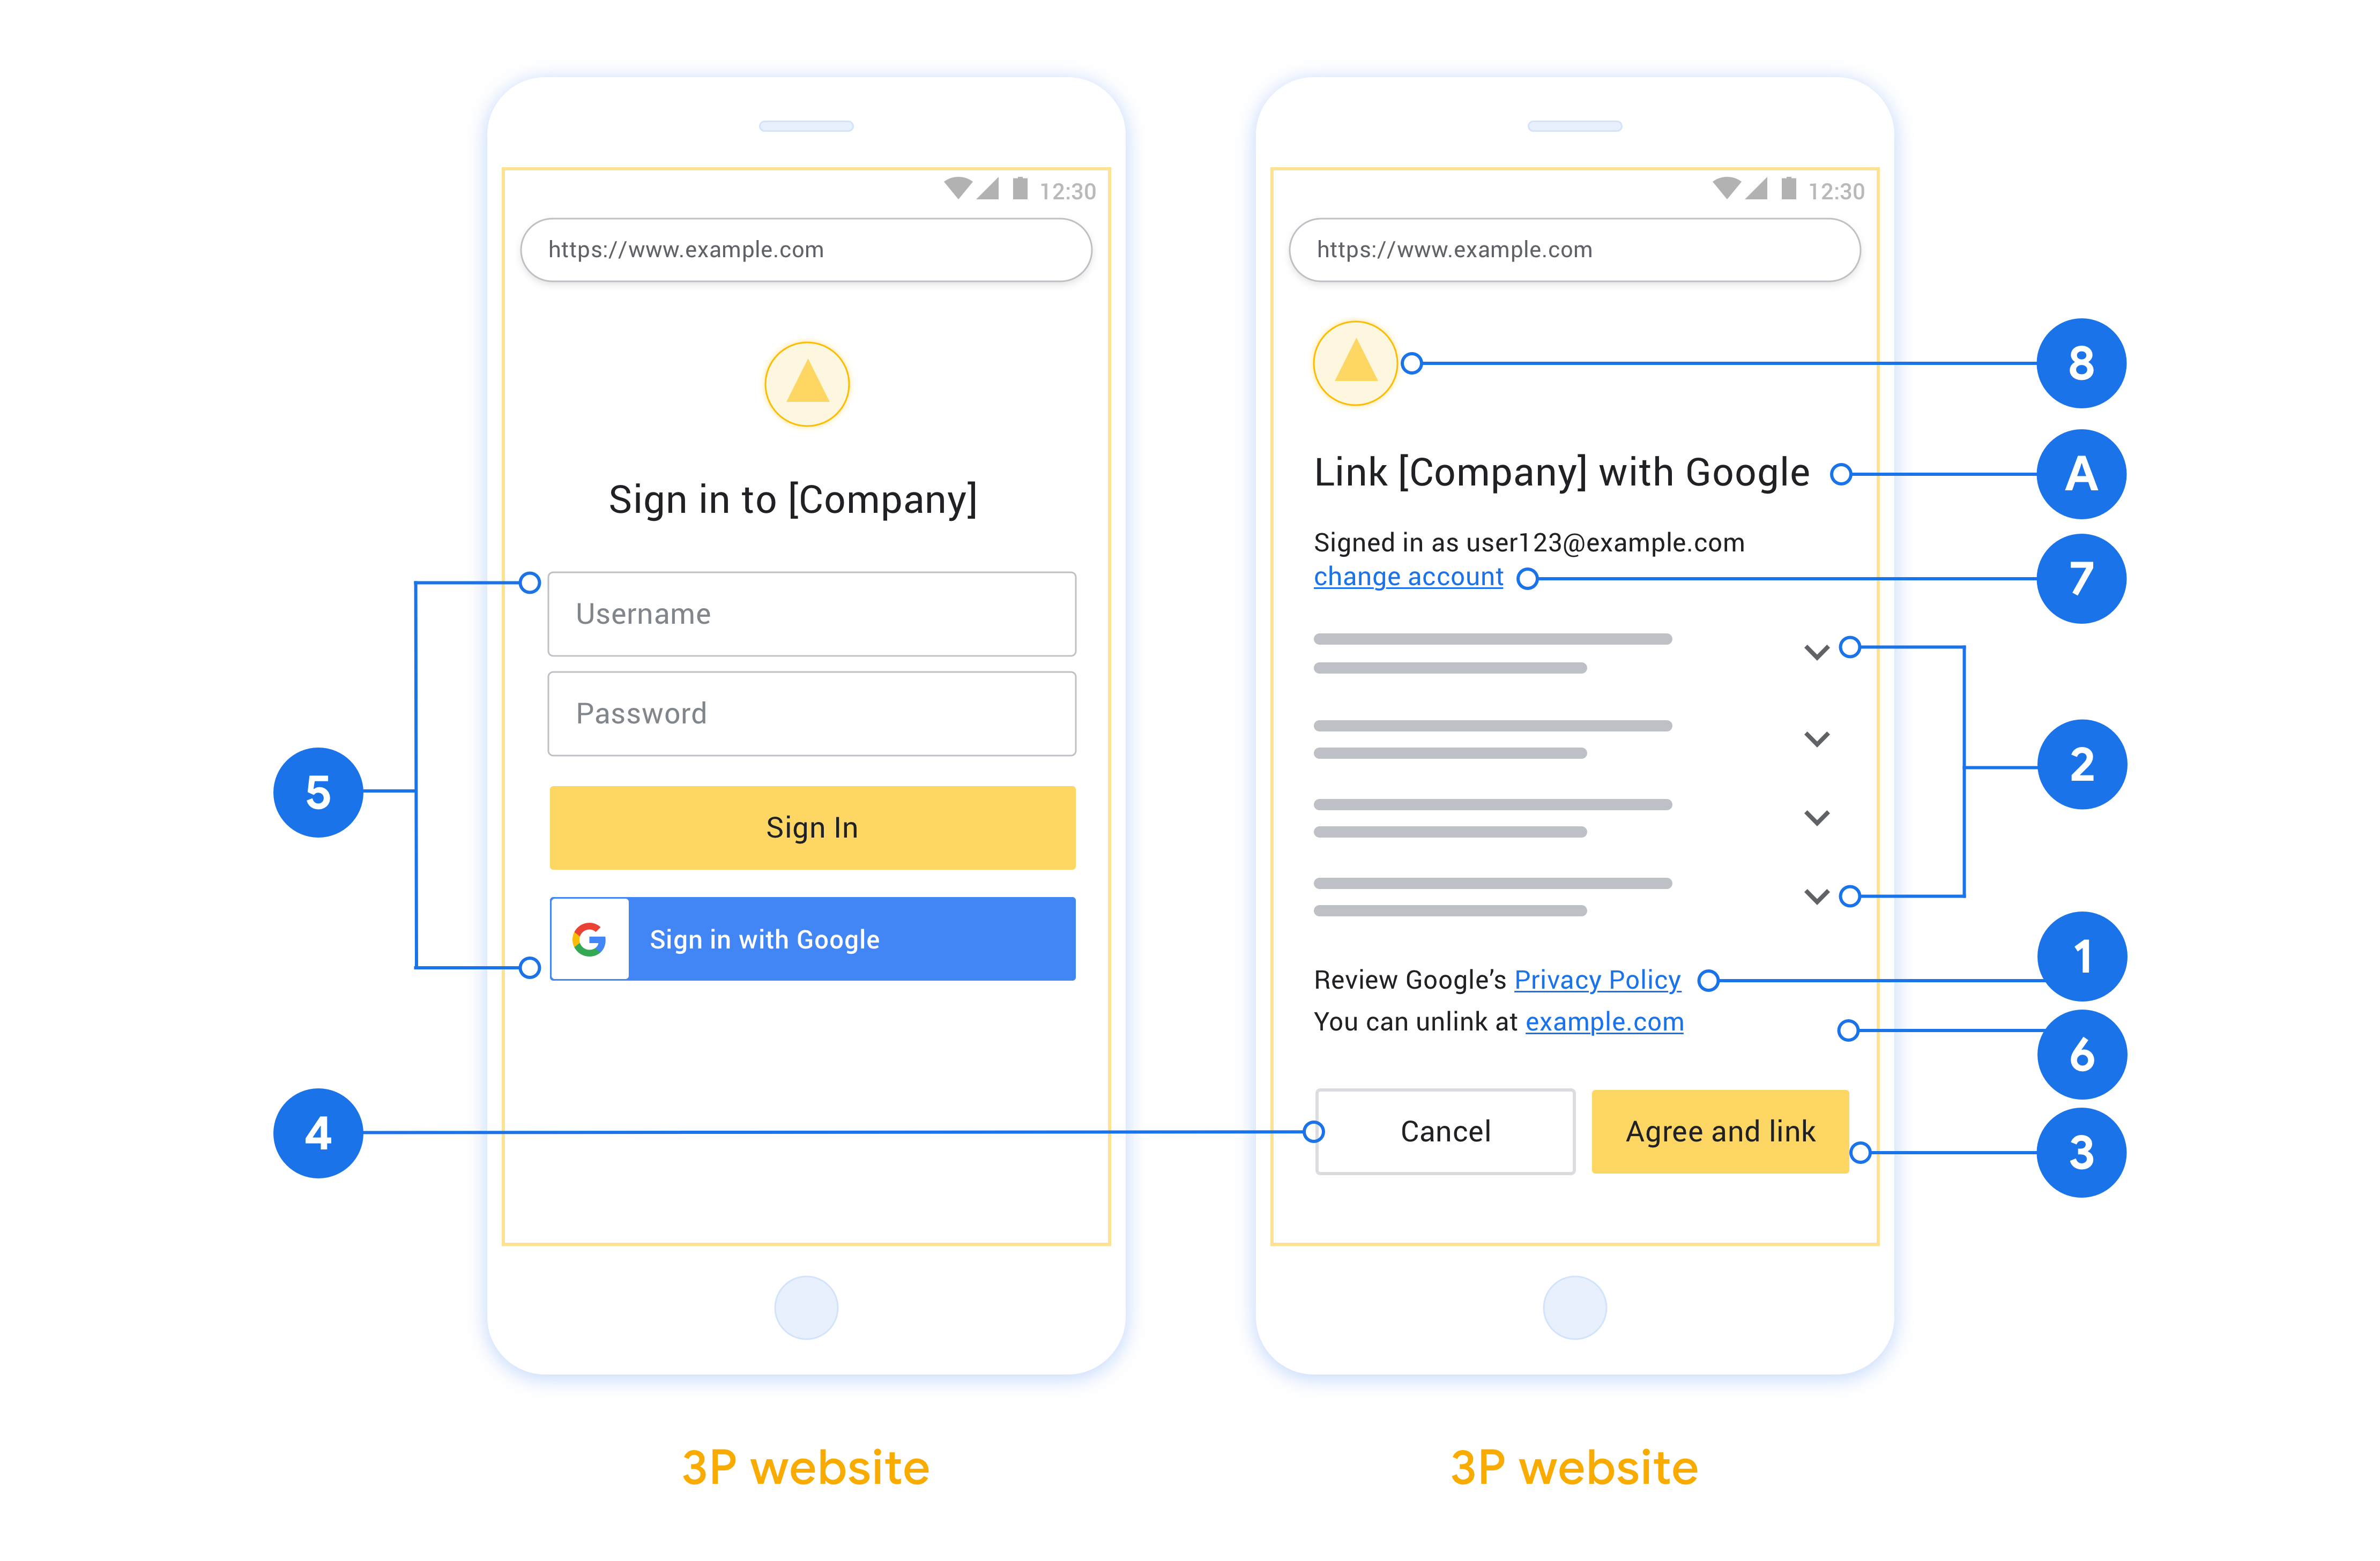
In diesem Abschnitt werden die Designanforderungen und -empfehlungen für den Nutzerbildschirm beschrieben, den Sie für OAuth-Verknüpfungsvorgänge hosten. Nachdem die Funktion von der Google-App aufgerufen wurde, wird dem Nutzer auf Ihrer Plattform eine Seite zur Anmeldung bei Google und ein Bildschirm zur Einwilligung in die Kontoverknüpfung angezeigt. Nachdem der Nutzer seine Einwilligung zur Kontoverknüpfung gegeben hat, wird er zur Google-App zurückgeleitet.
Voraussetzungen
- Du musst angeben, dass das Konto des Nutzers mit Google verknüpft wird und nicht mit einem bestimmten Google-Produkt wie Google Home oder Google Assistant.
Empfehlungen
Wir empfehlen Folgendes:
Datenschutzerklärung von Google anzeigen Fügen Sie im Zustimmungsbildschirm einen Link zur Datenschutzerklärung von Google ein.
Zu teilende Daten: Informieren Sie die Nutzer in einer klaren und prägnanten Sprache darüber, welche Daten von ihnen Google benötigt und warum.
Klarer Call-to-Action Geben Sie auf dem Einwilligungsbildschirm einen klaren Call-to-Action an, z. B. „Zustimmen und verknüpfen“. Nutzer müssen wissen, welche Daten sie mit Google teilen müssen, um ihre Konten zu verknüpfen.
Kündigung möglich. Bieten Sie Nutzern die Möglichkeit, zurückzugehen oder abzubrechen, wenn sie die Verknüpfung nicht herstellen möchten.
Klarer Anmeldevorgang. Achten Sie darauf, dass Nutzer eine eindeutige Methode für die Anmeldung in ihrem Google-Konto haben, z. B. Felder für ihren Nutzernamen und das Passwort oder Über Google anmelden.
Möglichkeit, die Verknüpfung aufzuheben Bieten Sie Nutzern die Möglichkeit, die Verknüpfung aufzuheben, z. B. über eine URL zu ihren Kontoeinstellungen auf Ihrer Plattform. Alternativ können Sie einen Link zum Google-Konto einfügen, über den Nutzer ihr verknüpftes Konto verwalten können.
Berechtigung zum Ändern des Nutzerkontos. Schlage Nutzern eine Methode vor, mit der sie ihr Konto bzw. ihre Konten wechseln können. Das ist besonders hilfreich, wenn Nutzer mehrere Konten haben.
- Wenn ein Nutzer den Einwilligungsbildschirm schließen muss, um das Konto zu wechseln, senden Sie einen wiederherstellbaren Fehler an Google, damit sich der Nutzer mit der OAuth-Verknüpfung und dem impliziten Ablauf im gewünschten Konto anmelden kann.
Fügen Sie Ihr Logo hinzu. Zeigen Sie Ihr Firmenlogo auf dem Einwilligungsbildschirm an. Verwenden Sie die Stilrichtlinien, um Ihr Logo zu platzieren. Wenn Sie auch das Google-Logo anzeigen lassen möchten, lesen Sie den Hilfeartikel Logos und Marken.
Projekt erstellen
So erstellen Sie Ihr Projekt für die Kontoverknüpfung:
- Klicken Sie auf Projekt erstellen.
- Geben Sie einen Namen ein oder übernehmen Sie den generierten Vorschlag.
- Bestätigen oder bearbeiten Sie die verbleibenden Felder.
- Klicken Sie auf Erstellen.
So rufen Sie Ihre Projekt-ID auf:
- Suchen Sie in der Tabelle auf der Landingpage nach Ihrem Projekt. Die Projekt-ID wird in der Spalte ID angezeigt.
OAuth-Zustimmungsbildschirm konfigurieren
Der Prozess zur Verknüpfung von Google-Konten umfasst einen Zustimmungsbildschirm, auf dem Nutzer darüber informiert werden, welche Anwendung Zugriff auf ihre Daten anfordert, welche Art von Daten angefordert wird und welche Nutzungsbedingungen gelten. Sie müssen den OAuth-Zustimmungsbildschirm konfigurieren, bevor Sie eine Google API-Client-ID generieren.
- Öffnen Sie in der Google APIs Console die Seite OAuth-Zustimmungsbildschirm.
- Wählen Sie bei Aufforderung das Projekt aus, das Sie gerade erstellt haben.
Füllen Sie auf der Seite „OAuth-Zustimmungsbildschirm“ das Formular aus und klicken Sie auf die Schaltfläche „Speichern“.
Anwendungsname:Der Name der Anwendung, die um Einwilligung bittet. Der Name sollte Ihre Anwendung korrekt widerspiegeln und mit dem Anwendungsnamen übereinstimmen, den Nutzer an anderer Stelle sehen. Der Anwendungsname wird auf dem Zustimmungsbildschirm für die Kontoverknüpfung angezeigt.
Anwendungslogo:Ein Bild auf dem Zustimmungsbildschirm, das Nutzern hilft, Ihre App zu erkennen. Das Logo wird auf dem Zustimmungsbildschirm für die Kontoverknüpfung und in den Kontoeinstellungen angezeigt.
Support-E-Mail-Adresse:Für Nutzer, die Sie wegen Fragen zu ihrer Einwilligung kontaktieren möchten.
Bereiche für Google-APIs:Mit Bereichen kann Ihre Anwendung auf die privaten Google-Daten Ihrer Nutzer zugreifen. Für die Verknüpfung von Google-Konten reicht der Standardbereich (email, profile, openid) aus. Sie müssen keine sensiblen Bereiche hinzufügen. Es empfiehlt sich, Bereiche inkrementell anzufordern, wenn der Zugriff erforderlich ist, und nicht im Voraus. Weitere Informationen
Autorisierte Domains:Um Sie und Ihre Nutzer zu schützen, erlaubt Google die Nutzung autorisierter Domains nur Anwendungen, die sich mit OAuth authentifizieren. Die Links Ihrer Anwendungen müssen auf autorisierten Domains gehostet werden. Weitere Informationen
Link zur Startseite der Anwendung:Die Startseite Ihrer Anwendung. Muss auf einer autorisierten Domain gehostet werden.
Link zur Datenschutzerklärung der Anwendung:Wird auf dem Zustimmungsbildschirm für die Google-Kontoverknüpfung angezeigt. Muss auf einer autorisierten Domain gehostet werden.
Link zu den Nutzungsbedingungen der Anwendung (optional): Muss auf einer autorisierten Domain gehostet werden.
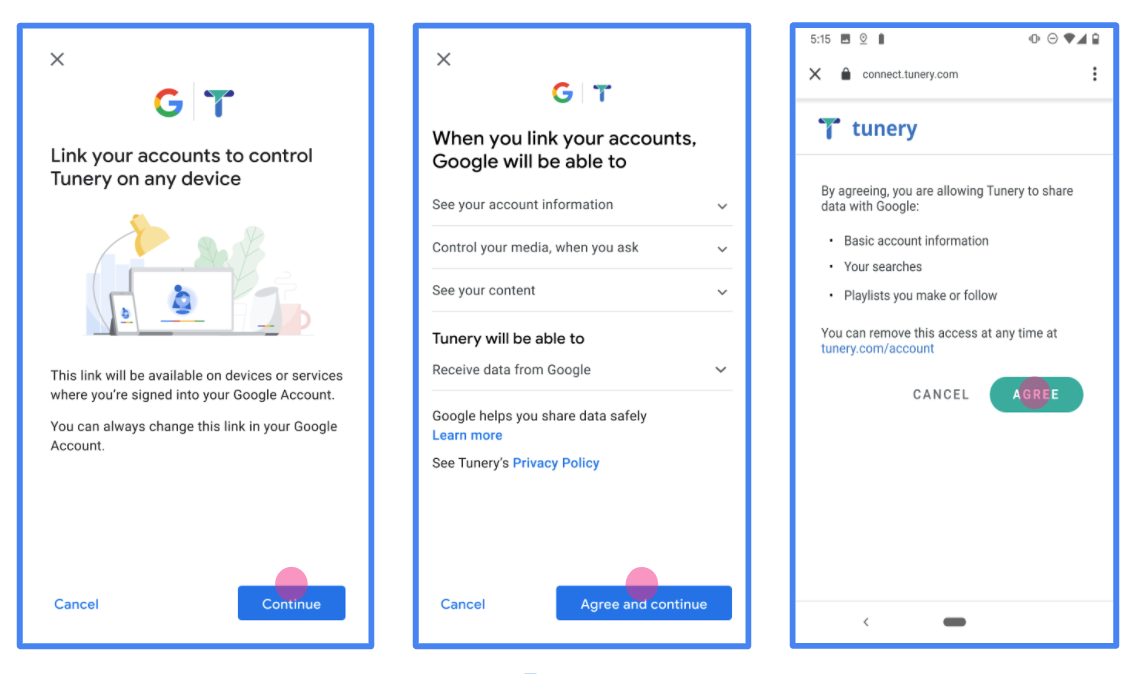
Abbildung 1. Zustimmungsbildschirm für die Google-Kontoverknüpfung für die fiktive App „Tunery“
Prüfen Sie den „Überprüfungsstatus“. Wenn Ihre Anwendung überprüft werden muss, klicken Sie auf die Schaltfläche „Zur Überprüfung einreichen“, um sie zur Überprüfung einzureichen. Weitere Informationen finden Sie unter Voraussetzungen für die OAuth-Überprüfung.
OAuth-Server implementieren
Ihr Dienst führt eine Autorisierung durch, um den impliziten OAuth 2.0-Vorgang zu unterstützen. Endpunkt verfügbar über HTTPS. Dieser Endpunkt ist für die Authentifizierung und Einholen der Einwilligung der Nutzer für den Datenzugriff Den Autorisierungsendpunkt Nutzern, die noch nicht angemeldet sind, wird eine Anmeldeoberfläche angezeigt und die Daten werden aufgezeichnet. Zustimmung zum angeforderten Zugriff geben.
Wenn eine Google-Anwendung eine der autorisierten APIs Ihres Dienstes aufrufen muss, Google verwendet diesen Endpunkt, um von Ihren Nutzern die Berechtigung zum Aufrufen dieser APIs einzuholen im Namen der Person.
Eine typische von Google initiierte Sitzung im impliziten OAuth 2.0-Vorgang hat den folgenden Ablauf:
- Google öffnet Ihren Autorisierungsendpunkt im Browser des Nutzers. Die Der Nutzer meldet sich an, falls er nicht bereits angemeldet ist, und erteilt Google die Berechtigung, mit Ihrer API auf ihre Daten zugreifen, falls sie nicht bereits eine Berechtigung erteilt haben.
- Ihr Dienst erstellt ein Zugriffstoken und gibt es an Google. Leiten Sie dazu den Browser des Nutzers zurück zu Google mit den Zugriffsrechten Token, das an die Anfrage angehängt ist.
- Google ruft die APIs Ihres Dienstes auf und hängt das Zugriffstoken mit für jede Anfrage. Ihr Dienst überprüft, ob das Zugriffstoken Google autorisiert, auf die API zuzugreifen und dann den API-Aufruf abzuschließen.
Autorisierungsanfragen verarbeiten
Wenn eine Google-Anwendung die Kontoverknüpfung über OAuth 2.0 durchführen muss impliziten Vorgang ab, sendet Google den Nutzer mit einer -Anfrage mit den folgenden Parametern:
| Parameter des Autorisierungsendpunkts | |
|---|---|
client_id |
Die Client-ID, die Sie Google zugewiesen haben. |
redirect_uri |
Die URL, an die Sie die Antwort auf diese Anfrage senden. |
state |
Buchhaltungswert, der unverändert an Google zurückgegeben wird Weiterleitungs-URI. |
response_type |
Der Werttyp, der in der Antwort zurückgegeben werden soll. Für den impliziten OAuth 2.0-Code
ist der Antworttyp immer token. |
user_locale |
Die Spracheinstellung des Google-Kontos in RFC5646 -Format, mit dem Ihre Inhalte in die bevorzugte Sprache des Nutzers lokalisiert werden. |
Wenn Ihr Autorisierungsendpunkt z. B. unter
https://myservice.example.com/auth, kann eine Anfrage so aussehen:
GET https://myservice.example.com/auth?client_id=GOOGLE_CLIENT_ID&redirect_uri=REDIRECT_URI&state=STATE_STRING&response_type=token&user_locale=LOCALE
Damit der Autorisierungsendpunkt Anmeldeanfragen verarbeiten kann, musst du Folgendes tun: Schritte:
Prüfen Sie die Werte
client_idundredirect_uri, um So verhindern Sie, dass unbeabsichtigte oder falsch konfigurierte Client-Apps Zugriff gewährt werden:- Prüfen Sie, ob die
client_idmit Ihrer Client-ID übereinstimmt die Google zugewiesen sind. - Prüfen Sie, ob die in
redirect_uriangegebene URL hat das folgende Format:https://oauth-redirect.googleusercontent.com/r/YOUR_PROJECT_ID https://oauth-redirect-sandbox.googleusercontent.com/r/YOUR_PROJECT_ID
- Prüfen Sie, ob die
Prüfen Sie, ob der Nutzer in Ihrem Dienst angemeldet ist. Wenn der Nutzer nicht angemeldet ist angemeldet haben, müssen Sie den Anmelde- bzw. Anmeldevorgang für den Dienst abschließen.
Generieren Sie ein Zugriffstoken, mit dem Google auf Ihre API zugreifen kann. Die Zugriffstoken kann ein beliebiger Stringwert sein, muss aber den Wert Nutzer und den Client, für den das Token bestimmt ist, und darf nicht erraten werden.
Eine HTTP-Antwort senden, die den Browser des Nutzers an die URL weiterleitet
redirect_uriwird angegeben. Schließen Sie alle folgende Parameter im URL-Fragment:access_token: Das Zugriffstoken, das Sie gerade generiert haben.token_type: der Stringbearerstate: der unveränderte Statuswert aus dem Original Anfrage
Hier ein Beispiel für die resultierende URL:
https://oauth-redirect.googleusercontent.com/r/YOUR_PROJECT_ID#access_token=ACCESS_TOKEN&token_type=bearer&state=STATE_STRING
Der OAuth 2.0-Weiterleitungs-Handler von Google empfängt das Zugriffstoken und bestätigt
dass sich der Wert für state nicht geändert hat. Nachdem Google eine
Zugriffstoken für Ihren Dienst verwendet, hängt Google das Token an nachfolgende Aufrufe an.
zu Ihren Dienst-APIs hinzu.
userinfo-Anfragen verarbeiten
Der userinfo-Endpunkt ist eine geschützte OAuth 2.0-Ressource, die Ansprüche über den verknüpften Nutzer zurückgibt. Die Implementierung und das Hosten des userinfo-Endpunkts sind mit Ausnahme der folgenden Anwendungsfälle optional:
- Anmeldung in einem verknüpften Konto über Google One Tap.
- Reibungsloses Abo auf Android TV
Nachdem das Zugriffstoken erfolgreich von Ihrem Tokenendpunkt abgerufen wurde, sendet Google eine Anfrage an Ihren userinfo-Endpunkt, um grundlegende Profilinformationen über den verknüpften Nutzer abzurufen.
| Anfrageheader für userinfo-Endpunkt | |
|---|---|
Authorization header |
Das Zugriffstoken vom Typ „Bearer“. |
Wenn Ihr userinfo-Endpunkt beispielsweise unter
https://myservice.example.com/userinfo, kann eine Anfrage so aussehen:
GET /userinfo HTTP/1.1
Host: myservice.example.com
Authorization: Bearer ACCESS_TOKEN
Führen Sie die folgenden Schritte aus, damit der userinfo-Endpunkt Anfragen verarbeiten kann:
- Extrahieren Sie das Zugriffstoken aus dem Autorisierungs-Header und geben Sie Informationen für den Nutzer zurück, der mit dem Zugriffstoken verknüpft ist.
- Wenn das Zugriffstoken ungültig ist, gib den Fehler „HTTP 401 Unauthorized“ mit dem Antwortheader
WWW-Authenticatezurück. Hier ist ein Beispiel für eine Userinfo-Fehlerantwort:HTTP/1.1 401 Unauthorized WWW-Authenticate: error="invalid_token", error_description="The Access Token expired"
Wenn das Zugriffstoken gültig ist, geben Sie eine HTTP 200-Antwort mit dem folgenden JSON-Objekt im Text des HTTPS-Objekts zurück. Antwort:
{ "sub": "USER_UUID", "email": "EMAIL_ADDRESS", "given_name": "FIRST_NAME", "family_name": "LAST_NAME", "name": "FULL_NAME", "picture": "PROFILE_PICTURE", }Userinfo-Endpunktantwort subEine eindeutige ID, die den Nutzer in Ihrem System identifiziert. emailE-Mail-Adresse des Nutzers given_nameOptional:Vorname des Nutzers. family_nameOptional:Nachname des Nutzers. nameOptional:Vollständiger Name des Nutzers. pictureOptional:Profilbild des Nutzers.
Implementierung validieren
Sie können Ihre Implementierung mit dem Tool OAuth 2.0 Playground validieren.
Führen Sie im Tool die folgenden Schritte aus:
- Klicken Sie auf Konfiguration , um das Fenster für die OAuth 2.0-Konfiguration zu öffnen.
- Wählen Sie im Feld OAuth-Ablauf die Option Clientseitig aus.
- Wählen Sie im Feld OAuth-Endpunkte die Option Benutzerdefiniert aus.
- Geben Sie in den entsprechenden Feldern Ihren OAuth 2.0-Endpunkt und die Client-ID an, die Sie Google zugewiesen haben.
- Wählen Sie im Abschnitt Schritt 1 keine Google-Bereiche aus. Lassen Sie dieses Feld stattdessen leer oder geben Sie einen für Ihren Server gültigen Bereich ein (oder einen beliebigen String, wenn Sie keine OAuth-Bereiche verwenden). Wenn Sie fertig sind, klicken Sie auf APIs autorisieren.
- Führen Sie in den Abschnitten Schritt 2 und Schritt 3 den OAuth 2.0-Ablauf durch und prüfen Sie, ob jeder Schritt wie vorgesehen funktioniert.
Sie können Ihre Implementierung mit der Demo zur Google-Kontoverknüpfung prüfen.
Führen Sie im Tool die folgenden Schritte aus:
- Klicken Sie auf die Schaltfläche Über Google anmelden.
- Wählen Sie das Konto aus, das Sie verknüpfen möchten.
- Geben Sie die Service-ID ein.
- Optional können Sie einen oder mehrere Bereiche angeben, für die Sie Zugriff anfordern möchten.
- Klicken Sie auf Demo starten.
- Bestätigen Sie bei Aufforderung, dass Sie der Verknüpfungsanfrage zustimmen oder sie ablehnen können.
- Prüfen Sie, ob Sie zu Ihrer Plattform weitergeleitet werden.