खास जानकारी
OAuth पर आधारित 'Google साइन इन' को आसानी से लिंक करने की सुविधा, OAuth लिंकिंग के साथ-साथ 'Google साइन इन' को भी जोड़ती है. इससे, Google के उपयोगकर्ताओं को खाता लिंक करने का आसान अनुभव मिलता है. साथ ही, खाता बनाने की सुविधा भी चालू होती है. इससे उपयोगकर्ता, अपने Google खाते का इस्तेमाल करके आपकी सेवा पर नया खाता बना सकता है.
OAuth और Google Sign-In की मदद से खाता लिंक करने के लिए, ये सामान्य तरीके अपनाएं:
- सबसे पहले, उपयोगकर्ता से उसकी Google प्रोफ़ाइल को ऐक्सेस करने की सहमति मांगें.
- उपयोगकर्ता की प्रोफ़ाइल में मौजूद जानकारी का इस्तेमाल करके, यह देखें कि उसका खाता मौजूद है या नहीं.
- मौजूदा उपयोगकर्ताओं के लिए, खातों को लिंक करें.
- अगर आपको पुष्टि करने वाले अपने सिस्टम में, Google उपयोगकर्ता से मैच होने वाला कोई उपयोगकर्ता नहीं मिलता है, तो Google से मिले आईडी टोकन की पुष्टि करें. इसके बाद, आईडी टोकन में मौजूद प्रोफ़ाइल की जानकारी के आधार पर उपयोगकर्ता बनाया जा सकता है.
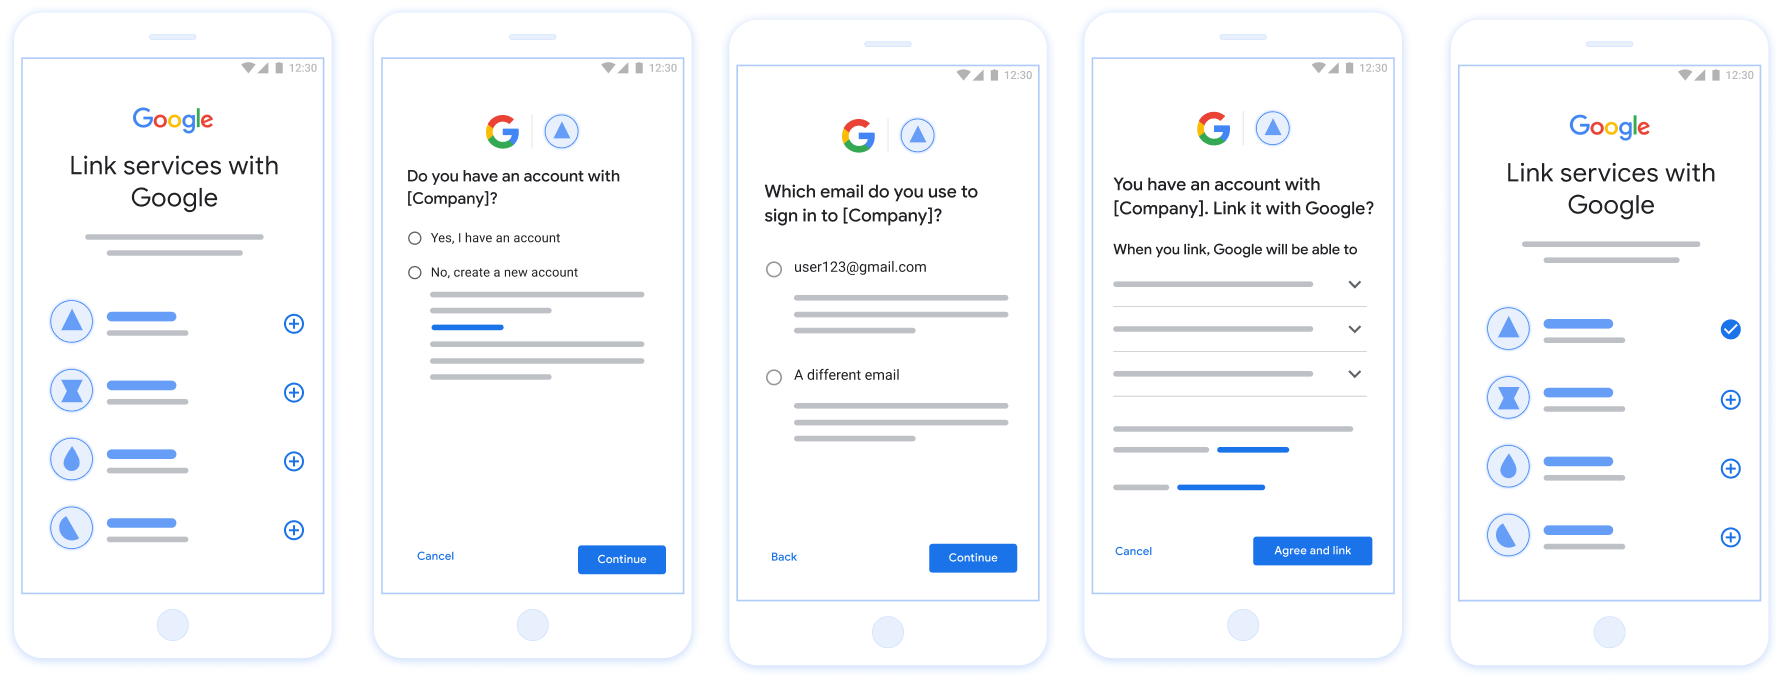
पहली इमेज. आसानी से लिंक करने की सुविधा की मदद से, उपयोगकर्ता के फ़ोन पर खाता लिंक करना
आसानी से लिंक करने की सुविधा के लिए ज़रूरी शर्तें
- वेब पर OAuth लिंक करने का बुनियादी तरीका लागू करें. आपकी सेवा, OAuth 2.0 के मुताबिक काम करने वाले ऑथराइज़ेशन और टोकन एक्सचेंज एंडपॉइंट के साथ काम करनी चाहिए.
- आपका टोकन एक्सचेंज एंडपॉइंट, JSON वेब टोकन (JWT) के दावों के साथ काम करना चाहिए. साथ ही,
check,create, औरgetइंटेंट लागू करना चाहिए.
अपना OAuth सर्वर लागू करना
आपके टोकन एक्सचेंज एंडपॉइंट में check, create, get इंटेंट काम करने चाहिए. यहां खाता लिंक करने के फ़्लो के दौरान पूरे किए गए चरणों को दिखाया गया है. साथ ही, यह भी बताया गया है कि अलग-अलग इंटेंट कब कॉल किए जाते हैं:
- क्या उपयोगकर्ता के पास आपके पुष्टि करने वाले सिस्टम में खाता है? (उपयोगकर्ता हां या नहीं चुनकर तय करता है)
- हां : क्या उपयोगकर्ता आपके प्लैटफ़ॉर्म में साइन इन करने के लिए, अपने Google खाते से जुड़े ईमेल पते का इस्तेमाल करता है? (उपयोगकर्ता हां या नहीं चुनकर तय करता है)
- हां : क्या उपयोगकर्ता के पास पुष्टि करने वाले आपके सिस्टम में मैच होने वाला खाता है? (पुष्टि करने के लिए
check intentको कॉल किया जाता है)- हां :
get intentको कॉल किया जाता है और अगर get intent सही तरीके से काम करता है, तो खाता लिंक हो जाता है. - नहीं : नया खाता बनाना? (उपयोगकर्ता हां या नहीं चुनकर तय करता है)
- हां :
create intentको कॉल किया जाता है और खाता लिंक हो जाता है. ऐसा तब होता है, जब create intent फ़ंक्शन सही तरीके से काम करता है. - नहीं : वेब OAuth फ़्लो ट्रिगर होता है, उपयोगकर्ता को उसके ब्राउज़र पर भेजा जाता है, और उपयोगकर्ता को किसी दूसरे ईमेल से लिंक करने का विकल्प दिया जाता है.
- हां :
- हां :
- नहीं : वेब OAuth फ़्लो ट्रिगर होता है. इसके बाद, उपयोगकर्ता को उसके ब्राउज़र पर भेजा जाता है और उसे किसी दूसरे ईमेल पते से लिंक करने का विकल्प दिया जाता है.
- हां : क्या उपयोगकर्ता के पास पुष्टि करने वाले आपके सिस्टम में मैच होने वाला खाता है? (पुष्टि करने के लिए
- नहीं : क्या उपयोगकर्ता के पास पुष्टि करने वाले आपके सिस्टम में मैच होने वाला खाता है? (पुष्टि करने के लिए
check intentको कॉल किया जाता है)- हां :
get intentको कॉल किया जाता है और अगर get intent सही तरीके से काम करता है, तो खाता लिंक हो जाता है. - नहीं :
create intentको कॉल किया जाता है और खाता लिंक हो जाता है, अगर create intent सही तरीके से काम करता है.
- हां :
- हां : क्या उपयोगकर्ता आपके प्लैटफ़ॉर्म में साइन इन करने के लिए, अपने Google खाते से जुड़े ईमेल पते का इस्तेमाल करता है? (उपयोगकर्ता हां या नहीं चुनकर तय करता है)
मौजूदा उपयोगकर्ता खाते की जांच करें (इंटेंट देखें)
जब उपयोगकर्ता अपनी Google प्रोफ़ाइल को ऐक्सेस करने की सहमति देता है, तो Google अनुरोध जिसमें Google उपयोगकर्ता की पहचान का हस्ताक्षर किया गया दावा शामिल हो. कॉन्टेंट बनाने दावे में ऐसी जानकारी शामिल है जिसमें उपयोगकर्ता का Google खाता आईडी शामिल है, आपका नाम और ईमेल पता. आपके लिए कॉन्फ़िगर किया गया टोकन एक्सचेंज एंडपॉइंट प्रोजेक्ट हैंडल करता है.
अगर संबंधित Google खाता पहले से ही आपकी पुष्टि में मौजूद है
सिस्टम, तो आपका टोकन एक्सचेंज एंडपॉइंट account_found=true के साथ जवाब देता है. अगर
Google खाता किसी मौजूदा उपयोगकर्ता और आपके टोकन एक्सचेंज एंडपॉइंट से मैच नहीं करता
account_found=false के साथ एचटीटीपी 404 नहीं मिला गड़बड़ी दिखाता है.
अनुरोध में यह फ़ॉर्म मौजूद है:
POST /token HTTP/1.1
Host: oauth2.example.com
Content-Type: application/x-www-form-urlencoded

grant_type=urn:ietf:params:oauth:grant-type:jwt-bearer&intent=check&assertion=JWT&scope=SCOPES&client_id=GOOGLE_CLIENT_ID&client_secret=GOOGLE_CLIENT_SECRET
यह ज़रूरी है कि आपका टोकन एक्सचेंज एंडपॉइंट इन पैरामीटर को मैनेज कर सके:
| टोकन एंडपॉइंट पैरामीटर | |
|---|---|
intent |
इन अनुरोधों के लिए, इस पैरामीटर का मान है
check. |
grant_type |
किस टाइप के टोकन की अदला-बदली की जा रही है. इन अनुरोधों के लिए, यह
पैरामीटर की वैल्यू urn:ietf:params:oauth:grant-type:jwt-bearer है. |
assertion |
JSON Web Token (JWT), जो Google का हस्ताक्षर किया गया दावा उपलब्ध कराता है उपयोगकर्ता की पहचान होती है. JWT में ऐसी जानकारी होती है जिसमें उपयोगकर्ता Google खाता आईडी, नाम, और ईमेल पता. |
client_id |
वह क्लाइंट आईडी जिसे आपने Google को असाइन किया है. |
client_secret |
वह क्लाइंट सीक्रेट जिसे आपने Google को असाइन किया है. |
check इंटेंट के अनुरोधों का जवाब देने के लिए, आपके टोकन एक्सचेंज एंडपॉइंट को ये चरण पूरे करने होंगे:
- JWT के दावे की पुष्टि करें और उन्हें डिकोड करें.
- देखें कि आपके पुष्टि करने वाले सिस्टम में Google खाता पहले से मौजूद है या नहीं.
JWT के दावे की पुष्टि करना और उसे डिकोड करना
JWT के दावे की पुष्टि करने और डिकोड करने के लिए, आपकी भाषा के लिए JWT-डिकोडिंग लाइब्रेरी. इस्तेमाल की जाने वाली चीज़ें Google की सार्वजनिक कुंजियां, इनमें उपलब्ध हैं JWK या पुष्टि करने के लिए, PEM फ़ॉर्मैट टोकन का सिग्नेचर होता है.
डिकोड किए जाने पर, JWT के दावे का उदाहरण यहां दिया गया है:
{
  "sub": "1234567890",      // The unique ID of the user's Google Account
  "iss": "https://accounts.google.com",        // The assertion's issuer
  "aud": "123-abc.apps.googleusercontent.com", // Your server's client ID
  "iat": 233366400,         // Unix timestamp of the assertion's creation time
  "exp": 233370000,         // Unix timestamp of the assertion's expiration time
  "name": "Jan Jansen",
  "given_name": "Jan",
  "family_name": "Jansen",
  "email": "jan@gmail.com", // If present, the user's email address
  "email_verified": true,   // true, if Google has verified the email address
  "hd": "example.com",      // If present, the host domain of the user's GSuite email address
                            // If present, a URL to user's profile picture
  "picture": "https://lh3.googleusercontent.com/a-/AOh14GjlTnZKHAeb94A-FmEbwZv7uJD986VOF1mJGb2YYQ",
  "locale": "en_US"         // User's locale, from browser or phone settings
}
टोकन के हस्ताक्षर की पुष्टि करने के अलावा, यह भी पुष्टि करें कि
जारी करने वाला (iss फ़ील्ड) https://accounts.google.com है, जो ऑडियंस
(aud फ़ील्ड) आपको असाइन किया गया क्लाइंट आईडी है और टोकन की समयसीमा खत्म नहीं हुई है
(exp फ़ील्ड).
email, email_verified, और hd फ़ील्ड का इस्तेमाल करके, यह पता लगाया जा सकता है कि
ईमेल पते को Google होस्ट करता है और आधिकारिक तौर पर उपलब्ध कराता है. ऐसे मामले जहां Google
उस उपयोगकर्ता के पास फ़िलहाल खाते का असली मालिक होने की अनुमति है
और पासवर्ड या अन्य चैलेंज वाले तरीकों को स्किप किया जा सकता है. या फिर, इन तरीकों से
का इस्तेमाल, खाता जोड़ने से पहले उसकी पुष्टि करने के लिए किया जा सकता है.
ऐसे मामले, जिनमें Google आधिकारिक जानकारी देता है:
emailमें@gmail.comसफ़िक्स लगा है. यह Gmail खाता है.email_verifiedसही है औरhdसेट है, यह एक G Suite खाता है.
उपयोगकर्ता, Gmail या G Suite का इस्तेमाल किए बिना Google खातों के लिए रजिस्टर कर सकते हैं. टास्क कब शुरू होगा
email में @gmail.com सफ़िक्स नहीं है और hd मौजूद नहीं है
पुष्टि करने के लिए, भरोसेमंद और पासवर्ड या अन्य चैलेंज वाले तरीकों का इस्तेमाल करने का सुझाव दिया जाता है
उपयोगकर्ता है. email_verified भी सही हो सकती है, क्योंकि Google ने शुरुआत में
Google खाता बनाए जाने के समय उपयोगकर्ता, हालांकि तीसरे पक्ष का मालिकाना हक
शायद उसके बाद ईमेल खाता बदल गया है.
देखें कि आपके पुष्टि करने वाले सिस्टम में Google खाता पहले से मौजूद है या नहीं
देखें कि इनमें से कोई एक शर्त सही है या नहीं:
- दावे के
subफ़ील्ड में मौजूद Google खाता आईडी, आपके उपयोगकर्ता का है डेटाबेस. - दावे में दिया गया ईमेल पता, आपके उपयोगकर्ता डेटाबेस के किसी उपयोगकर्ता से मेल खाता है.
अगर दोनों में से कोई भी शर्त सही है, तो इसका मतलब है कि उपयोगकर्ता ने पहले ही साइन अप कर लिया है. ऐसी स्थिति में, इस तरह से जवाब दें:
HTTP/1.1 200 Success
Content-Type: application/json;charset=UTF-8

{
  "account_found":"true",
}
अगर Google खाता आईडी और ईमेल पता,
दावा आपके डेटाबेस के किसी उपयोगकर्ता से मेल खाता है, तो उपयोगकर्ता ने अभी तक साइन अप नहीं किया है. तय सीमा में
इस मामले में, आपके टोकन एक्सचेंज एंडपॉइंट को एचटीटीपी 404 वाली गड़बड़ी का जवाब देना होगा
जो "account_found": "false" के बारे में बताता है, जैसा कि इस उदाहरण में दिखाया गया है:
HTTP/1.1 404 Not found
Content-Type: application/json;charset=UTF-8

{
  "account_found":"false",
}
अपने-आप लिंक होने की सुविधा मैनेज करना (इंटेंट पाएं)
जब उपयोगकर्ता अपनी Google प्रोफ़ाइल को ऐक्सेस करने की सहमति देता है, तो Google ऐसा अनुरोध जिसमें Google उपयोगकर्ता की पहचान का हस्ताक्षर किया गया दावा शामिल हो. कॉन्टेंट बनाने दावे में ऐसी जानकारी शामिल है जिसमें उपयोगकर्ता का Google खाता आईडी शामिल है, आपका नाम और ईमेल पता. आपके लिए कॉन्फ़िगर किया गया टोकन एक्सचेंज एंडपॉइंट प्रोजेक्ट हैंडल करता है.
अगर इससे जुड़ा Google खाता, पुष्टि करने के लिए पहले से मौजूद है
सिस्टम का इस्तेमाल करता है, तो आपका टोकन एक्सचेंज एंडपॉइंट, उपयोगकर्ता के लिए टोकन दिखाता है. अगर
Google खाता किसी मौजूदा उपयोगकर्ता और आपके टोकन एक्सचेंज एंडपॉइंट से मैच नहीं करता
यह linking_error गड़बड़ी और वैकल्पिक login_hint दिखाता है.
अनुरोध में यह फ़ॉर्म मौजूद है:
POST /token HTTP/1.1
Host: oauth2.example.com
Content-Type: application/x-www-form-urlencoded

grant_type=urn:ietf:params:oauth:grant-type:jwt-bearer&intent=get&assertion=JWT&scope=SCOPES&client_id=GOOGLE_CLIENT_ID&client_secret=GOOGLE_CLIENT_SECRET
यह ज़रूरी है कि आपका टोकन एक्सचेंज एंडपॉइंट इन पैरामीटर को मैनेज कर सके:
| टोकन एंडपॉइंट पैरामीटर | |
|---|---|
intent |
इन अनुरोधों के लिए, इस पैरामीटर की वैल्यू get है. |
grant_type |
किस टाइप के टोकन की अदला-बदली की जा रही है. इन अनुरोधों के लिए, यह
पैरामीटर की वैल्यू urn:ietf:params:oauth:grant-type:jwt-bearer है. |
assertion |
JSON Web Token (JWT), जो Google का हस्ताक्षर किया गया दावा उपलब्ध कराता है उपयोगकर्ता की पहचान होती है. JWT में ऐसी जानकारी होती है जिसमें उपयोगकर्ता Google खाता आईडी, नाम, और ईमेल पता. |
scope |
ज़रूरी नहीं: ऐसे कोई भी दायरे जिन्हें आपने Google को, अनुरोध करने के लिए कॉन्फ़िगर किया है उपयोगकर्ता. |
client_id |
वह क्लाइंट आईडी जिसे आपने Google को असाइन किया है. |
client_secret |
वह क्लाइंट सीक्रेट जिसे आपने Google को असाइन किया है. |
get इंटेंट के अनुरोधों का जवाब देने के लिए, आपके टोकन एक्सचेंज एंडपॉइंट को ये चरण पूरे करने होंगे:
- JWT के दावे की पुष्टि करें और उन्हें डिकोड करें.
- देखें कि आपके पुष्टि करने वाले सिस्टम में Google खाता पहले से मौजूद है या नहीं.
JWT के दावे की पुष्टि करना और उसे डिकोड करना
JWT के दावे की पुष्टि करने और डिकोड करने के लिए, आपकी भाषा के लिए JWT-डिकोडिंग लाइब्रेरी. इस्तेमाल की जाने वाली चीज़ें Google की सार्वजनिक कुंजियां, इनमें उपलब्ध हैं JWK या पुष्टि करने के लिए, PEM फ़ॉर्मैट टोकन का सिग्नेचर होता है.
डिकोड किए जाने पर, JWT के दावे का उदाहरण यहां दिया गया है:
{
  "sub": "1234567890",      // The unique ID of the user's Google Account
  "iss": "https://accounts.google.com",        // The assertion's issuer
  "aud": "123-abc.apps.googleusercontent.com", // Your server's client ID
  "iat": 233366400,         // Unix timestamp of the assertion's creation time
  "exp": 233370000,         // Unix timestamp of the assertion's expiration time
  "name": "Jan Jansen",
  "given_name": "Jan",
  "family_name": "Jansen",
  "email": "jan@gmail.com", // If present, the user's email address
  "email_verified": true,   // true, if Google has verified the email address
  "hd": "example.com",      // If present, the host domain of the user's GSuite email address
                            // If present, a URL to user's profile picture
  "picture": "https://lh3.googleusercontent.com/a-/AOh14GjlTnZKHAeb94A-FmEbwZv7uJD986VOF1mJGb2YYQ",
  "locale": "en_US"         // User's locale, from browser or phone settings
}
टोकन के हस्ताक्षर की पुष्टि करने के अलावा, यह भी पुष्टि करें कि
जारी करने वाला (iss फ़ील्ड) https://accounts.google.com है, जो ऑडियंस
(aud फ़ील्ड) आपको असाइन किया गया क्लाइंट आईडी है और टोकन की समयसीमा खत्म नहीं हुई है
(exp फ़ील्ड).
email, email_verified, और hd फ़ील्ड का इस्तेमाल करके, यह पता लगाया जा सकता है कि
ईमेल पते को Google होस्ट करता है और आधिकारिक तौर पर उपलब्ध कराता है. ऐसे मामले जहां Google
उस उपयोगकर्ता के पास फ़िलहाल खाते का असली मालिक होने की अनुमति है
और पासवर्ड या अन्य चैलेंज वाले तरीकों को स्किप किया जा सकता है. या फिर, इन तरीकों से
का इस्तेमाल, खाता जोड़ने से पहले उसकी पुष्टि करने के लिए किया जा सकता है.
ऐसे मामले, जिनमें Google आधिकारिक जानकारी देता है:
emailमें@gmail.comसफ़िक्स लगा है. यह Gmail खाता है.email_verifiedसही है औरhdसेट है, यह एक G Suite खाता है.
उपयोगकर्ता, Gmail या G Suite का इस्तेमाल किए बिना Google खातों के लिए रजिस्टर कर सकते हैं. टास्क कब शुरू होगा
email में @gmail.com सफ़िक्स नहीं है और hd मौजूद नहीं है
पुष्टि करने के लिए, भरोसेमंद और पासवर्ड या अन्य चैलेंज वाले तरीकों का इस्तेमाल करने का सुझाव दिया जाता है
उपयोगकर्ता है. email_verified भी सही हो सकती है, क्योंकि Google ने शुरुआत में
Google खाता बनाए जाने के समय उपयोगकर्ता, हालांकि तीसरे पक्ष का मालिकाना हक
शायद उसके बाद ईमेल खाता बदल गया है.
देखें कि आपके पुष्टि करने वाले सिस्टम में Google खाता पहले से मौजूद है या नहीं
देखें कि इनमें से कोई एक शर्त सही है या नहीं:
- दावे के
subफ़ील्ड में मौजूद Google खाता आईडी, आपके उपयोगकर्ता का है डेटाबेस. - दावे में दिया गया ईमेल पता, आपके उपयोगकर्ता डेटाबेस के किसी उपयोगकर्ता से मेल खाता है.
अगर उपयोगकर्ता का कोई खाता मिल जाता है, तो ऐक्सेस टोकन जारी करें और अपने एचटीटीपीएस रिस्पॉन्स के मुख्य हिस्से में, JSON ऑब्जेक्ट में वैल्यू दिखाएं, जैसा कि इस उदाहरण में दिखाया गया है:
{
  "token_type": "Bearer",
  "access_token": "ACCESS_TOKEN",
  "refresh_token": "REFRESH_TOKEN",
  "expires_in": SECONDS_TO_EXPIRATION
}
कुछ मामलों में, हो सकता है कि आईडी टोकन के आधार पर खाता लिंक न किया जा सके. अगर यह
किसी भी वजह से ऐसा करता है, तो आपके टोकन एक्सचेंज एंडपॉइंट को एचटीटीपी के साथ जवाब देना होगा
401 वाली गड़बड़ी, जो error=linking_error के बारे में बताती है, जैसा कि नीचे दिए गए उदाहरण में बताया गया है:
HTTP/1.1 401 Unauthorized
Content-Type: application/json;charset=UTF-8

{
  "error":"linking_error",
  "login_hint":"foo@bar.com"
}
जब Google को linking_error के साथ 401 वाली गड़बड़ी का जवाब मिलता है, तो Google
उपयोगकर्ता को आपके ऑथराइज़ेशन एंडपॉइंट पर भेजने के लिए, पैरामीटर के तौर पर login_hint का इस्तेमाल करता है. कॉन्टेंट बनाने
उपयोगकर्ता अपने ब्राउज़र में OAuth लिंक करने के फ़्लो का इस्तेमाल करके, खाता लिंक करता है.
'Google साइन-इन' के ज़रिए खाता बनाने का काम मैनेज करना (इंटेंट बनाएं)
जब किसी उपयोगकर्ता को आपकी सेवा पर खाता बनाना होता है, तब Google इसके लिए अनुरोध करता है
आपके टोकन एक्सचेंज एंडपॉइंट से कनेक्ट करता है, जो intent=create के बारे में बताता है.
अनुरोध में यह फ़ॉर्म मौजूद है:
POST /token HTTP/1.1
Host: oauth2.example.com
Content-Type: application/x-www-form-urlencoded

response_type=token&grant_type=urn:ietf:params:oauth:grant-type:jwt-bearer&scope=SCOPES&intent=create&assertion=JWT&client_id=GOOGLE_CLIENT_ID&client_secret=GOOGLE_CLIENT_SECRET
यह ज़रूरी है कि आपका टोकन एक्सचेंज एंडपॉइंट इन पैरामीटर को मैनेज कर सके:
| टोकन एंडपॉइंट पैरामीटर | |
|---|---|
intent |
इन अनुरोधों के लिए, इस पैरामीटर की वैल्यू create है. |
grant_type |
किस टाइप के टोकन की अदला-बदली की जा रही है. इन अनुरोधों के लिए, यह
पैरामीटर की वैल्यू urn:ietf:params:oauth:grant-type:jwt-bearer है. |
assertion |
JSON Web Token (JWT), जो Google का हस्ताक्षर किया गया दावा उपलब्ध कराता है उपयोगकर्ता की पहचान होती है. JWT में ऐसी जानकारी होती है जिसमें उपयोगकर्ता Google खाता आईडी, नाम, और ईमेल पता. |
client_id |
वह क्लाइंट आईडी जिसे आपने Google को असाइन किया है. |
client_secret |
वह क्लाइंट सीक्रेट जिसे आपने Google को असाइन किया है. |
assertion पैरामीटर के JWT में उपयोगकर्ता का Google खाता आईडी होता है,
नाम और ईमेल पता, जिनका उपयोग करके आप अपने
सेवा.
create इंटेंट के अनुरोधों का जवाब देने के लिए, आपके टोकन एक्सचेंज एंडपॉइंट को ये चरण पूरे करने होंगे:
- JWT के दावे की पुष्टि करें और उन्हें डिकोड करें.
- उपयोगकर्ता की जानकारी की पुष्टि करें और नया खाता बनाएं.
JWT के दावे की पुष्टि करना और उसे डिकोड करना
JWT के दावे की पुष्टि करने और डिकोड करने के लिए, आपकी भाषा के लिए JWT-डिकोडिंग लाइब्रेरी. इस्तेमाल की जाने वाली चीज़ें Google की सार्वजनिक कुंजियां, इनमें उपलब्ध हैं JWK या पुष्टि करने के लिए, PEM फ़ॉर्मैट टोकन का सिग्नेचर होता है.
डिकोड किए जाने पर, JWT के दावे का उदाहरण यहां दिया गया है:
{
  "sub": "1234567890",      // The unique ID of the user's Google Account
  "iss": "https://accounts.google.com",        // The assertion's issuer
  "aud": "123-abc.apps.googleusercontent.com", // Your server's client ID
  "iat": 233366400,         // Unix timestamp of the assertion's creation time
  "exp": 233370000,         // Unix timestamp of the assertion's expiration time
  "name": "Jan Jansen",
  "given_name": "Jan",
  "family_name": "Jansen",
  "email": "jan@gmail.com", // If present, the user's email address
  "email_verified": true,   // true, if Google has verified the email address
  "hd": "example.com",      // If present, the host domain of the user's GSuite email address
                            // If present, a URL to user's profile picture
  "picture": "https://lh3.googleusercontent.com/a-/AOh14GjlTnZKHAeb94A-FmEbwZv7uJD986VOF1mJGb2YYQ",
  "locale": "en_US"         // User's locale, from browser or phone settings
}
टोकन के हस्ताक्षर की पुष्टि करने के अलावा, यह भी पुष्टि करें कि
जारी करने वाला (iss फ़ील्ड) https://accounts.google.com है, जो ऑडियंस
(aud फ़ील्ड) आपको असाइन किया गया क्लाइंट आईडी है और टोकन की समयसीमा खत्म नहीं हुई है
(exp फ़ील्ड).
email, email_verified, और hd फ़ील्ड का इस्तेमाल करके, यह पता लगाया जा सकता है कि
ईमेल पते को Google होस्ट करता है और आधिकारिक तौर पर उपलब्ध कराता है. ऐसे मामले जहां Google
उस उपयोगकर्ता के पास फ़िलहाल खाते का असली मालिक होने की अनुमति है
और पासवर्ड या अन्य चैलेंज वाले तरीकों को स्किप किया जा सकता है. या फिर, इन तरीकों से
का इस्तेमाल, खाता जोड़ने से पहले उसकी पुष्टि करने के लिए किया जा सकता है.
ऐसे मामले, जिनमें Google आधिकारिक जानकारी देता है:
emailमें@gmail.comसफ़िक्स लगा है. यह Gmail खाता है.email_verifiedसही है औरhdसेट है, यह एक G Suite खाता है.
उपयोगकर्ता, Gmail या G Suite का इस्तेमाल किए बिना Google खातों के लिए रजिस्टर कर सकते हैं. टास्क कब शुरू होगा
email में @gmail.com सफ़िक्स नहीं है और hd मौजूद नहीं है
पुष्टि करने के लिए, भरोसेमंद और पासवर्ड या अन्य चैलेंज वाले तरीकों का इस्तेमाल करने का सुझाव दिया जाता है
उपयोगकर्ता है. email_verified भी सही हो सकती है, क्योंकि Google ने शुरुआत में
Google खाता बनाए जाने के समय उपयोगकर्ता, हालांकि तीसरे पक्ष का मालिकाना हक
शायद उसके बाद ईमेल खाता बदल गया है.
उपयोगकर्ता जानकारी की पुष्टि करें और नया खाता बनाएं
देखें कि इनमें से कोई एक शर्त सही है या नहीं:
- दावे के
subफ़ील्ड में मौजूद Google खाता आईडी, आपके उपयोगकर्ता का है डेटाबेस. - दावे में दिया गया ईमेल पता, आपके उपयोगकर्ता डेटाबेस के किसी उपयोगकर्ता से मेल खाता है.
अगर दोनों में से कोई भी शर्त सही है, तो उपयोगकर्ता को उसका मौजूदा खाता लिंक करने के लिए कहें
साइन इन करना होगा. ऐसा करने के लिए, अनुरोध का जवाब एचटीटीपी 401 गड़बड़ी के साथ दें
जो error=linking_error के बारे में बताता है और उपयोगकर्ता का ईमेल पता
login_hint. यहां रिस्पॉन्स का सैंपल दिया गया है:
HTTP/1.1 401 Unauthorized
Content-Type: application/json;charset=UTF-8

{
  "error":"linking_error",
  "login_hint":"foo@bar.com"
}
जब Google को linking_error के साथ 401 वाली गड़बड़ी का जवाब मिलता है, तो Google
उपयोगकर्ता को आपके ऑथराइज़ेशन एंडपॉइंट पर भेजने के लिए, पैरामीटर के तौर पर login_hint का इस्तेमाल करता है. कॉन्टेंट बनाने
उपयोगकर्ता अपने ब्राउज़र में OAuth लिंक करने के फ़्लो का इस्तेमाल करके, खाता लिंक करता है.
अगर कोई भी शर्त सही नहीं होती है, तो इस जानकारी के साथ एक नया उपयोगकर्ता खाता बनाएं में दी गई जानकारी होती है. नए खातों में आम तौर पर पासवर्ड सेट नहीं होता है. यह समय है हमारा सुझाव है कि आप अन्य प्लैटफ़ॉर्म में 'Google साइन इन' को जोड़ें, ताकि उपयोगकर्ता इन कामों को कर सकें अपने ऐप्लिकेशन के सभी प्लैटफ़ॉर्म पर Google के साथ लॉग इन करें. इसके अलावा, आपके पास उपयोगकर्ता को एक ऐसा लिंक ईमेल कर सकता है जो अन्य प्लैटफ़ॉर्म पर साइन इन करने के लिए उपयोगकर्ता को पासवर्ड सेट करना होगा.
कॉन्टेंट बनाने के बाद, ऐक्सेस टोकन जारी करें और टोकन को रीफ़्रेश करें और JSON ऑब्जेक्ट में वैल्यू आपके एचटीटीपीएस रिस्पॉन्स का मुख्य हिस्सा, जैसा कि नीचे दिए गए उदाहरण में दिखाया गया है:
{
  "token_type": "Bearer",
  "access_token": "ACCESS_TOKEN",
  "refresh_token": "REFRESH_TOKEN",
  "expires_in": SECONDS_TO_EXPIRATION
}
अपना Google API क्लाइंट आईडी पाना
खाता लिंक करने के रजिस्ट्रेशन की प्रोसेस के दौरान, आपको अपना Google API क्लाइंट आईडी देना होगा.
OAuth लिंक करने के लिए, आपने जो प्रोजेक्ट बनाया है उसका इस्तेमाल करके अपना एपीआई क्लाइंट आईडी पाने के लिए. ऐसा करने के लिए, यह तरीका अपनाएं:
Google API प्रोजेक्ट बनाएं या कोई मौजूदा प्रोजेक्ट चुनें.
अगर आपके प्रोजेक्ट में वेब ऐप्लिकेशन टाइप के लिए क्लाइंट आईडी नहीं है, तो एक बनाने के लिए क्लाइंट बनाएं पर क्लिक करें. अनुमति वाले JavaScript ऑरिजिन बॉक्स में, अपनी साइट का डोमेन ज़रूर शामिल करें. लोकल टेस्ट या डेवलपमेंट करते समय, आपको अनुमति वाले JavaScript ऑरिजिन फ़ील्ड में
http://localhostऔरhttp://localhost:<port_number>, दोनों को जोड़ना होगा.
लागू करने की पुष्टि करना
OAuth 2.0 Playground टूल का इस्तेमाल करके, पुष्टि की जा सकती है कि आपने OAuth 2.0 को सही तरीके से लागू किया है या नहीं.
टूल में, नीचे दिया गया तरीका अपनाएं:
- OAuth 2.0 कॉन्फ़िगरेशन विंडो खोलने के लिए, कॉन्फ़िगरेशन पर क्लिक करें.
- OAuth फ़्लो फ़ील्ड में, क्लाइंट-साइड चुनें.
- OAuth एंडपॉइंट फ़ील्ड में, कस्टम चुनें.
- अपने OAuth 2.0 एंडपॉइंट और उस क्लाइंट आईडी की जानकारी दें जिसे आपने Google को असाइन किया है. इसके लिए, दिए गए फ़ील्ड का इस्तेमाल करें.
- पहला चरण सेक्शन में, Google का कोई स्कोप न चुनें. इसके बजाय, इस फ़ील्ड को खाली छोड़ दें या अपने सर्वर के लिए मान्य स्कोप टाइप करें. अगर OAuth स्कोप का इस्तेमाल नहीं किया जा रहा है, तो कोई भी स्ट्रिंग टाइप करें. इसके बाद, एपीआई को अनुमति दें पर क्लिक करें.
- दूसरे चरण और तीसरा सेक्शन में, OAuth 2.0 फ़्लो देखें और पुष्टि करें कि हर चरण आपके हिसाब से काम कर रहा हो.
Google खाते को लिंक करने के डेमो टूल का इस्तेमाल करके, पुष्टि की जा सकती है कि आपने इसे सही तरीके से लागू किया है या नहीं.
टूल में, नीचे दिया गया तरीका अपनाएं:
- Google से साइन इन करें बटन पर क्लिक करें.
- वह खाता चुनें जिसे आपको लिंक करना है.
- सेवा आईडी डालें.
- इसके अलावा, एक या उससे ज़्यादा ऐसे स्कोप डालें जिनके लिए आपको ऐक्सेस का अनुरोध करना है.
- डेमो शुरू करें पर क्लिक करें.
- जब कहा जाए, तब पुष्टि करें कि आपके पास खाते को लिंक करने के अनुरोध को स्वीकार और अस्वीकार करने का विकल्प है.
- पुष्टि करें कि आपको अपने प्लैटफ़ॉर्म पर रीडायरेक्ट किया गया है.