Genel Bakış
OAuth tabanlı Google ile Oturum Açma basitleştirilmiş bağlantısı, OAuth bağlantısının üzerine Google ile Oturum Açma'yı ekler. Bu, Google kullanıcıları için sorunsuz bir bağlantı deneyimi sağlar ve hesap oluşturma özelliğini etkinleştirir. Bu sayede kullanıcı, Google Hesabını kullanarak hizmetinizde yeni bir hesap oluşturabilir.
OAuth ve Google ile oturum açma özelliğini kullanarak hesap bağlama işlemini gerçekleştirmek için aşağıdaki genel adımları uygulayın:
- Öncelikle kullanıcıdan Google profiline erişmek için izin vermesini isteyin.
- Kullanıcı hesabının mevcut olup olmadığını kontrol etmek için profilindeki bilgileri kullanın.
- Mevcut kullanıcılar için hesapları bağlayın.
- Kimlik doğrulama sisteminizde Google kullanıcısıyla eşleşen bir kullanıcı bulamıyorsanız Google'dan alınan kimlik jetonunu doğrulayın. Ardından, kimlik jetonunda bulunan profil bilgilerine göre bir kullanıcı oluşturabilirsiniz.
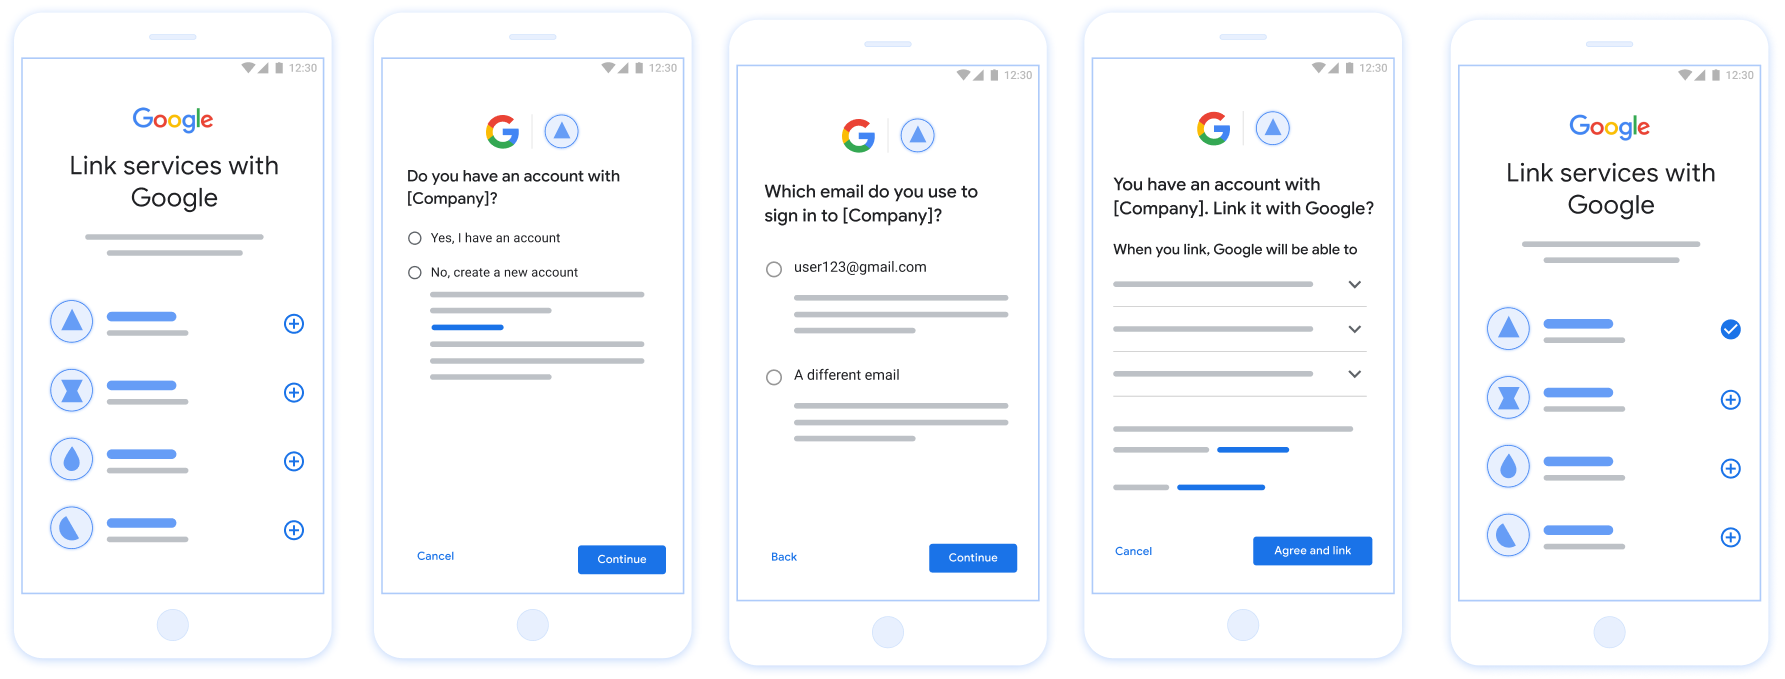
Şekil 1. Basitleştirilmiş Bağlantı ile kullanıcının telefonunda hesap bağlama
Basitleştirilmiş Bağlantı Oluşturma ile İlgili Şartlar
- Temel web OAuth bağlantısı akışını uygulayın. Hizmetiniz, OAuth 2.0 uyumlu yetkilendirme ve jeton değişimi uç noktalarını desteklemelidir.
- Jeton değişimi uç noktanız JSON Web Jetonu (JWT) iddialarını desteklemeli ve
check,createvegetintent'lerini uygulamalıdır.
OAuth sunucunuzu uygulama
Jeton değişimi uç noktanız check, create, get intent'lerini desteklemelidir. Aşağıda, hesap bağlama akışında tamamlanan adımlar gösterilmektedir ve farklı intent'lerin ne zaman çağrıldığı belirtilmektedir:
- Kullanıcının kimlik doğrulama sisteminizde hesabı var mı? (Kullanıcı EVET veya HAYIR'ı seçerek karar verir)
- EVET : Kullanıcı, platformunuzda oturum açmak için Google Hesabı ile ilişkili e-postayı kullanıyor mu? (Kullanıcı EVET veya HAYIR'ı seçerek karar verir)
- EVET : Kullanıcının kimlik doğrulama sisteminizde eşleşen bir hesabı var mı? (
check intentnumaralı telefon onay için aranır)- EVET : get intent başarılı bir şekilde döndürülürse
get intentçağrılır ve hesap bağlanır. - HAYIR : Yeni Hesap Oluştur? (Kullanıcı EVET veya HAYIR'ı seçerek karar verir)
- EVET : create intent başarılı bir şekilde döndürülürse
create intentçağrılır ve hesap bağlanır. - HAYIR : Web OAuth akışı tetiklenir, kullanıcı kendi tarayıcısına yönlendirilir ve kullanıcıya farklı bir e-posta ile bağlantı kurma seçeneği sunulur.
- EVET : create intent başarılı bir şekilde döndürülürse
- EVET : get intent başarılı bir şekilde döndürülürse
- HAYIR : Web OAuth akışı tetiklenir, kullanıcı kendi tarayıcısına yönlendirilir ve farklı bir e-posta ile bağlantı kurma seçeneği sunulur.
- EVET : Kullanıcının kimlik doğrulama sisteminizde eşleşen bir hesabı var mı? (
- HAYIR : Kullanıcının kimlik doğrulama sisteminizde eşleşen bir hesabı var mı? (
check intentnumaralı telefon onay için aranır)- EVET : get intent başarılı bir şekilde döndürülürse
get intentçağrılır ve hesap bağlanır. - HAYIR : create intent başarıyla döndürülürse
create intentçağrılır ve hesap bağlanır.
- EVET : get intent başarılı bir şekilde döndürülürse
- EVET : Kullanıcı, platformunuzda oturum açmak için Google Hesabı ile ilişkili e-postayı kullanıyor mu? (Kullanıcı EVET veya HAYIR'ı seçerek karar verir)
Mevcut kullanıcı hesabı olup olmadığını kontrol etme (amacı kontrol edin)
Kullanıcı Google profiline erişim izni verdikten sonra Google, isteği tarafından sağlanır. İlgili içeriği oluşturmak için kullanılan onay işlemi, kullanıcının Google Hesabı kimliğini, ve e-posta adresini girin. Sizin için yapılandırılan jeton değişimi uç noktası: bu isteği yerine getirir.
İlgili Google Hesabı zaten kimlik doğrulamanızda mevcutsa
kullanıyorsanız jeton değişimi uç noktanız account_found=true ile yanıt verir. Öğe
Google Hesabı mevcut bir kullanıcıyla eşleşmiyor, jeton değişimi uç noktanız
account_found=false ile birlikte HTTP 404 Bulunamadı hatası döndürüyor.
Talep aşağıdaki biçimdedir:
POST /token HTTP/1.1
Host: oauth2.example.com
Content-Type: application/x-www-form-urlencoded

grant_type=urn:ietf:params:oauth:grant-type:jwt-bearer&intent=check&assertion=JWT&scope=SCOPES&client_id=GOOGLE_CLIENT_ID&client_secret=GOOGLE_CLIENT_SECRET
Jeton değişimi uç noktanız aşağıdaki parametreleri işleyebilmelidir:
| Jeton uç noktası parametreleri | |
|---|---|
intent |
Bu istekler için bu parametrenin değeri şu şekildedir:
check |
grant_type |
Değişen jetonun türü. Söz konusu
parametresi urn:ietf:params:oauth:grant-type:jwt-bearer değerine sahiptir. |
assertion |
Google Cloud konsolunun imzalı onayını sağlayan bir JSON Web Token (JWT) kullanıcı kimliği. JWT, kullanıcının Google Hesabı kimliği, adı ve e-posta adresi. |
client_id |
Google'a atadığınız istemci kimliği. |
client_secret |
Google'a atadığınız istemci gizli anahtarı. |
check intent isteklerine yanıt vermek için jeton değişimi uç noktanızın aşağıdaki adımları uygulaması gerekir:
- JWT onayını doğrulayın ve kodunu çözün.
- Google hesabının kimlik doğrulama sisteminizde olup olmadığını kontrol edin.
JWT onayını doğrulama ve kodunu çözme
JWT onayını doğrulamak ve kodunu çözmek için Diliniz için JWT kod çözme kitaplığı. Tekliflerinizi otomatikleştirmek ve optimize etmek için Google'ın genel anahtarları JWK veya PEM biçimlerini doğrulamak için jetonun imzası.
Kodu çözüldüğünde JWT onayı aşağıdaki örnek gibi görünür:
{
  "sub": "1234567890",      // The unique ID of the user's Google Account
  "iss": "https://accounts.google.com",        // The assertion's issuer
  "aud": "123-abc.apps.googleusercontent.com", // Your server's client ID
  "iat": 233366400,         // Unix timestamp of the assertion's creation time
  "exp": 233370000,         // Unix timestamp of the assertion's expiration time
  "name": "Jan Jansen",
  "given_name": "Jan",
  "family_name": "Jansen",
  "email": "jan@gmail.com", // If present, the user's email address
  "email_verified": true,   // true, if Google has verified the email address
  "hd": "example.com",      // If present, the host domain of the user's GSuite email address
                            // If present, a URL to user's profile picture
  "picture": "https://lh3.googleusercontent.com/a-/AOh14GjlTnZKHAeb94A-FmEbwZv7uJD986VOF1mJGb2YYQ",
  "locale": "en_US"         // User's locale, from browser or phone settings
}
Jetonun imzasını doğrulamanın yanı sıra onaylamanın
iss alanı https://accounts.google.com ise,
(aud alanı) atanmış istemci kimliğinizdir ve jetonun süresinin dolmadığından emin olun.
(exp alanı).
email, email_verified ve hd alanlarını kullanarak aşağıdakilerin geçerli olup olmadığını belirleyebilirsiniz:
Google, e-posta adreslerini barındırır ve bu adres konusunda yetkilidir. Google'ın,
kullanıcının şu anda meşru hesap sahibi olduğu bilinen yetkili
Ayrıca şifre veya diğer sorgulama yöntemlerini atlayabilirsiniz. Aksi halde bu yöntemler
önce hesabı doğrulamak için kullanılabilir.
Google'ın yetkili olduğu durumlar:
emailadresinin@gmail.comson eki var. Bu bir Gmail hesabı.email_verifieddoğru vehdayarlandı. Bu bir G Suite hesabı.
Kullanıcılar, Gmail veya G Suite kullanmadan Google Hesaplarına kaydolabilir. Zaman
email, @gmail.com son eki içermiyor ve hd mevcut değilse Google
kimlik doğrulama, şifre veya diğer sorgulama yöntemlerinin önerildiğini
gösterir. email_verified, Google ilk olarak
kullanıcı hesabı sırasında üçüncü tarafın
e-posta hesabı değişmiş olabilir.
Google Hesabı'nın kimlik doğrulama sisteminizde olup olmadığını kontrol edin
Aşağıdaki koşullardan herhangi birinin doğru olup olmadığını kontrol edin:
- Onaylamanın
subalanında bulunan Google Hesabı kimliği kullanıcınızda yer alır. - Onaylamadaki e-posta adresi, kullanıcı veritabanınızdaki bir kullanıcıyla eşleşiyor.
İki koşul da doğruysa kullanıcı zaten kaydolmuş demektir. Böyle bir durumda, şuna benzer bir yanıt döndür:
HTTP/1.1 200 Success
Content-Type: application/json;charset=UTF-8

{
  "account_found":"true",
}
Belgede belirtilen Google Hesabı Kimliği veya e-posta adresi
Onaylama, veritabanınızdaki bir kullanıcıyla eşleşiyorsa kullanıcı henüz kaydolmadı. İçinde
Bu durumda, jeton değişimi uç noktanızın HTTP 404 hatasıyla yanıt vermesi gerekir
değerini döndürür, aşağıdaki örnekte olduğu gibi: "account_found": "false"
HTTP/1.1 404 Not found
Content-Type: application/json;charset=UTF-8

{
  "account_found":"false",
}
Otomatik bağlamayı yönetme (amaca alma)
Kullanıcı Google profiline erişim izni verdikten sonra Google, isteği tarafından sağlanır. İlgili içeriği oluşturmak için kullanılan onay işlemi, kullanıcının Google Hesabı kimliğini, ve e-posta adresini girin. Sizin için yapılandırılan jeton değişimi uç noktası: bu isteği yerine getirir.
İlgili Google Hesabı zaten kimlik doğrulamanızda mevcutsa
yeni bir sistem yüklediğinizde, jeton değişimi uç noktanız kullanıcı için bir jeton döndürür. Öğe
Google Hesabı mevcut bir kullanıcıyla eşleşmiyor, jeton değişimi uç noktanız
bir linking_error hatası ve isteğe bağlı login_hint döndürür.
Talep aşağıdaki biçimdedir:
POST /token HTTP/1.1
Host: oauth2.example.com
Content-Type: application/x-www-form-urlencoded

grant_type=urn:ietf:params:oauth:grant-type:jwt-bearer&intent=get&assertion=JWT&scope=SCOPES&client_id=GOOGLE_CLIENT_ID&client_secret=GOOGLE_CLIENT_SECRET
Jeton değişimi uç noktanız aşağıdaki parametreleri işleyebilmelidir:
| Jeton uç noktası parametreleri | |
|---|---|
intent |
Bu istekler için bu parametrenin değeri get şeklindedir. |
grant_type |
Değişen jetonun türü. Söz konusu
parametresi urn:ietf:params:oauth:grant-type:jwt-bearer değerine sahiptir. |
assertion |
Google Cloud konsolunun imzalı onayını sağlayan bir JSON Web Token (JWT) kullanıcı kimliği. JWT, kullanıcının Google Hesabı kimliği, adı ve e-posta adresi. |
scope |
İsteğe bağlı: Google'ın istekte bulunacak şekilde yapılandırdığınız tüm kapsamlar yardımcı olur. |
client_id |
Google'a atadığınız istemci kimliği. |
client_secret |
Google'a atadığınız istemci gizli anahtarı. |
get intent isteklerine yanıt vermek için jeton değişimi uç noktanızın aşağıdaki adımları uygulaması gerekir:
- JWT onayını doğrulayın ve kodunu çözün.
- Google hesabının kimlik doğrulama sisteminizde olup olmadığını kontrol edin.
JWT onayını doğrulama ve kodunu çözme
JWT onayını doğrulamak ve kodunu çözmek için Diliniz için JWT kod çözme kitaplığı. Tekliflerinizi otomatikleştirmek ve optimize etmek için Google'ın genel anahtarları JWK veya PEM biçimlerini doğrulamak için jetonun imzası.
Kodu çözüldüğünde JWT onayı aşağıdaki örnek gibi görünür:
{
  "sub": "1234567890",      // The unique ID of the user's Google Account
  "iss": "https://accounts.google.com",        // The assertion's issuer
  "aud": "123-abc.apps.googleusercontent.com", // Your server's client ID
  "iat": 233366400,         // Unix timestamp of the assertion's creation time
  "exp": 233370000,         // Unix timestamp of the assertion's expiration time
  "name": "Jan Jansen",
  "given_name": "Jan",
  "family_name": "Jansen",
  "email": "jan@gmail.com", // If present, the user's email address
  "email_verified": true,   // true, if Google has verified the email address
  "hd": "example.com",      // If present, the host domain of the user's GSuite email address
                            // If present, a URL to user's profile picture
  "picture": "https://lh3.googleusercontent.com/a-/AOh14GjlTnZKHAeb94A-FmEbwZv7uJD986VOF1mJGb2YYQ",
  "locale": "en_US"         // User's locale, from browser or phone settings
}
Jetonun imzasını doğrulamanın yanı sıra onaylamanın
iss alanı https://accounts.google.com ise,
(aud alanı) atanmış istemci kimliğinizdir ve jetonun süresinin dolmadığından emin olun.
(exp alanı).
email, email_verified ve hd alanlarını kullanarak aşağıdakilerin geçerli olup olmadığını belirleyebilirsiniz:
Google, e-posta adreslerini barındırır ve bu adres konusunda yetkilidir. Google'ın,
kullanıcının şu anda meşru hesap sahibi olduğu bilinen yetkili
Ayrıca şifre veya diğer sorgulama yöntemlerini atlayabilirsiniz. Aksi halde bu yöntemler
önce hesabı doğrulamak için kullanılabilir.
Google'ın yetkili olduğu durumlar:
emailadresinin@gmail.comson eki var. Bu bir Gmail hesabı.email_verifieddoğru vehdayarlandı. Bu bir G Suite hesabı.
Kullanıcılar, Gmail veya G Suite kullanmadan Google Hesaplarına kaydolabilir. Zaman
email, @gmail.com son eki içermiyor ve hd mevcut değilse Google
kimlik doğrulama, şifre veya diğer sorgulama yöntemlerinin önerildiğini
gösterir. email_verified, Google ilk olarak
kullanıcı hesabı sırasında üçüncü tarafın
e-posta hesabı değişmiş olabilir.
Google Hesabı'nın kimlik doğrulama sisteminizde olup olmadığını kontrol edin
Aşağıdaki koşullardan herhangi birinin doğru olup olmadığını kontrol edin:
- Onaylamanın
subalanında bulunan Google Hesabı kimliği kullanıcınızda yer alır. - Onaylamadaki e-posta adresi, kullanıcı veritabanınızdaki bir kullanıcıyla eşleşiyor.
Kullanıcı için bir hesap bulunursa bir erişim jetonu yayınlayın ve değerleri, aşağıdaki örnekte gösterildiği gibi HTTPS yanıtınızın gövdesinde bir JSON nesnesinin içinde döndürün:
{
  "token_type": "Bearer",
  "access_token": "ACCESS_TOKEN",
  "refresh_token": "REFRESH_TOKEN",
  "expires_in": SECONDS_TO_EXPIRATION
}
Bazı durumlarda kimlik jetonuyla hesap bağlama işlemi kullanıcı için başarısız olabilir. Eğer
herhangi bir nedenle olursa jeton değişimi uç noktanızın bir HTTP
Aşağıdaki örnekte gösterildiği gibi, error=linking_error belirten 401 hatası:
HTTP/1.1 401 Unauthorized
Content-Type: application/json;charset=UTF-8

{
  "error":"linking_error",
  "login_hint":"foo@bar.com"
}
Google linking_error ile ilgili bir 401 hatası yanıtı aldığında, Google
kullanıcıyı parametre olarak login_hint ile yetkilendirme uç noktanıza yönlendirin. İlgili içeriği oluşturmak için kullanılan
Kullanıcı, tarayıcıdaki OAuth bağlantı akışını kullanarak hesap bağlama işlemini tamamladığında.
Google ile Oturum Açma aracılığıyla hesap oluşturma işlemini yönetme (amaç oluşturma)
Kullanıcının hizmetinizde hesap oluşturması gerektiğinde Google bir istekte bulunur
intent=create değerini belirten jeton değişimi uç noktanıza bağlayın.
Talep aşağıdaki biçimdedir:
POST /token HTTP/1.1
Host: oauth2.example.com
Content-Type: application/x-www-form-urlencoded

response_type=token&grant_type=urn:ietf:params:oauth:grant-type:jwt-bearer&scope=SCOPES&intent=create&assertion=JWT&client_id=GOOGLE_CLIENT_ID&client_secret=GOOGLE_CLIENT_SECRET
Jeton değişimi uç noktanız aşağıdaki parametreleri işleyebilmelidir:
| Jeton uç noktası parametreleri | |
|---|---|
intent |
Bu istekler için bu parametrenin değeri create şeklindedir. |
grant_type |
Değişen jetonun türü. Söz konusu
parametresi urn:ietf:params:oauth:grant-type:jwt-bearer değerine sahiptir. |
assertion |
Google Cloud konsolunun imzalı onayını sağlayan bir JSON Web Token (JWT) kullanıcı kimliği. JWT, kullanıcının Google Hesabı kimliği, adı ve e-posta adresi. |
client_id |
Google'a atadığınız istemci kimliği. |
client_secret |
Google'a atadığınız istemci gizli anahtarı. |
assertion parametresindeki JWT, kullanıcının Google Hesabı kimliğini içerir.
adınızı ve e-posta adresinizi girin. Bu bilgileri
geliştirmenizi sağlar.
create intent isteklerine yanıt vermek için jeton değişimi uç noktanızın aşağıdaki adımları uygulaması gerekir:
- JWT onayını doğrulayın ve kodunu çözün.
- Kullanıcı bilgilerini doğrulayın ve yeni hesap oluşturun.
JWT onayını doğrulama ve kodunu çözme
JWT onayını doğrulamak ve kodunu çözmek için Diliniz için JWT kod çözme kitaplığı. Tekliflerinizi otomatikleştirmek ve optimize etmek için Google'ın genel anahtarları JWK veya PEM biçimlerini doğrulamak için jetonun imzası.
Kodu çözüldüğünde JWT onayı aşağıdaki örnek gibi görünür:
{
  "sub": "1234567890",      // The unique ID of the user's Google Account
  "iss": "https://accounts.google.com",        // The assertion's issuer
  "aud": "123-abc.apps.googleusercontent.com", // Your server's client ID
  "iat": 233366400,         // Unix timestamp of the assertion's creation time
  "exp": 233370000,         // Unix timestamp of the assertion's expiration time
  "name": "Jan Jansen",
  "given_name": "Jan",
  "family_name": "Jansen",
  "email": "jan@gmail.com", // If present, the user's email address
  "email_verified": true,   // true, if Google has verified the email address
  "hd": "example.com",      // If present, the host domain of the user's GSuite email address
                            // If present, a URL to user's profile picture
  "picture": "https://lh3.googleusercontent.com/a-/AOh14GjlTnZKHAeb94A-FmEbwZv7uJD986VOF1mJGb2YYQ",
  "locale": "en_US"         // User's locale, from browser or phone settings
}
Jetonun imzasını doğrulamanın yanı sıra onaylamanın
iss alanı https://accounts.google.com ise,
(aud alanı) atanmış istemci kimliğinizdir ve jetonun süresinin dolmadığından emin olun.
(exp alanı).
email, email_verified ve hd alanlarını kullanarak aşağıdakilerin geçerli olup olmadığını belirleyebilirsiniz:
Google, e-posta adreslerini barındırır ve bu adres konusunda yetkilidir. Google'ın,
kullanıcının şu anda meşru hesap sahibi olduğu bilinen yetkili
Ayrıca şifre veya diğer sorgulama yöntemlerini atlayabilirsiniz. Aksi halde bu yöntemler
önce hesabı doğrulamak için kullanılabilir.
Google'ın yetkili olduğu durumlar:
emailadresinin@gmail.comson eki var. Bu bir Gmail hesabı.email_verifieddoğru vehdayarlandı. Bu bir G Suite hesabı.
Kullanıcılar, Gmail veya G Suite kullanmadan Google Hesaplarına kaydolabilir. Zaman
email, @gmail.com son eki içermiyor ve hd mevcut değilse Google
kimlik doğrulama, şifre veya diğer sorgulama yöntemlerinin önerildiğini
gösterir. email_verified, Google ilk olarak
kullanıcı hesabı sırasında üçüncü tarafın
e-posta hesabı değişmiş olabilir.
Kullanıcı bilgilerini doğrulayın ve yeni hesap oluşturun
Aşağıdaki koşullardan herhangi birinin doğru olup olmadığını kontrol edin:
- Onaylamanın
subalanında bulunan Google Hesabı kimliği kullanıcınızda yer alır. - Onaylamadaki e-posta adresi, kullanıcı veritabanınızdaki bir kullanıcıyla eşleşiyor.
İki koşul da doğruysa kullanıcıdan mevcut hesabını bağlamasını isteyin.
oturum açın. Bunu yapmak için isteğe HTTP 401 hatasıyla yanıt verin
error=linking_error belirtir ve kullanıcının e-posta adresini
login_hint. Aşağıda örnek bir yanıt verilmiştir:
HTTP/1.1 401 Unauthorized
Content-Type: application/json;charset=UTF-8

{
  "error":"linking_error",
  "login_hint":"foo@bar.com"
}
Google linking_error ile ilgili bir 401 hatası yanıtı aldığında, Google
kullanıcıyı parametre olarak login_hint ile yetkilendirme uç noktanıza yönlendirin. İlgili içeriği oluşturmak için kullanılan
Kullanıcı, tarayıcıdaki OAuth bağlantı akışını kullanarak hesap bağlama işlemini tamamladığında.
İki koşul da doğru değilse söz konusu bilgileri kullanarak yeni bir kullanıcı hesabı oluşturun bu formu doldurmanızı öneririm. Yeni hesaplarda genellikle belirlenmiş bir şifre bulunmaz. İnsanların Google ile Oturum Açma'yı diğer platformlara eklemenizi önerdi. uygulamanızın tüm platformlarında Google ile giriş yapın. Alternatif olarak kullanıcıya şifre kurtarma akışınızı başlatan bir bağlantı göndererek diğer platformlarda oturum açmak için şifre belirlemesine izin verin.
Oluşturma işlemi tamamlandığında bir erişim jetonu düzenleyin ve değerleri şurada bir JSON nesnesinin içinde döndürür: aşağıdaki örnekte olduğu gibi HTTPS yanıtınızın gövdesini yazın:
{
  "token_type": "Bearer",
  "access_token": "ACCESS_TOKEN",
  "refresh_token": "REFRESH_TOKEN",
  "expires_in": SECONDS_TO_EXPIRATION
}
Google API istemci kimliğinizi alma
Hesap Bağlama kaydı sırasında Google API istemci kimliğinizi sağlamanız gerekir.
OAuth Bağlantısı adımlarını tamamlarken oluşturduğunuz projeyi kullanarak API istemci kimliğinizi almak için. Bunun için aşağıdaki adımları uygulayın:
Bir Google API'leri projesi oluşturun veya seçin.
Projenizde web uygulaması türü için istemci kimliği yoksa İstemci oluştur'u tıklayarak istemci kimliği oluşturun. Sitenizin alanını Yetkilendirilmiş JavaScript kaynakları kutusuna eklediğinizden emin olun. Yerel testler veya geliştirme yaparken Yetkili JavaScript kaynakları alanına hem
http://localhosthem dehttp://localhost:<port_number>eklemeniz gerekir.
Uygulamanızı doğrulama
OAuth 2.0 Playground aracını kullanarak uygulamanızı doğrulayabilirsiniz.
Aracı kullanarak aşağıdaki adımları uygulayın:
- OAuth 2.0 Yapılandırması penceresini açmak için Yapılandırma'yı tıklayın.
- OAuth akışı alanında İstemci tarafı'nı seçin.
- OAuth Uç Noktaları alanında Özel'i seçin.
- İlgili alanlarda OAuth 2.0 uç noktanızı ve Google'a atadığınız istemci kimliğini belirtin.
- 1. Adım bölümünde herhangi bir Google kapsamı seçmeyin. Bunun yerine bu alanı boş bırakın veya sunucunuz için geçerli bir kapsam yazın (veya OAuth kapsamları kullanmıyorsanız rastgele bir dize yazın). İşlemi tamamladığınızda API'leri yetkilendir'i tıklayın.
- 2. Adım ve 3. Adım bölümlerinde OAuth 2.0 akışını uygulayın ve her adımın istenen şekilde çalıştığını doğrulayın.
Google Hesabı Bağlantı Demo aracını kullanarak uygulamanızı doğrulayabilirsiniz.
Araçta aşağıdaki adımları uygulayın:
- Google ile oturum aç düğmesini tıklayın.
- Bağlamak istediğiniz hesabı seçin.
- Hizmet kimliğini girin.
- İsteğe bağlı olarak, erişim isteyeceğiniz bir veya daha fazla kapsam girin.
- Demoyu Başlat'ı tıklayın.
- Sorulduğunda, bağlantı isteğini onaylayabileceğinizi ve reddedebileceğinizi onaylayın.
- Platformunuza yönlendirildiğinizi onaylayın.