總覽
以下概略說明密碼金鑰驗證的重要步驟:
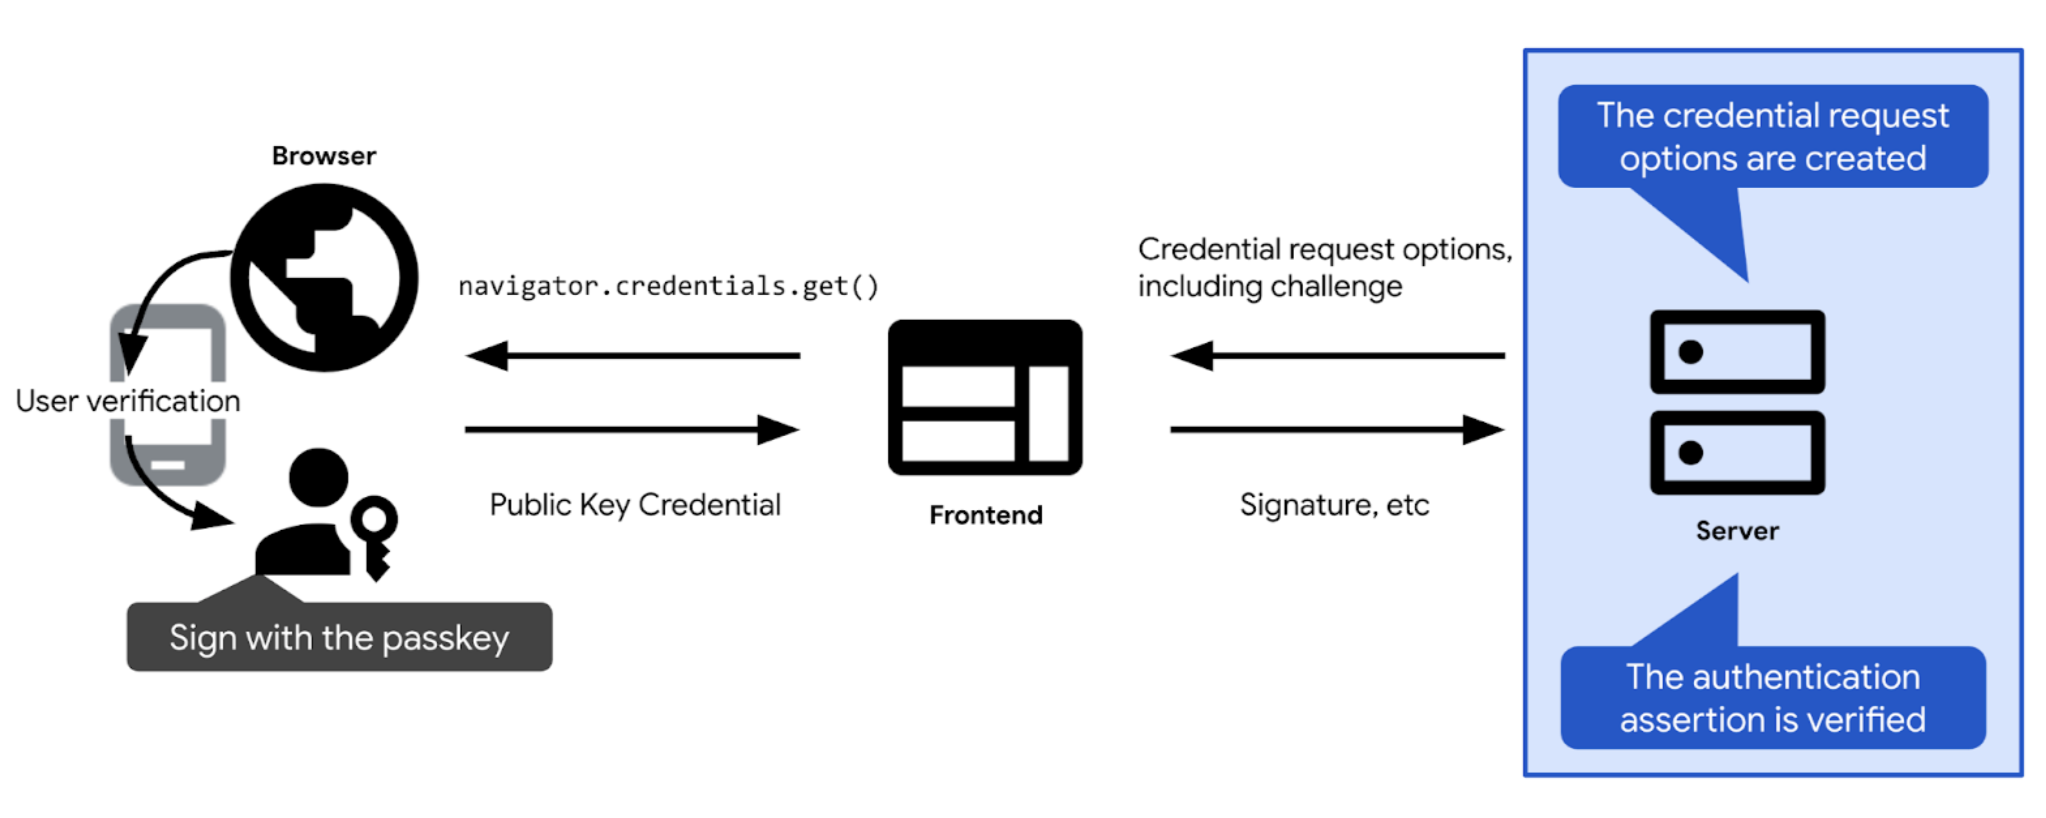
- 定義使用密碼金鑰進行驗證所需的驗證和其他選項。將這些檔案傳送給用戶端,以便將這些資訊傳遞至密碼金鑰驗證呼叫 (網路上的
navigator.credentials.get)。使用者確認密碼金鑰驗證後,系統就會解析密碼金鑰驗證呼叫,並傳回憑證 (PublicKeyCredential)。此憑證包含驗證斷言。
- 驗證驗證斷言。
- 如果驗證斷言有效,請驗證使用者。
以下各節將深入說明每個步驟。
建立挑戰
在實務上,挑戰是隨機位元組的陣列,以 ArrayBuffer 物件表示。
// Example challenge, base64URL-encoded
weMLPOSx1VfSnMV6uPwDKbjGdKRMaUDGxeDEUTT5VN8
為確保挑戰可實現其目的,您必須:
- 確保不會多次使用相同的驗證方式。每次嘗試登入時都產生新的驗證問題。每次嘗試登入後捨棄挑戰,無論成功或失敗都一樣。並在一段時間後捨棄挑戰。請勿在回覆中重複接受同一個挑戰。
- 確保驗證作業安全無虞。挑戰應幾乎不可能猜測。如要建立在伺服器端建立加密編譯安全驗證問題,最好使用您信任的 FIDO 伺服器端程式庫。如果您改為自行設計挑戰,請使用技術堆疊中內建的加密編譯功能,或尋找專為加密編譯用途設計的程式庫。例如 Node.js 中的 iso-crypto,或是 Python 中的密鑰。根據規格的規定,挑戰內容長度不得少於 16 個位元組才算安全。
建立挑戰後,請儲存在使用者的工作階段中,以便日後進行驗證。
建立憑證要求選項
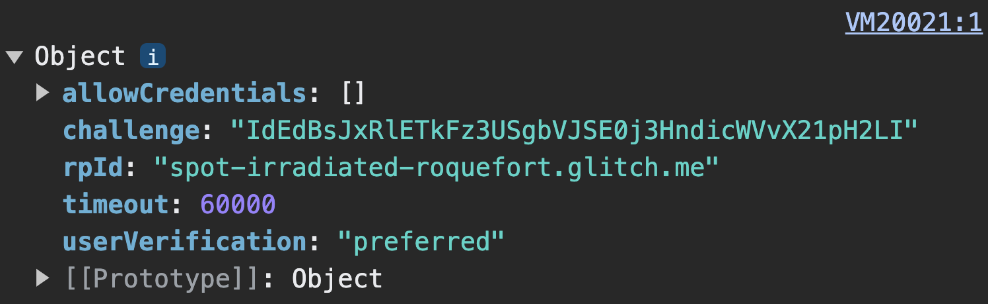
以 publicKeyCredentialRequestOptions 物件的形式建立憑證要求選項。
如要執行這項作業,請使用 FIDO 伺服器端程式庫。通常會提供公用程式函式,可為您建立這些選項。SimpleWebAuthn 提供的方案,例如 generateAuthenticationOptions。
publicKeyCredentialRequestOptions 應包含密碼金鑰驗證所需的所有資訊。將這項資訊傳遞至負責建立 publicKeyCredentialRequestOptions 物件的 FIDO 伺服器端程式庫中的函式。
部分「publicKeyCredentialRequestOptions」欄位可以是常數。其他值則必須在伺服器上動態定義:
rpId:您預期與哪個 RP ID 相關聯的憑證,例如example.com。您在這裡提供的 RP ID 必須與憑證相關聯的 RP ID 相符時,驗證才會成功。如要填入 RP ID,請使用您在憑證註冊期間在publicKeyCredentialCreationOptions中設定的 RP ID。challenge:密碼金鑰供應商將簽署的資料,用於驗證要求驗證要求時,使用者持有密碼金鑰。查看「建立挑戰」中的詳細資料。allowCredentials:此驗證的可接受憑證陣列。傳遞空白陣列,讓使用者從瀏覽器顯示的清單中選取可用的密碼金鑰。詳情請參閱「從 RP 伺服器擷取挑戰」和「可搜尋的憑證深入探索」。userVerification:指出使用裝置螢幕鎖定功能進行使用者的驗證是否為「必要」或「建議」或「不建議」請參閱「從 RP 伺服器擷取挑戰」。timeout:使用者完成驗證所需的時間長度 (以毫秒為單位)。它應該合理,且比challenge的生命週期短。建議的預設值是 5 分鐘,但您可以增加為 10 分鐘 (仍在建議範圍內)。如果您預計使用者採用混合工作流程,但通常需要較長的時間,逾時設定就很合理。如果作業逾時,系統會擲回NotAllowedError。
建立 publicKeyCredentialRequestOptions 後,請傳送給用戶端。
challenge 解碼會在用戶端進行。程式碼範例:建立憑證要求選項
我們在我們的範例中使用的是 SimpleWebAuthn 程式庫。在本文中,我們將憑證要求選項的建立作業交予其 generateAuthenticationOptions 函式。
import {
  generateRegistrationOptions,
  verifyRegistrationResponse,
  generateAuthenticationOptions,
  verifyAuthenticationResponse
} from '@simplewebauthn/server';

router.post('/signinRequest', csrfCheck, async (req, res) => {

  // Ensure you nest calls in try/catch blocks.
  // If something fails, throw an error with a descriptive error message.
  // Return that message with an appropriate error code to the client.
  try {
    // Use the generateAuthenticationOptions function from SimpleWebAuthn
    const options = await generateAuthenticationOptions({
      rpID: process.env.HOSTNAME,
      allowCredentials: [],
    });
    // Save the challenge in the user session
    req.session.challenge = options.challenge;

    return res.json(options);
  } catch (e) {
    console.error(e);
    return res.status(400).json({ error: e.message });
  }
});
驗證並登入使用者
當 navigator.credentials.get 在用戶端成功解析後,會傳回 PublicKeyCredential 物件。
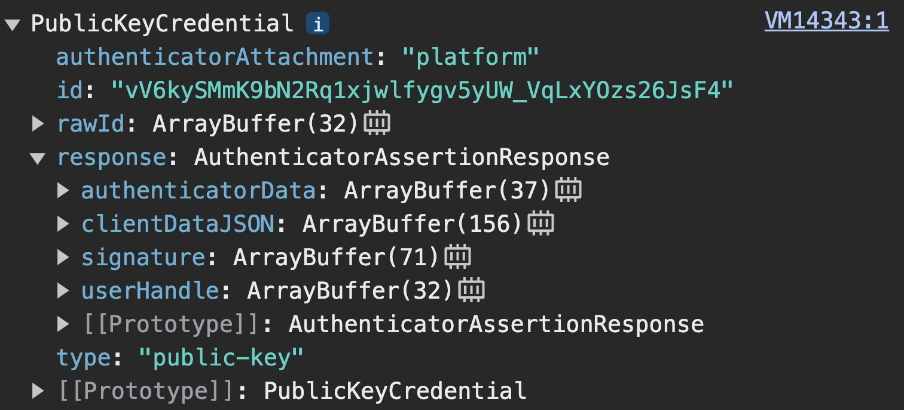
navigator.credentials.get 會傳回 PublicKeyCredential。response 為 AuthenticatorAssertionResponse。代表密碼金鑰供應商對用戶端指示的回應,建立嘗試在 RP 上使用密碼金鑰進行驗證的必要作業。內容如下:
response.authenticatorData和response.clientDataJSON,例如在密碼金鑰註冊步驟中操作。response.signature,其中包含這些值的簽章。
將 PublicKeyCredential 物件傳送至伺服器。
在伺服器上執行下列操作:
- 收集您需要驗證宣告並驗證使用者所需的資訊:
- 透過產生驗證選項時,取得工作階段中儲存的預期驗證。
- 取得預期的 origin 和 RP ID。
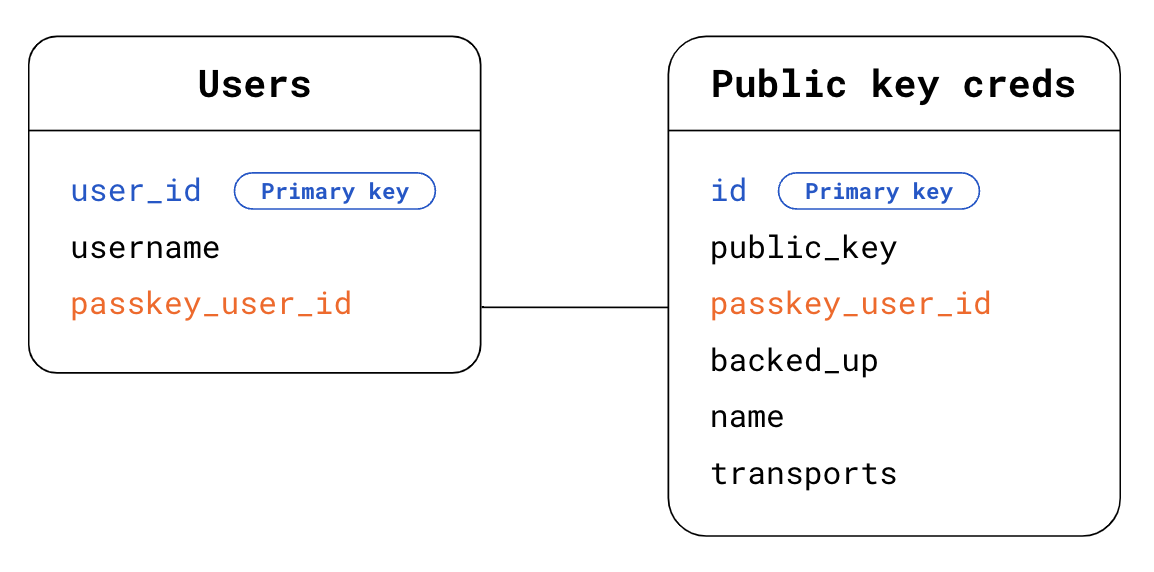
- 在資料庫中找出使用者。在可搜尋的憑證的情況下,您不知道提出驗證要求的使用者是誰。您可透過以下兩種方法找出原因:
- 方法 1:在
PublicKeyCredential物件中使用response.userHandle。在「使用者」資料表中,尋找與userHandle相符的passkey_user_id。 - 方法 2:使用
PublicKeyCredential物件中現有的憑證id。在「公開金鑰憑證」表格中,找出與PublicKeyCredential物件中現有憑證id相符的憑證id。然後使用外鍵passkey_user_id來尋找「使用者」資料表對應的使用者。
- 方法 1:在
- 在您的資料庫中,找出與您收到的驗證宣告相符的公開金鑰憑證資訊。方法是在「公開金鑰憑證」表格中,尋找與
PublicKeyCredential物件中id憑證相符的憑證id。
驗證驗證斷言。將此驗證步驟交給 FIDO 伺服器端程式庫,該程式庫通常會提供可用於此目的的公用程式函式。SimpleWebAuthn 提供的方案,例如
verifyAuthenticationResponse。如要瞭解具體情況,請參閱「附錄:驗證回應」。刪除驗證是否成功以防止重送攻擊。
登入使用者帳戶。如果驗證成功,請更新工作階段資訊,將使用者標示為已登入。您也可以將
user物件傳回用戶端,以便前端使用與新登入使用者相關的資訊。
範例程式碼:驗證並登入使用者
我們在我們的範例中使用的是 SimpleWebAuthn 程式庫。在此,我們將驗證回應的驗證回應給其 verifyAuthenticationResponse 函式。
import {
  generateRegistrationOptions,
  verifyRegistrationResponse,
  generateAuthenticationOptions,
  verifyAuthenticationResponse
} from '@simplewebauthn/server';
import { isoBase64URL } from '@simplewebauthn/server/helpers';

router.post('/signinResponse', csrfCheck, async (req, res) => {
  const response = req.body;
  const expectedChallenge = req.session.challenge;
  const expectedOrigin = getOrigin(req.get('User-Agent'));
  const expectedRPID = process.env.HOSTNAME;

  // Ensure you nest verification function calls in try/catch blocks.
  // If something fails, throw an error with a descriptive error message.
  // Return that message with an appropriate error code to the client.
  try {
    // Find the credential stored to the database by the credential ID
    const cred = Credentials.findById(response.id);
    if (!cred) {
      throw new Error('Credential not found.');
    }
    // Find the user - Here alternatively we could look up the user directly
    // in the Users table via userHandle
    const user = Users.findByPasskeyUserId(cred.passkey_user_id);
    if (!user) {
      throw new Error('User not found.');
    }
    // Base64URL decode some values
    const authenticator = {
      credentialPublicKey: isoBase64URL.toBuffer(cred.publicKey),
      credentialID: isoBase64URL.toBuffer(cred.id),
      transports: cred.transports,
    };

    // Verify the credential
    const { verified, authenticationInfo } = await verifyAuthenticationResponse({
      response,
      expectedChallenge,
      expectedOrigin,
      expectedRPID,
      authenticator,
      requireUserVerification: false,
    });

    if (!verified) {
      throw new Error('User verification failed.');
    }

    // Kill the challenge for this session.
    delete req.session.challenge;

    req.session.username = user.username;
    req.session['signed-in'] = 'yes';

    return res.json(user);
  } catch (e) {
    delete req.session.challenge;

    console.error(e);
    return res.status(400).json({ error: e.message });
  }
});
附錄:驗證驗證回應
驗證驗證回應包含下列檢查:
- 確認 RP ID 與您的網站相符。
- 確認要求的來源與網站的登入來源相符。如果是 Android 應用程式,請參閱「驗證來源」一節。
- 檢查裝置是否能提供您提出的挑戰。
- 確認使用者在驗證過程中遵循您以 RP 授權的規定。如果您需要進行使用者驗證,請確認
authenticatorData中的uv(經使用者驗證) 標記是true。確認authenticatorData中的up(使用者目前) 標記是true,因為密碼金鑰一律必須使用者存在。 - 驗證簽名。如要驗證簽章,您需要:
- 簽章,已簽署的挑戰:
response.signature - 公開金鑰,用於驗證簽名。
- 原始已簽署資料。這是指要驗證其簽章的資料。
- 用於建立簽章的加密編譯演算法。
- 簽章,已簽署的挑戰:
如要進一步瞭解這些步驟,請參閱 SimpleWebAuthn 的 verifyAuthenticationResponse 原始碼,或參閱規格中完整的驗證清單。