IDX offers a wide range of built-in templates that include all the files, system packages (for example, compilers), and extensions you need to quickly get started with a language or framework.
You can also launch an IDX workspace using Community templates hosted on GitHub. For more information about launching a new workspace from a template, see Create a workspace.
Most users will use the built-in templates or import projects from Git, but for more advanced use cases, you can create your own templates:
If you're building your own framework, library, or service, you can let your users quickly get started with your technology without ever leaving the browser, with the full power of a cloud-based virtual machine.
If you have a preferred technology stack for your projects, you can simplify your own process for starting new projects with a custom template.
If you're teaching others, such as through a tutorial or codelab, you can remove some of the initial steps for your students by pre-configuring the starting point for your codelab as a custom template.
After you create and test your custom template, you can create a link for
it to place on your website, Git repository
README file, package detail page (for example, in NPM), or other any other
place that you expect your users to start using your technology.
Prerequisites
Before you get started:
Learn how to use the
idx/dev.nixfile to customize your environment.Get familiar with Nix language basics and keep the reference handy.
Template file structure
An IDX template is a public Git repository (or folder or branch in a repository) that contains at least two files:
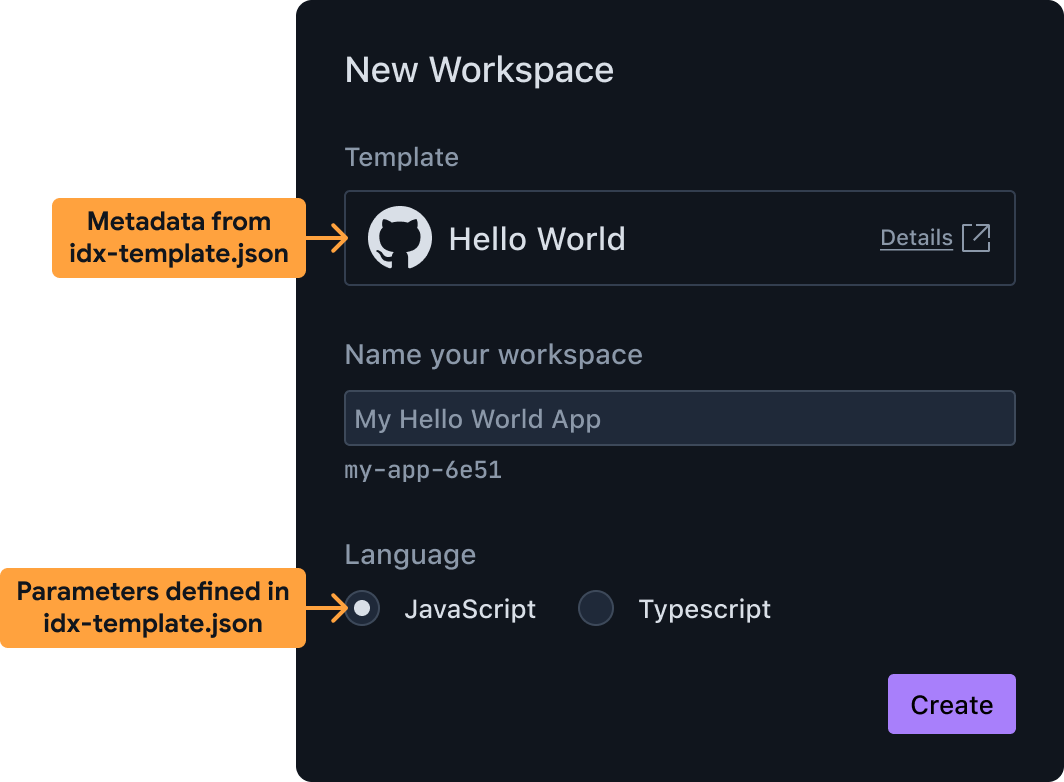
Creating a new workspace from a custom template idx-template.jsonincludes the metadata for the template, including its user-visible name, description, and parameters available to users to configure the template. For example, you can allow your users to choose from a number of programming languages, or example use cases. IDX uses this information to prepare the UI shown to users when they choose to create a new workspace from your template.idx-template.nixis a file written with the Nix language that contains a Bash shell script (wrapped in a Nix function) responsible for:- Creating the new workspace's working directory.
- Setting up its environment by creating a
.idx/dev.nixfile. Note that you can also just run a project scaffolding tool likeflutter createornpm initin this script, or run a custom script written in Go, Python, Node.js, or another language.
This file will be executed with the parameters specified by the user when IDX loads the template.
Other files may be included alongside these two files, for use in
idx-template.nix, in order to instantiate the template. For example, you could
include the final .idx/dev.nix file, or even include all of the scaffolding
files right in the repository.
Create a starter template
To expedite template creation, we recommend that you start with one of the following methods to create an IDX template that you can further customize:
- Turn any public GitHub repository into a template
- Use an official or community template as a basis for your template
A basic example: turn any public GitHub repository into a template
Before getting into the details of how to define your idx-template.json and
idx-template.nix, it's useful to see a basic example template that:
- Has no user-configurable parameters
- Just copies all the files in your template repository (except for the two
idx-templatefiles) into the user's workspace. There should already be a.idxsubfolder with adev.nixfile defining the environment.
Adding the following files to any public GitHub repository (or subfolder or branch) effectively turns that repository into an IDX template.
idx-template.json
{
  "name": "Hello world",
  "description": "A template for a CLI program that prints 'hello world'",
  "icon": "https://www.gstatic.com/images/branding/productlogos/idx/v1/192px.svg",
  "params": []
}
idx-template.nix
# No user-configurable parameters
{ pkgs, ... }: {
  # Shell script that produces the final environment
  bootstrap = ''
    # Copy the folder containing the `idx-template` files to the final
    # project folder for the new workspace. ${./.} inserts the directory
    # of the checked-out Git folder containing this template.
    cp -rf ${./.} "$out"

    # Set some permissions
    chmod -R +w "$out"

    # Remove the template files themselves and any connection to the template's
    # Git repository
    rm -rf "$out/.git" "$out/idx-template".{nix,json}
  '';
}
Proceed to Customize your template to learn about additional changes you can make to customize your template.
Create a custom template using an official or community template
The Project IDX team maintains two repositories for IDX templates:
Official templates: These are the templates you select directly from the IDX dashboard when you create a new app.
Community templates: These templates allow contributions from the open source community. To use a community template, clone the Community templates Git repository. You can use the full link to the template you want to use.
To create a custom template with an existing template as a basis:
Decide which template to use as a basis for your custom template, then clone the project.
Customize
idx-template.json,idx-template.nix, and.idx/dev.nixas needed, starting with Customize your template.Check the changes into your repository.
Follow Create a new workspace for your template to deploy and test your template. If you use a nested repository, link directly to it in your URL. For example, if you were using the community "Vanilla Vite" template, you'd provision and test a new workspace using the following URL:
https://idx.google.com/new?template=https://github.com/project-idx/community-templates/tree/main/vite-vanilla
Proceed to Customize your template to learn about additional changes you can make to customize your template.
Customize your template
Now that you've created a basic template to build upon, you can edit the
idx-template.json, idx-template.nix, and .idx/dev.nix files to match your
requirements. Some of the configurations you might want to customize include:
- Adding system packages to your
bootstrapscript. - Adding user-configurable parameters
- Choosing which files should open by default
- Choosing a default workspace icon
Use additional system packages in your bootstrap script
The basic example only uses basic POSIX commands to copy
files into the right place. Your template's bootstrap script may require
additional binaries to be installed, such as git, node, python3, or
others.
You can make additional system packages available to your bootstrap script by
specifying packages in your idx-template.nix file, just as you would
customize a workspace with additional system packages
by adding to the packages in its dev.nix file.
Here's an example of adding pkgs.nodejs, which includes binaries like node,
npx and npm:
# idx-template.nix
{pkgs}: {
  packages = [
    # Enable "node", "npm" and "npx" in the bootstrap script below.
    # Note, this is NOT the list of packages available to the workspace once
    # it's created. Those go in .idx/dev.nix
    pkgs.nodejs
  ];

  bootstrap = ''
    mkdir "$out"
    # We can now use "npm"
    npm init --yes my-boot-strap@latest "$out"
  ''
}
Add user-configurable parameters
To allow users to customize the starting point for their new project, you can
either create multiple templates, or create a single template with parameters.
This is a great option if your different starting points are just different
values passed to a CLI tool (for example --language=js versus
--language=ts).
To add parameters, you'll:
- Describe your parameter in the
paramsobject of youridx-template.jsonmetadata file. IDX uses information in this file to prepare the UI (such as checkboxes, drop-downs, and text fields) shown to users of your template. - Update your
idx-template.nixbootstrap to use the values the user selected while instantiating the template.
Describe your parameter in idx-template.json
Here's an example of adding an enum parameter, which IDX shows as either
a drop-down menu or radio button group, depending on the number of options:
{
  "name": "Hello world",
  "description": "A hello world app",
  "params": [
    {
      "id": "language",
      "name": "Programming Language",
      "type": "enum",
      "default": "ts",
      "options": {
        "js": "JavaScript",
        "ts": "TypeScript"
      },
      "required": true
    }
  ]
}
Since there are two values (JavaScript and TypeScript), the UI will render a
radio button group for the two options and pass either the value ts or js to
the idx-template.nix script.
Each parameter object has the following properties:
| PROPERTY | TYPE | DESCRIPTION |
|---|---|---|
| id | string |
The parameter's unique ID, similar to a variable name. |
| name | string |
The display name for this parameter. |
| type | string |
Specifies the UI component to use for this parameter, and the data type to pass to the bootstrap script. Valid values are:
|
| options | object |
For enum parameters, this represents the options to show users. For example if options is {"js": "JavaScript", ...}, "JavaScript" will be shown as the option, and when selected the value of this parameter will be js. |
| default | string or boolean |
Sets the initial value in the UI. For enum parameters, this must be one of the keys in options. For boolean parameters, this should be either true or false. |
| required | boolean |
Indicates that this parameter is required. |
Use parameter values in idx-template.nix
After defining the params object in your idx-template.json file, you can
start customizing the bootstrap script based on the parameter values the user
chooses.
Following the example in the previous section, if you have a single parameter
with ID language that's an enum with possible values ts or js, you can use
it like so:
# idx-template.nix
# Accept additional arguments to this template corresponding to template
# parameter IDs, including default values (language=ts by default in this example).
{ pkgs, language ? "ts", ... }: {
  packages = [
    pkgs.nodejs
  ];

  bootstrap = ''
    # We use Nix string interpolation to pass the user's chosen programming
    # language to our script.
    npm init --yes my-boot-strap@latest "$out" -- --lang=${language}
  ''
}
Another common pattern is to conditionally include content depending on the value of a string. Another way to write the previous example is:
npm init --yes my-boot-strap@latest "$out" -- \
    ${if language == "ts" then "--lang=ts" else "--lang=js" }
Choose which files should open by default
It's a good idea to customize which files should be opened for editing when new workspaces are created with your template. For example, if your template is for a basic website, you may want to open the main HTML, JavaScript and CSS files.
To customize which files should open by default, update your .idx/dev.nix file
(not your idx-template.nix file!) to include an onCreate workspace hook
with an openFiles attribute, like so:
# .idx/dev.nix
{pkgs}: {
  ...
  idx = {
    # Workspace lifecycle hooks
    workspace = {
      # Runs when a workspace is first created with this `dev.nix` file
      onCreate = {
        # Open editors for the following files by default, if they exist.
        # The last file in the list will be focused.
        default.openFiles = [
          "src/index.css"
          "src/index.js"
          "src/index.html"
        ];
        # Include other scripts here, as needed, for example:
        # installDependencies = "npm install";
      };
      # To run something each time the workspace is (re)started, use the `onStart` hook
    };
    # Enable previews and customize configuration
    previews = { ... };
  };
}
Choose a default workspace icon
You can choose the default icon for workspaces created with your template,
by placing a PNG file named icon.png next to the dev.nix file, inside the
.idx directory.
Test your template in a new workspace
The simplest way to test your template end-to-end is to create a new workspace with it. Visit the following link, replacing the example with your template's GitHub repository URL:
https://idx.google.com/new?template=https://github.com/my-org/my-repo
You can optionally include a branch and subfolder. All of the following are valid, as long as they are publicly accessible:
https://github.com/my-org/my-repo/https://github.com/my-org/my-repo/tree/main/path/to/myidxtemplatehttps://github.com/my-org/my-repo/tree/branchhttps://github.com/my-org/my-repo/tree/branch/path/to/myidxtemplate
This is also the URL you'll share with others so that they can use your new template, or the URL you'll link to from your "Open in IDX" button.
Share your template
Once you've confirmed that your template behaves as expected, publish it to a GitHub repository and share the same link you used when creating a workspace for testing.
And to make it even easier for users to find your template, add an "Open in IDX" button to your website or repository README.