KML im Google Mashup Editor verwenden
Mit Sammlungen den Überblick behalten
Sie können Inhalte basierend auf Ihren Einstellungen speichern und kategorisieren.
Valery Hronusov, KML-Entwickler,
Perm State University, Russland
Einführung
Der
Google Mashup Editor (GME) ist eines der am meisten erwarteten und nützlichsten Tools für Mashup-Entwickler. Mit GME können Entwickler dynamische Komponenten wie Karten, Tabellen, Listen und andere Elemente auf Webseiten erstellen und bearbeiten, die auf Verbindungen mit externen Daten basieren. Diese Elemente können dann mithilfe eines iFrames in Webseiten und Blogs eingebunden werden.
In diesem Tutorial erfahren Sie, wie Sie eine KML-Datei in eine mit GME erstellte Karte einfügen.
Mein erster Eindruck von Google Mashup Editor
- Die Benutzeroberfläche ist wie bei den meisten Google-Produkten einfach, übersichtlich und klar strukturiert.
- Es enthält einen praktischen Projektindex mit einer ständig wachsenden Sammlung von Codebeispielen sowie den Code des Autors.
- So können Sie ganz einfach zusätzliche Ressourcen (z. B. Bilddateien) im Projekt speichern.
- Er verfügt über einen benutzerfreundlichen XML-Debugger.
- Es gibt viele benutzerfreundliche Beispielanwendungen.
GME für KML-Entwickler
Vor der Einführung des Internets war es traditionell schwierig, räumliche Daten freizugeben. Mit der Entwicklung des Internets wurden Kartenanwendungen jedoch zu einer Standardmethode, um GIS-Daten (Geographic Information Systems) einfach mit der Welt zu teilen. KML entwickelt sich zum Standard für die Darstellung und den Austausch von GIS-Daten, da es kompakt und einfach zu entwickeln ist und von beliebten Anwendungen wie Google Earth und Google Maps unterstützt wird.
Bis vor Kurzem war das Erstellen und Bearbeiten von Seiten auf Grundlage von JavaScript ein großes Problem für KML-Entwickler. Es waren viele zusätzliche Schritte erforderlich, um ein Mashup zu erstellen und zu debuggen. Mit GME lässt sich aus wenigen grundlegenden Komponenten sehr schnell ein KML-basiertes Mashup erstellen. Für die Erstellung sind keine speziellen HTML- oder JavaScript-Kenntnisse erforderlich. Die GME-Beispielprojekte bieten genug, um loszulegen.
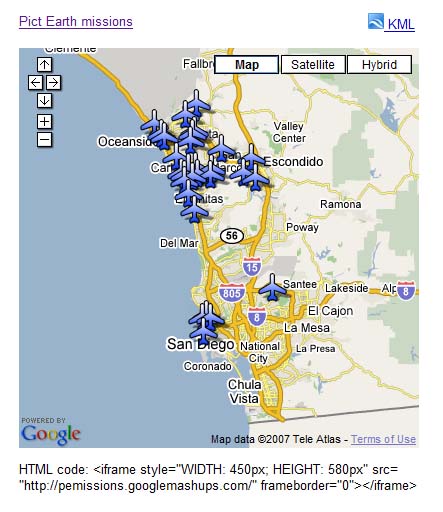
Im folgenden Beispiel verwende ich eine KML-Datei, die auf die Sammlung der Fotos verweist, die während der Pict Earth USA-Flüge aufgenommen wurden.
Hier sehen Sie einen Snapshot des Pict Earth-Karten-Mashups:
So binden Sie eine KML-Datei mithilfe der Google Maps API in ein GME-Projekt ein:
Schritt 1: KML-Datei auswählen
Schritt 2: Neues GME-Projekt erstellen
Schritt 3: Funktion zum Hinzufügen der KML-Datei erstellen
Schritt 4: Karte hinzufügen
Schritt 5: Mashup testen
Schritt 6: Mashup veröffentlichen
Schritt 7: Mashup einer Webseite hinzufügen
Schritt 8: Mashup in die GME-Galerie aufnehmen
Schritt 1: KML-Datei auswählen
Wählen Sie die KML-Datei aus, die Sie Ihrer Karte hinzufügen möchten. Das kann alles sein, was in Google Maps unterstützt wird. Sie muss auf einem öffentlich zugänglichen Server gehostet werden.
Schritt 2: Neues GME-Projekt erstellen
Erstellen Sie ein neues leeres GME-Projekt.
So sieht ein leeres GME-Projekt aus:
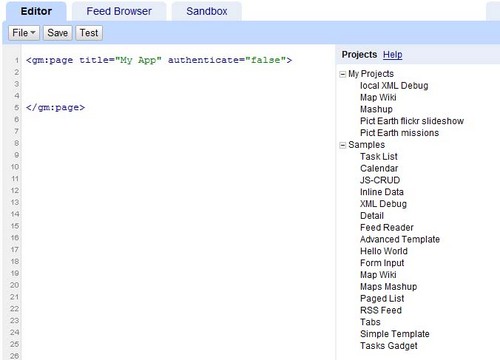
Fügen Sie einen Titel und einen Namen für die Funktion hinzu.
<gm:page
title="Pict Earth
missions" authenticate="false"
onload="kmlPE()">
</gm:page>
Schritt 3: Funktion zum Hinzufügen der KML-Datei erstellen
Erstellen Sie eine JavaScript-Funktion mit dem Pfad zur KML-Datei, die der Karte hinzugefügt werden soll.
<script>
function kmlPE()
{
<!-- Get map -->
var myMap = google.mashups.getObjectById('map').getMap();
<!-- Get KML -->
var geoXml = new GGeoXml("http://pictearthusa.com/kml/missions.kml");
<!--Place KML on Map -->
myMap.addOverlay(geoXml);
<!--Set zoom on double click -->
myMap.enableDoubleClickZoom();
}
</script>
Schritt 4: Karte hinzufügen
Fügen Sie eine Karte und Parameter hinzu.
<gm:map id="map" height="400px" width="400px" lat="32.9393" lng="-117.206" zoom="9" maptypes="true"/>
Schritt 5: Mashup testen
Drücken Sie die Schaltfläche „Test“ (F4).
Dies ist ein Bild des in der Sandbox getesteten Pict Earth-Mashups.
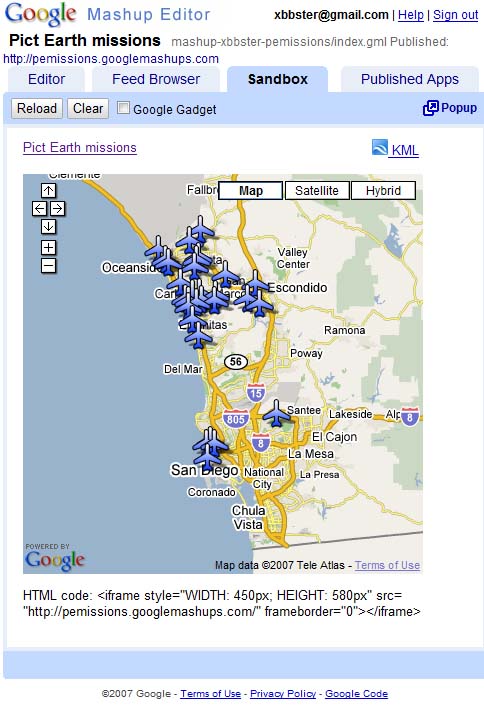
Jetzt können wir den Text der Anwendung prüfen und das erste Ergebnis sehen. Wir können einen Titel und Links hinzufügen und es noch einmal versuchen.
Schritt 6: Mashup veröffentlichen
Legen Sie den Namen des Projekts fest und veröffentlichen Sie es. Sie erhalten damit einen permanenten Link zu Ihrem Mashup, den Sie in Webseiten einfügen können. In meinem Beispiel ist das der Link zur Startseite des GME-Projekts. Sie können auch den Quellcode des Projekts sehen.
Schritt 7: Mashup einer Webseite hinzufügen
Fügen Sie das Mashup mithilfe eines iFrames in eine Webseite ein. Wenn Sie beispielsweise das Beispielprojekt einfügen möchten, fügen Sie Folgendes hinzu:
<iframe style="WIDTH: 439px; HEIGHT: 491px" src="http://pemissions.googlemashups.com/" frameborder="0"></iframe>
Hier sind Beispiele für das Mashup auf einer Webseite und in einem Blog.
Sie können dem Projekt auch Ihren Google Analytics-Code hinzufügen, um Statistiken dazu zu erfassen, wer Ihre Seite aufruft. Hier ist das einfache Skript zum Hinzufügen:
<script src="http://www.google-analytics.com/urchin.js" type="text/javascript"></script>
<script type="text/javascript">uacct = "youraccountnumber";urchinTracker();</script>
Schritt 8: In die GME-Galerie einfügen
Veröffentlichen Sie Ihr Mashup in der GME Mashup Gallery.
So können andere Nutzer Ihr Mashup ansehen.
Im Startleitfaden für den Google Mashup Editor wird der Prozess der Mashup-Erstellung ausführlich beschrieben. Hier finden Sie eine Liste mit Tags mit einer kurzen Beschreibung aller gm-Tags und Beispielen.
Code:
Hier ist der vollständige Code für die Verwendung des Pict Earth-KML in GME:
<gm:page title="Pict Earth missions" authenticate="false" onload="kmlPE()>
<!-- Map definition -->
<gm:mapid="map" height="400px" width="400px" lat="32.9393" lng="-117.206" zoom="9" maptypes="true"/>
<script>
function kmlPE(){
<!-- Get map -->
var myMap = google.mashups.getObjectById('map').getMap();
<!-- Get KML -->
var geoXml = new GGeoXml("http://pictearthusa.com/kml/missions.kml");
<!-- Place KML on Map -->
myMap.addOverlay(geoXml);
<!-- Set zoom on double click -->
myMap.enableDoubleClickZoom();
}
</script>
</gm:page>
Nächste Schritte
Nachdem Sie Ihr Mashup veröffentlicht haben, können Sie die darin enthaltene KML-Datei als Parameter in eine andere Anwendung einfügen oder direkt als Karte laden. Zum Beispiel diese Seite:
http://param.googlemashups.com
ist ein GME-Mashup. Sie können direkt auf eine KML-Datei im Mashup verweisen, indem Sie kml= als Parameter in die URL einfügen, z. B. so:
http://param.googlemashups.com/?kml=http://mapgadgets.googlepages.com/cta.kml
Sie können auch ein Gadget aus Ihrem Projekt erstellen. Nachdem Sie das Gadget eingereicht haben, rufen Sie das Dateimenü auf, klicken Sie auf „Gadget einreichen“ und folgen Sie der Anleitung. So können Sie Ihre Anwendung ganz einfach Ihrer personalisierten Google-Startseite hinzufügen, sie auf anderen Webseiten einfügen und mit anderen teilen.
Sofern nicht anders angegeben, sind die Inhalte dieser Seite unter der Creative Commons Attribution 4.0 License und Codebeispiele unter der Apache 2.0 License lizenziert. Weitere Informationen finden Sie in den Websiterichtlinien von Google Developers. Java ist eine eingetragene Marke von Oracle und/oder seinen Partnern.
Zuletzt aktualisiert: 2025-07-27 (UTC).
[null,null,["Zuletzt aktualisiert: 2025-07-27 (UTC)."],[[["\u003cp\u003eThis tutorial demonstrates how to integrate a KML file into a Google Mashup Editor (GME) project using the Google Maps API.\u003c/p\u003e\n"],["\u003cp\u003eGME simplifies the process of creating and editing KML-based mashups, enabling developers to build dynamic map components without extensive HTML or JavaScript knowledge.\u003c/p\u003e\n"],["\u003cp\u003eThe tutorial provides a step-by-step guide, covering selecting a KML file, creating a GME project, adding a map, testing, publishing, and embedding the mashup into web pages.\u003c/p\u003e\n"],["\u003cp\u003eUsers can further enhance their mashups by adding Google Analytics tracking and submitting them to the GME Mashup Gallery for wider visibility.\u003c/p\u003e\n"],["\u003cp\u003ePublished mashups can be parameterized to dynamically load different KML files and can be converted into Gadgets for integration into Google Personalized Home Page and other web pages.\u003c/p\u003e\n"]]],[],null,["# Using KML in Google Mashup Editor\n\n*Valery Hronusov, KML Developer,\nPerm State University, Russia* \n\nIntroduction\n------------\n\n[Google\nMashup Editor](http://editor.googlemashups.com/ \"Google Mashup Editor\") (GME) is one of the most long-awaited and useful tools for mashup developers. GME helps developers create and edit dynamic components in Web pages, such as maps, tables, lists, and other elements, based on connections with external data. These elements can be then be included in Web pages and blogs using an iframe. \n\nThis tutorial will show you how to incorporate a KML file into a Map created with GME. \n\n\u003cbr /\u003e\n\n### My first impressions of Google Mashup Editor\n\n- It has the utmost simplicity, with a clean and distinct interface, like the majority of Google products.\n- It has a convenient project index with a constantly increasing collection of code examples, as well as the author's code.\n- It allows for the easy storage of additional resources to the project (such as image files).\n- It has an easy-to-use XML debugger.\n- It has lots of easy-to-use sample applications.\n\n\u003cbr /\u003e\n\n### GME for KML Developers\n\nBefore the advent of the Internet, spatial data\nwas traditionally difficult to share. However, with\nthe development of the Internet, mapping applications became a standard\nway of easily sharing Geographic Information Systems\n(GIS) data with the world. KML is becoming a standard for the\npresentation and interchange of GIS data because it is compact, easy to\ndevelop, and is supported by popular applications such as Google Earth\nand\nGoogle Maps.\n\n\nUntil recently, the process of creating and editing pages\nbased\non\nJavaScript was a large problem for KML developers. It required a large\nnumber of\nadditional steps to create a mashup and debug it. GME makes\nit\npossible to create a KML-based mashup very rapidly\nout of a few basic\ncomponents. The process of creation does not require special\nknowledge of HTML\nor JavaScript. The GME sample projects provide enough to get\nstarted.\n\n\nIn the following example, I'll be using a KML file that points\nto the\ncollection of the photographs taken during\n[Pict Earth\nUSA](http://pictearth.com/missions.html \"Pict Earth USA\") flights.\n\nThis is a snapshot of the Pict Earth maps mashup: \n\n### Here are the steps to integrate a KML file into a GME project using the\nGoogle Maps API:\n\n\u003cbr /\u003e\n\n[Step 1: Select the KML file](#Step1) \n[Step 2: Create a new GME project](#Step2) \n[Step 3: Create a function to add the KML](#Step3) \n[Step 4: Add a map](#Step4) \n[Step 5: Test the mashup](#Step5) \n[Step 6: Publish the mashup](#Step6) \n[Step 7: Add the mashup to a web page](#Step7) \n[Step 8: Put it in the GME gallery](#Step8) \n\n### Step 1: Select the KML file\n\nSelect\nthe KML file you would like to add to your Map. This can be anything\nthat has features supported in Google Maps. It must be hosted on a\npublicly available server.\n\n### Step 2: Create a New\nGME Project\n\nCreate a new blank GME project.\n\nThis is what a blank GME project looks like: \n\nAdd a\ntitle and a name for your function.\n\\\u003cgm:page title=**\"Pict Earth\nmissions\"** authenticate=\"false\" **onload=**\"**kmlPE()**\"\\\u003e \n\\\u003c/gm:page\\\u003e \n\n### Step 3: Create\na function to add the KML\n\n\nCreate a JavaScript function with the path to the KML file to be added\nto the Map. \n\n```gdscript\n\u003cscript\u003e\n function kmlPE()\n {\n \u003c!-- Get map --\u003e\n var myMap = google.mashups.getObjectById('map').getMap();\n \u003c!-- Get KML --\u003e\n var geoXml = new GGeoXml(\"http://pictearthusa.com/kml/missions.kml\");\n \u003c!--Place KML on Map --\u003e\n myMap.addOverlay(geoXml);\n \u003c!--Set zoom on double click --\u003e\n myMap.enableDoubleClickZoom();\n }\n\u003c/script\u003e\n```\n\n### Step 4: Add a Map\n\nAdd map and parameters.\n\n```actionscript-3\n\u003cgm:map id=\"map\" height=\"400px\" width=\"400px\" lat=\"32.9393\" lng=\"-117.206\" zoom=\"9\" maptypes=\"true\"/\u003e\n```\n\n### Step 5: Test the mashup.\n\nPress the Test button (F4).\n\nThis is an image of the Pict Earth mashup tested in the\nSandbox. \n\nNow we can verify the text of application and see the first result. We\ncan add a\ntitle and links and test it again.\n\n### Step 6: Publish the mashup\n\nSet the name of the project, and then publish it. This will give you a\npermanent link to your mashup, which you can use to incorporate it into\nweb pages. Using my example, this is the link to the GME project\n[home page](http://pemissions.googlemashups.com/ \"home page\"). You\ncan also see\n[source\ncode](http://pemissions.googlemashups.com/index.gml \"Source code\") of project.\n\n### Step 7: Add the mashup\nto a web page\n\nAdd the mashup to a web page using an iframe. For instance, to insert\nthe example project, add this:\n\n```css+lasso\n\u003ciframe style=\"WIDTH: 439px; HEIGHT: 491px\" src=\"http://pemissions.googlemashups.com/\" frameborder=\"0\"\u003e\u003c/iframe\u003e\n```\n\nHere are examples of the mashup in a web [page](http://spreadsheetsgis.googlepages.com/pe \"page\")\nand a [blog](http://gisplanet.blogspot.com/2007/07/pict-earth-usa-missions.html \"blog\").\n\nYou can also add your [Google\nAnalytics](http://analytics.google.com/ \"Google Analytics\") code to the project, which will allow you to track\nstatistics about who is viewing your page. Here's the simple script to\nadd it:\n\n```carbon\n\u003cscript src=\"http://www.google-analytics.com/urchin.js\" type=\"text/javascript\"\u003e\u003c/script\u003e\n\u003cscript type=\"text/javascript\"\u003euacct = \"youraccountnumber\";urchinTracker();\u003c/script\u003e\n```\n\n\u003cbr /\u003e\n\n### Step 8: Put it in the\nGME Gallery\n\nPublish your mashup to the [GME Mashup Gallery](http://gallery.googlemashups.com/).\nThis will\nallow other users to view your mashup.\n\n\u003cbr /\u003e\n\n### For more information:\n\nCheck out the\n[Google\nMashup Editor Getting Started Guide](http://editor.googlemashups.com/docs/gettingstarted.html \"Google Mashup Editor Getting Started Guide\"), which presents in\ndetail the\nprocess of creating mashups. Also, check out\nthe [list\nof tags](http://editor.googlemashups.com/docs/reference.html \"list of tags\") for a brief description of all gm tags with\n[examples](http://editor.googlemashups.com/docs/samples.html \"examples\").\n\n\u003cbr /\u003e\n\n### Code:\n\nHere is\nthe whole code for using the Pict Earth KML in GME: \n\n```gdscript\n\u003cgm:page title=\"Pict Earth missions\" authenticate=\"false\" onload=\"kmlPE()\u003e\n\n\u003c!-- Map definition --\u003e\n\u003cgm:mapid=\"map\" height=\"400px\" width=\"400px\" lat=\"32.9393\" lng=\"-117.206\" zoom=\"9\" maptypes=\"true\"/\u003e\n\n\u003cscript\u003e\n function kmlPE(){\n\n \u003c!-- Get map --\u003e\n var myMap = google.mashups.getObjectById('map').getMap();\n\n \u003c!-- Get KML --\u003e\n var geoXml = new GGeoXml(\"http://pictearthusa.com/kml/missions.kml\");\n\n \u003c!-- Place KML on Map --\u003e\n myMap.addOverlay(geoXml);\n\n \u003c!-- Set zoom on double click --\u003e\n myMap.enableDoubleClickZoom();\n }\n\u003c/script\u003e\n\u003c/gm:page\u003e\n```\n\n### What's next?\n\nOnce you've published your mashup, you can use the KML file\nin it as a\nparameter to include in another application, or loaded directly as a\nmap. For\ninstance, this page:\n[http://param.googlemashups.com](http://param.googlemashups.com/?kml=http://pictearthusa.com/kml/missions.kml \"http://param.googlemashups.com/?kml=http://pictearthusa.com/kml/missions.kml\")\n\n\u003cbr /\u003e\n\nis a GME mashup. You can directly reference a KML file to the mashup by adding kml= as a parameter in the URL, like this:\n\n\u003cbr /\u003e\n\n\u003chttp://param.googlemashups.com/?kml=http://mapgadgets.googlepages.com/cta.kml\u003e \n\nYou can also create a [Gadget](http://www.google.com/apis/gadgets/) from your project. Once you've submitted it, go to the file menu and click on Submit Gadget, and follow the directions. This will allow you to easily add your application to your [Google personalized home page](http://www.google.com/ig), on other web pages, and to share it with others.\n\n\u003cbr /\u003e"]]