Использование KML в редакторе Google Mashup
Оптимизируйте свои подборки
Сохраняйте и классифицируйте контент в соответствии со своими настройками.
Валерий Хронусов, разработчик KML, Пермский государственный университет, Россия Введение
Google Mashup Editor (GME) — один из самых долгожданных и полезных инструментов для разработчиков мэшапов. GME помогает разработчикам создавать и редактировать динамические компоненты веб-страниц, такие как карты, таблицы, списки и другие элементы, на основе связей с внешними данными. Эти элементы затем можно добавлять на веб-страницы и в блоги с помощью iframe.
В этом руководстве вы узнаете, как интегрировать файл KML в карту, созданную с помощью GME.
Мои первые впечатления от Google Mashup Editor
- Он предельно прост, имеет понятный и понятный интерфейс, как и большинство продуктов Google.
- Имеет удобный индекс проектов с постоянно пополняющейся коллекцией примеров кода, а также код автора.
- Позволяет легко хранить дополнительные ресурсы проекта (например, файлы изображений).
- Имеет простой в использовании отладчик XML.
- В нем имеется множество простых в использовании примеров приложений.
GME для разработчиков KML
До появления Интернета обмен пространственными данными был традиционно затруднён. Однако с развитием Интернета картографические приложения стали стандартным способом лёгкого обмена данными геоинформационных систем (ГИС) со всем миром. Формат KML становится стандартом представления и обмена данными ГИС благодаря своей компактности, простоте разработки и поддержке таких популярных приложений, как Google Earth и Google Maps.
До недавнего времени создание и редактирование страниц на основе JavaScript представляло собой серьёзную проблему для разработчиков KML. Для создания и отладки мэшапа требовалось множество дополнительных действий. GME позволяет очень быстро создать мэшап на основе KML из нескольких базовых компонентов. Процесс создания не требует специальных знаний HTML или JavaScript. Примеры проектов GME содержат достаточно информации для начала работы.
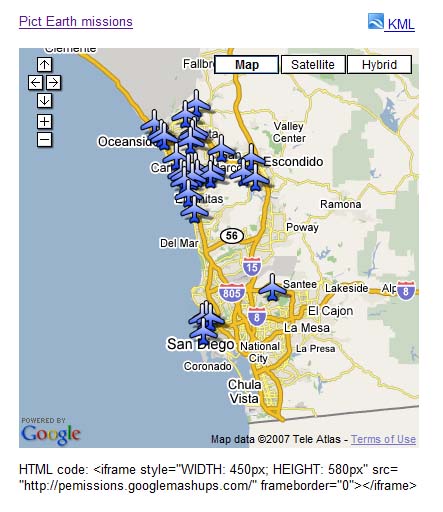
В следующем примере я буду использовать файл KML, который указывает на коллекцию фотографий, сделанных во время полетов Pict Earth USA .
Это снимок мэшапа карт Pict Earth:
Вот шаги для интеграции файла KML в проект GME с помощью API Google Карт:
Шаг 1: Выберите файл KML Шаг 2: Создайте новый проект GME Шаг 3: Создайте функцию для добавления KML Шаг 4: Добавьте карту Шаг 5: Тестирование мэшапа Шаг 6: Опубликуйте мэшап Шаг 7: Добавьте мэшап на веб-страницу Шаг 8: Поместите его в галерею GME.
Шаг 1: Выберите файл KML
Выберите KML-файл, который вы хотите добавить на карту. Это может быть любой файл, функции которого поддерживаются в Google Картах. Он должен быть размещён на общедоступном сервере.
Шаг 2: Создайте новый проект GME
Создайте новый пустой проект GME.
Вот как выглядит пустой проект GME:
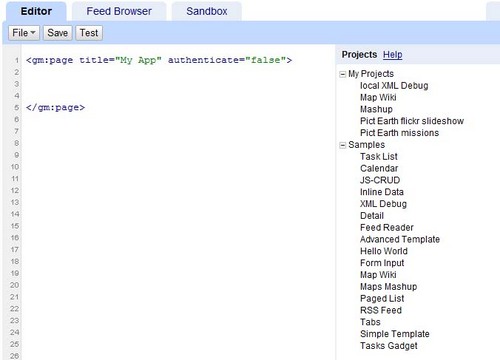
Добавьте заголовок и имя вашей функции.
<gm:page title= "Pict Earth missions" authenticate="false" onload= " kmlPE() "> </gm:page>
Шаг 3: Создайте функцию для добавления KML
Создайте функцию JavaScript с путем к файлу KML, который нужно добавить на карту.
<script>
function kmlPE()
{
<!-- Get map -->
var myMap = google.mashups.getObjectById('map').getMap();
<!-- Get KML -->
var geoXml = new GGeoXml("http://pictearthusa.com/kml/missions.kml");
<!--Place KML on Map -->
myMap.addOverlay(geoXml);
<!--Set zoom on double click -->
myMap.enableDoubleClickZoom();
}
</script>
Шаг 4: Добавьте карту.
Добавьте карту и параметры.
<gm:map id="map" height="400px" width="400px" lat="32.9393" lng="-117.206" zoom="9" maptypes="true"/>
Шаг 5: Протестируйте мэшап.
Нажмите кнопку «Тест» (F4).
Это изображение мэшапа Pict Earth, протестированного в песочнице.
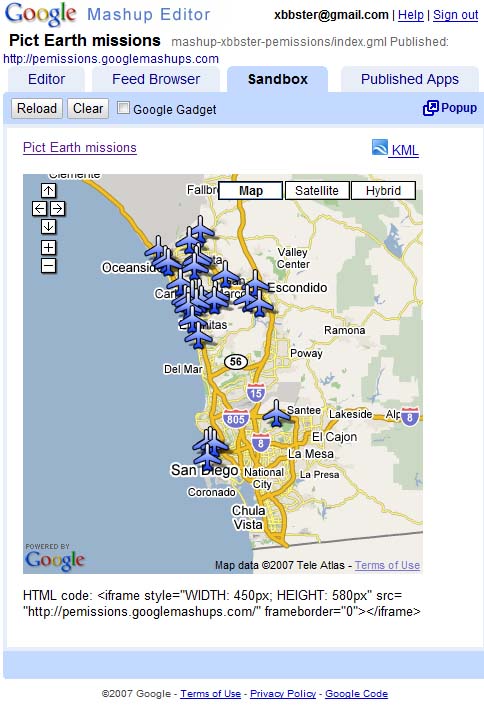
Теперь мы можем проверить текст заявки и увидеть первый результат. Можно добавить заголовок и ссылки и протестировать ещё раз.
Шаг 6: Опубликуйте мэшап.
Задайте название проекта и опубликуйте его. Это создаст постоянную ссылку на ваш мэшап, которую можно будет использовать для встраивания в веб-страницы. В моём примере это ссылка на домашнюю страницу проекта GME. Вы также можете увидеть исходный код проекта.
Шаг 7: Добавьте мэшап на веб-страницу.
Добавьте мэшап на веб-страницу с помощью iframe. Например, чтобы вставить пример проекта, добавьте следующее:
<iframe style="WIDTH: 439px; HEIGHT: 491px" src="http://pemissions.googlemashups.com/" frameborder="0"></iframe>
Вот примеры мэшапа на веб- странице и в блоге .
Вы также можете добавить в проект код Google Analytics , который позволит отслеживать статистику просмотра вашей страницы. Вот простой скрипт для добавления:
<script src="http://www.google-analytics.com/urchin.js" type="text/javascript"></script>
<script type="text/javascript">uacct = "youraccountnumber";urchinTracker();</script>
Шаг 8: Добавьте его в галерею GME.
Опубликуйте свой мэшап в галерее мэшапов GME . Это позволит другим пользователям просматривать его.
ознакомьтесь с руководством по началу работы с редактором Google Mashup Editor , в котором подробно описан процесс создания мэшапов. Также ознакомьтесь со списком тегов, где вы найдете краткое описание всех тегов GM с примерами .
Код:
Вот полный код для использования Pict Earth KML в GME:
<gm:page title="Pict Earth missions" authenticate="false" onload="kmlPE()>
<!-- Map definition -->
<gm:mapid="map" height="400px" width="400px" lat="32.9393" lng="-117.206" zoom="9" maptypes="true"/>
<script>
function kmlPE(){
<!-- Get map -->
var myMap = google.mashups.getObjectById('map').getMap();
<!-- Get KML -->
var geoXml = new GGeoXml("http://pictearthusa.com/kml/missions.kml");
<!-- Place KML on Map -->
myMap.addOverlay(geoXml);
<!-- Set zoom on double click -->
myMap.enableDoubleClickZoom();
}
</script>
</gm:page>
Что дальше?
После публикации мэшапа вы можете использовать KML-файл из него в качестве параметра для включения в другое приложение или загрузить его напрямую в виде карты. Например, эта страница:
http://param.googlemashups.com — это мэшап GME. Вы можете напрямую сослаться на KML-файл в мэшапе, добавив kml= в качестве параметра в URL-адрес, например: http://param.googlemashups.com/?kml=http://mapgadgets.googlepages.com/cta.kml
Вы также можете создать гаджет из своего проекта. После отправки перейдите в меню «Файл» и нажмите «Отправить гаджет», следуя инструкциям. Это позволит вам легко добавить приложение на персонализированную домашнюю страницу Google и другие веб-страницы, а также поделиться им с другими пользователями.
Если не указано иное, контент на этой странице предоставляется по лицензии Creative Commons "С указанием авторства 4.0", а примеры кода – по лицензии Apache 2.0. Подробнее об этом написано в правилах сайта. Java – это зарегистрированный товарный знак корпорации Oracle и ее аффилированных лиц.
Последнее обновление: 2025-07-24 UTC.
[null,null,["Последнее обновление: 2025-07-24 UTC."],[[["\u003cp\u003eThis tutorial demonstrates how to integrate a KML file into a Google Mashup Editor (GME) project using the Google Maps API.\u003c/p\u003e\n"],["\u003cp\u003eGME simplifies the process of creating and editing KML-based mashups, enabling developers to build dynamic map components without extensive HTML or JavaScript knowledge.\u003c/p\u003e\n"],["\u003cp\u003eThe tutorial provides a step-by-step guide, covering selecting a KML file, creating a GME project, adding a map, testing, publishing, and embedding the mashup into web pages.\u003c/p\u003e\n"],["\u003cp\u003eUsers can further enhance their mashups by adding Google Analytics tracking and submitting them to the GME Mashup Gallery for wider visibility.\u003c/p\u003e\n"],["\u003cp\u003ePublished mashups can be parameterized to dynamically load different KML files and can be converted into Gadgets for integration into Google Personalized Home Page and other web pages.\u003c/p\u003e\n"]]],[],null,["# Using KML in Google Mashup Editor\n\n*Valery Hronusov, KML Developer,\nPerm State University, Russia* \n\nIntroduction\n------------\n\n[Google\nMashup Editor](http://editor.googlemashups.com/ \"Google Mashup Editor\") (GME) is one of the most long-awaited and useful tools for mashup developers. GME helps developers create and edit dynamic components in Web pages, such as maps, tables, lists, and other elements, based on connections with external data. These elements can be then be included in Web pages and blogs using an iframe. \n\nThis tutorial will show you how to incorporate a KML file into a Map created with GME. \n\n\u003cbr /\u003e\n\n### My first impressions of Google Mashup Editor\n\n- It has the utmost simplicity, with a clean and distinct interface, like the majority of Google products.\n- It has a convenient project index with a constantly increasing collection of code examples, as well as the author's code.\n- It allows for the easy storage of additional resources to the project (such as image files).\n- It has an easy-to-use XML debugger.\n- It has lots of easy-to-use sample applications.\n\n\u003cbr /\u003e\n\n### GME for KML Developers\n\nBefore the advent of the Internet, spatial data\nwas traditionally difficult to share. However, with\nthe development of the Internet, mapping applications became a standard\nway of easily sharing Geographic Information Systems\n(GIS) data with the world. KML is becoming a standard for the\npresentation and interchange of GIS data because it is compact, easy to\ndevelop, and is supported by popular applications such as Google Earth\nand\nGoogle Maps.\n\n\nUntil recently, the process of creating and editing pages\nbased\non\nJavaScript was a large problem for KML developers. It required a large\nnumber of\nadditional steps to create a mashup and debug it. GME makes\nit\npossible to create a KML-based mashup very rapidly\nout of a few basic\ncomponents. The process of creation does not require special\nknowledge of HTML\nor JavaScript. The GME sample projects provide enough to get\nstarted.\n\n\nIn the following example, I'll be using a KML file that points\nto the\ncollection of the photographs taken during\n[Pict Earth\nUSA](http://pictearth.com/missions.html \"Pict Earth USA\") flights.\n\nThis is a snapshot of the Pict Earth maps mashup: \n\n### Here are the steps to integrate a KML file into a GME project using the\nGoogle Maps API:\n\n\u003cbr /\u003e\n\n[Step 1: Select the KML file](#Step1) \n[Step 2: Create a new GME project](#Step2) \n[Step 3: Create a function to add the KML](#Step3) \n[Step 4: Add a map](#Step4) \n[Step 5: Test the mashup](#Step5) \n[Step 6: Publish the mashup](#Step6) \n[Step 7: Add the mashup to a web page](#Step7) \n[Step 8: Put it in the GME gallery](#Step8) \n\n### Step 1: Select the KML file\n\nSelect\nthe KML file you would like to add to your Map. This can be anything\nthat has features supported in Google Maps. It must be hosted on a\npublicly available server.\n\n### Step 2: Create a New\nGME Project\n\nCreate a new blank GME project.\n\nThis is what a blank GME project looks like: \n\nAdd a\ntitle and a name for your function.\n\\\u003cgm:page title=**\"Pict Earth\nmissions\"** authenticate=\"false\" **onload=**\"**kmlPE()**\"\\\u003e \n\\\u003c/gm:page\\\u003e \n\n### Step 3: Create\na function to add the KML\n\n\nCreate a JavaScript function with the path to the KML file to be added\nto the Map. \n\n```gdscript\n\u003cscript\u003e\n function kmlPE()\n {\n \u003c!-- Get map --\u003e\n var myMap = google.mashups.getObjectById('map').getMap();\n \u003c!-- Get KML --\u003e\n var geoXml = new GGeoXml(\"http://pictearthusa.com/kml/missions.kml\");\n \u003c!--Place KML on Map --\u003e\n myMap.addOverlay(geoXml);\n \u003c!--Set zoom on double click --\u003e\n myMap.enableDoubleClickZoom();\n }\n\u003c/script\u003e\n```\n\n### Step 4: Add a Map\n\nAdd map and parameters.\n\n```actionscript-3\n\u003cgm:map id=\"map\" height=\"400px\" width=\"400px\" lat=\"32.9393\" lng=\"-117.206\" zoom=\"9\" maptypes=\"true\"/\u003e\n```\n\n### Step 5: Test the mashup.\n\nPress the Test button (F4).\n\nThis is an image of the Pict Earth mashup tested in the\nSandbox. \n\nNow we can verify the text of application and see the first result. We\ncan add a\ntitle and links and test it again.\n\n### Step 6: Publish the mashup\n\nSet the name of the project, and then publish it. This will give you a\npermanent link to your mashup, which you can use to incorporate it into\nweb pages. Using my example, this is the link to the GME project\n[home page](http://pemissions.googlemashups.com/ \"home page\"). You\ncan also see\n[source\ncode](http://pemissions.googlemashups.com/index.gml \"Source code\") of project.\n\n### Step 7: Add the mashup\nto a web page\n\nAdd the mashup to a web page using an iframe. For instance, to insert\nthe example project, add this:\n\n```css+lasso\n\u003ciframe style=\"WIDTH: 439px; HEIGHT: 491px\" src=\"http://pemissions.googlemashups.com/\" frameborder=\"0\"\u003e\u003c/iframe\u003e\n```\n\nHere are examples of the mashup in a web [page](http://spreadsheetsgis.googlepages.com/pe \"page\")\nand a [blog](http://gisplanet.blogspot.com/2007/07/pict-earth-usa-missions.html \"blog\").\n\nYou can also add your [Google\nAnalytics](http://analytics.google.com/ \"Google Analytics\") code to the project, which will allow you to track\nstatistics about who is viewing your page. Here's the simple script to\nadd it:\n\n```carbon\n\u003cscript src=\"http://www.google-analytics.com/urchin.js\" type=\"text/javascript\"\u003e\u003c/script\u003e\n\u003cscript type=\"text/javascript\"\u003euacct = \"youraccountnumber\";urchinTracker();\u003c/script\u003e\n```\n\n\u003cbr /\u003e\n\n### Step 8: Put it in the\nGME Gallery\n\nPublish your mashup to the [GME Mashup Gallery](http://gallery.googlemashups.com/).\nThis will\nallow other users to view your mashup.\n\n\u003cbr /\u003e\n\n### For more information:\n\nCheck out the\n[Google\nMashup Editor Getting Started Guide](http://editor.googlemashups.com/docs/gettingstarted.html \"Google Mashup Editor Getting Started Guide\"), which presents in\ndetail the\nprocess of creating mashups. Also, check out\nthe [list\nof tags](http://editor.googlemashups.com/docs/reference.html \"list of tags\") for a brief description of all gm tags with\n[examples](http://editor.googlemashups.com/docs/samples.html \"examples\").\n\n\u003cbr /\u003e\n\n### Code:\n\nHere is\nthe whole code for using the Pict Earth KML in GME: \n\n```gdscript\n\u003cgm:page title=\"Pict Earth missions\" authenticate=\"false\" onload=\"kmlPE()\u003e\n\n\u003c!-- Map definition --\u003e\n\u003cgm:mapid=\"map\" height=\"400px\" width=\"400px\" lat=\"32.9393\" lng=\"-117.206\" zoom=\"9\" maptypes=\"true\"/\u003e\n\n\u003cscript\u003e\n function kmlPE(){\n\n \u003c!-- Get map --\u003e\n var myMap = google.mashups.getObjectById('map').getMap();\n\n \u003c!-- Get KML --\u003e\n var geoXml = new GGeoXml(\"http://pictearthusa.com/kml/missions.kml\");\n\n \u003c!-- Place KML on Map --\u003e\n myMap.addOverlay(geoXml);\n\n \u003c!-- Set zoom on double click --\u003e\n myMap.enableDoubleClickZoom();\n }\n\u003c/script\u003e\n\u003c/gm:page\u003e\n```\n\n### What's next?\n\nOnce you've published your mashup, you can use the KML file\nin it as a\nparameter to include in another application, or loaded directly as a\nmap. For\ninstance, this page:\n[http://param.googlemashups.com](http://param.googlemashups.com/?kml=http://pictearthusa.com/kml/missions.kml \"http://param.googlemashups.com/?kml=http://pictearthusa.com/kml/missions.kml\")\n\n\u003cbr /\u003e\n\nis a GME mashup. You can directly reference a KML file to the mashup by adding kml= as a parameter in the URL, like this:\n\n\u003cbr /\u003e\n\n\u003chttp://param.googlemashups.com/?kml=http://mapgadgets.googlepages.com/cta.kml\u003e \n\nYou can also create a [Gadget](http://www.google.com/apis/gadgets/) from your project. Once you've submitted it, go to the file menu and click on Submit Gadget, and follow the directions. This will allow you to easily add your application to your [Google personalized home page](http://www.google.com/ig), on other web pages, and to share it with others.\n\n\u003cbr /\u003e"]]