การใช้ KML ใน Google Mashup Editor
จัดทุกอย่างให้เป็นระเบียบอยู่เสมอด้วยคอลเล็กชัน
บันทึกและจัดหมวดหมู่เนื้อหาตามค่ากำหนดของคุณ
Valery Hronusov นักพัฒนา KML
Perm State University ประเทศรัสเซีย
บทนำ
Google
Mashup Editor (GME) เป็นหนึ่งในเครื่องมือที่นักพัฒนาโปรแกรม Mashup รอคอยมานานที่สุดและมีประโยชน์มากที่สุด GME ช่วยให้นักพัฒนาซอฟต์แวร์สร้างและแก้ไขคอมโพเนนต์แบบไดนามิกในหน้าเว็บ เช่น แผนที่ ตาราง รายการ และองค์ประกอบอื่นๆ โดยอิงตามการเชื่อมต่อกับข้อมูลภายนอก จากนั้นคุณจะ
รวมองค์ประกอบเหล่านี้ไว้ในหน้าเว็บและบล็อกโดยใช้ iframe ได้
บทแนะนำนี้จะแสดงวิธีรวมไฟล์ KML เข้ากับแผนที่
ที่สร้างขึ้น
ด้วย GME
ความประทับใจแรกของฉันที่มีต่อ Google Mashup Editor
- โดยมีรูปแบบที่เรียบง่ายที่สุด พร้อมอินเทอร์เฟซที่สะอาดตาและโดดเด่น
เช่นเดียวกับผลิตภัณฑ์ส่วนใหญ่ของ Google
- โดยมีดัชนีโปรเจ็กต์ที่สะดวกพร้อมคอลเล็กชันตัวอย่างโค้ดที่เพิ่มขึ้นเรื่อยๆ รวมถึงโค้ดของผู้เขียน
- ซึ่งช่วยให้จัดเก็บทรัพยากรเพิ่มเติมลงในโปรเจ็กต์ได้อย่างง่ายดาย (เช่น ไฟล์รูปภาพ)
- โดยมีโปรแกรมแก้ไขข้อบกพร่อง XML ที่ใช้งานง่าย
- โดยมีตัวอย่างแอปพลิเคชันที่ใช้งานง่ายมากมาย
GME สำหรับนักพัฒนา KML
ก่อนที่จะมีอินเทอร์เน็ต การแชร์ข้อมูลเชิงพื้นที่
เป็นเรื่องยากมาโดยตลอด อย่างไรก็ตาม เมื่ออินเทอร์เน็ตพัฒนาขึ้น แอปพลิเคชันการทำแผนที่ก็กลายเป็นวิธีมาตรฐานในการแชร์ข้อมูลระบบสารสนเทศภูมิศาสตร์ (GIS) กับทั่วโลกได้อย่างง่ายดาย
KML กำลังกลายเป็นมาตรฐานสำหรับการนำเสนอและการแลกเปลี่ยนข้อมูล GIS เนื่องจากมีขนาดกะทัดรัด พัฒนาได้ง่าย และได้รับการรองรับจากแอปพลิเคชันยอดนิยม เช่น Google Earth และ Google Maps
จนกระทั่งเมื่อไม่นานมานี้ กระบวนการสร้างและแก้ไขหน้าเว็บ
โดยอิงตาม
JavaScript
เป็นปัญหาใหญ่สำหรับนักพัฒนา KML ซึ่งต้องมีขั้นตอนเพิ่มเติมอีกมากมายในการสร้างและแก้ไขข้อบกพร่องของมิกซ์ GME ช่วยให้คุณสร้างแมชอัปที่อิงตาม KML ได้อย่างรวดเร็วจากคอมโพเนนต์พื้นฐานเพียงไม่กี่อย่าง
กระบวนการสร้างไม่จำเป็นต้องมีความรู้พิเศษเกี่ยวกับ HTML หรือ JavaScript โปรเจ็กต์ตัวอย่าง GME มีข้อมูลเพียงพอที่จะช่วยให้คุณเริ่มต้นใช้งานได้
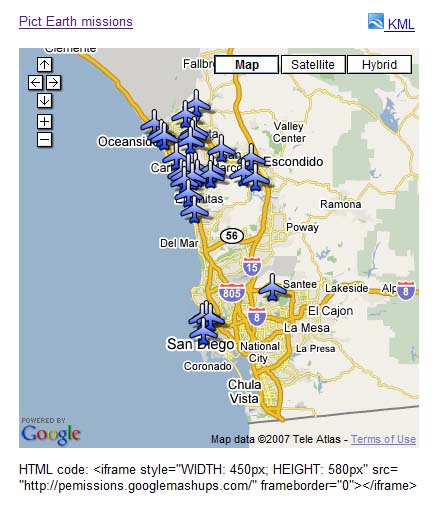
ในตัวอย่างต่อไปนี้ ฉันจะใช้ไฟล์ KML ที่ชี้ไปยังคอลเล็กชันภาพถ่ายที่ถ่ายระหว่างเที่ยวบินของ Pict Earth
USA
ภาพรวมของแมชอัปแผนที่ Pict Earth มีดังนี้
ขั้นตอนการผสานรวมไฟล์ KML เข้ากับโปรเจ็กต์ GME โดยใช้
Google Maps API มีดังนี้
ขั้นตอนที่ 1: เลือกไฟล์ KML
ขั้นตอนที่ 2: สร้างโปรเจ็กต์ GME ใหม่
ขั้นตอนที่ 3: สร้างฟังก์ชันเพื่อเพิ่ม KML
ขั้นตอนที่ 4: เพิ่มแผนที่
ขั้นตอนที่ 5: ทดสอบแมชอัป
ขั้นตอนที่ 6: เผยแพร่แมชอัป
ขั้นตอนที่ 7: เพิ่มแมชอัปไปยังหน้าเว็บ
ขั้นตอนที่ 8: ใส่แมชอัปในแกลเลอรี GME
ขั้นตอนที่ 1: เลือกไฟล์ KML
เลือก
ไฟล์ KML ที่ต้องการเพิ่มลงในแผนที่ ซึ่งอาจเป็นอะไรก็ได้
ที่มีฟีเจอร์ที่รองรับใน Google Maps โดยต้องโฮสต์บนเซิร์ฟเวอร์ที่
พร้อมให้บริการแก่สาธารณะ
ขั้นตอนที่ 2: สร้างโปรเจ็กต์ GME ใหม่
สร้างโปรเจ็กต์ GME ใหม่ที่ว่างเปล่า
โปรเจ็กต์ GME ที่ว่างเปล่าจะมีลักษณะดังนี้
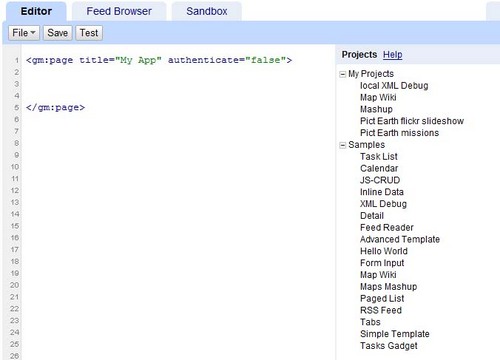
เพิ่ม
ชื่อและชื่อสำหรับฟังก์ชัน
<gm:page
title="ภารกิจ Pict Earth" authenticate="false"
onload="kmlPE()">
</gm:page>
ขั้นตอนที่ 3: สร้าง
ฟังก์ชันเพื่อเพิ่ม KML
สร้างฟังก์ชัน JavaScript ที่มีเส้นทางไปยังไฟล์ KML ที่จะเพิ่ม
ลงในแผนที่
<script>
function kmlPE()
{
<!-- Get map -->
var myMap = google.mashups.getObjectById('map').getMap();
<!-- Get KML -->
var geoXml = new GGeoXml("http://pictearthusa.com/kml/missions.kml");
<!--Place KML on Map -->
myMap.addOverlay(geoXml);
<!--Set zoom on double click -->
myMap.enableDoubleClickZoom();
}
</script>
ขั้นตอนที่ 4: เพิ่มแผนที่
เพิ่มแผนที่และพารามิเตอร์
<gm:map id="map" height="400px" width="400px" lat="32.9393" lng="-117.206" zoom="9" maptypes="true"/>
ขั้นตอนที่ 5: ทดสอบการผสม
กดปุ่มทดสอบ (F4)
นี่คือรูปภาพของ Pict Earth Mashup ที่ทดสอบใน
Sandbox
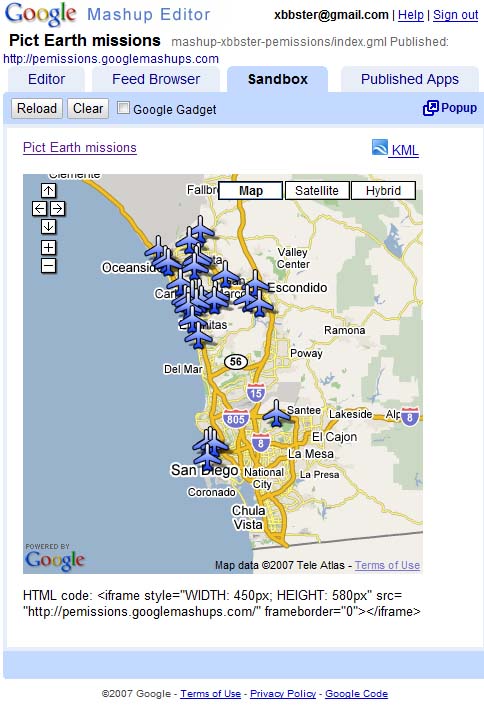
ตอนนี้เราสามารถยืนยันข้อความของแอปพลิเคชันและดูผลลัพธ์แรกได้แล้ว เรา
สามารถเพิ่ม
ชื่อและลิงก์ แล้วทดสอบอีกครั้งได้
ขั้นตอนที่ 6: เผยแพร่ผลงานรีมิกซ์
ตั้งชื่อโปรเจ็กต์ แล้วเผยแพร่ ซึ่งจะให้
ลิงก์ถาวรไปยังแมชอัปที่คุณใช้เพื่อรวมไว้ใน
หน้าเว็บได้ จากตัวอย่างของฉัน นี่คือลิงก์ไปยังหน้าแรกของโปรเจ็กต์ GME
นอกจากนี้ คุณยังดูซอร์สโค้ดของโปรเจ็กต์ได้ด้วย
ขั้นตอนที่ 7: เพิ่มแมชอัป
ลงในหน้าเว็บ
เพิ่มแมชอัปไปยังหน้าเว็บโดยใช้ iframe เช่น หากต้องการแทรก
โปรเจ็กต์ตัวอย่าง ให้เพิ่มข้อมูลต่อไปนี้
<iframe style="WIDTH: 439px; HEIGHT: 491px" src="http://pemissions.googlemashups.com/" frameborder="0"></iframe>
ต่อไปนี้คือตัวอย่างของ Mashup ในหน้าเว็บ
และบล็อก
นอกจากนี้ คุณยังเพิ่มโค้ด Google
Analytics ลงในโปรเจ็กต์ได้ด้วย ซึ่งจะช่วยให้คุณติดตามสถิติเกี่ยวกับผู้ที่ดูหน้าเว็บได้ ต่อไปนี้คือสคริปต์ง่ายๆ ที่ใช้
เพิ่ม
<script src="http://www.google-analytics.com/urchin.js" type="text/javascript"></script>
<script type="text/javascript">uacct = "youraccountnumber";urchinTracker();</script>
ขั้นตอนที่ 8: ใส่ลงใน
แกลเลอรี GME
เผยแพร่ผลงานแมชอัปของคุณไปยังแกลเลอรีแมชอัปของ GME
ซึ่งจะ
อนุญาตให้ผู้ใช้คนอื่นๆ ดูแมชอัปของคุณได้
ดูคู่มือเริ่มต้นใช้งาน Google
Mashup Editor ซึ่งอธิบาย
กระบวนการสร้าง Mashup โดยละเอียด นอกจากนี้ โปรดดูรายการ
แท็กเพื่อดูคำอธิบายสั้นๆ ของแท็ก gm ทั้งหมดพร้อมตัวอย่าง
รหัส:
โค้ดทั้งหมดสำหรับการใช้ KML ของ Pict Earth ใน GME มีดังนี้
<gm:page title="Pict Earth missions" authenticate="false" onload="kmlPE()>
<!-- Map definition -->
<gm:mapid="map" height="400px" width="400px" lat="32.9393" lng="-117.206" zoom="9" maptypes="true"/>
<script>
function kmlPE(){
<!-- Get map -->
var myMap = google.mashups.getObjectById('map').getMap();
<!-- Get KML -->
var geoXml = new GGeoXml("http://pictearthusa.com/kml/missions.kml");
<!-- Place KML on Map -->
myMap.addOverlay(geoXml);
<!-- Set zoom on double click -->
myMap.enableDoubleClickZoom();
}
</script>
</gm:page>
ขั้นตอนถัดไปคือ
เมื่อเผยแพร่แมชอัปแล้ว คุณจะใช้ไฟล์ KML
ในแมชอัปเป็น
พารามิเตอร์เพื่อรวมไว้ในแอปพลิเคชันอื่น หรือโหลดโดยตรงเป็น
แผนที่ก็ได้ เช่น หน้านี้
http://param.googlemashups.com
เป็นผลงานผสมของ GME คุณอ้างอิงไฟล์ KML ไปยังแมชอัปได้โดยตรงโดย
เพิ่ม kml= เป็นพารามิเตอร์ใน URL ดังนี้
http://param.googlemashups.com/?kml=http://mapgadgets.googlepages.com/cta.kml
นอกจากนี้ คุณยังสร้างแกดเจ็ตจากโปรเจ็กต์ได้ด้วย เมื่อส่งแล้ว ให้ไปที่เมนูไฟล์ แล้วคลิก "ส่งแกดเจ็ต" และทำตามวิธีการ ซึ่งจะช่วยให้คุณเพิ่มแอปพลิเคชันลงในหน้าแรกของ Google ที่ปรับตามโปรไฟล์ของผู้ใช้ หน้าเว็บอื่นๆ และแชร์กับผู้อื่นได้อย่างง่ายดาย
เนื้อหาของหน้าเว็บนี้ได้รับอนุญาตภายใต้ใบอนุญาตที่ต้องระบุที่มาของครีเอทีฟคอมมอนส์ 4.0 และตัวอย่างโค้ดได้รับอนุญาตภายใต้ใบอนุญาต Apache 2.0 เว้นแต่จะระบุไว้เป็นอย่างอื่น โปรดดูรายละเอียดที่นโยบายเว็บไซต์ Google Developers Java เป็นเครื่องหมายการค้าจดทะเบียนของ Oracle และ/หรือบริษัทในเครือ
อัปเดตล่าสุด 2025-07-27 UTC
[null,null,["อัปเดตล่าสุด 2025-07-27 UTC"],[[["\u003cp\u003eThis tutorial demonstrates how to integrate a KML file into a Google Mashup Editor (GME) project using the Google Maps API.\u003c/p\u003e\n"],["\u003cp\u003eGME simplifies the process of creating and editing KML-based mashups, enabling developers to build dynamic map components without extensive HTML or JavaScript knowledge.\u003c/p\u003e\n"],["\u003cp\u003eThe tutorial provides a step-by-step guide, covering selecting a KML file, creating a GME project, adding a map, testing, publishing, and embedding the mashup into web pages.\u003c/p\u003e\n"],["\u003cp\u003eUsers can further enhance their mashups by adding Google Analytics tracking and submitting them to the GME Mashup Gallery for wider visibility.\u003c/p\u003e\n"],["\u003cp\u003ePublished mashups can be parameterized to dynamically load different KML files and can be converted into Gadgets for integration into Google Personalized Home Page and other web pages.\u003c/p\u003e\n"]]],[],null,["# Using KML in Google Mashup Editor\n\n*Valery Hronusov, KML Developer,\nPerm State University, Russia* \n\nIntroduction\n------------\n\n[Google\nMashup Editor](http://editor.googlemashups.com/ \"Google Mashup Editor\") (GME) is one of the most long-awaited and useful tools for mashup developers. GME helps developers create and edit dynamic components in Web pages, such as maps, tables, lists, and other elements, based on connections with external data. These elements can be then be included in Web pages and blogs using an iframe. \n\nThis tutorial will show you how to incorporate a KML file into a Map created with GME. \n\n\u003cbr /\u003e\n\n### My first impressions of Google Mashup Editor\n\n- It has the utmost simplicity, with a clean and distinct interface, like the majority of Google products.\n- It has a convenient project index with a constantly increasing collection of code examples, as well as the author's code.\n- It allows for the easy storage of additional resources to the project (such as image files).\n- It has an easy-to-use XML debugger.\n- It has lots of easy-to-use sample applications.\n\n\u003cbr /\u003e\n\n### GME for KML Developers\n\nBefore the advent of the Internet, spatial data\nwas traditionally difficult to share. However, with\nthe development of the Internet, mapping applications became a standard\nway of easily sharing Geographic Information Systems\n(GIS) data with the world. KML is becoming a standard for the\npresentation and interchange of GIS data because it is compact, easy to\ndevelop, and is supported by popular applications such as Google Earth\nand\nGoogle Maps.\n\n\nUntil recently, the process of creating and editing pages\nbased\non\nJavaScript was a large problem for KML developers. It required a large\nnumber of\nadditional steps to create a mashup and debug it. GME makes\nit\npossible to create a KML-based mashup very rapidly\nout of a few basic\ncomponents. The process of creation does not require special\nknowledge of HTML\nor JavaScript. The GME sample projects provide enough to get\nstarted.\n\n\nIn the following example, I'll be using a KML file that points\nto the\ncollection of the photographs taken during\n[Pict Earth\nUSA](http://pictearth.com/missions.html \"Pict Earth USA\") flights.\n\nThis is a snapshot of the Pict Earth maps mashup: \n\n### Here are the steps to integrate a KML file into a GME project using the\nGoogle Maps API:\n\n\u003cbr /\u003e\n\n[Step 1: Select the KML file](#Step1) \n[Step 2: Create a new GME project](#Step2) \n[Step 3: Create a function to add the KML](#Step3) \n[Step 4: Add a map](#Step4) \n[Step 5: Test the mashup](#Step5) \n[Step 6: Publish the mashup](#Step6) \n[Step 7: Add the mashup to a web page](#Step7) \n[Step 8: Put it in the GME gallery](#Step8) \n\n### Step 1: Select the KML file\n\nSelect\nthe KML file you would like to add to your Map. This can be anything\nthat has features supported in Google Maps. It must be hosted on a\npublicly available server.\n\n### Step 2: Create a New\nGME Project\n\nCreate a new blank GME project.\n\nThis is what a blank GME project looks like: \n\nAdd a\ntitle and a name for your function.\n\\\u003cgm:page title=**\"Pict Earth\nmissions\"** authenticate=\"false\" **onload=**\"**kmlPE()**\"\\\u003e \n\\\u003c/gm:page\\\u003e \n\n### Step 3: Create\na function to add the KML\n\n\nCreate a JavaScript function with the path to the KML file to be added\nto the Map. \n\n```gdscript\n\u003cscript\u003e\n function kmlPE()\n {\n \u003c!-- Get map --\u003e\n var myMap = google.mashups.getObjectById('map').getMap();\n \u003c!-- Get KML --\u003e\n var geoXml = new GGeoXml(\"http://pictearthusa.com/kml/missions.kml\");\n \u003c!--Place KML on Map --\u003e\n myMap.addOverlay(geoXml);\n \u003c!--Set zoom on double click --\u003e\n myMap.enableDoubleClickZoom();\n }\n\u003c/script\u003e\n```\n\n### Step 4: Add a Map\n\nAdd map and parameters.\n\n```actionscript-3\n\u003cgm:map id=\"map\" height=\"400px\" width=\"400px\" lat=\"32.9393\" lng=\"-117.206\" zoom=\"9\" maptypes=\"true\"/\u003e\n```\n\n### Step 5: Test the mashup.\n\nPress the Test button (F4).\n\nThis is an image of the Pict Earth mashup tested in the\nSandbox. \n\nNow we can verify the text of application and see the first result. We\ncan add a\ntitle and links and test it again.\n\n### Step 6: Publish the mashup\n\nSet the name of the project, and then publish it. This will give you a\npermanent link to your mashup, which you can use to incorporate it into\nweb pages. Using my example, this is the link to the GME project\n[home page](http://pemissions.googlemashups.com/ \"home page\"). You\ncan also see\n[source\ncode](http://pemissions.googlemashups.com/index.gml \"Source code\") of project.\n\n### Step 7: Add the mashup\nto a web page\n\nAdd the mashup to a web page using an iframe. For instance, to insert\nthe example project, add this:\n\n```css+lasso\n\u003ciframe style=\"WIDTH: 439px; HEIGHT: 491px\" src=\"http://pemissions.googlemashups.com/\" frameborder=\"0\"\u003e\u003c/iframe\u003e\n```\n\nHere are examples of the mashup in a web [page](http://spreadsheetsgis.googlepages.com/pe \"page\")\nand a [blog](http://gisplanet.blogspot.com/2007/07/pict-earth-usa-missions.html \"blog\").\n\nYou can also add your [Google\nAnalytics](http://analytics.google.com/ \"Google Analytics\") code to the project, which will allow you to track\nstatistics about who is viewing your page. Here's the simple script to\nadd it:\n\n```carbon\n\u003cscript src=\"http://www.google-analytics.com/urchin.js\" type=\"text/javascript\"\u003e\u003c/script\u003e\n\u003cscript type=\"text/javascript\"\u003euacct = \"youraccountnumber\";urchinTracker();\u003c/script\u003e\n```\n\n\u003cbr /\u003e\n\n### Step 8: Put it in the\nGME Gallery\n\nPublish your mashup to the [GME Mashup Gallery](http://gallery.googlemashups.com/).\nThis will\nallow other users to view your mashup.\n\n\u003cbr /\u003e\n\n### For more information:\n\nCheck out the\n[Google\nMashup Editor Getting Started Guide](http://editor.googlemashups.com/docs/gettingstarted.html \"Google Mashup Editor Getting Started Guide\"), which presents in\ndetail the\nprocess of creating mashups. Also, check out\nthe [list\nof tags](http://editor.googlemashups.com/docs/reference.html \"list of tags\") for a brief description of all gm tags with\n[examples](http://editor.googlemashups.com/docs/samples.html \"examples\").\n\n\u003cbr /\u003e\n\n### Code:\n\nHere is\nthe whole code for using the Pict Earth KML in GME: \n\n```gdscript\n\u003cgm:page title=\"Pict Earth missions\" authenticate=\"false\" onload=\"kmlPE()\u003e\n\n\u003c!-- Map definition --\u003e\n\u003cgm:mapid=\"map\" height=\"400px\" width=\"400px\" lat=\"32.9393\" lng=\"-117.206\" zoom=\"9\" maptypes=\"true\"/\u003e\n\n\u003cscript\u003e\n function kmlPE(){\n\n \u003c!-- Get map --\u003e\n var myMap = google.mashups.getObjectById('map').getMap();\n\n \u003c!-- Get KML --\u003e\n var geoXml = new GGeoXml(\"http://pictearthusa.com/kml/missions.kml\");\n\n \u003c!-- Place KML on Map --\u003e\n myMap.addOverlay(geoXml);\n\n \u003c!-- Set zoom on double click --\u003e\n myMap.enableDoubleClickZoom();\n }\n\u003c/script\u003e\n\u003c/gm:page\u003e\n```\n\n### What's next?\n\nOnce you've published your mashup, you can use the KML file\nin it as a\nparameter to include in another application, or loaded directly as a\nmap. For\ninstance, this page:\n[http://param.googlemashups.com](http://param.googlemashups.com/?kml=http://pictearthusa.com/kml/missions.kml \"http://param.googlemashups.com/?kml=http://pictearthusa.com/kml/missions.kml\")\n\n\u003cbr /\u003e\n\nis a GME mashup. You can directly reference a KML file to the mashup by adding kml= as a parameter in the URL, like this:\n\n\u003cbr /\u003e\n\n\u003chttp://param.googlemashups.com/?kml=http://mapgadgets.googlepages.com/cta.kml\u003e \n\nYou can also create a [Gadget](http://www.google.com/apis/gadgets/) from your project. Once you've submitted it, go to the file menu and click on Submit Gadget, and follow the directions. This will allow you to easily add your application to your [Google personalized home page](http://www.google.com/ig), on other web pages, and to share it with others.\n\n\u003cbr /\u003e"]]