
Introduction
This Hello World! tutorial uses MediaPipe Framework to develop an iOS application that runs a MediaPipe graph on iOS.
What you will build
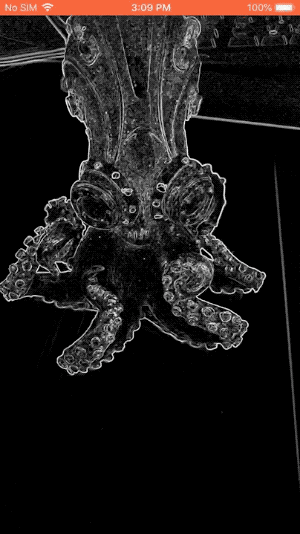
A simple camera app for real-time Sobel edge detection applied to a live video stream on an iOS device.
Setup
- Install MediaPipe Framework on your system, see Framework installation guide for details.
- Setup your iOS device for development.
- Setup Bazel on your system to build and deploy the iOS app.
Graph for edge detection
We will be using the following graph, edge_detection_mobile_gpu.pbtxt:
# MediaPipe graph that performs GPU Sobel edge detection on a live video stream.
# Used in the examples
# mediapipe/examples/android/src/java/com/google/mediapipe/apps/basic:helloworld
# and mediapipe/examples/ios/helloworld.

# Images coming into and out of the graph.
input_stream: "input_video"
output_stream: "output_video"

# Converts RGB images into luminance images, still stored in RGB format.
node: {
  calculator: "LuminanceCalculator"
  input_stream: "input_video"
  output_stream: "luma_video"
}

# Applies the Sobel filter to luminance images stored in RGB format.
node: {
  calculator: "SobelEdgesCalculator"
  input_stream: "luma_video"
  output_stream: "output_video"
}
A visualization of the graph is shown below:
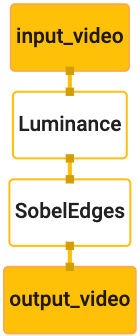
This graph has a single input stream named input_video for all incoming frames
that will be provided by your device's camera.
The first node in the graph, LuminanceCalculator, takes a single packet (image
frame) and applies a change in luminance using an OpenGL shader. The resulting
image frame is sent to the luma_video output stream.
The second node, SobelEdgesCalculator applies edge detection to incoming
packets in the luma_video stream and outputs results in output_video output
stream.
Our iOS application will display the output image frames of the output_video
stream.
Initial minimal application setup
We first start with a simple iOS application and demonstrate how to use bazel
to build it.
First, create an XCode project via File > New > Single View App.
Set the product name to "HelloWorld", and use an appropriate organization
identifier, such as com.google.mediapipe. The organization identifier
alongwith the product name will be the bundle_id for the application, such as
com.google.mediapipe.HelloWorld.
Set the language to Objective-C.
Save the project to an appropriate location. Let's call this
$PROJECT_TEMPLATE_LOC. So your project will be in the
$PROJECT_TEMPLATE_LOC/HelloWorld directory. This directory will contain
another directory named HelloWorld and an HelloWorld.xcodeproj file.
The HelloWorld.xcodeproj will not be useful for this tutorial, as we will use
bazel to build the iOS application. The content of the
$PROJECT_TEMPLATE_LOC/HelloWorld/HelloWorld directory is listed below:
AppDelegate.handAppDelegate.mViewController.handViewController.mmain.mInfo.plistMain.storyboardandLaunch.storyboardAssets.xcassetsdirectory.
Copy these files to a directory named HelloWorld to a location that can access
the MediaPipe Framework source code. For example, the source code of the
application that we will build in this tutorial is located in
mediapipe/examples/ios/HelloWorld. We will refer to this path as the
$APPLICATION_PATH throughout the codelab.
Create a BUILD file in the $APPLICATION_PATH and add the following build
rules:
MIN_IOS_VERSION = "11.0"

load(
    "@build_bazel_rules_apple//apple:ios.bzl",
    "ios_application",
)

ios_application(
    name = "HelloWorldApp",
    bundle_id = "com.google.mediapipe.HelloWorld",
    families = [
        "iphone",
        "ipad",
    ],
    infoplists = ["Info.plist"],
    minimum_os_version = MIN_IOS_VERSION,
    provisioning_profile = "//mediapipe/examples/ios:developer_provisioning_profile",
    deps = [":HelloWorldAppLibrary"],
)

objc_library(
    name = "HelloWorldAppLibrary",
    srcs = [
        "AppDelegate.m",
        "ViewController.m",
        "main.m",
    ],
    hdrs = [
        "AppDelegate.h",
        "ViewController.h",
    ],
    data = [
        "Base.lproj/LaunchScreen.storyboard",
        "Base.lproj/Main.storyboard",
    ],
    sdk_frameworks = [
        "UIKit",
    ],
    deps = [],
)
The objc_library rule adds dependencies for the AppDelegate and
ViewController classes, main.m and the application storyboards. The
templated app depends only on the UIKit SDK.
The ios_application rule uses the HelloWorldAppLibrary Objective-C library
generated to build an iOS application for installation on your iOS device.
To build the app, use the following command in a terminal:
bazel build -c opt --config=ios_arm64 <$APPLICATION_PATH>:HelloWorldApp'
For example, to build the HelloWorldApp application in
mediapipe/examples/ios/helloworld, use the following command:
bazel build -c opt --config=ios_arm64 mediapipe/examples/ios/helloworld:HelloWorldApp
Then, go back to XCode, open Window > Devices and Simulators, select your
device, and add the .ipa file generated by the command above to your device.
Here is the document on setting up and compiling iOS Framework apps.
Open the application on your device. Since it is empty, it should display a blank white screen.
Use the camera for the live view feed
In this tutorial, we will use the MPPCameraInputSource class to access and
grab frames from the camera. This class uses the AVCaptureSession API to get
the frames from the camera.
But before using this class, change the Info.plist file to support camera
usage in the app.
In ViewController.m, add the following import line:
#import "mediapipe/objc/MPPCameraInputSource.h"
Add the following to its implementation block to create an object
_cameraSource:
@implementation ViewController {
  // Handles camera access via AVCaptureSession library.
  MPPCameraInputSource* _cameraSource;
}
Add the following code to viewDidLoad():
-(void)viewDidLoad {
  [super viewDidLoad];

  _cameraSource = [[MPPCameraInputSource alloc] init];
  _cameraSource.sessionPreset = AVCaptureSessionPresetHigh;
  _cameraSource.cameraPosition = AVCaptureDevicePositionBack;
  // The frame's native format is rotated with respect to the portrait orientation.
  _cameraSource.orientation = AVCaptureVideoOrientationPortrait;
}
The code initializes _cameraSource, sets the capture session preset, and which
camera to use.
We need to get frames from the _cameraSource into our application
ViewController to display them. MPPCameraInputSource is a subclass of
MPPInputSource, which provides a protocol for its delegates, namely the
MPPInputSourceDelegate. So our application ViewController can be a delegate
of _cameraSource.
Update the interface definition of ViewController accordingly:
@interface ViewController () <MPPInputSourceDelegate>
To handle camera setup and process incoming frames, we should use a queue
different from the main queue. Add the following to the implementation block of
the ViewController:
// Process camera frames on this queue.
dispatch_queue_t _videoQueue;
In viewDidLoad(), add the following line after initializing the
_cameraSource object:
[_cameraSource setDelegate:self queue:_videoQueue];
And add the following code to initialize the queue before setting up the
_cameraSource object:
dispatch_queue_attr_t qosAttribute = dispatch_queue_attr_make_with_qos_class(
      DISPATCH_QUEUE_SERIAL, QOS_CLASS_USER_INTERACTIVE, /*relative_priority=*/0);
_videoQueue = dispatch_queue_create(kVideoQueueLabel, qosAttribute);
We will use a serial queue with the priority QOS_CLASS_USER_INTERACTIVE for
processing camera frames.
Add the following line after the header imports at the top of the file, before
the interface/implementation of the ViewController:
static const char* kVideoQueueLabel = "com.google.mediapipe.example.videoQueue";
Before implementing any method from MPPInputSourceDelegate protocol, we must
first set up a way to display the camera frames. Mediapipe Framework provides
another utility called MPPLayerRenderer to display images on the screen. This
utility can be used to display CVPixelBufferRef objects, which is the type of
the images provided by MPPCameraInputSource to its delegates.
In ViewController.m, add the following import line:
#import "mediapipe/objc/MPPLayerRenderer.h"
To display images of the screen, we need to add a new UIView object called
_liveView to the ViewController.
Add the following lines to the implementation block of the ViewController:
// Display the camera preview frames.
IBOutlet UIView* _liveView;
// Render frames in a layer.
MPPLayerRenderer* _renderer;
Go to Main.storyboard, add a UIView object from the object library to the
View of the ViewController class. Add a referencing outlet from this view to
the _liveView object you just added to the ViewController class. Resize the
view so that it is centered and covers the entire application screen.
Go back to ViewController.m and add the following code to viewDidLoad() to
initialize the _renderer object:
_renderer = [[MPPLayerRenderer alloc] init];
_renderer.layer.frame = _liveView.layer.bounds;
[_liveView.layer addSublayer:_renderer.layer];
_renderer.frameScaleMode = MPPFrameScaleModeFillAndCrop;
To get frames from the camera, we will implement the following method:
// Must be invoked on _videoQueue.
-   (void)processVideoFrame:(CVPixelBufferRef)imageBuffer
                timestamp:(CMTime)timestamp
               fromSource:(MPPInputSource*)source {
  if (source != _cameraSource) {
    NSLog(@"Unknown source: %@", source);
    return;
  }
  // Display the captured image on the screen.
  CFRetain(imageBuffer);
  dispatch_async(dispatch_get_main_queue(), ^{
    [_renderer renderPixelBuffer:imageBuffer];
    CFRelease(imageBuffer);
  });
}
This is a delegate method of MPPInputSource. We first check that we are
getting frames from the right source, i.e. the _cameraSource. Then we display
the frame received from the camera via _renderer on the main queue.
Now, we need to start the camera as soon as the view to display the frames is
about to appear. To do this, we will implement the
viewWillAppear:(BOOL)animated function:
-(void)viewWillAppear:(BOOL)animated {
  [super viewWillAppear:animated];
}
Before we start running the camera, we need the user's permission to access it.
MPPCameraInputSource provides a function
requestCameraAccessWithCompletionHandler:(void (^_Nullable)(BOOL
granted))handler
to request camera access and do some work when the user has
responded. Add the following code to viewWillAppear:animated:
[_cameraSource requestCameraAccessWithCompletionHandler:^void(BOOL granted) {
  if (granted) {
    dispatch_async(_videoQueue, ^{
      [_cameraSource start];
    });
  }
}];
Before building the application, add the following dependencies to your BUILD
file:
sdk_frameworks = [
    "AVFoundation",
    "CoreGraphics",
    "CoreMedia",
],
deps = [
    "//mediapipe/objc:mediapipe_framework_ios",
    "//mediapipe/objc:mediapipe_input_sources_ios",
    "//mediapipe/objc:mediapipe_layer_renderer",
],
Now build and run the application on your iOS device. You should see a live camera view feed after accepting camera permissions.
We are now ready to use camera frames in a MediaPipe graph.
Using a MediaPipe graph in iOS
Add relevant dependencies
We already added the dependencies of the MediaPipe framework code which contains
the iOS API to use a MediaPipe graph. To use a MediaPipe graph, we need to add a
dependency on the graph we intend to use in our application. Add the following
line to the data list in your BUILD file:
"//mediapipe/graphs/edge_detection:mobile_gpu_binary_graph",
Now add the dependency to the calculators used in this graph in the deps field
in the BUILD file:
"//mediapipe/graphs/edge_detection:mobile_calculators",
Finally, rename the file ViewController.m to ViewController.mm to support
Objective-C++.
Use the graph in ViewController
In ViewController.m, add the following import line:
#import "mediapipe/objc/MPPGraph.h"
Declare a static constant with the name of the graph, the input stream and the output stream:
static NSString* const kGraphName = @"mobile_gpu";

static const char* kInputStream = "input_video";
static const char* kOutputStream = "output_video";
Add the following property to the interface of the ViewController:
// The MediaPipe graph currently in use. Initialized in viewDidLoad, started in viewWillAppear: and
// sent video frames on _videoQueue.
@property(nonatomic) MPPGraph* mediapipeGraph;
As explained in the comment above, we will initialize this graph in
viewDidLoad first. To do so, we need to load the graph from the .pbtxt file
using the following function:
+   (MPPGraph*)loadGraphFromResource:(NSString*)resource {
  // Load the graph config resource.
  NSError* configLoadError = nil;
  NSBundle* bundle = [NSBundle bundleForClass:[self class]];
  if (!resource || resource.length == 0) {
    return nil;
  }
  NSURL* graphURL = [bundle URLForResource:resource withExtension:@"binarypb"];
  NSData* data = [NSData dataWithContentsOfURL:graphURL options:0 error:&configLoadError];
  if (!data) {
    NSLog(@"Failed to load MediaPipe graph config: %@", configLoadError);
    return nil;
  }

  // Parse the graph config resource into mediapipe::CalculatorGraphConfig proto object.
  mediapipe::CalculatorGraphConfig config;
  config.ParseFromArray(data.bytes, data.length);

  // Create MediaPipe graph with mediapipe::CalculatorGraphConfig proto object.
  MPPGraph* newGraph = [[MPPGraph alloc] initWithGraphConfig:config];
  [newGraph addFrameOutputStream:kOutputStream outputPacketType:MPPPacketTypePixelBuffer];
  return newGraph;
}
Use this function to initialize the graph in viewDidLoad as follows:
self.mediapipeGraph = [[self class] loadGraphFromResource:kGraphName];
The graph should send the results of processing camera frames back to the
ViewController. Add the following line after initializing the graph to set the
ViewController as a delegate of the mediapipeGraph object:
self.mediapipeGraph.delegate = self;
To avoid memory contention while processing frames from the live video feed, add the following line:
// Set maxFramesInFlight to a small value to avoid memory contention for real-time processing.
self.mediapipeGraph.maxFramesInFlight = 2;
Now, start the graph when the user has granted the permission to use the camera in our app:
[_cameraSource requestCameraAccessWithCompletionHandler:^void(BOOL granted) {
  if (granted) {
    // Start running self.mediapipeGraph.
    NSError* error;
    if (![self.mediapipeGraph startWithError:&error]) {
      NSLog(@"Failed to start graph: %@", error);
    }
    else if (![self.mediapipeGraph waitUntilIdleWithError:&error]) {
      NSLog(@"Failed to complete graph initial run: %@", error);
    }

    dispatch_async(_videoQueue, ^{
      [_cameraSource start];
    });
  }
}];
Earlier, when we received frames from the camera in the processVideoFrame
function, we displayed them in the _liveView using the _renderer. Now, we
need to send those frames to the graph and render the results instead. Modify
this function's implementation to do the following:
-   (void)processVideoFrame:(CVPixelBufferRef)imageBuffer
                timestamp:(CMTime)timestamp
               fromSource:(MPPInputSource*)source {
  if (source != _cameraSource) {
    NSLog(@"Unknown source: %@", source);
    return;
  }
  [self.mediapipeGraph sendPixelBuffer:imageBuffer
                            intoStream:kInputStream
                            packetType:MPPPacketTypePixelBuffer];
}
We send the imageBuffer to self.mediapipeGraph as a packet of type
MPPPacketTypePixelBuffer into the input stream kInputStream, i.e.
"input_video".
The graph will run with this input packet and output a result in
kOutputStream, i.e. "output_video". We can implement the following delegate
method to receive packets on this output stream and display them on the screen:
-   (void)mediapipeGraph:(MPPGraph*)graph
   didOutputPixelBuffer:(CVPixelBufferRef)pixelBuffer
             fromStream:(const std::string&)streamName {
  if (streamName == kOutputStream) {
    // Display the captured image on the screen.
    CVPixelBufferRetain(pixelBuffer);
    dispatch_async(dispatch_get_main_queue(), ^{
      [_renderer renderPixelBuffer:pixelBuffer];
      CVPixelBufferRelease(pixelBuffer);
    });
  }
}
Update the interface definition of ViewController with MPPGraphDelegate:
@interface ViewController () <MPPGraphDelegate, MPPInputSourceDelegate>
And that is all! Build and run the app on your iOS device. You should see the results of running the edge detection graph on a live video feed. Congrats!
Please note that the iOS examples now use a common template app. The code in
this tutorial is used in the common template app. The helloworld app has the
appropriate BUILD file dependencies for the edge detection graph.