पब्लिशर, सर्वर-साइड इंटिग्रेशन का इस्तेमाल मुख्य रूप से उनका कॉन्टेंट पढ़ने वाले लोगों और उनके एनटाइटलमेंट को मैनेज करने के लिए करेंगे. मुख्य तौर पर, पब्लिशर किसी पीपीआईडी के लिए, प्रॉडक्ट आईडी के एनटाइटलमेंट से जुड़े Google के रिकॉर्ड को अपडेट करने के लिए, UpdateReaderEntitlements का इस्तेमाल करेंगे.
Google Cloud का सेटअप
Google Cloud में Subscription Linking API कॉन्फ़िगर करने की प्रोसेस में दो अहम चरण शामिल हैं:
- दिए गए किसी प्रोजेक्ट के लिए, इस एपीआई को चालू करना
- इस एपीआई को ऐक्सेस करने के लिए, एक सेवा खाता बनाना
Subscription Linking API चालू करना
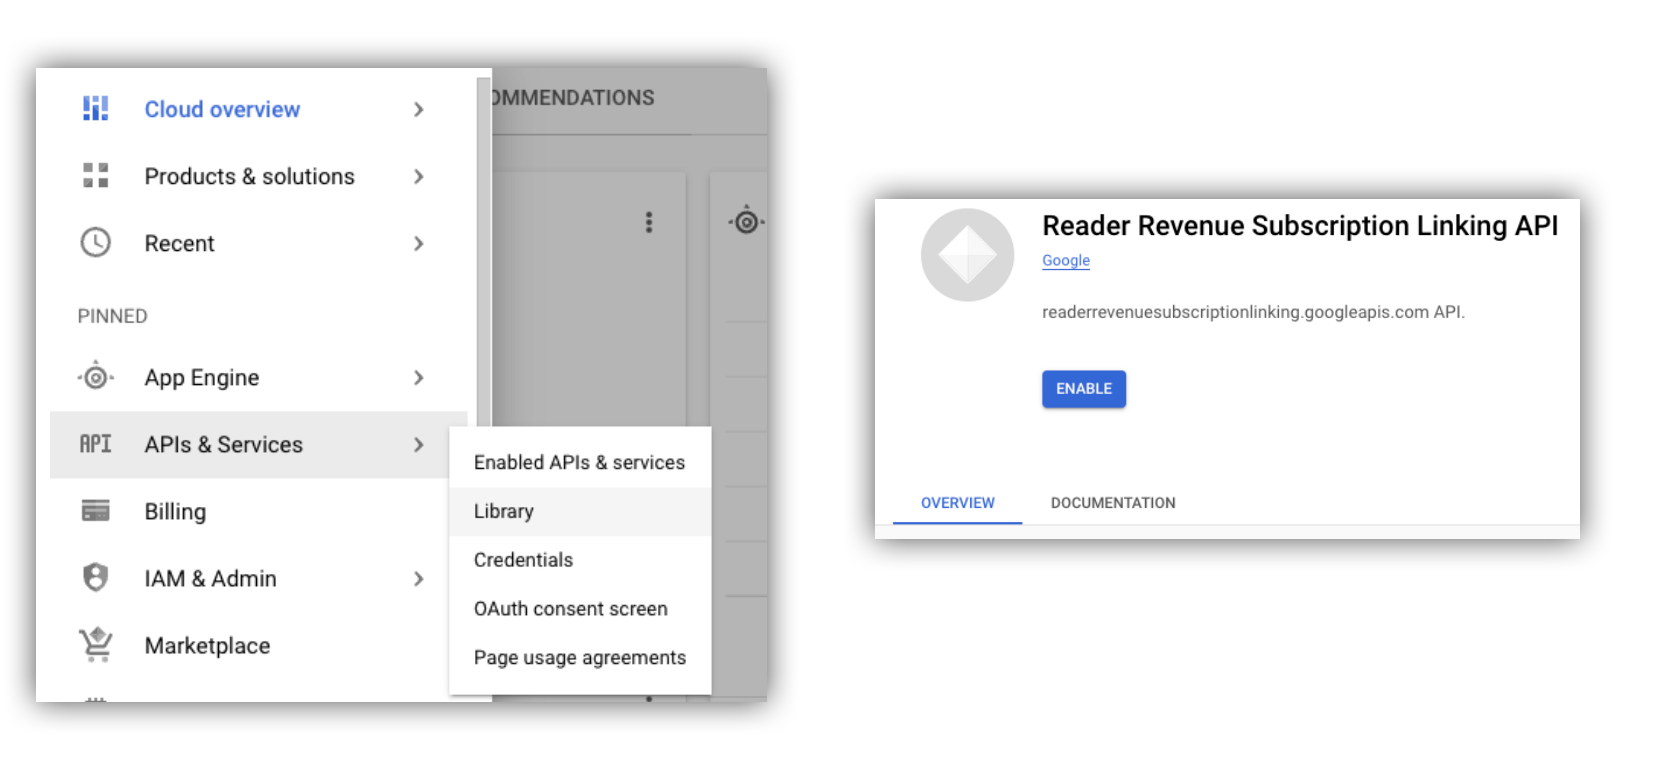
सेवा खाते का इस्तेमाल करने और लोगों के एनटाइटलमेंट को मैनेज करने के लिए, Google Cloud प्रोजेक्ट में Subscription Linking API चालू होना चाहिए. साथ ही, सही तरीके से कॉन्फ़िगर किया गया OAuth सेवा खाता मौजूद होना चाहिए. किसी प्रोजेक्ट के लिए Subscription Linking API चालू करने के लिए, मेन्यू -> एपीआई और सेवाएं -> लाइब्रेरी पर जाएं और Subscription Linking खोजें या सीधे इस पेज पर जाएं:
https://console.cloud.google.com/apis/library?project=gcp_project_id

पहली इमेज. एपीआई लाइब्रेरी पर जाना और Google Cloud प्रोजेक्ट के लिए एपीआई चालू करना.
सेवा खाता बनाना
सेवा खातों का इस्तेमाल, आपके ऐप्लिकेशन से Subscription Linking API को ऐक्सेस करने की अनुमति देने के लिए किया जाता है.
- अपने प्रोजेक्ट के कंसोल में, सेवा खाता बनाएं.
- सेवा खाते के लिए क्रेडेंशियल बनाएं और
credentials.jsonफ़ाइल को किसी ऐसी सुरक्षित जगह पर सेव करें जहां से आपका ऐप्लिकेशन इसे ऐक्सेस कर सके. - आपने जो सेवा खाता बनाया है उसके लिए, आईएएम की यह भूमिका तय करें: "सदस्यता लिंक करने वाला एडमिन". सेवा खातों की क्षमताओं के हिसाब से बेहतर कंट्रोल के लिए, यहां दी गई टेबल से कोई भूमिका असाइन करें.
| क्षमता / भूमिका | सदस्यता लिंक करने वाला एडमिन | सदस्यता लिंक करने की सुविधा से जुड़ी ऑडियंस | सदस्यता लिंक करने की सुविधा के एनटाइटलमेंट से जुड़ी ऑडियंस |
|---|---|---|---|
| ऑडियंस के एनटाइटलमेंट देखना | |||
| ऑडियंस का डेटा देखना | |||
| ऑडियंस के एनटाइटलमेंट अपडेट करना | |||
| ऑडियंस का डेटा मिटाना |
Subscription Linking API के साथ सेवा खाते इस्तेमाल करना
Subscription Linking API की पुष्टि का अनुरोध करने के लिए, सेवा खातों का इस्तेमाल करें. इसके लिए इन खातों का इस्तेमाल या तो googleapis क्लाइंट लाइब्रेरी के साथ करें या REST API पर अनुरोध करके करें. क्लाइंट लाइब्रेरी, सही access_token का अनुरोध करके पुष्टि की प्रोसेस को अपने-आप मैनेज कर लेती हैं. जबकि, REST API को id_token की ज़रूरत होती है, जिसे access_token से बदला जाता है.
क्लाइंट लाइब्रेरी और REST API के नीचे दिए गए दोनों उदाहरणों में, getReader() एंडपॉइंट का इस्तेमाल किया जाता है. एपीआई के सभी तरीकों को लाइव इस्तेमाल होता देखने के लिए,Subscription Linking Demo साइट या इसका कोड देखें.
node.js googleapis क्लाइंट लाइब्रेरी वाले अनुरोध का सैंपल
import {readerrevenuesubscriptionlinking_v1, Auth} from 'googleapis';
const subscriptionLinking = readerrevenuesubscriptionlinking_v1.Readerrevenuesubscriptionlinking;

class SubscriptionLinking {
  constructor() {
    this.auth = new Auth.GoogleAuth({
      keyFile: process.env.KEY_FILE,
      scopes: [
        'https://www.googleapis.com/auth/readerrevenue.subscriptionlinking.manage'
      ],
    })
  }

  init() {
    return new subscriptionLinking(
        {version: 'v1', auth: this.auth})
  }
}

const api = new SubscriptionLinking();
const client = api.init();

async function getReader(ppid) {
  const publicationId = process.env.PUBLICATION_ID;
  return await client.publications.readers.get({
    name: `publications/${publicationId}/readers/${ppid}`,
  });
};

async function updateEntitlements(ppid) {
  const publicationId = process.env.PUBLICATION_ID;
  const requestBody = {
    /*
    Refer to
    https://developers.google.com/news/subscribe/subscription-linking/appendix/glossary#entitlements_object
    */
    entitlements : [{
      product_id: `${publicationId}:basic`,
      subscription_token: 'abc1234',
      detail: 'This is our basic plan',
      expire_time: '2025-10-21T03:05:08.200564Z'
    }]
  };
  return await client.publications.readers.updateEntitlements({
    name: `publications/${publicationId}/readers/${ppid}/entitlements`,
    requestBody
  });
};
REST API के अनुरोधों पर, मैन्युअल तरीके से साइन करना
import fetch from 'node-fetch'
import jwt from 'jsonwebtoken'

function getSignedJwt() {
  /*
    Either store the credentials string in an environmental variable
    Or implement logic to fetch it.
  */
  const key_file = process.env.CREDENTIALS_STRING

  const issueDate = new Date()
  const expireMinutes = 60
  const offsetInSeconds = issueDate.getTimezoneOffset() * 60000
  const expireDate = new Date(issueDate.getTime() + (expireMinutes * 60000))
  const iat = Math.floor((issueDate.getTime() + offsetInSeconds) / 1000)
  const exp = Math.floor((expireDate.getTime() + offsetInSeconds) / 1000)

  const token = {
    iss: key_file.client_email,
    iat,
    exp,
    aud: 'https://oauth2.googleapis.com/token',
    scope:'https://www.googleapis.com/auth/readerrevenue.subscriptionlinking.manage',
  }
  return jwt.sign(token, key_file.private_key, {
    algorithm: 'RS256',
    keyid: key_file.private_key_id,
  })
}

async function getAccessToken(signedJwt) {
  let body = new URLSearchParams();
  body.set('grant_type', 'urn:ietf:params:oauth:grant-type:jwt-bearer')
  body.set('assertion', signedJwt)
  const request = await fetch('https://oauth2.googleapis.com/token', {
    method: 'POST',
    headers: {'Content-Type': 'application/x-www-form-urlencoded'},
    body
  })

  const accessResponse = await accessFetch.json()
  return accessResponse.access_token
}

async function getReader(ppid) {
  const publicationId = process.env.PUBLICATION_ID
  const base_url = 'https://readerrevenuesubscriptionlinking.googleapis.com/v1'
  const endpoint = `${base_url}/publications/${publicationId}/readers/${ppid}`
  const signedJwt = await getSignedJwt()
  const accessToken = await getAccessToken(signedJwt)

  const reader = await fetch(endpoint, {
     method: 'GET',
     headers: {
       Authorization: `Bearer ${accessToken}`,
     },
   }).then((response) => {
    return response.json()
  })

  return reader
}