Overview
The purpose of the Begin Redirect flow is to redirect the user to the payment integrator with sufficient information to complete a payment. The integrator in turn redirects the user to an issuer's web interface, forwarding the information provided by Google. The user can then follow the instructions provided by the issuer to complete a payment. This will trigger the Complete Redirect flow.
How the flow works
There are two ways for the user to select the issuer they will use as Form of Payment (FOP).
- User selects issuer in Google's User Interface (UI).
- User selects integrator in Google's UI, and issuer in the integrator's UI.
User selects issuer in Google's UI
In this case, the user selects an issuer during FOP selection in Google's UI, so the issuerId field of the formOfPayment object in the RedirectRequest will contain a Google-generated unique identifier that represents an issuer. Note that if the payment integrator and the issuer are the same entity, Google will generate an issuerId for the payment integrator. The redirect request uses an HTTPS GET method, with parameters encoded in the URL.
Begin Redirect flow (issuer selected)
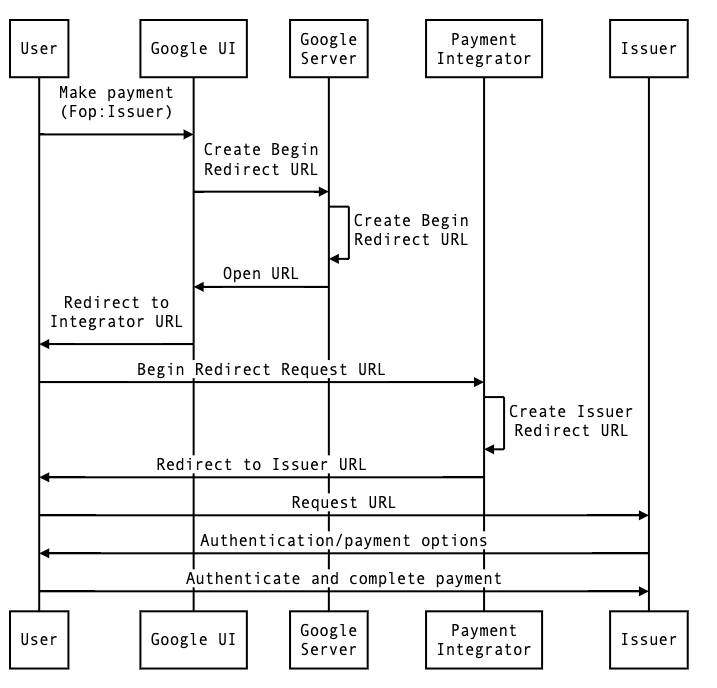
The following sequence diagram shows the interaction between the user's browser, Google, the integrator, and the issuer when the user selects an issuer in Google's UI:

Here is the list of objects in the above diagram:
- User: This is the person who wants to make a payment.
- Google UI: Google's web or app interface, where the customer initiates a payment.
- Google Server: The backend server at Google that creates a redirect request.
- Payment Integrator: The integrator which forwards the user and the redirect request to the issuer.
- Issuer: The issuer where the user has an account.
For the Begin Redirect flow, we already assume the user is on Google’s property (Google UI) and is choosing a payment method. Here is where everything starts.
- The user selects the specific issuer they want to use to make a payment. This is what triggers the Begin Redirect flow.
- The Google UI calls the Google Server (backend) to create a new redirect request.
- The Google Server creates a redirect request.
- The redirect request is sent to the Google UI.
- The Google UI redirects the user to the integrator's server.
- The integrator processes Google's redirect request and generates an issuer-specific redirect request.
- The integrator redirects the user to the issuer's web interface.
- The user authenticates in the issuer's web interface.
- The user follows on-screen instructions to complete payment.
User selects integrator in Google's UI
In this case, the user selects the integrator in Google's UI, so the formOfPayment field of the RedirectRequest will be set to noneChosen, because only issuers are considered valid FOPs. The integrator must provide a UI that allows the user to select one of the issuers that has been approved by Google. The redirect request uses an HTTPS GET method, with parameters encoded in the URL.
Begin Redirect flow (integrator selected)
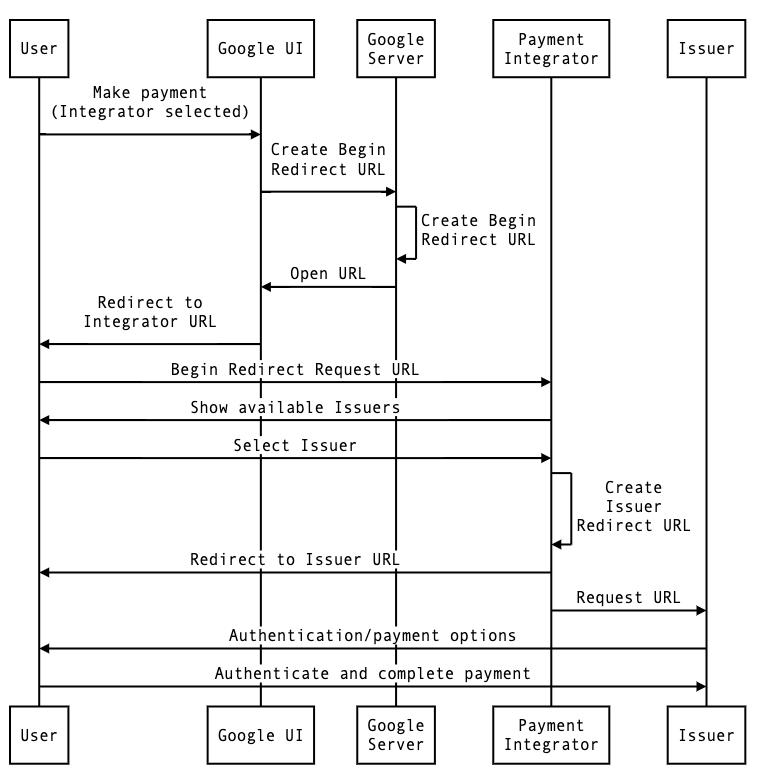
The following sequence diagram shows the interaction between the user's browser, Google, the integrator, and the issuer when the user selects an integrator in Google's UI:

Here is the list of objects in the above diagram:
- User: This is the person who wants to make a payment.
- Google UI: Google's web or app interface, where the customer initiates a payment.
- Google Server: The backend server at Google that creates a redirect request.
- Payment Integrator: The integrator where the user selects an issuer.
- Issuer: The issuer where the user has an account.
For the Begin Redirect flow, we already assume the user is on Google’s property (Google UI) and is choosing a payment method. Here is where everything starts.
- The user selects an integrator (not a specific issuer) to make a payment. This is what triggers the Begin Redirect flow.
- The Google UI calls the Google Server (backend) to create a new redirect request.
- The Google Server creates a redirect request.
- The redirect request is sent to the Google UI.
- The Google UI redirects the user to the integrator's web interface.
- The integrator processes Google's redirect request.
- The integrator shows the available issuers to the user.
- The user selects the specific issuer they want to use to make a payment.
- The integrator generates an issuer-specific redirect request.
- The integrator redirects the user to the issuer's web interface.
- The user authenticates in the issuer's web interface.
- The user follows on-screen instructions to complete payment.
Best practices and other considerations
Safety measures
The redirect request URL will include an unencrypted callbackUrl field and an encrypted redirectRequest field. Both of these fields will contain the requestId for the current transaction. The vendor should validate that the requestId is identical in both the callbackUrl and the encrypted payload to verify that these are related.