
本文档通过一个示例 Web 应用(该应用使用 Google Tasks API 显示用户的任务)介绍了如何使用 Java servlet 实现 OAuth 2.0 授权回调处理程序。此示例应用首先请求授权以访问用户的 Google Tasks,然后在默认任务列表中显示用户的任务。
受众群体
本文档专门面向熟悉 Java 和 J2EE Web 应用架构的人员。建议您对 OAuth 2.0 授权流程有一定的了解。
目录
为了获得这样一个可正常运行的完整示例,您需要执行以下几个步骤:
- 在 web.xml 文件中声明 servlet 映射
- 对用户在其系统上的身份进行验证,并请求授权以访问其任务
- 监听来自 Google 授权端点的授权代码
- 使用授权代码兑换刷新令牌和访问令牌
- 读取用户的任务并显示它们
在 web.xml 文件中声明 servlet 映射
此应用使用以下两个 servlet:
- PrintTasksTitlesServlet(映射到
/):应用的入口点,用于处理用户身份验证并显示用户的任务 - OAuthCodeCallbackHandlerServlet(映射到
/oauth2callback):OAuth 2.0 回调,用于处理来自 OAuth 授权端点的响应
以下 web.xml 文件将这两个 servlet 映射到我们应用中的网址:
<?xml version="1.0" encoding="UTF-8"?>
<web-app version="2.5" xmlns="http://java.sun.com/xml/ns/javaee"
    xmlns:xsi="http://www.w3.org/2001/XMLSchema-instance"
    xsi:schemaLocation="http://java.sun.com/xml/ns/javaee http://java.sun.com/xml/ns/javaee/web-app_2_5.xsd">

 <servlet>
   <servlet-name>PrintTasksTitles</servlet-name>
   <servlet-class>com.google.oauthsample.PrintTasksTitlesServlet</servlet-class>
 </servlet>

 <servlet-mapping>
   <servlet-name>PrintTasksTitles</servlet-name>
   <url-pattern>/</url-pattern>
 </servlet-mapping>

 <servlet>
   <servlet-name>OAuthCodeCallbackHandlerServlet</servlet-name>
   <servlet-class>com.google.oauthsample.OAuthCodeCallbackHandlerServlet</servlet-class>
 </servlet>

 <servlet-mapping>
   <servlet-name>OAuthCodeCallbackHandlerServlet</servlet-name>
   <url-pattern>/oauth2callback</url-pattern>
 </servlet-mapping>

</web-app>在用户系统上验证用户身份,并请求授权以访问用户任务
用户通过映射到 PrintTaskListsTitlesServlet servlet 的根“/”网址进入应用。在该 servlet 中,执行以下任务:
- 检查用户是否已通过系统身份验证。
- 如果用户未通过身份验证,则会被重定向到身份验证页面。
- 如果用户已通过身份验证,系统会检查数据存储区中是否已存在刷新令牌,这由下面的
OAuthTokenDao处理。如果存储空间中没有用户的令牌,则表示用户尚未向应用授予访问其任务的授权。然后,用户会被重定向到 Google 的 OAuth 2.0 授权端点。
以下展示了一种实现方式:
package com.google.oauthsample;

import ...

/**
 * Simple sample Servlet which will display the tasks in the default task list of the user.
 */
@SuppressWarnings("serial")
public class PrintTasksTitlesServlet extends HttpServlet {

  /**
   * The OAuth Token DAO implementation, used to persist the OAuth refresh token.
   * Consider injecting it instead of using a static initialization. Additionally, a
   * simple memory implementation is used as a mock. Change the implementation to
   * using the user's own user/login implementation.
   */
  public static OAuthTokenDao oauthTokenDao = new OAuthTokenDaoMemoryImpl();

  public void doGet(HttpServletRequest req, HttpServletResponse resp) throws IOException {
    // Getting the current user
    // This is using App Engine's User Service but you should replace this to
    // your own user/login implementation
    UserService userService = UserServiceFactory.getUserService();
    User user = userService.getCurrentUser();

    // If the user is not logged-in it is redirected to the login service, then back to this page
    if (user == null) {
      resp.sendRedirect(userService.createLoginURL(getFullRequestUrl(req)));
      return;
    }

    // Checking if we already have tokens for this user in store
    AccessTokenResponse accessTokenResponse = oauthTokenDao.getKeys(user.getEmail());

    // If tokens are not available for this user
    if (accessTokenResponse == null) {
      OAuthProperties oauthProperties = new OAuthProperties();
      // Redirects to the Google OAuth 2.0 authorization endpoint
      resp.sendRedirect(new GoogleAuthorizationRequestUrl(oauthProperties.getClientId(),
          OAuthCodeCallbackHandlerServlet.getOAuthCodeCallbackHandlerUrl(req), oauthProperties
              .getScopesAsString()).build());
      return;
    }
  }

  /**
   * Construct the request's URL without the parameter part.
   *
   * @param req the HttpRequest object
   * @return The constructed request's URL
   */
  public static String getFullRequestUrl(HttpServletRequest req) {
    String scheme = req.getScheme() + "://";
    String serverName = req.getServerName();
    String serverPort = (req.getServerPort() == 80) ? "" : ":" + req.getServerPort();
    String contextPath = req.getContextPath();
    String servletPath = req.getServletPath();
    String pathInfo = (req.getPathInfo() == null) ? "" : req.getPathInfo();
    String queryString = (req.getQueryString() == null) ? "" : "?" + req.getQueryString();
    return scheme + serverName + serverPort + contextPath + servletPath + pathInfo + queryString;
  }
}
注意:上述实现使用了一些 App Engine 库。这些变量仅用于简化。如果您是为其他平台开发应用,请重新实现处理用户身份验证的 UserService 接口。
应用使用 DAO 来持久保存和访问用户的授权令牌。
本示例中使用的 OAuthTokenDao 接口和模拟(内存中)实现 - OAuthTokenDaoMemoryImpl - 如以下示例所示:
package com.google.oauthsample;

import com.google.api.client.auth.oauth2.draft10.AccessTokenResponse;

/**
 * Allows easy storage and access of authorization tokens.
 */
public interface OAuthTokenDao {

  /**
   * Stores the given AccessTokenResponse using the {@code username}, the OAuth
   * {@code clientID} and the tokens scopes as keys.
   *
   * @param tokens The AccessTokenResponse to store
   * @param userName The userName associated wit the token
   */
  public void saveKeys(AccessTokenResponse tokens, String userName);

  /**
   * Returns the AccessTokenResponse stored for the given username, clientId and
   * scopes. Returns {@code null} if there is no AccessTokenResponse for this
   * user and scopes.
   *
   * @param userName The username of which to get the stored AccessTokenResponse
   * @return The AccessTokenResponse of the given username
   */
  public AccessTokenResponse getKeys(String userName);
}
package com.google.oauthsample;

import com.google.api.client.auth.oauth2.draft10.AccessTokenResponse;
...

/**
 * Quick and Dirty memory implementation of {@link OAuthTokenDao} based on
 * HashMaps.
 */
public class OAuthTokenDaoMemoryImpl implements OAuthTokenDao {

  /** Object where all the Tokens will be stored */
  private static Map<String, AccessTokenResponse> tokenPersistance = new HashMap<String, AccessTokenResponse>();

  public void saveKeys(AccessTokenResponse tokens, String userName) {
    tokenPersistance.put(userName, tokens);
  }

  public AccessTokenResponse getKeys(String userName) {
    return tokenPersistance.get(userName);
  }
}
应用的 OAuth 2.0 凭据存储在属性文件中。
或者,您也可以将它们作为常量存储在某个 Java 类中。
以下是示例中使用的 OAuthProperties 类和 oauth.properties 文件:
package com.google.oauthsample;

import ...

/**
 * Object representation of an OAuth properties file.
 */
public class OAuthProperties {

  public static final String DEFAULT_OAUTH_PROPERTIES_FILE_NAME = "oauth.properties";

  /** The OAuth 2.0 Client ID */
  private String clientId;

  /** The OAuth 2.0 Client Secret */
  private String clientSecret;

  /** The Google APIs scopes to access */
  private String scopes;

  /**
   * Instantiates a new OauthProperties object reading its values from the
   * {@code OAUTH_PROPERTIES_FILE_NAME} properties file.
   *
   * @throws IOException IF there is an issue reading the {@code propertiesFile}
   * @throws OauthPropertiesFormatException If the given {@code propertiesFile}
   *           is not of the right format (does not contains the keys {@code
   *           clientId}, {@code clientSecret} and {@code scopes})
   */
  public OAuthProperties() throws IOException {
    this(OAuthProperties.class.getResourceAsStream(DEFAULT_OAUTH_PROPERTIES_FILE_NAME));
  }

  /**
   * Instantiates a new OAuthProperties object, reading its values from the given
   * properties file.
   *
   * @param propertiesFile the InputStream to read an OAuth Properties file. The
   *          file should contain the keys {@code clientId}, {@code
   *          clientSecret} and {@code scopes}
   * @throws IOException if there is an issue reading the {@code propertiesFile}
   * @throws OAuthPropertiesFormatException If the given {@code propertiesFile}
   *           is not in the correct format (does not contain the keys {@code
   *           clientId}, {@code clientSecret} and {@code scopes})
   */
  public OAuthProperties(InputStream propertiesFile) throws IOException {
    Properties oauthProperties = new Properties();
    oauthProperties.load(propertiesFile);
    clientId = oauthProperties.getProperty("clientId");
    clientSecret = oauthProperties.getProperty("clientSecret");
    scopes = oauthProperties.getProperty("scopes");
    if ((clientId == null) || (clientSecret == null) || (scopes == null)) {
      throw new OAuthPropertiesFormatException();
    }
  }

  /**
   * @return the clientId
   */
  public String getClientId() {
    return clientId;
  }

  /**
   * @return the clientSecret
   */
  public String getClientSecret() {
    return clientSecret;
  }

  /**
   * @return the scopes
   */
  public String getScopesAsString() {
    return scopes;
  }

  /**
   * Thrown when the OAuth properties file was not at the right format, i.e not
   * having the right properties names.
   */
  @SuppressWarnings("serial")
  public class OAuthPropertiesFormatException extends RuntimeException {
  }
}
oauth.properties 文件包含应用的 OAuth 2.0 凭据,如以下示例所示。
您需要更改此文件中的值。
# Client ID and secret. They can be found in the APIs console.
clientId=1234567890.apps.googleusercontent.com
clientSecret=aBcDeFgHiJkLmNoPqRsTuVwXyZ
# API scopes. Space separated.
scopes=https://www.googleapis.com/auth/tasks
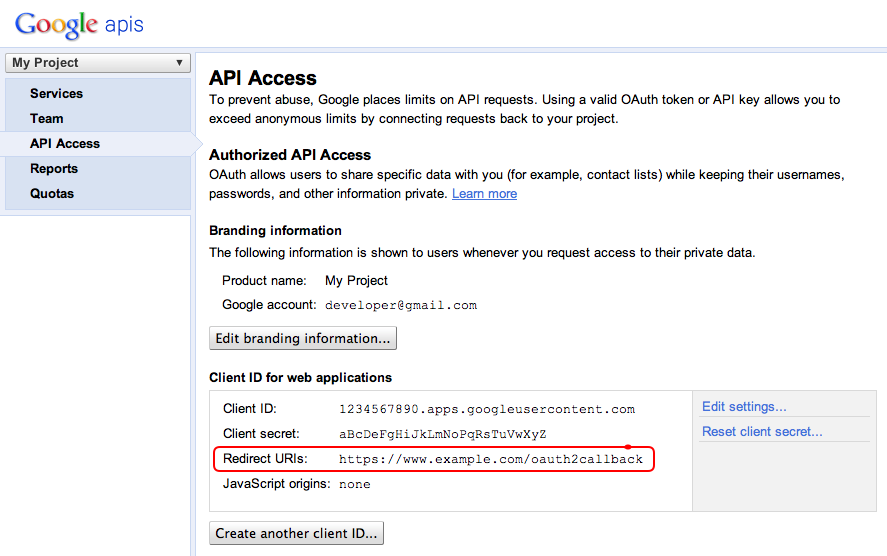
OAuth 2.0 客户端 ID 和客户端密钥用于标识应用,并允许 Tasks API 应用为该应用定义的过滤条件和配额规则。您可以在 Google API 控制台中找到客户端 ID 和密钥。进入控制台后,用户必须执行以下操作:
- 创建或选择一个项目。
- 在服务列表中,将 Tasks API 状态设置为启用,以启用 Tasks API。
- 在 API 访问权限下,创建一个 OAuth 2.0 客户端 ID(如果尚未创建)。
- 确保项目的 OAuth 2.0 代码回调处理程序网址已在重定向 URI 中注册/列入许可名单。例如,在此示例项目中,如果 Web 应用是从
https://www.example.com网域提供的,用户就必须注册https://www.example.com/oauth2callback。
处理来自 Google 授权端点的授权代码
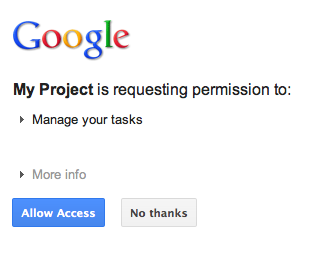
如果用户尚未授权应用访问其任务,因此被重定向到 Google 的 OAuth 2.0 授权端点,则系统会向用户显示一个来自 Google 的授权对话框,提示用户授予应用访问其任务的权限:
授予或拒绝访问权限后,用户会被重定向回在构建 Google 授权网址时指定为重定向/回调的 OAuth 2.0 代码回调处理程序:
new GoogleAuthorizationRequestUrl(oauthProperties.getClientId(),
      OAuthCodeCallbackHandlerServlet.getOAuthCodeCallbackHandlerUrl(req), oauthProperties
          .getScopesAsString()).build()
OAuth 2.0 代码回调处理程序 - OAuthCodeCallbackHandlerServlet - 处理来自 Google OAuth 2.0 端点的重定向。需要处理 2 种情况:
- 用户已授予访问权限:系统会解析请求,以从网址参数中获取 OAuth 2.0 代码。
- 用户已拒绝访问:系统会向用户显示一条消息。
package com.google.oauthsample;

import ...

/**
 * Servlet handling the OAuth callback from the authentication service. We are
 * retrieving the OAuth code, then exchanging it for a refresh and an access
 * token and saving it.
 */
@SuppressWarnings("serial")
public class OAuthCodeCallbackHandlerServlet extends HttpServlet {

  /** The name of the Oauth code URL parameter */
  public static final String CODE_URL_PARAM_NAME = "code";

  /** The name of the OAuth error URL parameter */
  public static final String ERROR_URL_PARAM_NAME = "error";

  /** The URL suffix of the servlet */
  public static final String URL_MAPPING = "/oauth2callback";

  public void doGet(HttpServletRequest req, HttpServletResponse resp) throws IOException {
    // Getting the "error" URL parameter
    String[] error = req.getParameterValues(ERROR_URL_PARAM_NAME);

    // Checking if there was an error such as the user denied access
    if (error != null && error.length > 0) {
      resp.sendError(HttpServletResponse.SC_NOT_ACCEPTABLE, "There was an error: \""+error[0]+"\".");
      return;
    }
    // Getting the "code" URL parameter
    String[] code = req.getParameterValues(CODE_URL_PARAM_NAME);

    // Checking conditions on the "code" URL parameter
    if (code == null || code.length == 0) {
      resp.sendError(HttpServletResponse.SC_BAD_REQUEST, "The \"code\" URL parameter is missing");
      return;
    }
  }

  /**
   * Construct the OAuth code callback handler URL.
   *
   * @param req the HttpRequest object
   * @return The constructed request's URL
   */
  public static String getOAuthCodeCallbackHandlerUrl(HttpServletRequest req) {
    String scheme = req.getScheme() + "://";
    String serverName = req.getServerName();
    String serverPort = (req.getServerPort() == 80) ? "" : ":" + req.getServerPort();
    String contextPath = req.getContextPath();
    String servletPath = URL_MAPPING;
    String pathInfo = (req.getPathInfo() == null) ? "" : req.getPathInfo();
    return scheme + serverName + serverPort + contextPath + servletPath + pathInfo;
  }
}
使用授权代码兑换刷新令牌和访问令牌
然后,OAuthCodeCallbackHandlerServlet 会将 Auth 2.0 代码换成刷新令牌和访问令牌,将其持久保存在数据存储区中,并将用户重定向回 PrintTaskListsTitlesServlet 网址:
添加到文件中的代码以突出显示。
package com.google.oauthsample;

import ...

/**
 * Servlet handling the OAuth callback from the authentication service. We are
 * retrieving the OAuth code, then exchanging it for a refresh and an access
 * token and saving it.
 */
@SuppressWarnings("serial")
public class OAuthCodeCallbackHandlerServlet extends HttpServlet {

  /** The name of the Oauth code URL parameter */
  public static final String CODE_URL_PARAM_NAME = "code";

  /** The name of the OAuth error URL parameter */
  public static final String ERROR_URL_PARAM_NAME = "error";

  /** The URL suffix of the servlet */
  public static final String URL_MAPPING = "/oauth2callback";
  /** The URL to redirect the user to after handling the callback. Consider
   * saving this in a cookie before redirecting users to the Google
   * authorization URL if you have multiple possible URL to redirect people to. */
  public static final String REDIRECT_URL = "/";

  /** The OAuth Token DAO implementation. Consider injecting it instead of using
   * a static initialization. Also we are using a simple memory implementation
   * as a mock. Change the implementation to using your database system. */
  public static OAuthTokenDao oauthTokenDao = new OAuthTokenDaoMemoryImpl();

  public void doGet(HttpServletRequest req, HttpServletResponse resp) throws IOException {
    // Getting the "error" URL parameter
    String[] error = req.getParameterValues(ERROR_URL_PARAM_NAME);

    // Checking if there was an error such as the user denied access
    if (error != null && error.length > 0) {
      resp.sendError(HttpServletResponse.SC_NOT_ACCEPTABLE, "There was an error: \""+error[0]+"\".");
      return;
    }

    // Getting the "code" URL parameter
    String[] code = req.getParameterValues(CODE_URL_PARAM_NAME);

    // Checking conditions on the "code" URL parameter
    if (code == null || code.length == 0) {
      resp.sendError(HttpServletResponse.SC_BAD_REQUEST, "The \"code\" URL parameter is missing");
      return;
    }
    // Construct incoming request URL
    String requestUrl = getOAuthCodeCallbackHandlerUrl(req);

    // Exchange the code for OAuth tokens
    AccessTokenResponse accessTokenResponse = exchangeCodeForAccessAndRefreshTokens(code[0],
        requestUrl);

    // Getting the current user
    // This is using App Engine's User Service, but the user should replace this
    // with their own user/login implementation
    UserService userService = UserServiceFactory.getUserService();
    String email = userService.getCurrentUser().getEmail();

    // Save the tokens
    oauthTokenDao.saveKeys(accessTokenResponse, email);

    resp.sendRedirect(REDIRECT_URL);
  }

  /**
   * Construct the OAuth code callback handler URL.
   *
   * @param req the HttpRequest object
   * @return The constructed request's URL
   */
  public static String getOAuthCodeCallbackHandlerUrl(HttpServletRequest req) {
    String scheme = req.getScheme() + "://";
    String serverName = req.getServerName();
    String serverPort = (req.getServerPort() == 80) ? "" : ":" + req.getServerPort();
    String contextPath = req.getContextPath();
    String servletPath = URL_MAPPING;
    String pathInfo = (req.getPathInfo() == null) ? "" : req.getPathInfo();
    return scheme + serverName + serverPort + contextPath + servletPath + pathInfo;
  }
  /**
   * Exchanges the given code for an exchange and a refresh token.
   *
   * @param code The code gotten back from the authorization service
   * @param currentUrl The URL of the callback
   * @param oauthProperties The object containing the OAuth configuration
   * @return The object containing both an access and refresh token
   * @throws IOException
   */
  public AccessTokenResponse exchangeCodeForAccessAndRefreshTokens(String code, String currentUrl)
      throws IOException {

    HttpTransport httpTransport = new NetHttpTransport();
    JacksonFactory jsonFactory = new JacksonFactory();

    // Loading the oauth config file
    OAuthProperties oauthProperties = new OAuthProperties();

    return new GoogleAuthorizationCodeGrant(httpTransport, jsonFactory, oauthProperties
        .getClientId(), oauthProperties.getClientSecret(), code, currentUrl).execute();
  }
}
注意:上述实现使用了一些 App Engine 库,这只是为了简化。如果您是为其他平台进行开发,请重新实现处理用户身份验证的 UserService 接口。
读取并显示用户的任务
用户已向应用授予任务访问权限。应用在可通过 OAuthTokenDao 访问的数据存储区中保存了刷新令牌。现在,PrintTaskListsTitlesServlet servlet 可以使用这些令牌来访问用户的任务并显示它们:
添加到文件中的代码以突出显示。
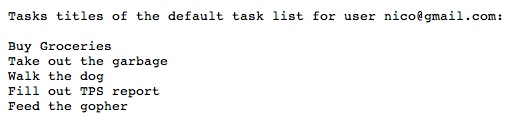
package com.google.oauthsample;

import ...

/**
 * Simple sample Servlet which will display the tasks in the default task list of the user.
 */
@SuppressWarnings("serial")
public class PrintTasksTitlesServlet extends HttpServlet {

  /**
   * The OAuth Token DAO implementation, used to persist the OAuth refresh token.
   * Consider injecting it instead of using a static initialization. Additionally, a
   * simple memory implementation is used as a mock. Change the implementation to
   * use your own database system.
   */
  public static OAuthTokenDao oauthTokenDao = new OAuthTokenDaoMemoryImpl();

  public void doGet(HttpServletRequest req, HttpServletResponse resp) throws IOException {
    // Getting the current user
    // This is using App Engine's User Service but you should replace this to
    // your own user/login implementation
    UserService userService = UserServiceFactory.getUserService();
    User user = userService.getCurrentUser();

    // If the user is not logged-in it is redirected to the login service, then back to this page
    if (user == null) {
      resp.sendRedirect(userService.createLoginURL(getFullRequestUrl(req)));
      return;
    }

    // Checking if we already have tokens for this user in store
    AccessTokenResponse accessTokenResponse = oauthTokenDao.getKeys(user.getEmail());

    // If we don't have tokens for this user
    if (accessTokenResponse == null) {
      OAuthProperties oauthProperties = new OAuthProperties();
      // Redirect to the Google OAuth 2.0 authorization endpoint
      resp.sendRedirect(new GoogleAuthorizationRequestUrl(oauthProperties.getClientId(),
          OAuthCodeCallbackHandlerServlet.getOAuthCodeCallbackHandlerUrl(req), oauthProperties
              .getScopesAsString()).build());
      return;
    }
// Prints the user's task list titles in the response
    resp.setContentType("text/plain");
    resp.getWriter().append("Task Lists titles for user " + user.getEmail() + ":\n\n");
    printTasksTitles(accessTokenResponse, resp.getWriter());
  }

  /**
   * Construct the request's URL without the parameter part.
   *
   * @param req the HttpRequest object
   * @return The constructed request's URL
   */
  public static String getFullRequestUrl(HttpServletRequest req) {
    String scheme = req.getScheme() + "://";
    String serverName = req.getServerName();
    String serverPort = (req.getServerPort() == 80) ? "" : ":" + req.getServerPort();
    String contextPath = req.getContextPath();
    String servletPath = req.getServletPath();
    String pathInfo = (req.getPathInfo() == null) ? "" : req.getPathInfo();
    String queryString = (req.getQueryString() == null) ? "" : "?" + req.getQueryString();
    return scheme + serverName + serverPort + contextPath + servletPath + pathInfo + queryString;
  }
  /**
   * Uses the Google Tasks API to retrieve a list of the user's tasks in the default
   * tasks list.
   *
   * @param accessTokenResponse The OAuth 2.0 AccessTokenResponse object
   *          containing the access token and a refresh token.
   * @param output The output stream writer to write the task list titles to.
   * @return A list of the user's task titles in the default task list.
   * @throws IOException
   */
  public void printTasksTitles(AccessTokenResponse accessTokenResponse, Writer output) throws IOException {

    // Initializing the Tasks service
    HttpTransport transport = new NetHttpTransport();
    JsonFactory jsonFactory = new JacksonFactory();
    OAuthProperties oauthProperties = new OAuthProperties();

    GoogleAccessProtectedResource accessProtectedResource = new GoogleAccessProtectedResource(
        accessTokenResponse.accessToken, transport, jsonFactory, oauthProperties.getClientId(),
        oauthProperties.getClientSecret(), accessTokenResponse.refreshToken);

    Tasks service = new Tasks(transport, accessProtectedResource, jsonFactory);

    // Using the initialized Tasks API service to query the list of tasks lists
    com.google.api.services.tasks.model.Tasks tasks = service.tasks.list("@default").execute();

    for (Task task : tasks.items) {
      output.append(task.title + "\n");
    }
  }
}
系统会显示用户的任务:
示例应用
您可以下载此示例应用的代码。