收集及管理 Google Chat 聯絡人

這個教學課程會說明如何建構能 Google Chat 使用者自行管理個人和業務聯絡人。為了收集資訊,Chat 應用程式會在資訊卡訊息和對話方塊中提示使用者填寫聯絡表單。

查看 Chat 應用程式的實際運作情形:

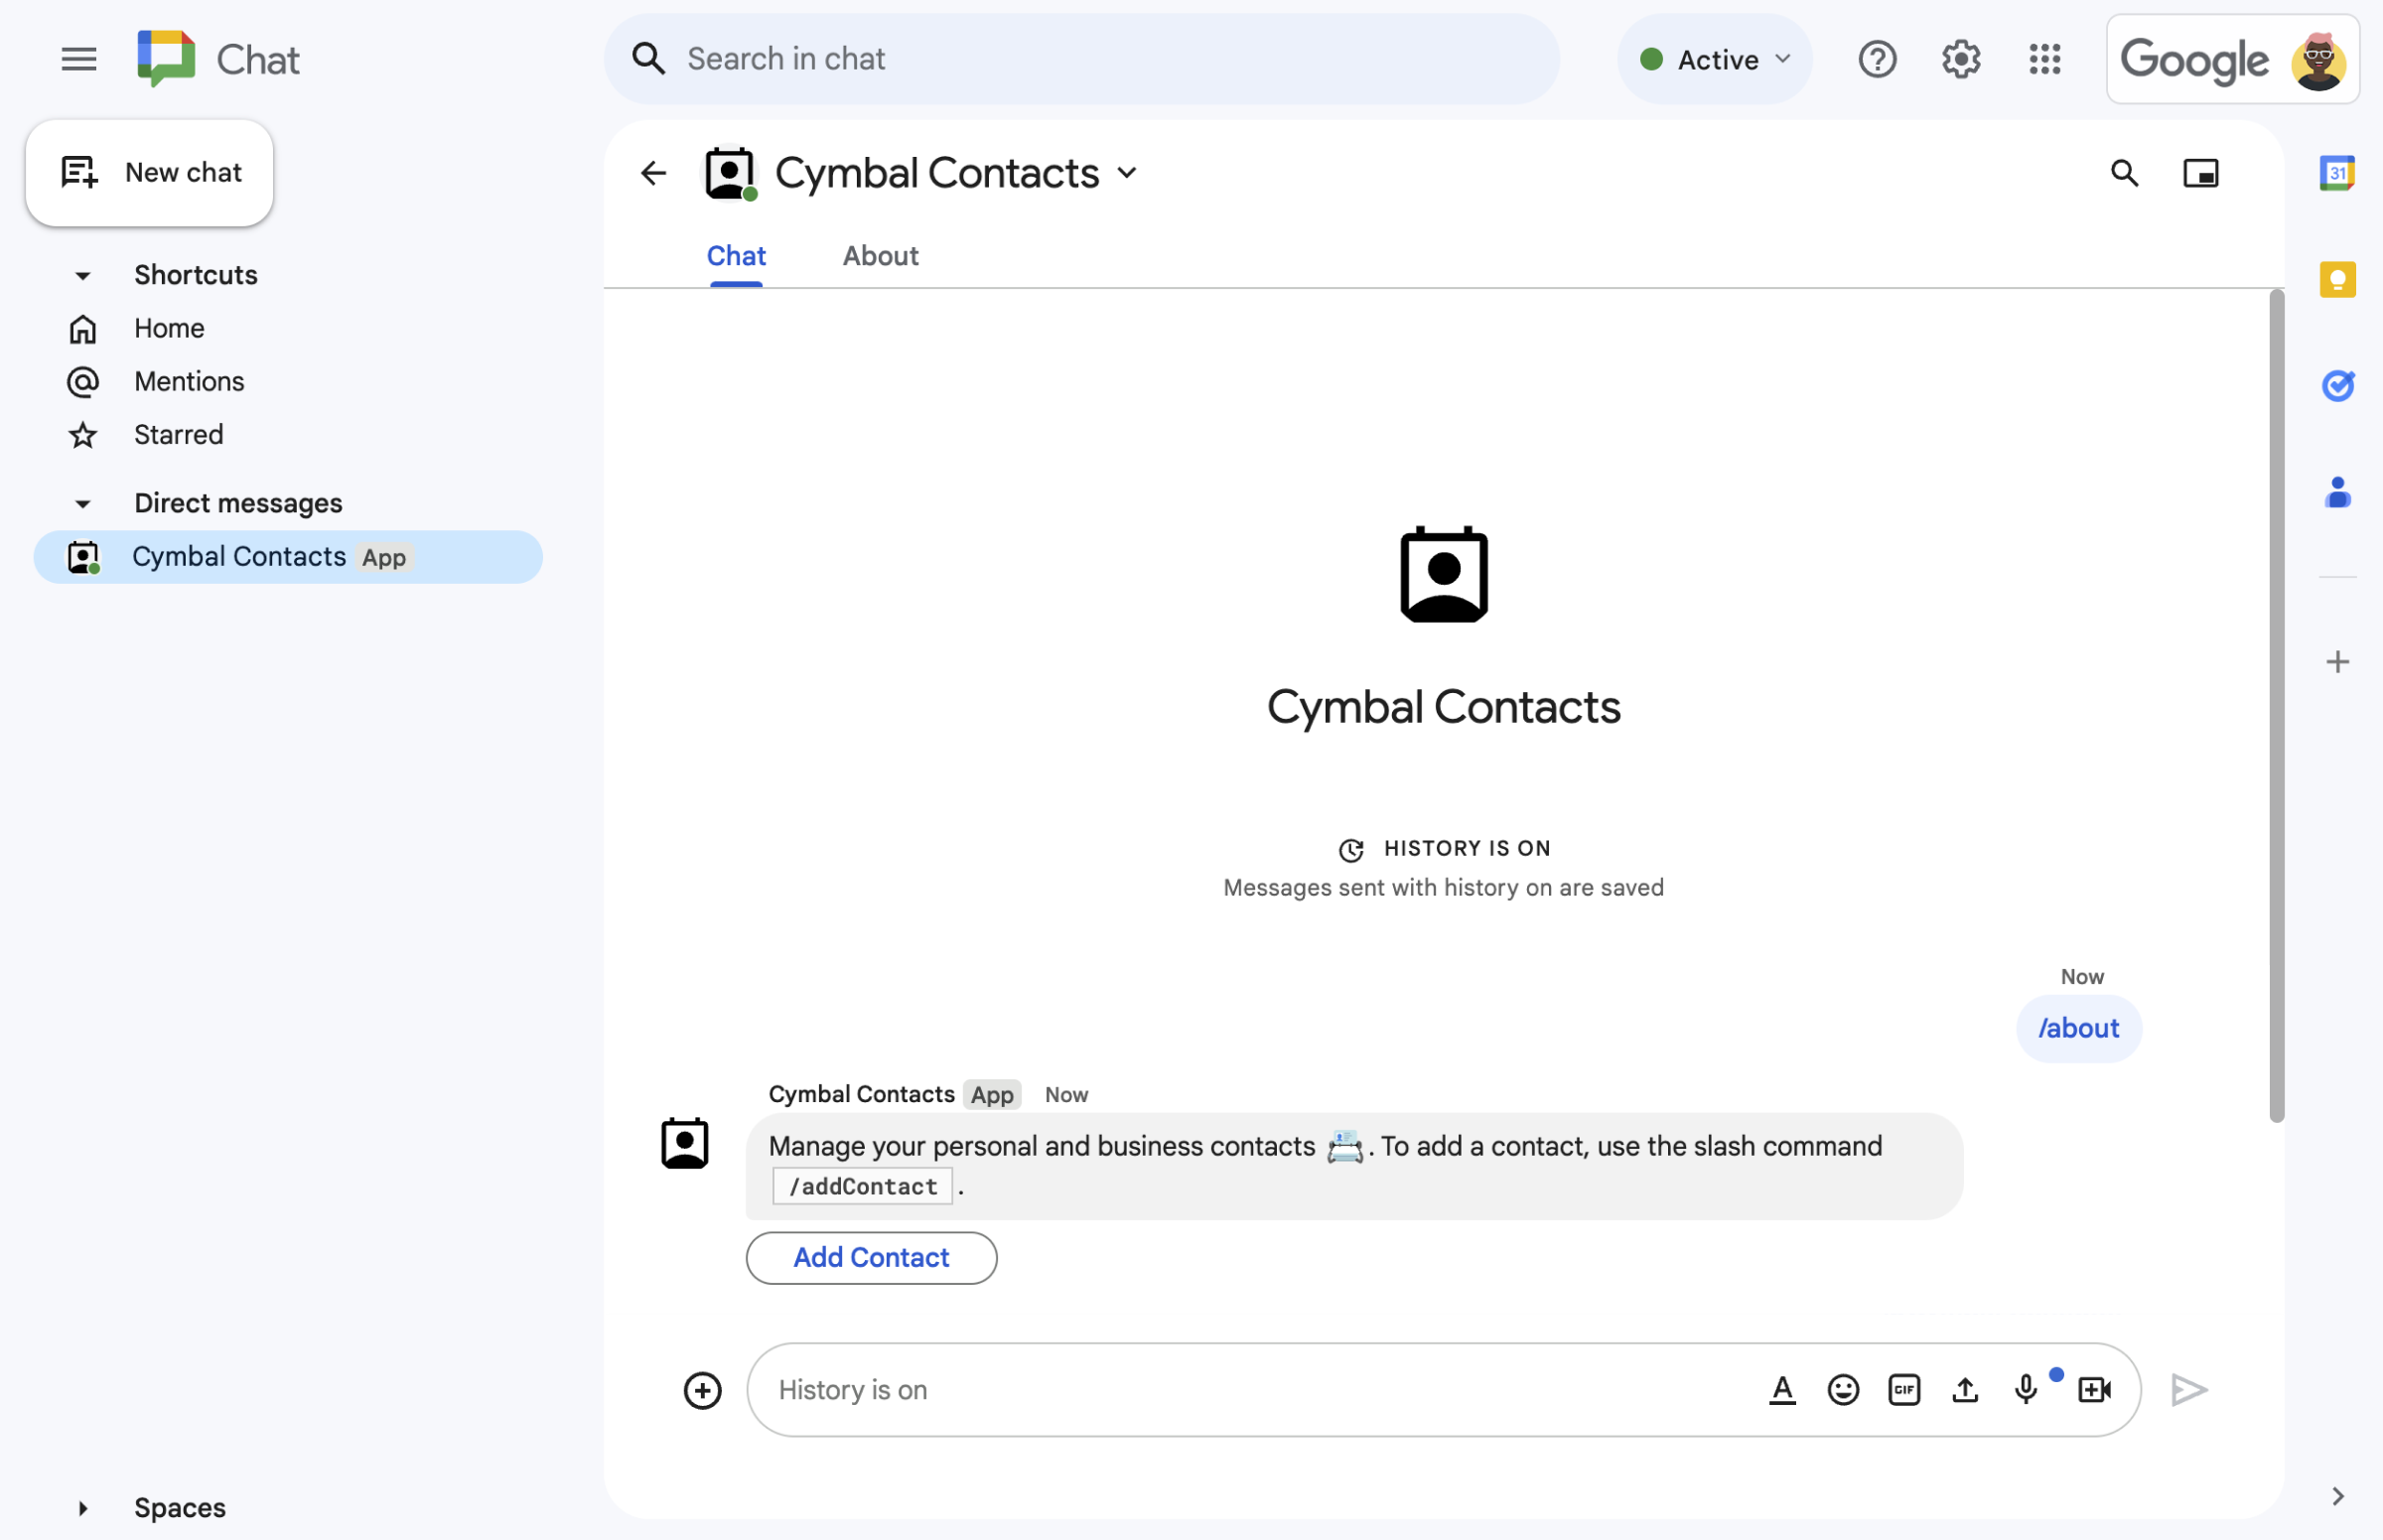
  • 斜線指令中的聯絡表單。
    圖 1. Chat 擴充應用程式會回應 包含文字訊息和按鈕的斜線指令 /about 開啟聯絡表單。
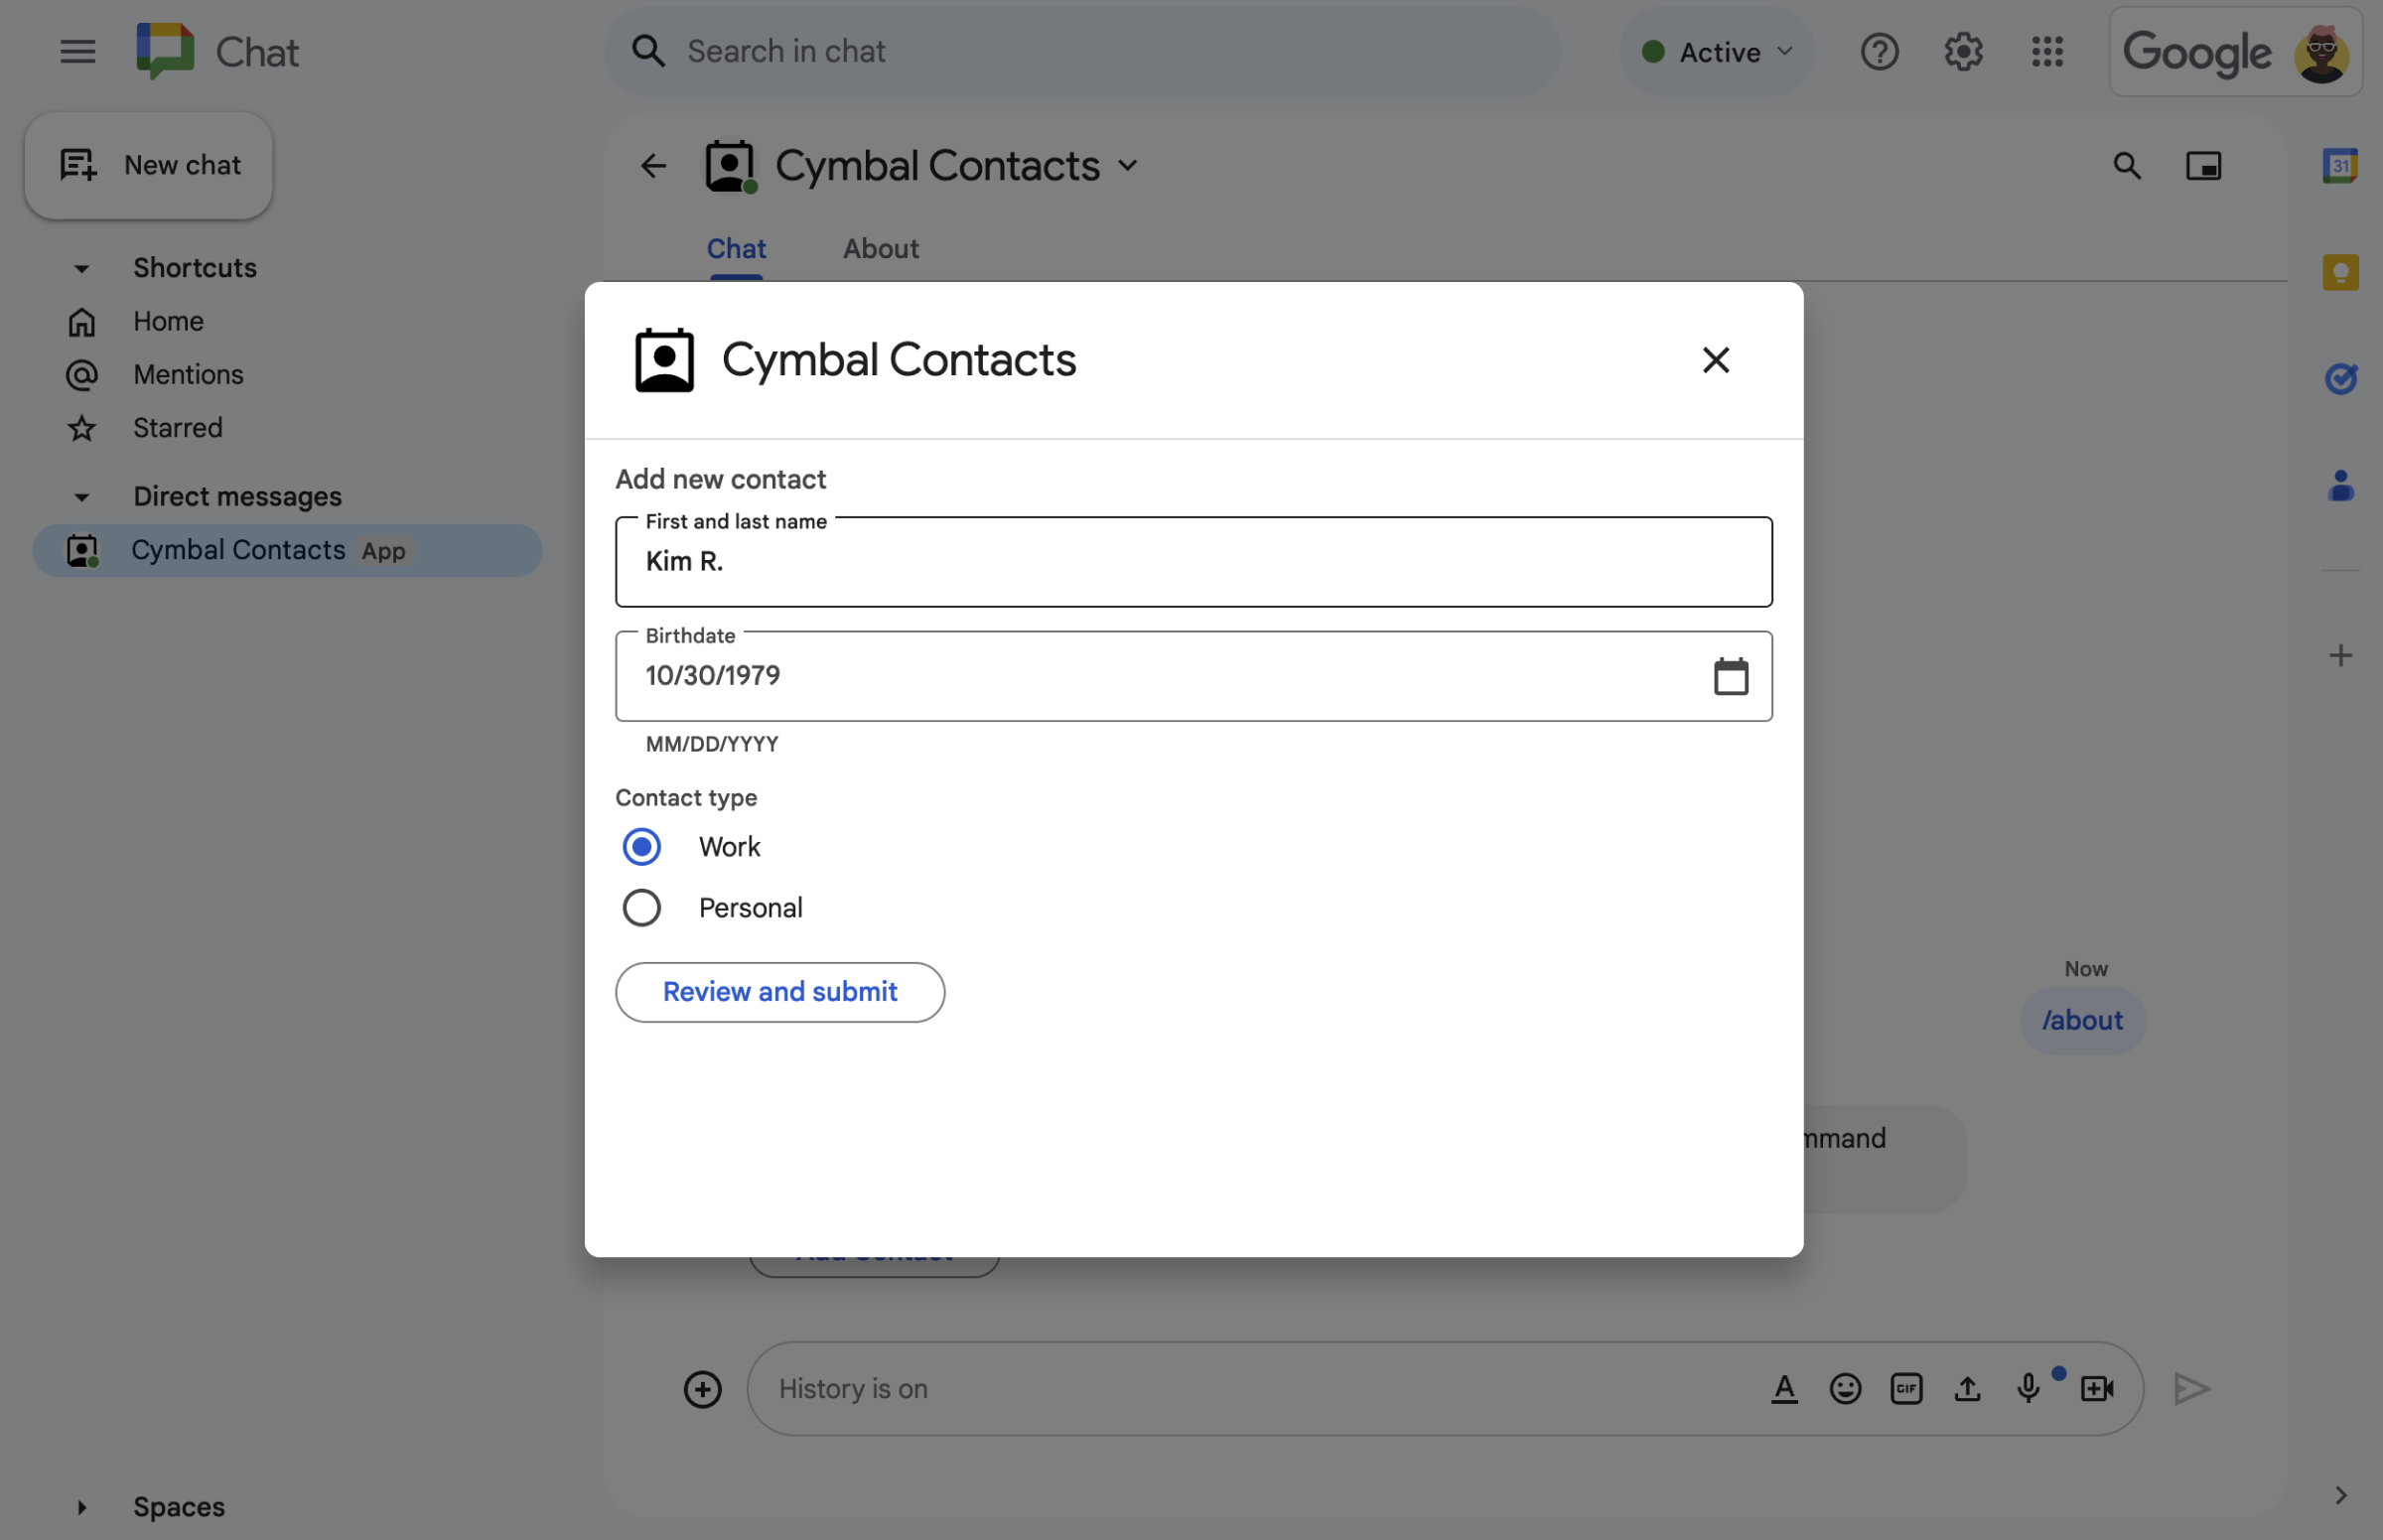
  • 對話方塊中的聯絡表單。
    圖 2. Chat 應用程式會開啟對話方塊,供使用者執行以下操作 輸入聯絡人相關資訊
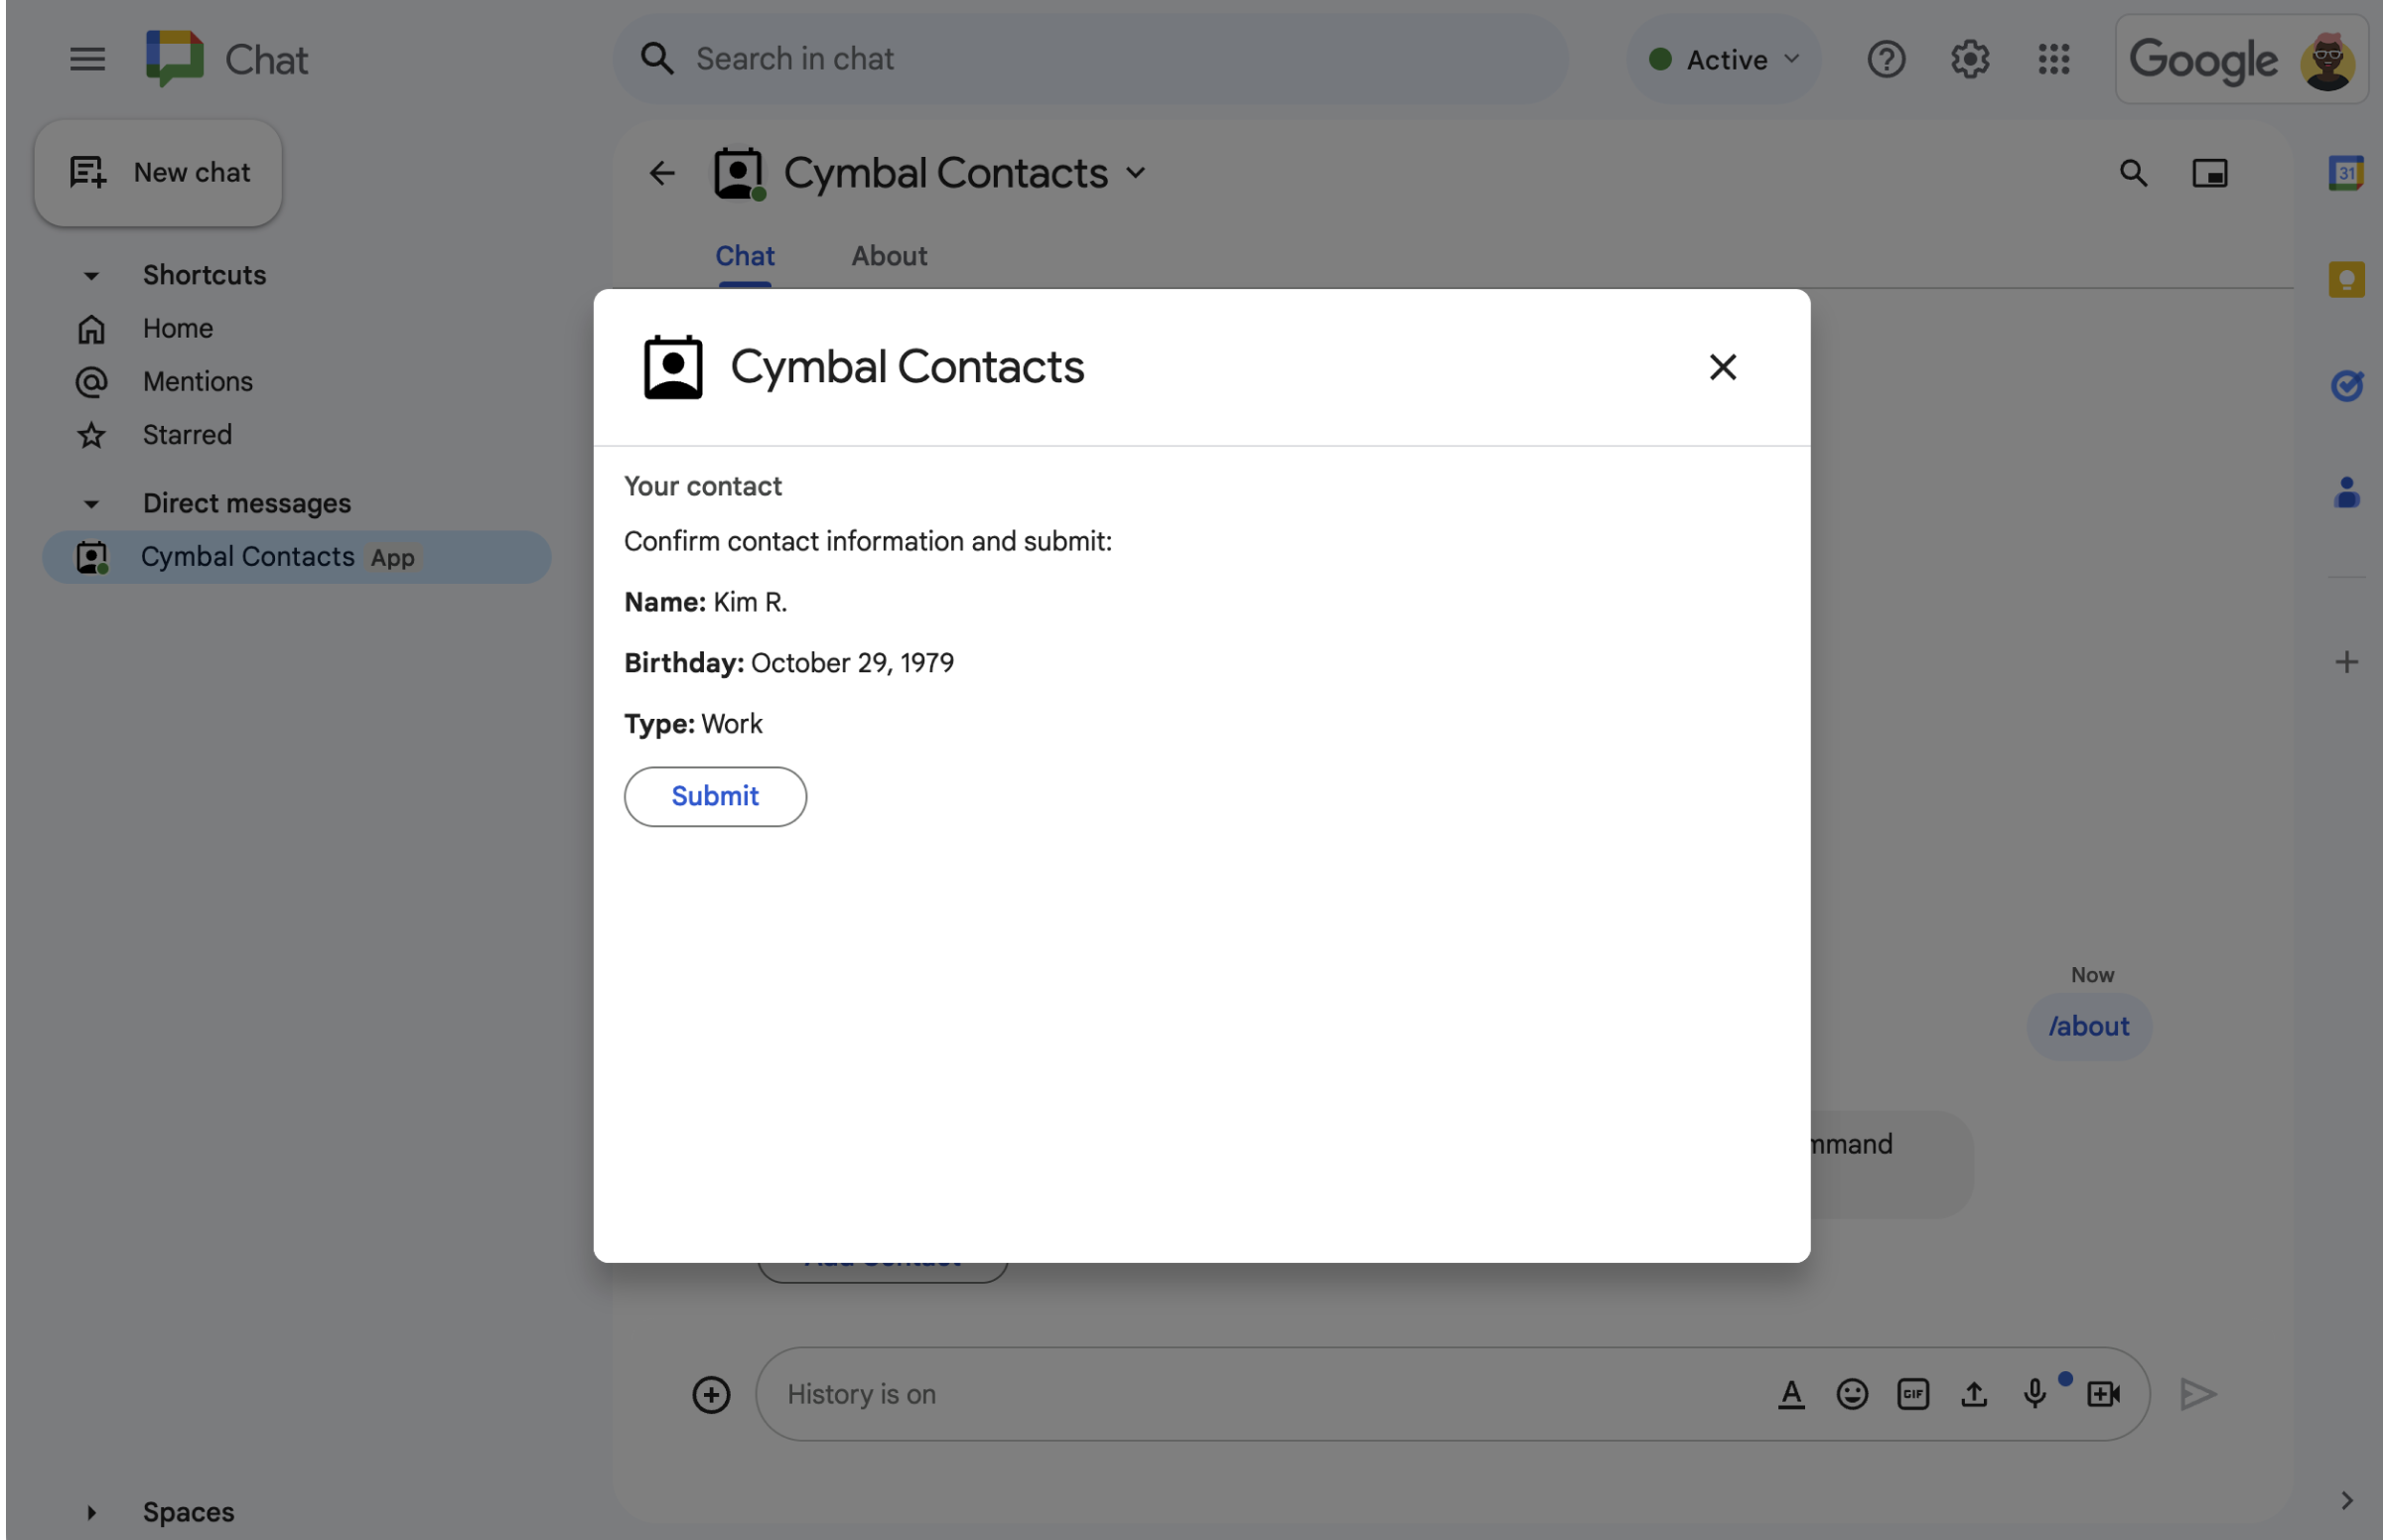
  • 「確認並查看」對話方塊。
    圖 3.Chat 應用程式會傳回確認對話方塊,讓使用者在提交前查看及確認資訊。
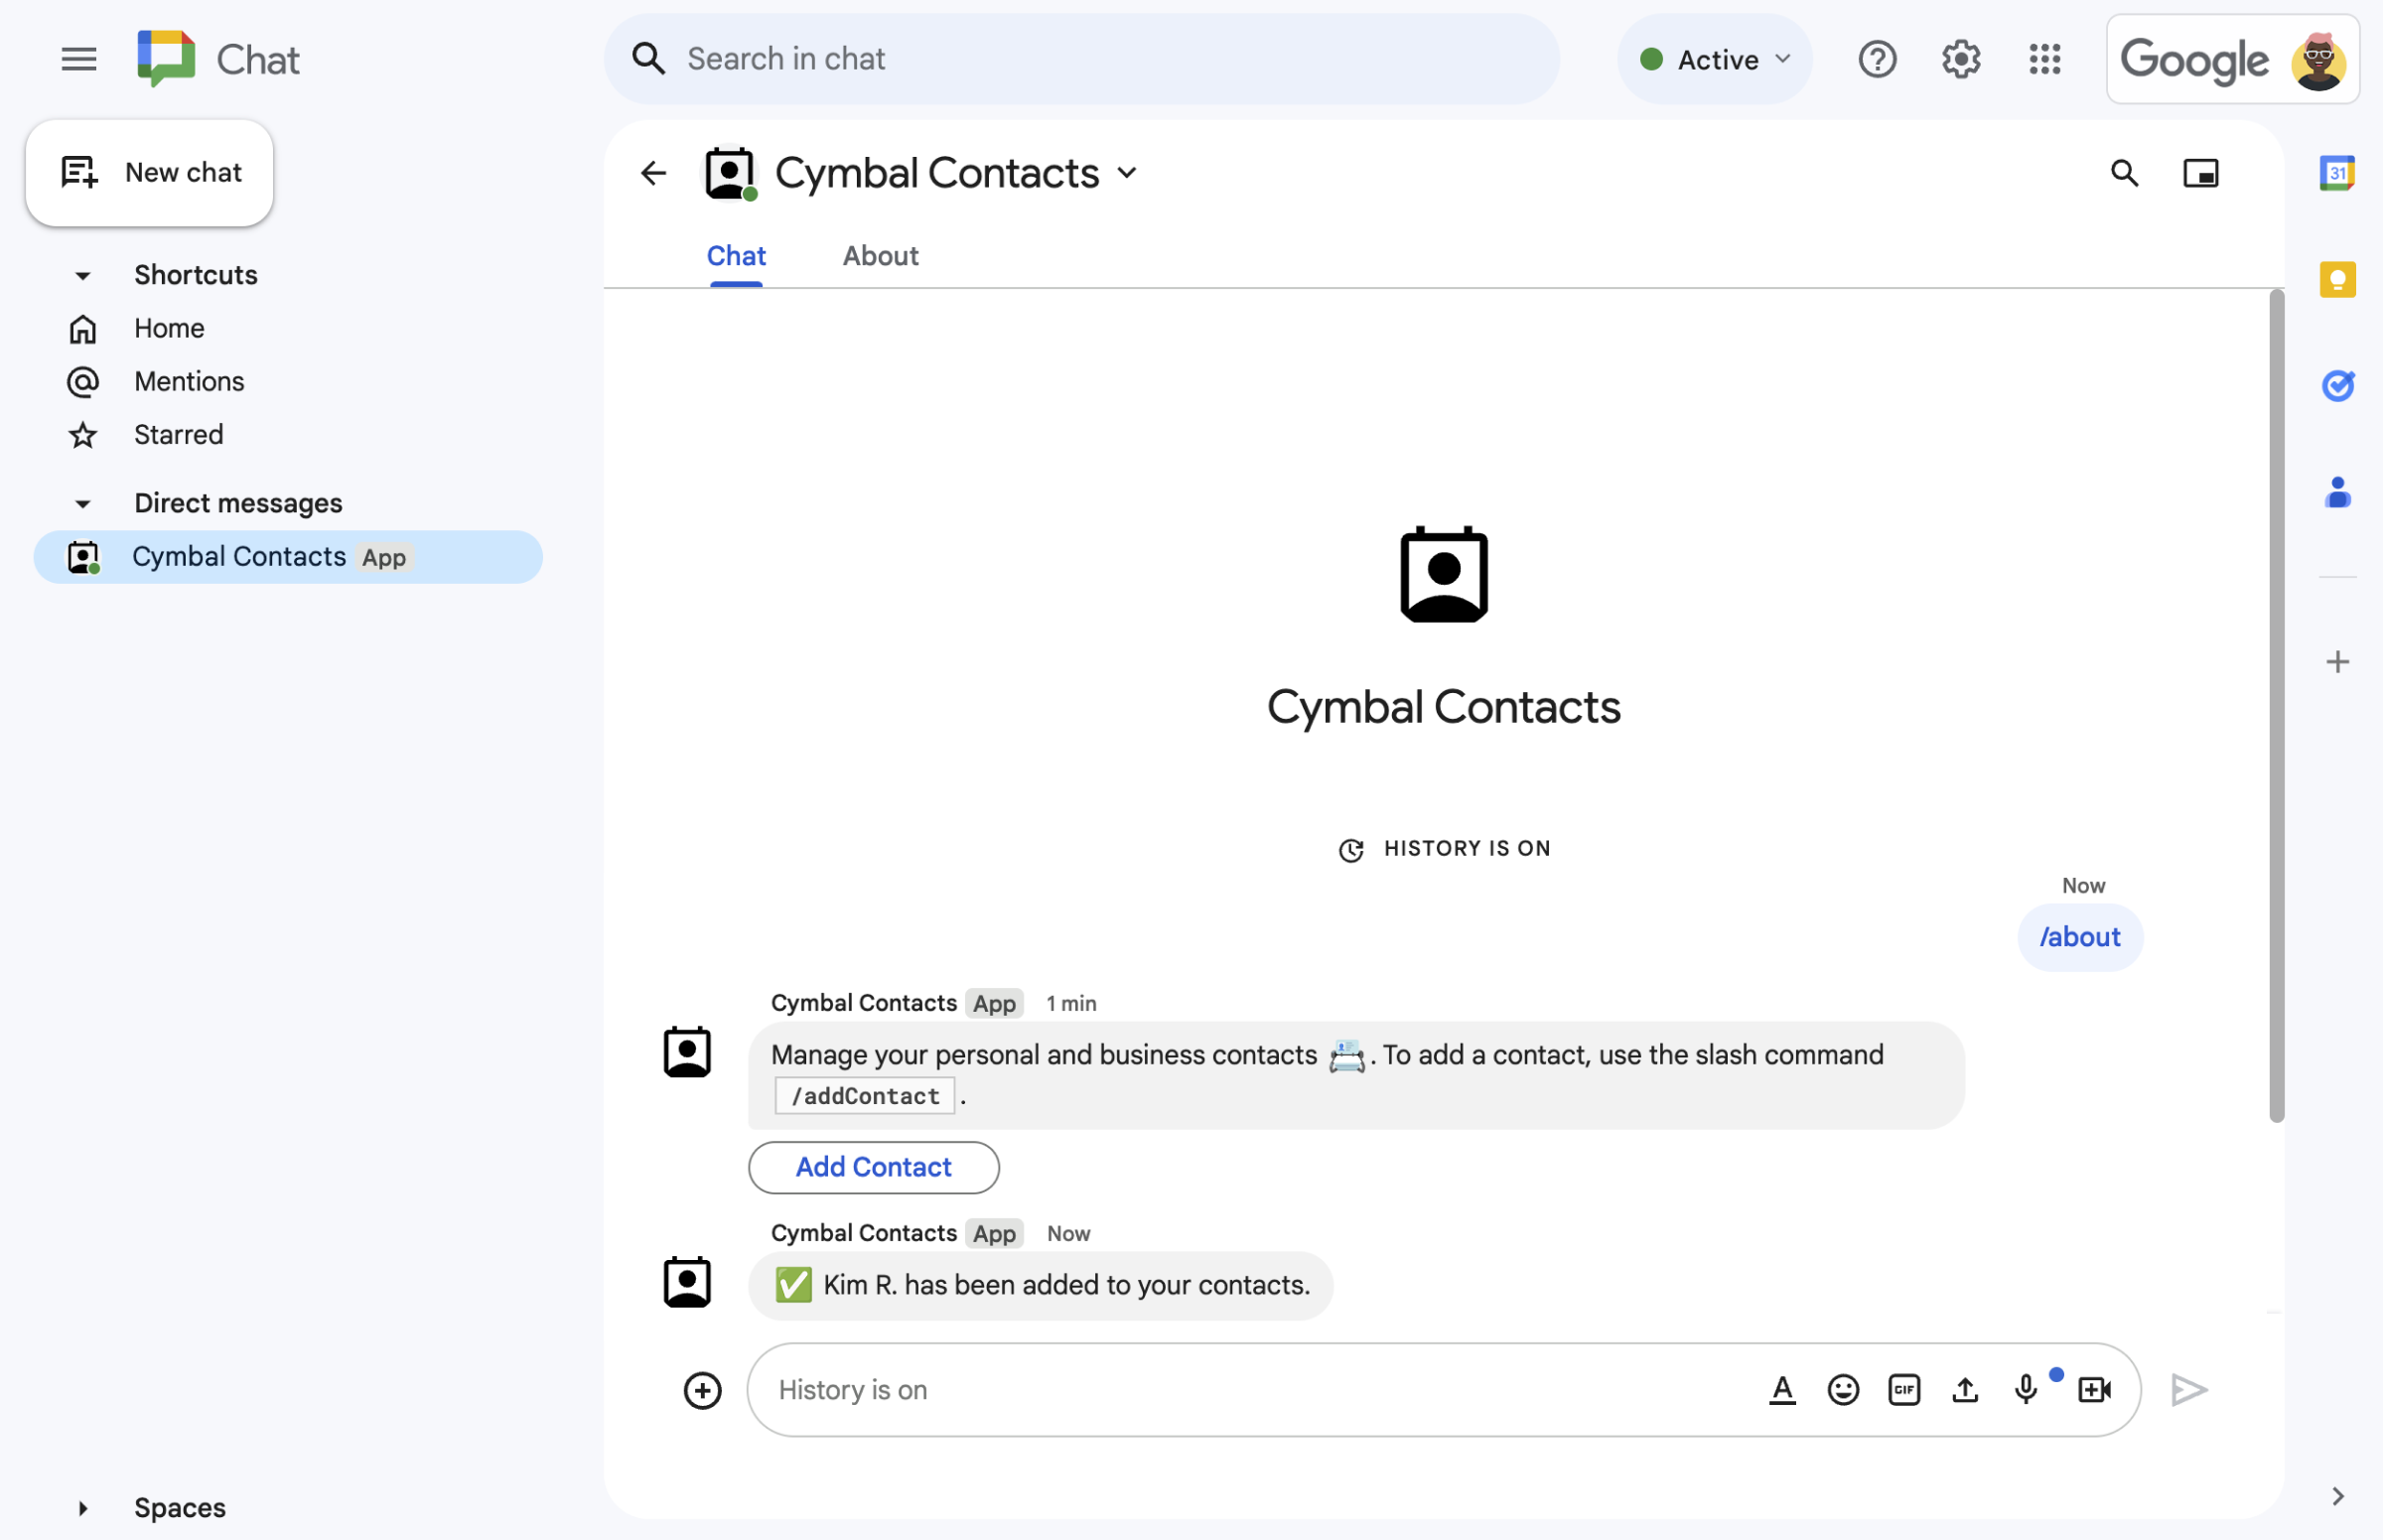
  • 確認新聯絡人的簡訊。
    圖 4. 使用者提交表單後,Chat 應用程式會傳送私人簡訊,確認提交內容。
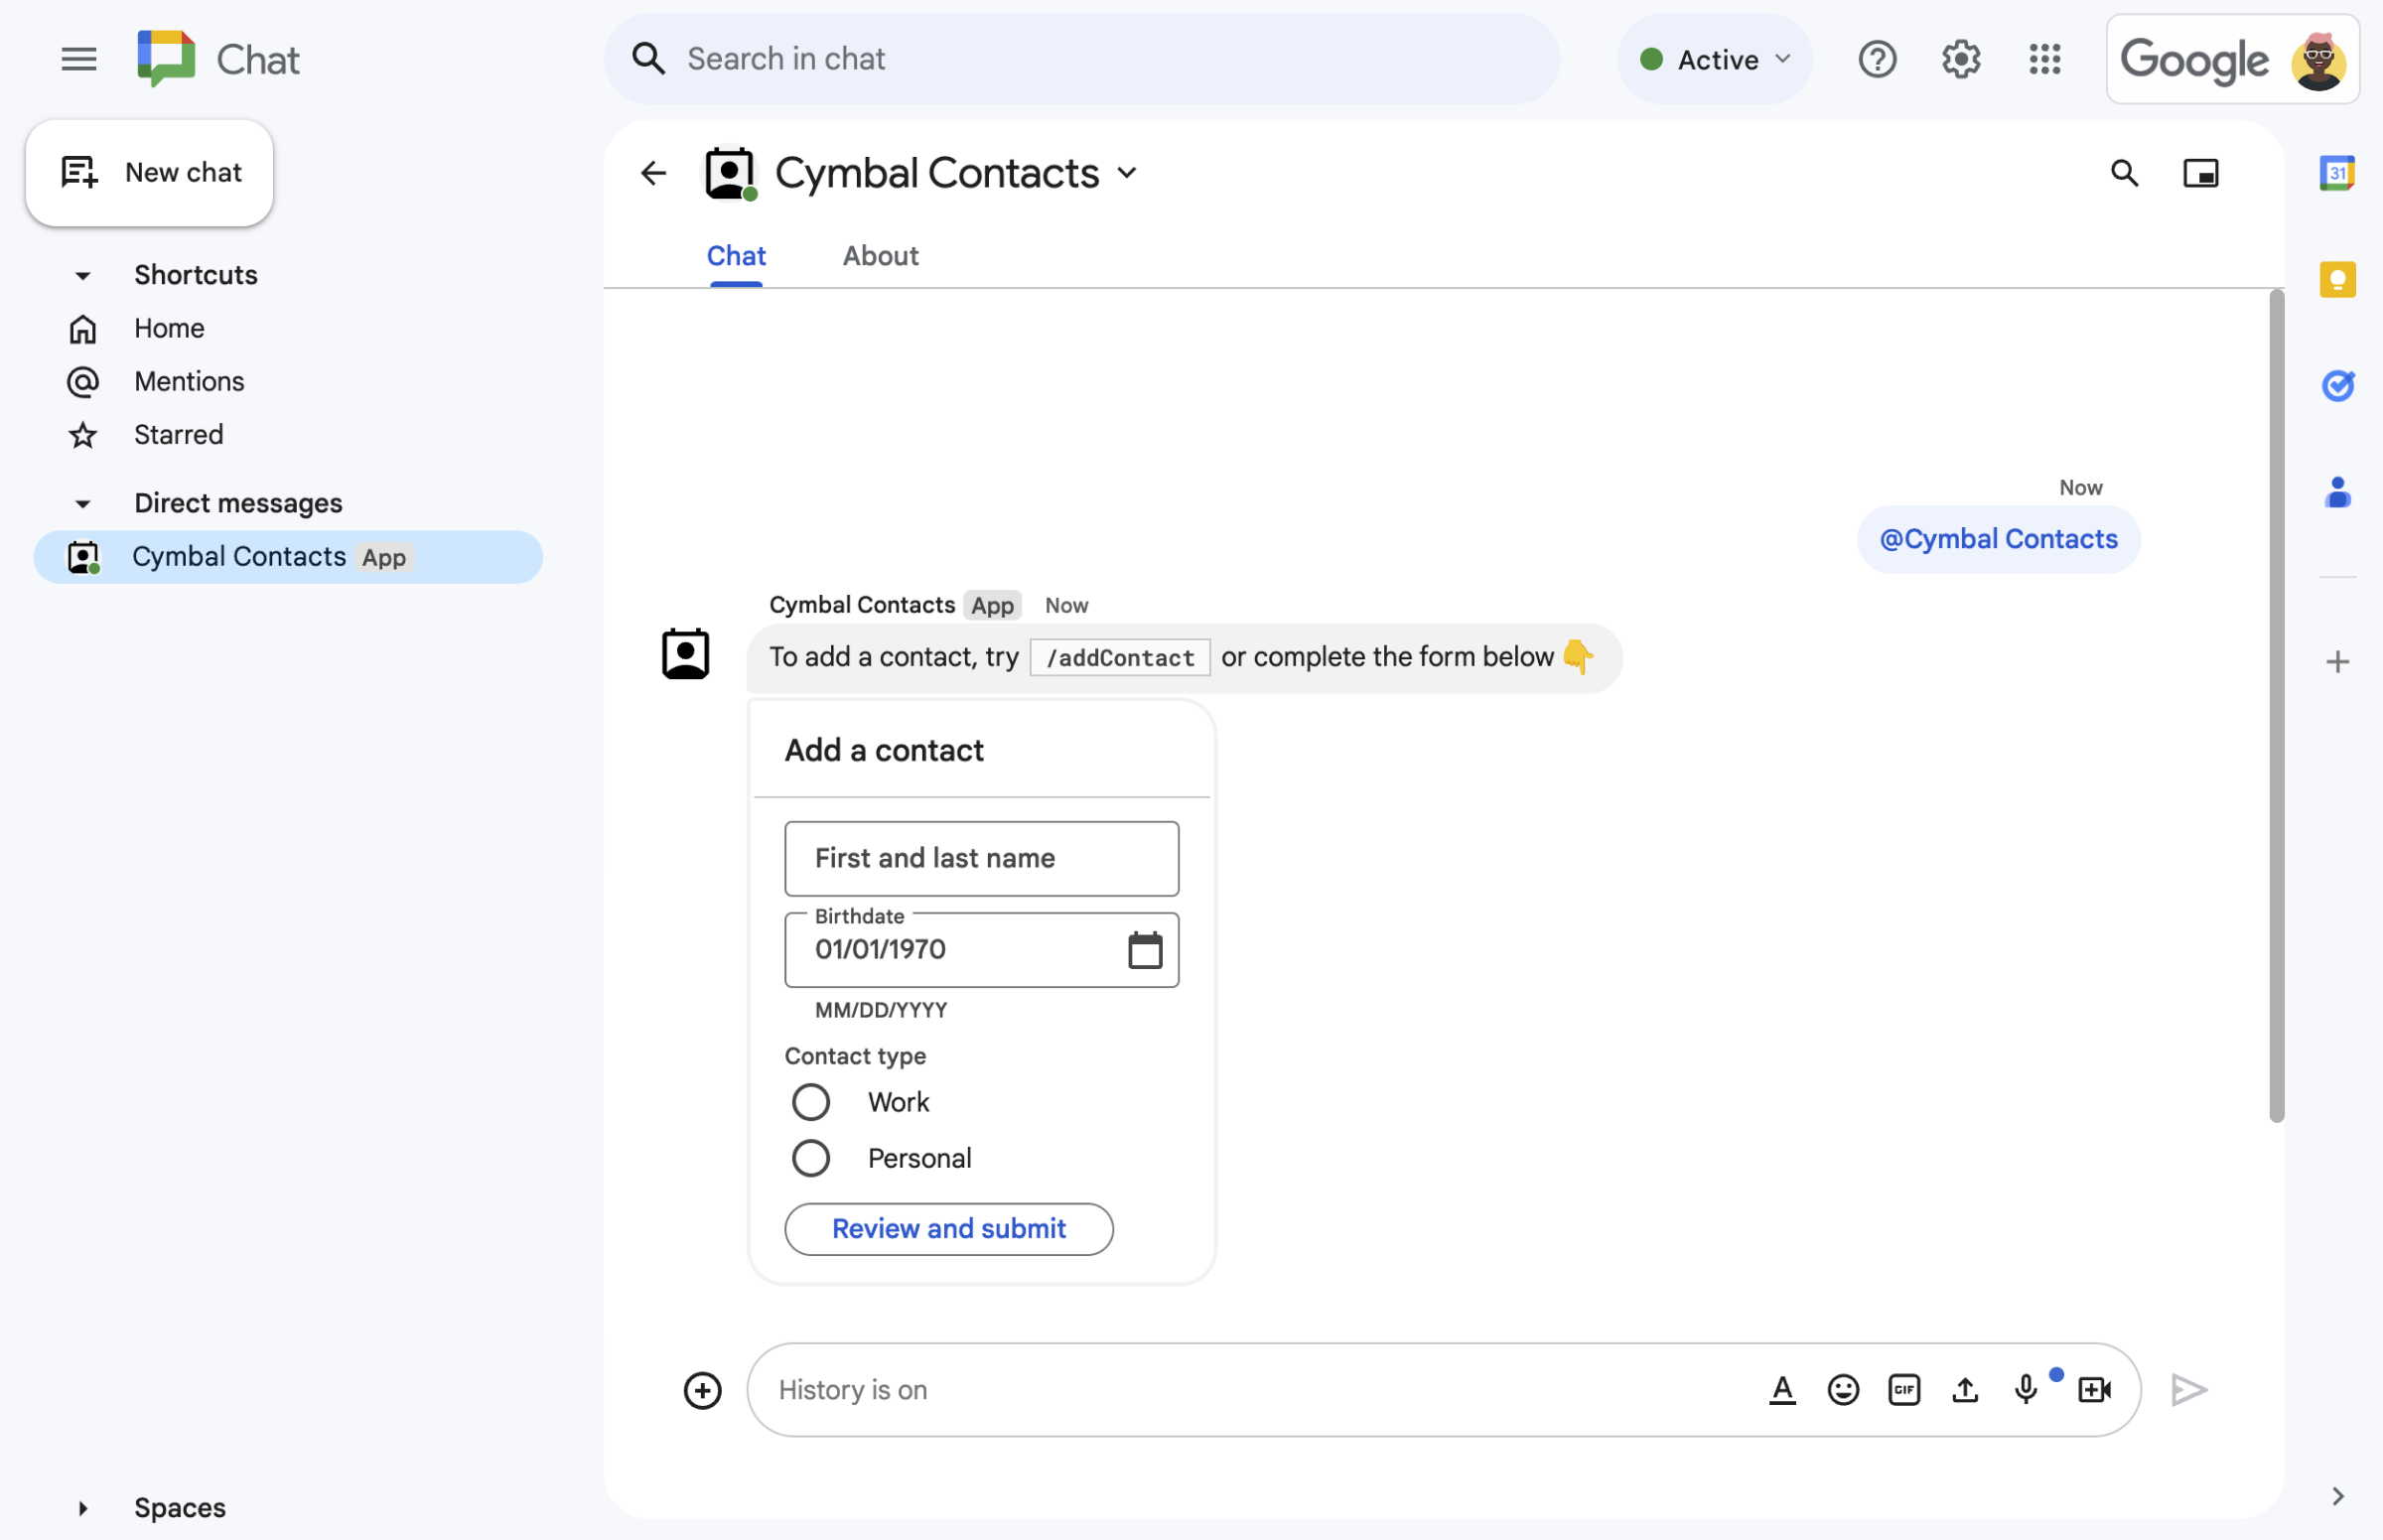
  • 資訊卡訊息中的聯絡表單。
    圖 5. Chat 應用程式也會提示使用者新增聯絡人 回覆訊息中的資訊卡

必要條件

目標

架構

內建 Chat 應用程式 Google Apps Script 和使用 要處理的互動事件 以及回覆 Chat 使用者。

以下說明使用者通常如何與 Chat 應用程式互動:

  1. 使用者透過 Chat 應用程式開啟即時訊息,或 將 Chat 應用程式新增至現有聊天室。

  2. Chat 應用程式會提示使用者透過以下方式新增聯絡人: 建立並顯示聯絡表單 card 物件。如要分享聯絡表單,Chat 應用程式 會以下列方式回應使用者:

    • 使用內含聯絡表單的資訊卡訊息回覆 @提及和即時訊息。
    • 開啟對話方塊,回應斜線指令 /addContact 聯絡表單
    • 回應斜線指令 /about 時,會傳送含有「Add a contact」按鈕的文字訊息,使用者只要按一下這個按鈕,即可開啟含有聯絡表單的對話方塊。
  3. 使用者在聯絡表單中輸入聯絡資訊 複製到以下欄位和小工具中:

    • 姓名textInput 可接受字串的小工具。
    • 出生日期dateTimePicker 小工具只接受日期。
    • 聯絡人類型:圓形按鈕的 selectionInput 小工具,可讓使用者選取及提交單一字串值 (PersonalWork)。
    • 「查看並提交」按鈕: buttonList 包含 button 小工具的陣列,使用者按下相關按鈕後即可提交 輸入內容
  4. Google Chat 應用程式會處理 CARD_CLICKED 互動事件 處理使用者輸入的值,並在 確認資訊卡。

  5. 使用者查看確認資訊卡,然後按一下「提交」按鈕,完成聯絡資訊。

  6. Google Chat 應用程式傳送私人簡訊。 確認提交內容

準備環境

本節說明如何建立及設定 Chat 應用程式。

建立 Google Cloud 專案

Google Cloud 控制台

  1. 在 Google Cloud 控制台中,前往「選單」圖示 > IAM 與管理員 > 建立專案

    前往「建立專案」

  2. 在「Project Name」(專案名稱) 欄位,輸入專案的描述性名稱。

    選用步驟:如要編輯「Project ID」,請按一下「Edit」。專案建立後就無法變更專案 ID,因此請選擇符合專案執行期間需求的 ID。

  3. 按一下「地區」欄位中的「瀏覽」,即可查看可能的地理位置 專案。然後按一下「選取」
  4. 點選「Create」(建立),Google Cloud 控制台前往「資訊主頁」頁面,已建立專案 幾分鐘內

gcloud CLI

在下列任一開發環境中,存取 Google Cloud CLI (gcloud):

  • Cloud Shell:如要使用已設定 gcloud CLI 的線上終端機,請啟用 Cloud Shell。
    啟用 Cloud Shell
  • 本機 Shell:如要使用本機開發環境,請安裝初始化 gcloud CLI。
    如要建立 Cloud 專案,請使用 gcloud projects create 指令:
    gcloud projects create PROJECT_ID
    設定您要建立的專案 ID,以取代 PROJECT_ID

設定驗證與授權

如要使用 Google Chat 應用程式,您必須設定 OAuth 同意畫面: 使用者可在 Google Workspace 應用程式中授權您的應用程式,包括 Google Chat。

在這個教學課程中,您會部署 因此您可以在測試和內部使用時,針對 同意畫面。發布 Chat 應用程式前,請將所有預留位置資訊替換為實際資訊。

  1. 在 Google Cloud 控制台中,依序前往「選單」>「API 和服務」>「OAuth 同意畫面」

    前往 OAuth 同意畫面

  2. 在「使用者類型」下方,選取「內部」,然後按一下「建立」

  3. 在「應用程式名稱」中輸入 Contact Manager

  4. 在「使用者支援電子郵件」部分,選取您的電子郵件地址或適當的電子郵件地址 Google 群組。

  5. 在「開發人員聯絡資訊」下方,輸入您的電子郵件地址。

  6. 按一下 [儲存並繼續]。

  7. 在「範圍」頁面中,按一下「儲存並繼續」。(Chat 應用程式不需要任何 OAuth 範圍)。

  8. 查看摘要,然後按一下「返回資訊主頁」

建立及部署 Chat 應用程式

在下一節中,您將複製與更新整個 內含所有必要應用程式的 Apps Script 專案 因此不必另外複製 貼上每個檔案

或者,您也可以在 GitHub 上查看整個專案。

前往 GitHub 查看

以下簡要說明各檔案:

main.gs

處理所有應用程式邏輯,包括使用者傳送訊息給 Chat 應用程式、點按 Chat 應用程式訊息中的按鈕,或開啟及關閉對話方塊時的互動事件。

查看 main.gs 程式碼

apps-script/contact-form-app/main.gs
/**
 * Copyright 2024 Google Inc.
 *
 * Licensed under the Apache License, Version 2.0 (the "License");
 * you may not use this file except in compliance with the License.
 * You may obtain a copy of the License at
 *
 * http://www.apache.org/licenses/LICENSE-2.0
 *
 * Unless required by applicable law or agreed to in writing, software
 * distributed under the License is distributed on an "AS IS" BASIS,
 * WITHOUT WARRANTIES OR CONDITIONS OF ANY KIND, either express or implied.
 * See the License for the specific language governing permissions and
 * limitations under the License.
 */

/**
 * Responds to a MESSAGE interaction event in Google Chat.
 *
 * @param {Object} event the MESSAGE interaction event from Chat API.
 * @return {Object} message response that opens a dialog or sends private
 *                          message with text and card.
 */
function onMessage(event) {
  if (event.message.slashCommand) {
    switch (event.message.slashCommand.commandId) {
      case 1:
        // If the slash command is "/about", responds with a text message and button
        // that opens a dialog.
        return {
          text: "Manage your personal and business contacts 📇. To add a " +
                  "contact, use the slash command `/addContact`.",
          accessoryWidgets: [{ buttonList: { buttons: [{
            text: "Add Contact",
            onClick: { action: {
              function: "openDialog",
              interaction: "OPEN_DIALOG"
            }}
          }]}}]
        }
      case 2:
        // If the slash command is "/addContact", opens a dialog.
        return openDialog(event);
    }
  }

  // If user sends the Chat app a message without a slash command, the app responds
  // privately with a text and card to add a contact.
  return {
    privateMessageViewer: event.user,
    text: "To add a contact, try `/addContact` or complete the form below:",
    cardsV2: [{
      cardId: "addContactForm",
      card: {
        header: { title: "Add a contact" },
        sections:[{ widgets: CONTACT_FORM_WIDGETS.concat([{
          buttonList: { buttons: [{
            text: "Review and submit",
            onClick: { action: { function : "openNextCard" }}
          }]}
        }])}]
      }
    }]
  };
}

/**
 * Responds to CARD_CLICKED interaction events in Google Chat.
 *
 * @param {Object} event the CARD_CLICKED interaction event from Google Chat
 * @return {Object} message responses specific to the dialog handling.
 */
function onCardClick(event) {
  // Initial dialog form page
  if (event.common.invokedFunction === "openDialog") {
    return openDialog(event);
  // Second dialog form page
  } else if (event.common.invokedFunction === "openNextCard") {
    return openNextCard(
      event.user,
      fetchFormValue(event, "contactName"),
      fetchFormValue(event, "contactBirthdate"),
      fetchFormValue(event, "contactType"),
      event.isDialogEvent
    );
  // Dialog form submission
  } else if (event.common.invokedFunction === "submitForm") {
    const userInputs = event.common.parameters;
    return submitForm(event.user, userInputs, event.dialogEventType);
  }
}

/**
 * Extracts form input value for a given widget.
 *
 * @param {Object} event the CARD_CLICKED interaction event from Google Chat.
 * @param {String} widgetName a unique ID for the widget, specified in the widget's name field.
 * @returns the value inputted by the user, null if no value can be found.
 */
function fetchFormValue(event, widgetName) {
  const formItem = event.common.formInputs[widgetName][""];
  // For widgets that receive StringInputs data, the value input by the user.
  if (formItem.hasOwnProperty("stringInputs")) {
    const stringInput = event.common.formInputs[widgetName][""].stringInputs.value[0];
    if (stringInput != null) {
      return stringInput;
    }
  // For widgets that receive dateInput data, the value input by the user.
  } else if (formItem.hasOwnProperty("dateInput")) {
    const dateInput = event.common.formInputs[widgetName][""].dateInput.msSinceEpoch;
     if (dateInput != null) {
       return dateInput;
     }
  }

  return null;
}

/**
 * Opens a dialog that prompts users to add details about a contact.
 *
 * @return {Object} a message with an action response to open a dialog.
 */
function openDialog() {
  return { actionResponse: {
    type: "DIALOG",
    dialogAction: { dialog: { body: { sections: [{
      header: "Add new contact",
      widgets: CONTACT_FORM_WIDGETS.concat([{
        buttonList: { buttons: [{
          text: "Review and submit",
          onClick: { action: { function: "openNextCard" }}
        }]}
      }])
    }]}}}
  }};
}

/**
 * Returns a dialog or card message that displays a confirmation of contact
 * details before users submit.
 *
 * @param {String} user the user who submitted the information.
 * @param {String} contactName the contact name from the previous dialog or card.
 * @param {String} contactBirthdate the birthdate from the previous dialog or card.
 * @param {String} contactType the contact type from the previous dialog or card.
 * @param {boolean} fromDialog whether the information was submitted from a dialog.
 *
 * @return {Object} returns a dialog or private card message.
 */
function openNextCard(user, contactName, contactBirthdate, contactType, fromDialog) {
  const name = contactName ?? "<i>Not provided</i>";
  const birthdate = contactBirthdate ?? "<i>Not provided</i>";
  const type = contactType ?? "<i>Not provided</i>";
  const cardConfirmation = {
    header: "Your contact",
    widgets: [{
      textParagraph: { text: "Confirm contact information and submit:" }}, {
      textParagraph: { text: "<b>Name:</b> " + name }}, {
      textParagraph: {
        text: "<b>Birthday:</b> " + convertMillisToDateString(birthdate)
      }}, {
      textParagraph: { text: "<b>Type:</b> " + type }}, {
      buttonList: { buttons: [{
        text: "Submit",
        onClick: { action: {
          function: "submitForm",
          parameters: [{
            key: "contactName", value: name }, {
            key: "contactBirthdate", value: birthdate }, {
            key: "contactType", value: type
          }]
        }}
      }]}
    }]
  };

  // Returns a dialog with contact information that the user input.
  if (fromDialog) {
    return { action_response: {
      type: "DIALOG",
      dialogAction: { dialog: { body: { sections: [ cardConfirmation ]}}}
    }};
  }

  // Updates existing card message with contact information that the user input.
  return {
    actionResponse: { type: "UPDATE_MESSAGE" },
    privateMessageViewer: user,
    cardsV2: [{
      card: { sections: [cardConfirmation]}
    }]
  }
}

/**
  * Submits information from a dialog or card message.
  *
  * @param {Object} user the person who submitted the information.
  * @param {Object} userInputs the form input values from event parameters.
  * @param {boolean} dialogEventType "SUBMIT_DIALOG" if from a dialog.
  * @return {Object} a message response that opens a dialog or posts a private
  *                  message.
  */
function submitForm(user, userInputs, dialogEventType) {
  const contactName = userInputs["contactName"];
  // Checks to make sure the user entered a contact name.
  // If no name value detected, returns an error message.
  if (!contactName) {
    const errorMessage = "Don't forget to name your new contact!";
    if (dialogEventType === "SUBMIT_DIALOG") {
      return { actionResponse: {
        type: "DIALOG",
        dialogAction: { actionStatus: {
          statusCode: "INVALID_ARGUMENT",
          userFacingMessage: errorMessage
        }}
      }};
    } else {
      return {
        privateMessageViewer: user,
        text: errorMessage
      };
    }
  }

  // The Chat app indicates that it received form data from the dialog or card.
  // Sends private text message that confirms submission.
  const confirmationMessage = " " + contactName + " has been added to your contacts.";
  if (dialogEventType === "SUBMIT_DIALOG") {
    return {
      actionResponse: {
        type: "NEW_MESSAGE",
        dialogAction: { actionStatus: {
          statusCode: "OK",
          userFacingMessage: "Success " + JSON.stringify(contactName)
        }}
      },
      privateMessageViewer: user,
      text: confirmationMessage
    }
  } else {
    return {
      actionResponse: { type: "NEW_MESSAGE" },
      privateMessageViewer: user,
      text: confirmationMessage
    };
  }
}

/**
 * Converts date in milliseconds since epoch to user-friendly string.
 *
 * @param {Object} millis the milliseconds since epoch time.
 * @return {string} Display-friend date (English US).
 */
function convertMillisToDateString(millis) {
  const date = new Date(millis);
  const options = { year: 'numeric', month: 'long', day: 'numeric' };
  return date.toLocaleDateString('en-US', options);
}
contactForm.gs

包含接收使用者表單資料的小工具。這些表單輸入小工具會顯示在訊息和對話方塊中的資訊卡中。

查看 contactForm.gs 程式碼

apps-script/contact-form-app/contactForm.gs
/**
 * Copyright 2024 Google Inc.
 *
 * Licensed under the Apache License, Version 2.0 (the "License");
 * you may not use this file except in compliance with the License.
 * You may obtain a copy of the License at
 *
 * http://www.apache.org/licenses/LICENSE-2.0
 *
 * Unless required by applicable law or agreed to in writing, software
 * distributed under the License is distributed on an "AS IS" BASIS,
 * WITHOUT WARRANTIES OR CONDITIONS OF ANY KIND, either express or implied.
 * See the License for the specific language governing permissions and
 * limitations under the License.
 */

/**
 * The section of the contact card that contains the form input widgets. Used in a dialog and card message.
 * To add and preview widgets, use the Card Builder: https://addons.gsuite.google.com/uikit/builder
 */
const CONTACT_FORM_WIDGETS = [
  {
    "textInput": {
      "name": "contactName",
      "label": "First and last name",
      "type": "SINGLE_LINE"
    }
  },
  {
    "dateTimePicker": {
      "name": "contactBirthdate",
      "label": "Birthdate",
      "type": "DATE_ONLY"
    }
  },
  {
    "selectionInput": {
      "name": "contactType",
      "label": "Contact type",
      "type": "RADIO_BUTTON",
      "items": [
        {
          "text": "Work",
          "value": "Work",
          "selected": false
        },
        {
          "text": "Personal",
          "value": "Personal",
          "selected": false
        }
      ]
    }
  }
];
appsscript.json

Apps Script 資訊清單 ,定義及設定 Apps Script 專案的 Chat 應用程式。

查看 appsscript.json 程式碼

apps-script/contact-form-app/appsscript.json
{
  "timeZone": "America/Los_Angeles",
  "dependencies": {},
  "exceptionLogging": "STACKDRIVER",
  "runtimeVersion": "V8",
  "chat": {}
}

尋找 Cloud 專案編號和 ID

  1. 在 Google Cloud 控制台中,前往您的 Cloud 專案。

    前往 Google Cloud 控制台

  2. 按一下 [設定和公用程式] &gt;「專案設定」

  3. 記下「專案編號」和「專案 ID」欄位中的值。您會在後續各節中使用這些值。

建立 Apps Script 專案

如要建立 Apps Script 專案並連結至 Cloud 專案:

  1. 點選下方按鈕,即可開啟「在 Google Chat 中管理聯絡人」 Apps Script 專案。
    開啟專案
  2. 按一下「總覽」圖示
  3. 在總覽頁面上,按一下「用來建立副本的圖示 建立副本」
  4. 為 Apps 指令碼專案副本命名:

    1. 按一下「在 Google Chat 中管理聯絡人的副本」

    2. 在「Project title」(專案標題) 中輸入 Contact Manager - Google Chat app

    3. 按一下 [重新命名]

設定 Apps Script 專案的 Cloud 專案

  1. 在您的 Apps Script 專案中, 按一下 專案設定圖示「Project Settings」
  2. 在「Google Cloud Platform (GCP) Project」(Google Cloud Platform (GCP) 專案) 下方,按一下 [變更專案]
  3. 在「GCP 專案編號」中,貼上 Cloud 專案的專案編號。
  4. 按一下「設定專案」。Cloud 專案和 Apps Script 專案現在已連結。

建立 Apps Script 部署作業

備妥所有程式碼後,請部署 Apps Script 專案。設定 Deployment ID 時 Google Cloud 中的即時通訊應用程式。

  1. 在 Apps Script 中,開啟 Chat 應用程式的 專案。

    前往 Apps Script

  2. 按一下「部署」>新增部署作業

  3. 如果尚未選取「外掛程式」,請按一下「選取類型」旁的部署類型 專案設定圖示,然後選取「外掛程式」

  4. 在「說明」中輸入這個版本的說明,例如: Test of Contact Manager

  5. 按一下「Deploy」。Apps Script 會回報部署作業成功,並提供部署 ID。

  6. 按一下「複製」圖示 即可複製 部署作業 ID,然後按一下「完成」

在 Google Cloud 控制台中設定 Chat 應用程式

本節說明如何在 Google Cloud 控制台中設定 Google Chat API 提供 Chat 應用程式相關資訊,包括 您剛透過 Apps Script 建立的部署作業 ID 專案。

  1. 在 Google Cloud 控制台中,依序點選「選單」 >「更多產品」 >「Google Workspace」 >「產品程式庫」 >「Google Chat API」 >「管理」 >「設定」

    前往 Chat API 設定

  2. 在「應用程式名稱」中輸入 Contact Manager

  3. 在「顯示圖片」中輸入 https://developers.google.com/chat/images/contact-icon.png

  4. 在「說明」中輸入 Manage your personal and business contacts

  5. 按一下「啟用互動功能」切換鈕,將其設為「開啟」。

  6. 在「功能」下方,勾選「接收一對一訊息」和「加入聊天室和群組對話」核取方塊。

  7. 在「連線設定」下方,選取「Apps Script」

  8. 在「部署作業 ID」中,貼上 Apps Script 部署作業 ID 您在上一個部分 Apps Script 部署作業。

  9. 在「Slash 指令」下方,設定斜線指令 /about/addContact:

    1. 按一下「新增斜線指令」,設定第一個斜線指令。
    2. 在「Name」(名稱) 中輸入 /about
    3. 在「Command ID」中輸入 1
    4. 在「說明」中輸入 Learn how to use this Chat app to manage your contacts
    5. 選取「開啟對話方塊」
    6. 按一下 [完成]。
    7. 按一下「新增斜線指令」,設定其他斜線指令。
    8. 在「名稱」中輸入 /addContact
    9. 在「指令 ID」中輸入 2
    10. 在「說明」中輸入 Submit information about a contact
    11. 選取「開啟對話方塊」
    12. 按一下 [完成]。
  10. 在「顯示設定」下方,選取「將這個 Chat 擴充應用程式提供給 YOUR DOMAIN 中的特定使用者和群組」核取方塊,然後輸入電子郵件地址。

  11. 在「記錄」底下,選取 [將錯誤記錄至 Logging]

  12. 按一下 [儲存]。系統會顯示已儲存的設定訊息。

現在可以安裝及測試 Chat 應用程式了 。

測試 Chat 應用程式

如要測試 Chat 應用程式,請開啟含有下列對話的即時訊息聊天室: 傳送訊息:

  1. 使用你使用的 Google Workspace 帳戶開啟 Google Chat (在您將自己新增為信任的測試人員時提供)。

    前往 Google Chat

  2. 按一下「新的即時通訊」圖示
  3. 在 [新增 1 或多位使用者] 欄位中,輸入你的使用者名稱 Chat 應用程式。
  4. 從搜尋結果中選取 Chat 應用程式。直接 訊息隨即開啟。

  1. 透過 Chat 應用程式開啟新的即時訊息時, 輸入 /addContact,然後按下 Enter 鍵。

  2. 在開啟的對話方塊中輸入聯絡資訊:

    1. 在「名字和姓氏」文字欄位中輸入名稱。
    2. 在「生日」日期挑選器中選取日期。
    3. 在「聯絡人類型」下方,選取「工作」或「個人」圓形按鈕。
  3. 按一下「檢閱並提交」

  4. 在確認對話方塊中,檢查您提交的資訊並 按一下「提交」。Chat 應用程式會回覆文字訊息,內容為 CONTACT NAME has been added to your contacts.

  5. 您也可以選擇以下列方式測試及提交聯絡表單:

    • 使用 /about 斜線指令。即時通訊應用程式會回覆文字訊息,並顯示「Add a contact」的配件小工具按鈕。按一下按鈕即可開啟含有聯絡表單的對話方塊。
    • 傳送即時訊息給 Chat 應用程式,但不傳送即時訊息 斜線指令,例如 Hello。Chat 應用程式 回覆簡訊和資訊卡,其中包含聯絡表單。

清除所用資源

如要避免系統向您的 Google Cloud 帳戶收取 但建議採用 Cloud 專案

  1. 在 Google Cloud 控制台中前往「管理資源」頁面。依序按一下「選單」圖示 >「IAM 與管理」 >「管理資源」

    前往 Resource Manager

  2. 在專案清單中選取要刪除的專案,然後按一下「刪除」圖示
  3. 在對話方塊中輸入專案 ID,然後按一下「Shut down」(關閉) 即可刪除專案。