
บทแนะนำนี้แสดงวิธีสร้างแอป Google Chat ที่ ตอบสนองต่อเหตุการณ์แบบเรียลไทม์ เมื่อตอบสนองต่อเหตุการณ์ แอปจะสร้างและป้อนข้อมูลในพื้นที่ทำงาน Chat, ช่วยอำนวยความสะดวกในการแก้ไขเหตุการณ์ด้วยข้อความ, คำสั่ง Slash และกล่องโต้ตอบ รวมถึงใช้ AI เพื่อสรุปการตอบสนองต่อเหตุการณ์ในเอกสาร Google เอกสาร
เหตุการณ์คือเหตุการณ์ที่ต้องได้รับความสนใจจากทีม บุคคลเพื่อแก้ไขทันที ตัวอย่างเหตุการณ์มีดังนี้
- มีการสร้างเคสที่ต้องดำเนินการอย่างเร่งด่วนในแพลตฟอร์มการจัดการลูกค้าสัมพันธ์ (CRM) ซึ่งกำหนดให้ทีมบริการต้องทำงานร่วมกันเพื่อแก้ไข
- ระบบออฟไลน์ ทำให้มีการแจ้งเตือนกลุ่มวิศวกรความเสถียรสำหรับเว็บไซต์ (SRE) เพื่อให้วิศวกรทำงานร่วมกันเพื่อนำระบบกลับมาออนไลน์อีกครั้ง
- เกิดแผ่นดินไหวรุนแรง และเจ้าหน้าที่กู้ภัยจำเป็นต้อง ประสานงานการตอบสนอง
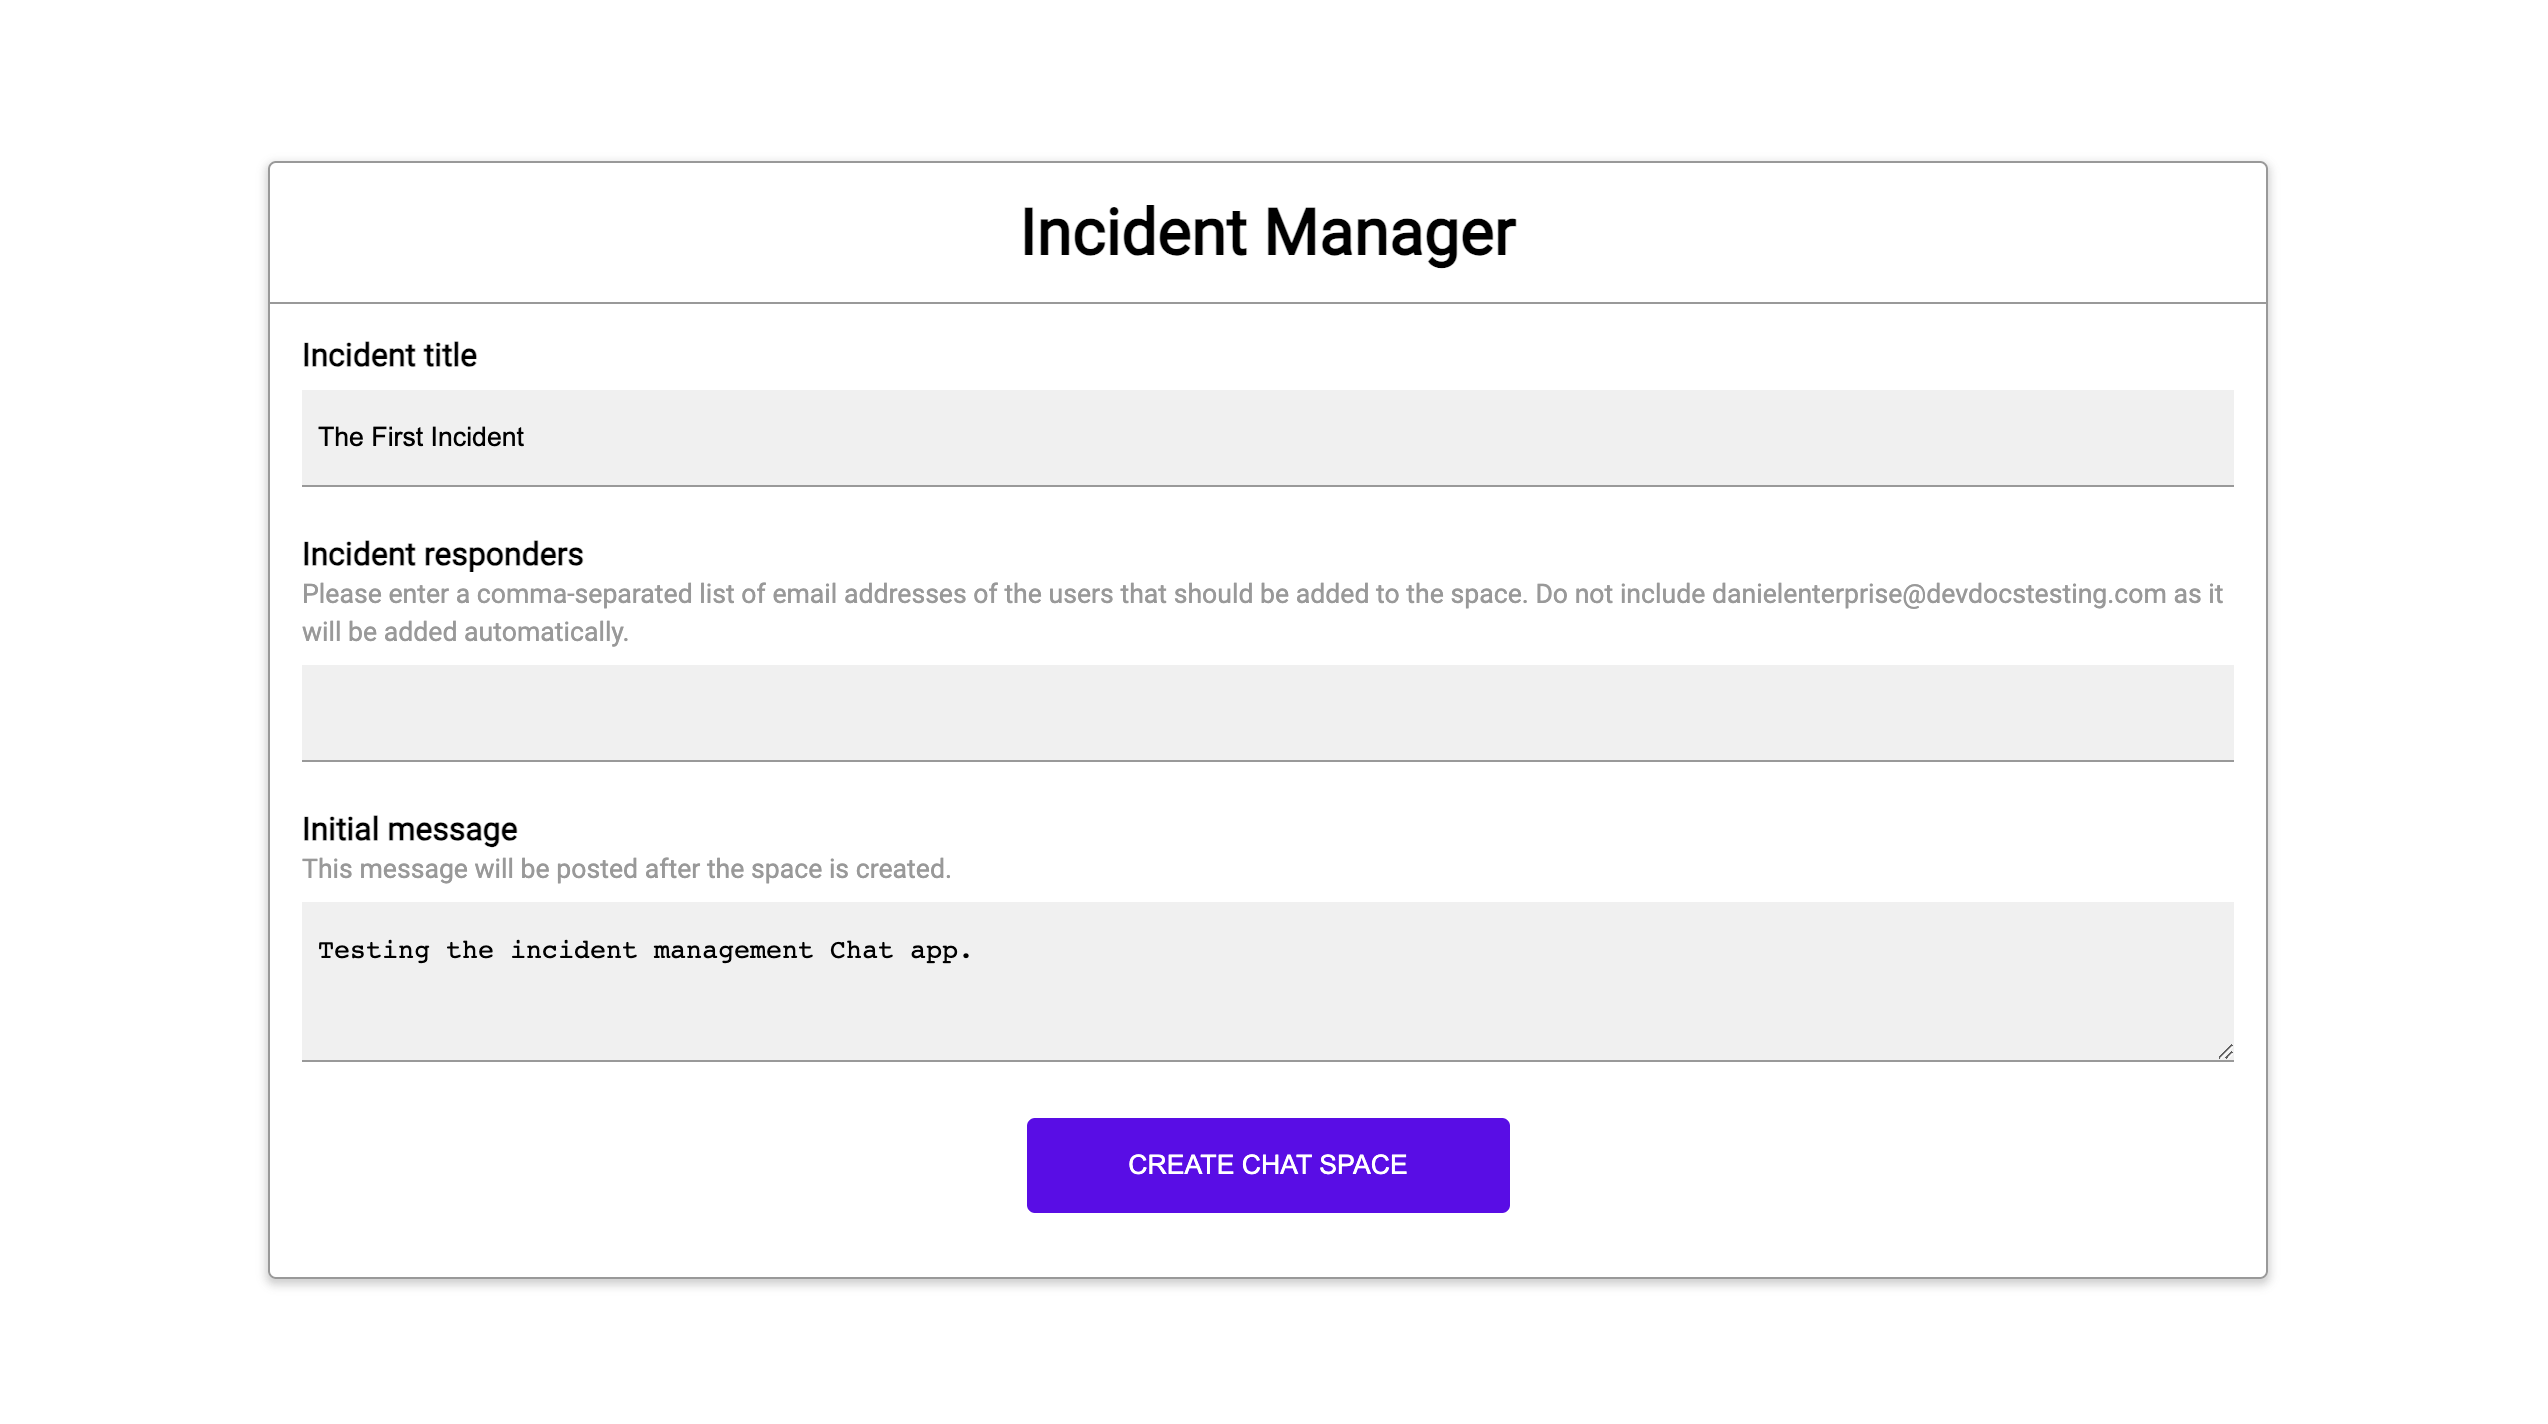
สำหรับวัตถุประสงค์ของบทแนะนำนี้ การแจ้งเตือนเหตุการณ์จะเริ่มเมื่อมีผู้รายงานเหตุการณ์ด้วยการคลิกปุ่มจากหน้าเว็บ หน้าเว็บจะจำลอง เหตุการณ์โดยขอให้ผู้ใช้ป้อนข้อมูลเหตุการณ์พื้นฐาน ได้แก่ ชื่อ คำอธิบาย และอีเมลของผู้ตอบ
ดูการทำงานของแอป Chat สำหรับการจัดการเหตุการณ์
-
รูปที่ 1 เว็บไซต์ที่ผู้ใช้รายงานเหตุการณ์ได้ -
รูปที่ 2 การแจ้งเตือนว่ามีการสร้างพื้นที่ใน Chat สำหรับเหตุการณ์ -

รูปที่ 3 พื้นที่ใน Chat สำหรับการตอบสนองต่อเหตุการณ์ -
รูปที่ 4 การแก้ไขเหตุการณ์ด้วยคำสั่งเครื่องหมายทับ -
รูปที่ 5 กล่องโต้ตอบการแก้ไขเหตุการณ์ -
รูปที่ 6 เอกสาร Google เอกสารเกี่ยวกับการแก้ไขเหตุการณ์ที่แชร์ในพื้นที่ทำงาน -
รูปที่ 7 เอกสาร Google เอกสารเกี่ยวกับการแก้ไขเหตุการณ์ที่ AI สรุป
ข้อกำหนดเบื้องต้น
หากต้องการเปิดใช้ข้อกำหนดเบื้องต้นเหล่านี้สำหรับองค์กร โปรดขอให้ ผู้ดูแลระบบ Google Workspace เปิดใช้
- บัญชี Google Workspace สำหรับธุรกิจหรือองค์กร ที่มีสิทธิ์เข้าถึง Google Chat
- เปิดใช้ไดเรกทอรี (การแชร์รายชื่อติดต่อ) สำหรับ Google Workspace แอปเหตุการณ์จะใช้ ไดเรกทอรีเพื่อค้นหาข้อมูลติดต่อของผู้ตอบเหตุการณ์ เช่น ชื่อ และอีเมล ผู้ตอบสนองต่อเหตุการณ์ต้องเป็นผู้ใช้ที่มีบัญชี Google Chat ในองค์กร Google Workspace
วัตถุประสงค์
- สร้างแอป Chat ที่ตอบสนองต่อเหตุการณ์
- ช่วยให้ผู้ใช้ตอบสนองต่อเหตุการณ์ได้โดยทำดังนี้
- การสร้างพื้นที่ตอบสนองต่อเหตุการณ์
- โพสต์ข้อความสรุปเหตุการณ์และการตอบกลับ
- รองรับการทำงานร่วมกันด้วยฟีเจอร์แอปแชทแบบอินเทอร์แอกทีฟ
- สรุปการสนทนาและการแก้ไขด้วย Vertex AI
สถาปัตยกรรม
แผนภาพต่อไปนี้แสดงสถาปัตยกรรมของ Google Workspace และ ทรัพยากร Google Cloud ที่แอป Google Chat สำหรับการตอบสนองต่อเหตุการณ์ใช้
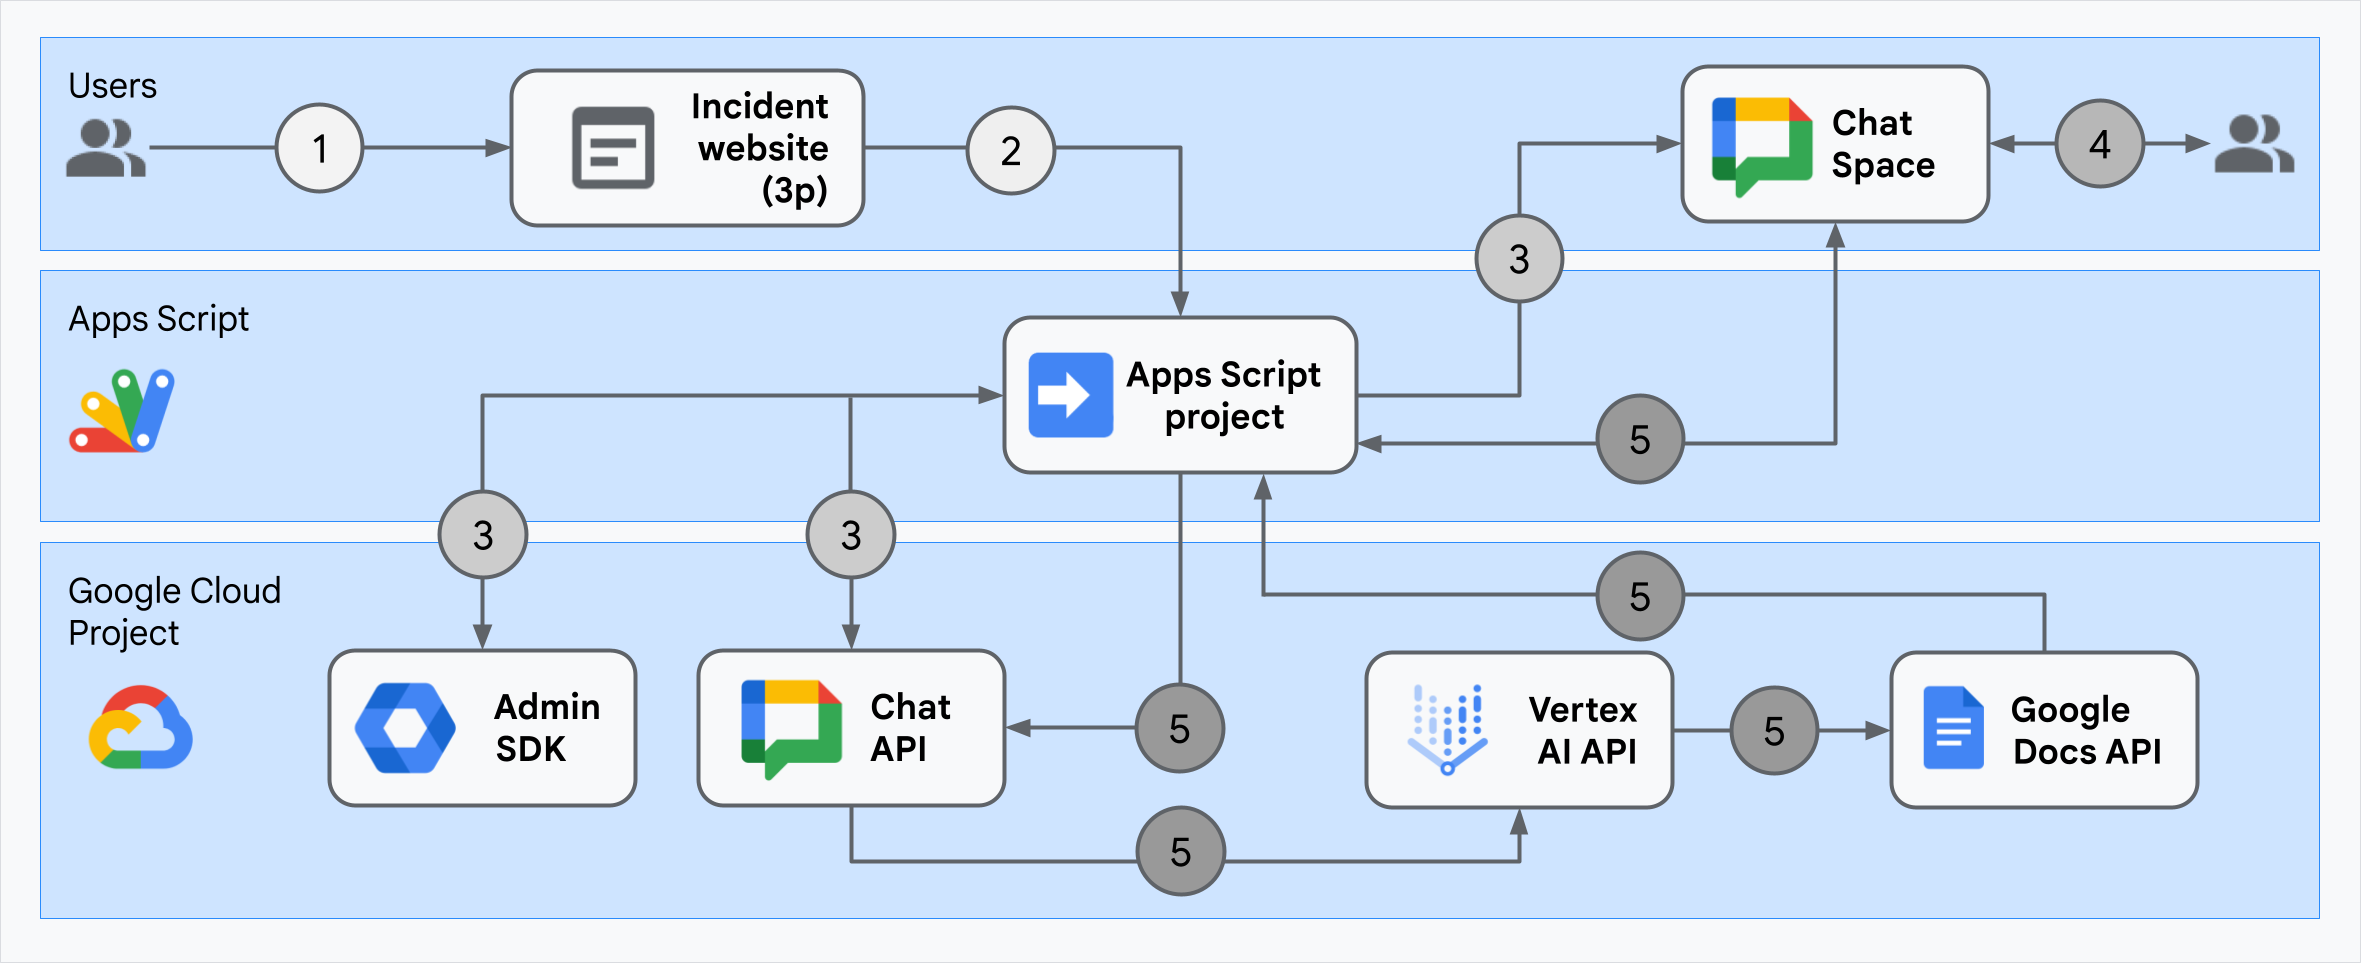
สถาปัตยกรรมแสดงให้เห็นว่าแอป Google Chat สำหรับการตอบสนองต่อเหตุการณ์ ประมวลผลเหตุการณ์และการแก้ไขอย่างไร
ผู้ใช้เริ่มเหตุการณ์จากเว็บไซต์ภายนอกที่โฮสต์ใน Apps Script
เว็บไซต์จะส่งคำขอ HTTP แบบไม่พร้อมกันไปยังแอป Google Chat ซึ่งโฮสต์ใน Apps Script ด้วย
แอป Google Chat สำหรับการตอบสนองต่อเหตุการณ์จะประมวลผลคำขอโดยทำดังนี้
บริการ Admin SDK ของ Apps Script จะรับข้อมูลสมาชิกในทีม เช่น รหัสผู้ใช้และอีเมล
เมื่อใช้ชุดคำขอ HTTP ไปยัง Chat API โดยใช้ บริการขั้นสูงของ Apps Script สำหรับ Chat แอป Google Chat สำหรับการตอบสนองต่อเหตุการณ์ จะสร้างพื้นที่ทำงานใน Chat สำหรับเหตุการณ์ เพิ่มสมาชิกในทีมลงในพื้นที่ทำงาน และส่งข้อความไปยังพื้นที่ทำงาน
สมาชิกในทีมพูดคุยเกี่ยวกับเหตุการณ์ในพื้นที่ใน Chat
สมาชิกในทีมเรียกใช้คำสั่ง Slash เพื่อส่งสัญญาณการแก้ไขปัญหา
การเรียก HTTP ไปยัง Chat API โดยใช้บริการ Chat ขั้นสูงของ Apps Script จะแสดงข้อความทั้งหมดในพื้นที่ทำงานของ Chat
Vertex AI จะรับข้อความที่แสดงและสร้างข้อมูลสรุป
บริการ
DocumentAppของ Apps Script จะสร้างเอกสาร ในเอกสาร และเพิ่มข้อมูลสรุปของ Vertex AI ลงใน เอกสารแอป Google Chat สำหรับการตอบสนองต่อเหตุการณ์จะเรียกใช้ Chat API เพื่อส่งข้อความที่แชร์ลิงก์ไปยังสรุป เอกสารในเอกสาร
เตรียมสภาพแวดล้อม
ส่วนนี้แสดงวิธีสร้างและกำหนดค่าโปรเจ็กต์ Google Cloud สำหรับ แอป Chat
สร้างโปรเจ็กต์ Google Cloud
คอนโซล Google Cloud
- ใน Google Cloud Console ให้ไปที่เมนู > IAM และผู้ดูแลระบบ > สร้างโปรเจ็กต์
-
ในช่องชื่อโปรเจ็กต์ ให้ป้อนชื่อที่สื่อความหมายสำหรับโปรเจ็กต์
ไม่บังคับ: หากต้องการแก้ไขรหัสโปรเจ็กต์ ให้คลิกแก้ไข คุณจะเปลี่ยนรหัสโปรเจ็กต์ไม่ได้ หลังจากสร้างโปรเจ็กต์แล้ว ดังนั้นให้เลือกรหัสที่ตรงกับความต้องการตลอดอายุการใช้งานของ โปรเจ็กต์
- ในช่องสถานที่ตั้ง ให้คลิกเรียกดูเพื่อแสดงสถานที่ตั้งที่อาจเป็นไปได้สำหรับ โปรเจ็กต์ จากนั้นคลิกเลือก
- คลิกสร้าง Google Cloud Console จะนำคุณไปยังหน้าแดชบอร์ดและสร้างโปรเจ็กต์ภายในไม่กี่นาที
gcloud CLI
ในสภาพแวดล้อมการพัฒนาอย่างใดอย่างหนึ่งต่อไปนี้ ให้เข้าถึง Google Cloud
CLI (gcloud)
-
Cloud Shell: หากต้องการใช้เทอร์มินัลออนไลน์ที่มีการตั้งค่า gcloud CLI ไว้แล้ว ให้เปิดใช้งาน Cloud Shell
เปิดใช้งาน Cloud Shell -
เชลล์ในเครื่อง: หากต้องการใช้สภาพแวดล้อมการพัฒนาในเครื่อง ให้
ติดตั้งและ
เริ่มต้น
gcloud CLI
หากต้องการสร้างโปรเจ็กต์ Cloud ให้ใช้คำสั่งgcloud projects creategcloud projects create PROJECT_ID
เปิดใช้การเรียกเก็บเงินสำหรับโปรเจ็กต์ Cloud
คอนโซล Google Cloud
- ในคอนโซล Google Cloud ให้ไปที่การเรียกเก็บเงิน คลิก เมนู > การเรียกเก็บเงิน > โปรเจ็กต์ของฉัน
- ในเลือกองค์กร ให้เลือกองค์กรที่เชื่อมโยงกับ โปรเจ็กต์ Google Cloud
- ในแถวของโปรเจ็กต์ ให้เปิดเมนูการดำเนินการ () คลิกเปลี่ยนการเรียกเก็บเงิน แล้วเลือก บัญชี Cloud Billing
- คลิกตั้งค่าบัญชี
gcloud CLI
- หากต้องการแสดงรายการบัญชีสำหรับการเรียกเก็บเงินที่ใช้ได้ ให้เรียกใช้คำสั่งต่อไปนี้
gcloud billing accounts list - ลิงก์บัญชีสำหรับการเรียกเก็บเงินกับโปรเจ็กต์ Google Cloud โดยทำดังนี้
gcloud billing projects link PROJECT_ID --billing-account=BILLING_ACCOUNT_IDแทนที่ค่าต่อไปนี้
PROJECT_IDคือรหัสโปรเจ็กต์ของ โปรเจ็กต์ Cloud ที่คุณต้องการเปิดใช้การเรียกเก็บเงินBILLING_ACCOUNT_IDคือรหัสบัญชีสำหรับการเรียกเก็บเงินที่จะลิงก์กับ โปรเจ็กต์ Google Cloud
เปิดใช้ API
คอนโซล Google Cloud
ในคอนโซล Google Cloud ให้เปิดใช้ Google Chat API, Google Docs API, Admin SDK API และ Vertex AI API
ยืนยันว่าคุณกำลังเปิดใช้ API ในโปรเจ็กต์ Cloud ที่ถูกต้อง แล้วคลิกถัดไป
ยืนยันว่าคุณเปิดใช้ API ที่ถูกต้อง แล้วคลิกเปิดใช้
gcloud CLI
หากจำเป็น ให้ตั้งค่าโปรเจ็กต์ Cloud ปัจจุบันเป็นโปรเจ็กต์ที่คุณสร้างด้วยคำสั่ง
gcloud config set projectgcloud config set project PROJECT_IDแทนที่ PROJECT_ID ด้วยรหัสโปรเจ็กต์ของ โปรเจ็กต์ Cloud ที่คุณสร้าง
เปิดใช้ Google Chat API, Google Docs API, Admin SDK API และ Vertex AI API ด้วยคำสั่ง
gcloud services enableดังนี้gcloud services enable chat.googleapis.com docs.googleapis.com admin.googleapis.com aiplatform.googleapis.com
ตั้งค่าการตรวจสอบสิทธิ์และการให้สิทธิ์
การตรวจสอบสิทธิ์และการให้สิทธิ์ช่วยให้ แอป Chat เข้าถึงทรัพยากรใน Google Workspace และ Google Cloud เพื่อประมวลผลการตอบสนองต่อเหตุการณ์ได้
ในบทแนะนำนี้ คุณจะเผยแพร่แอปภายใน ดังนั้นจึงใช้ข้อมูลตัวยึดตำแหน่งได้ ก่อนเผยแพร่แอปภายนอก ให้แทนที่ข้อมูลตัวยึดตำแหน่ง ด้วยข้อมูลจริงสำหรับหน้าจอขอความยินยอม
ใน Google Cloud Console ให้ไปที่เมนู > Google Auth platform > การสร้างแบรนด์
หากกำหนดค่า Google Auth platformแล้ว คุณจะกำหนดค่าการตั้งค่าหน้าจอขอความยินยอม OAuth ต่อไปนี้ได้ในการสร้างแบรนด์ กลุ่มเป้าหมาย และการเข้าถึงข้อมูล หากเห็นข้อความที่ระบุว่า Google Auth platform ยังไม่ได้กำหนดค่า ให้คลิกเริ่มต้นใช้งาน
- ในส่วนข้อมูลแอป ในชื่อแอป ให้พิมพ์
Incident Management - ในอีเมลสนับสนุนผู้ใช้ ให้เลือกอีเมลของคุณหรือ กลุ่ม Google ที่เหมาะสม
- คลิกถัดไป
- ในส่วนกลุ่มเป้าหมาย ให้เลือกภายใน หากเลือกภายในไม่ได้ ให้เลือกภายนอก
- คลิกถัดไป
- ในส่วนข้อมูลติดต่อ ให้ป้อนอีเมลที่คุณต้องการ รับการแจ้งเตือนเกี่ยวกับการเปลี่ยนแปลงในโปรเจ็กต์
- คลิกถัดไป
- ในส่วนเสร็จสิ้น ให้อ่าน นโยบายข้อมูลผู้ใช้ของบริการ Google API และหากยอมรับ ให้เลือก ฉันยอมรับบริการ Google API: นโยบายข้อมูลผู้ใช้
- คลิกต่อไป
- คลิกสร้าง
- หากเลือกภายนอกสำหรับประเภทผู้ใช้ ให้เพิ่มผู้ใช้ทดสอบโดยทำดังนี้
- คลิกกลุ่มเป้าหมาย
- ในส่วนผู้ใช้ทดสอบ ให้คลิกเพิ่มผู้ใช้
- ป้อนอีเมลและผู้ใช้ทดสอบที่ได้รับอนุญาตอื่นๆ แล้วคลิกบันทึก
- ในส่วนข้อมูลแอป ในชื่อแอป ให้พิมพ์
คลิกการเข้าถึงข้อมูล > เพิ่มหรือนำขอบเขตออก แผงจะปรากฏขึ้นพร้อมรายการขอบเขต สำหรับ API แต่ละรายการที่คุณเปิดใช้ในโปรเจ็กต์ Google Cloud
ในส่วนเพิ่มขอบเขตด้วยตนเอง ให้วางขอบเขตต่อไปนี้
https://www.googleapis.com/auth/chat.spaces.createhttps://www.googleapis.com/auth/chat.membershipshttps://www.googleapis.com/auth/chat.memberships.apphttps://www.googleapis.com/auth/chat.messageshttps://www.googleapis.com/auth/documentshttps://www.googleapis.com/auth/admin.directory.user.readonlyhttps://www.googleapis.com/auth/script.external_requesthttps://www.googleapis.com/auth/userinfo.emailhttps://www.googleapis.com/auth/cloud-platform
คลิกเพิ่มลงในตาราง
คลิกอัปเดต
หลังจากเลือกขอบเขตที่แอปของคุณต้องการแล้ว ให้คลิกบันทึกในหน้าการเข้าถึงข้อมูล
สร้างและติดตั้งใช้งานแอป Chat
ในส่วนต่อไปนี้ คุณจะคัดลอกและอัปเดตทั้งโปรเจ็กต์ Apps Script ที่มีโค้ดแอปพลิเคชันที่จำเป็นทั้งหมดสำหรับแอป Chat จึงไม่จำเป็นต้องคัดลอกและวางแต่ละไฟล์
ฟังก์ชันบางอย่างมีขีดล่างที่ท้ายชื่อ เช่น
processSlashCommand_() จาก ChatApp.gs ขีดล่างจะซ่อนฟังก์ชัน
จากหน้าเว็บการเริ่มต้นเหตุการณ์เมื่อเปิดในเบราว์เซอร์ ดูข้อมูลเพิ่มเติมได้ที่
ฟังก์ชันส่วนตัว
Apps Script รองรับไฟล์ 2 ประเภท ได้แก่ .gs สคริปต์และ.html
ไฟล์ หากต้องการปฏิบัติตามการรองรับนี้ ระบบจะรวม JavaScript ฝั่งไคลเอ็นต์ของแอปไว้
ในแท็ก <script /> และรวม CSS ไว้ในแท็ก <style /> ภายใน
ไฟล์ HTML
คุณเลือกดูทั้งโปรเจ็กต์ได้ใน GitHub
ต่อไปนี้คือภาพรวมของแต่ละไฟล์
Consts.gsกำหนดค่าคงที่ที่ไฟล์โค้ดอื่นๆ อ้างอิง รวมถึงรหัสโปรเจ็กต์ Cloud, รหัสตำแหน่ง Vertex AI และรหัสคำสั่ง Slash สำหรับปิดเหตุการณ์
ดูรหัส
Consts.gsChatApp.gsจัดการเหตุการณ์การโต้ตอบในแชท ซึ่งรวมถึง ข้อความ การคลิกการ์ด คำสั่ง Slash และกล่องโต้ตอบ ตอบสนองต่อคำสั่งเครื่องหมายทับ
/closeIncidentโดยเปิดกล่องโต้ตอบเพื่อรวบรวมรายละเอียดการแก้ไข เหตุการณ์ อ่านข้อความในพื้นที่โดยเรียกใช้เมธอดspaces.messages.listใน Chat API รับรหัสผู้ใช้โดยใช้บริการไดเรกทอรี Admin SDK ใน Apps Scriptดูรหัส
ChatApp.gsChatSpaceCreator.gsรับข้อมูลแบบฟอร์มที่ผู้ใช้ป้อนในหน้าเว็บการเริ่มต้นเหตุการณ์ และใช้ข้อมูลดังกล่าวเพื่อตั้งค่าพื้นที่ Chat โดยการสร้างและป้อนข้อมูล จากนั้นโพสต์ข้อความเกี่ยวกับ เหตุการณ์
ดูรหัส
ChatSpaceCreator.gsDocsApi.gsเรียกใช้ Google เอกสาร API เพื่อสร้างเอกสาร Google เอกสารใน Google ไดรฟ์ของผู้ใช้ และเขียนสรุปข้อมูลเหตุการณ์ที่สร้างใน
VertexAiApi.gsลงในเอกสารดูรหัส
DocsApi.gsVertexAiApi.gsสรุปการสนทนาในพื้นที่ Chat โดยใช้ Vertex AI ระบบจะโพสต์ข้อมูลสรุปนี้ในเอกสารที่สร้างขึ้นเป็นพิเศษ ใน
DocsAPI.gsดูรหัส
VertexAiApi.gsWebController.gsแสดงเว็บไซต์การเริ่มต้นเหตุการณ์
ดูรหัส
WebController.gsIndex.htmlHTML ที่ประกอบเป็นเว็บไซต์การเริ่มต้นเหตุการณ์
ดูรหัส
Index.htmlJavaScript.htmlจัดการลักษณะการทำงานของแบบฟอร์ม รวมถึงการส่ง ข้อผิดพลาด และการล้างข้อมูล สำหรับเว็บไซต์การเริ่มต้นเหตุการณ์ โดยจะรวมไว้ ใน
Index.htmlโดยฟังก์ชันincludeที่กำหนดเองในWebController.gsดูรหัส
JavaScript.htmlStylesheet.htmlCSS สำหรับเว็บไซต์การเริ่มต้นเหตุการณ์ โดยจะรวมไว้ใน
Index.htmlด้วยฟังก์ชันincludeที่กำหนดเองในWebController.gsดูรหัส
Stylesheet.html
ค้นหาหมายเลขและรหัสโปรเจ็กต์ Cloud
ไปที่โปรเจ็กต์ Cloud ใน Google Cloud Console
คลิกการตั้งค่าและยูทิลิตี > การตั้งค่าโปรเจ็กต์
จดค่าในช่องหมายเลขโปรเจ็กต์และรหัสโปรเจ็กต์ คุณ ใช้ได้ในส่วนต่อไปนี้
สร้างโปรเจ็กต์ Apps Script
วิธีสร้างโปรเจ็กต์ Apps Script และเชื่อมต่อกับโปรเจ็กต์ Cloud
- คลิกปุ่มต่อไปนี้เพื่อเปิดโปรเจ็กต์ Apps Script ตอบกลับเหตุการณ์ด้วย Google Chat
เปิดโปรเจ็กต์ - คลิก ภาพรวม
- ในหน้าภาพรวม ให้คลิก
 ทำสำเนา
 ตั้งชื่อสำเนาโปรเจ็กต์ Apps Script โดยทำดังนี้
คลิกสำเนาของตอบสนองต่อเหตุการณ์ด้วย Google Chat
ในชื่อโปรเจ็กต์ ให้พิมพ์
Incident Management Chat appคลิกเปลี่ยนชื่อ
ในสำเนาโปรเจ็กต์ Apps Script ให้ไปที่
Consts.gsไฟล์ แล้วแทนที่YOUR_PROJECT_IDด้วยรหัสของโปรเจ็กต์ Cloud
ตั้งค่าโปรเจ็กต์ Cloud ของโปรเจ็กต์ Apps Script
- ในโปรเจ็กต์ Apps Script ให้
คลิก
 การตั้งค่าโปรเจ็กต์
 - ในส่วนโปรเจ็กต์ Google Cloud Platform (GCP) ให้คลิกเปลี่ยนโปรเจ็กต์
- ในหมายเลขโปรเจ็กต์ GCP ให้วางหมายเลขโปรเจ็กต์ของโปรเจ็กต์ Cloud
- คลิกตั้งค่าโปรเจ็กต์ ตอนนี้โปรเจ็กต์ Cloud และโปรเจ็กต์ Apps Script เชื่อมต่อกันแล้ว
สร้างการทำให้ใช้งานได้ของ Apps Script
เมื่อมีโค้ดทั้งหมดแล้ว ให้ทำให้โปรเจ็กต์ Apps Script ใช้งานได้ คุณใช้รหัสการติดตั้งใช้งานเมื่อกำหนดค่า แอป Chat ใน Google Cloud
เปิดโปรเจ็กต์ของแอปการตอบสนองต่อเหตุการณ์ใน Apps Script
คลิกทำให้ใช้งานได้ > การทำให้ใช้งานได้ใหม่
หากยังไม่ได้เลือกส่วนเสริมและเว็บแอป ให้คลิกประเภทการติดตั้งใช้งาน
ข้างเลือกประเภท แล้วเลือกส่วนเสริมและเว็บแอปในคำอธิบาย ให้ป้อนคำอธิบายสำหรับเวอร์ชันนี้ เช่น
Complete version of incident management appในส่วนดำเนินการในฐานะ ให้เลือกผู้ใช้ที่เข้าถึงเว็บแอป
ในส่วนใครมีสิทธิ์เข้าถึง ให้เลือกทุกคนภายในองค์กร Workspace ของคุณ โดยที่ "องค์กร Workspace ของคุณ" คือชื่อของ องค์กร Google Workspace ของคุณ
คลิกทำให้ใช้งานได้ Apps Script จะรายงานการติดตั้งใช้งานที่สำเร็จ และระบุรหัสการติดตั้งใช้งานและ URL สำหรับหน้าเว็บเริ่มต้นของเหตุการณ์
จด URL ของเว็บแอปไว้เพื่อเข้าชมในภายหลังเมื่อคุณเริ่มเหตุการณ์ คัดลอกรหัสการติดตั้งใช้งาน คุณใช้รหัสนี้ขณะกําหนดค่าแอป Chat ในคอนโซล Google Cloud
คลิกเสร็จสิ้น
กำหนดค่าแอป Chat ใน Google Cloud Console
ส่วนนี้จะแสดงวิธีกำหนดค่า Google Chat API ในคอนโซล Google Cloud พร้อมข้อมูลเกี่ยวกับแอป Chat รวมถึง รหัสของการติดตั้งใช้งานที่คุณเพิ่งสร้างจากโปรเจ็กต์ Apps Script
ในคอนโซล Google Cloud ให้คลิกเมนู > ผลิตภัณฑ์เพิ่มเติม > Google Workspace > คลังผลิตภัณฑ์ > Google Chat API > จัดการ > การกำหนดค่า
ล้างสร้างแอป Chat นี้เป็นส่วนเสริมของ Google Workspace กล่องโต้ตอบจะเปิดขึ้นเพื่อขอให้คุณยืนยัน คลิกปิดใช้ในกล่องโต้ตอบ
ในส่วนชื่อแอป ให้พิมพ์
Incident Managementใน URL ของรูปโปรไฟล์ ให้พิมพ์
https://developers.google.com/chat/images/quickstart-app-avatar.pngในคำอธิบาย ให้พิมพ์
Responds to incidents.คลิกปุ่มเปิด/ปิดเปิดใช้ฟีเจอร์แบบอินเทอร์แอกทีฟไปที่ตำแหน่งเปิด
ในส่วนฟังก์ชันการทำงาน ให้เลือกเข้าร่วมพื้นที่ทำงานและการสนทนากลุ่ม
เลือก Apps Script ในส่วนการตั้งค่าการเชื่อมต่อ
ในรหัสการทำให้ใช้งานได้ ให้วางรหัสการทำให้ใช้งานได้ของ Apps Script ที่คัดลอกไว้ก่อนหน้านี้จากการทำให้ใช้งานได้ของโปรเจ็กต์ Apps Script
ลงทะเบียนคำสั่งเครื่องหมายทับที่แอป Chat ที่ใช้งานได้เต็มรูปแบบใช้โดยทำดังนี้
ในส่วนคำสั่งเครื่องหมายทับ ให้คลิกเพิ่มคำสั่งเครื่องหมายทับ
ในส่วนชื่อ ให้พิมพ์
Close incidentในรหัสคำสั่ง ให้พิมพ์
1ในคำอธิบาย ให้พิมพ์
Closes the incident being discussed in the space.ในส่วนประเภทคำสั่ง ให้เลือกคำสั่ง Slash
ในชื่อคำสั่งเครื่องหมายทับ ให้พิมพ์
/closeIncidentเลือกเปิดกล่องโต้ตอบ
คลิกเสร็จสิ้น ระบบจะลงทะเบียนและแสดงรายการคำสั่ง Slash
ในส่วนระดับการเข้าถึง ให้เลือก ทำให้แอป Chat นี้พร้อมใช้งานสำหรับบุคคลและกลุ่มที่เฉพาะเจาะจงในโดเมน Workspace ของคุณ แล้วป้อนอีเมล
ในส่วนบันทึก ให้เลือกบันทึกข้อผิดพลาดไปยังการบันทึก
คลิกบันทึก ข้อความว่าบันทึกการกำหนดค่าแล้วจะปรากฏขึ้น ซึ่งหมายความว่าแอป พร้อมทดสอบแล้ว
ทดสอบแอป Chat
หากต้องการทดสอบแอป Chat สำหรับการจัดการเหตุการณ์ ให้เริ่มเหตุการณ์จากหน้าเว็บและตรวจสอบว่าแอป Chat ทำงานตามที่คาดไว้หรือไม่ โดยทำดังนี้
ไปที่ URL ของเว็บแอปที่นำ Apps Script ไปใช้งาน
เมื่อ Apps Script ขอสิทธิ์เข้าถึงข้อมูล ให้คลิกตรวจสอบสิทธิ์ ลงชื่อเข้าใช้ด้วยบัญชี Google ที่เหมาะสม ในโดเมน Google Workspace แล้วคลิกอนุญาต
หน้าเว็บการเริ่มต้นเหตุการณ์จะเปิดขึ้น ป้อนข้อมูลการทดสอบ
- ในชื่อเหตุการณ์ ให้พิมพ์
The First Incident - ไม่บังคับ: ในผู้ตอบสนองต่อเหตุการณ์ ให้ป้อนอีเมลของ ผู้ตอบสนองต่อเหตุการณ์คนอื่นๆ โดยบุคคลดังกล่าวต้องเป็นผู้ใช้ที่มี บัญชี Google Chat ในองค์กร Google Workspace หรือ การสร้างพื้นที่ทำงานจะล้มเหลว โปรดอย่าป้อนอีเมลของคุณเองเนื่องจากระบบจะรวมอีเมลของคุณโดยอัตโนมัติ
- ในข้อความเริ่มต้น ให้พิมพ์
Testing the incident management Chat app.
- ในชื่อเหตุการณ์ ให้พิมพ์
คลิกสร้างพื้นที่ทำงานใน Chat ข้อความ
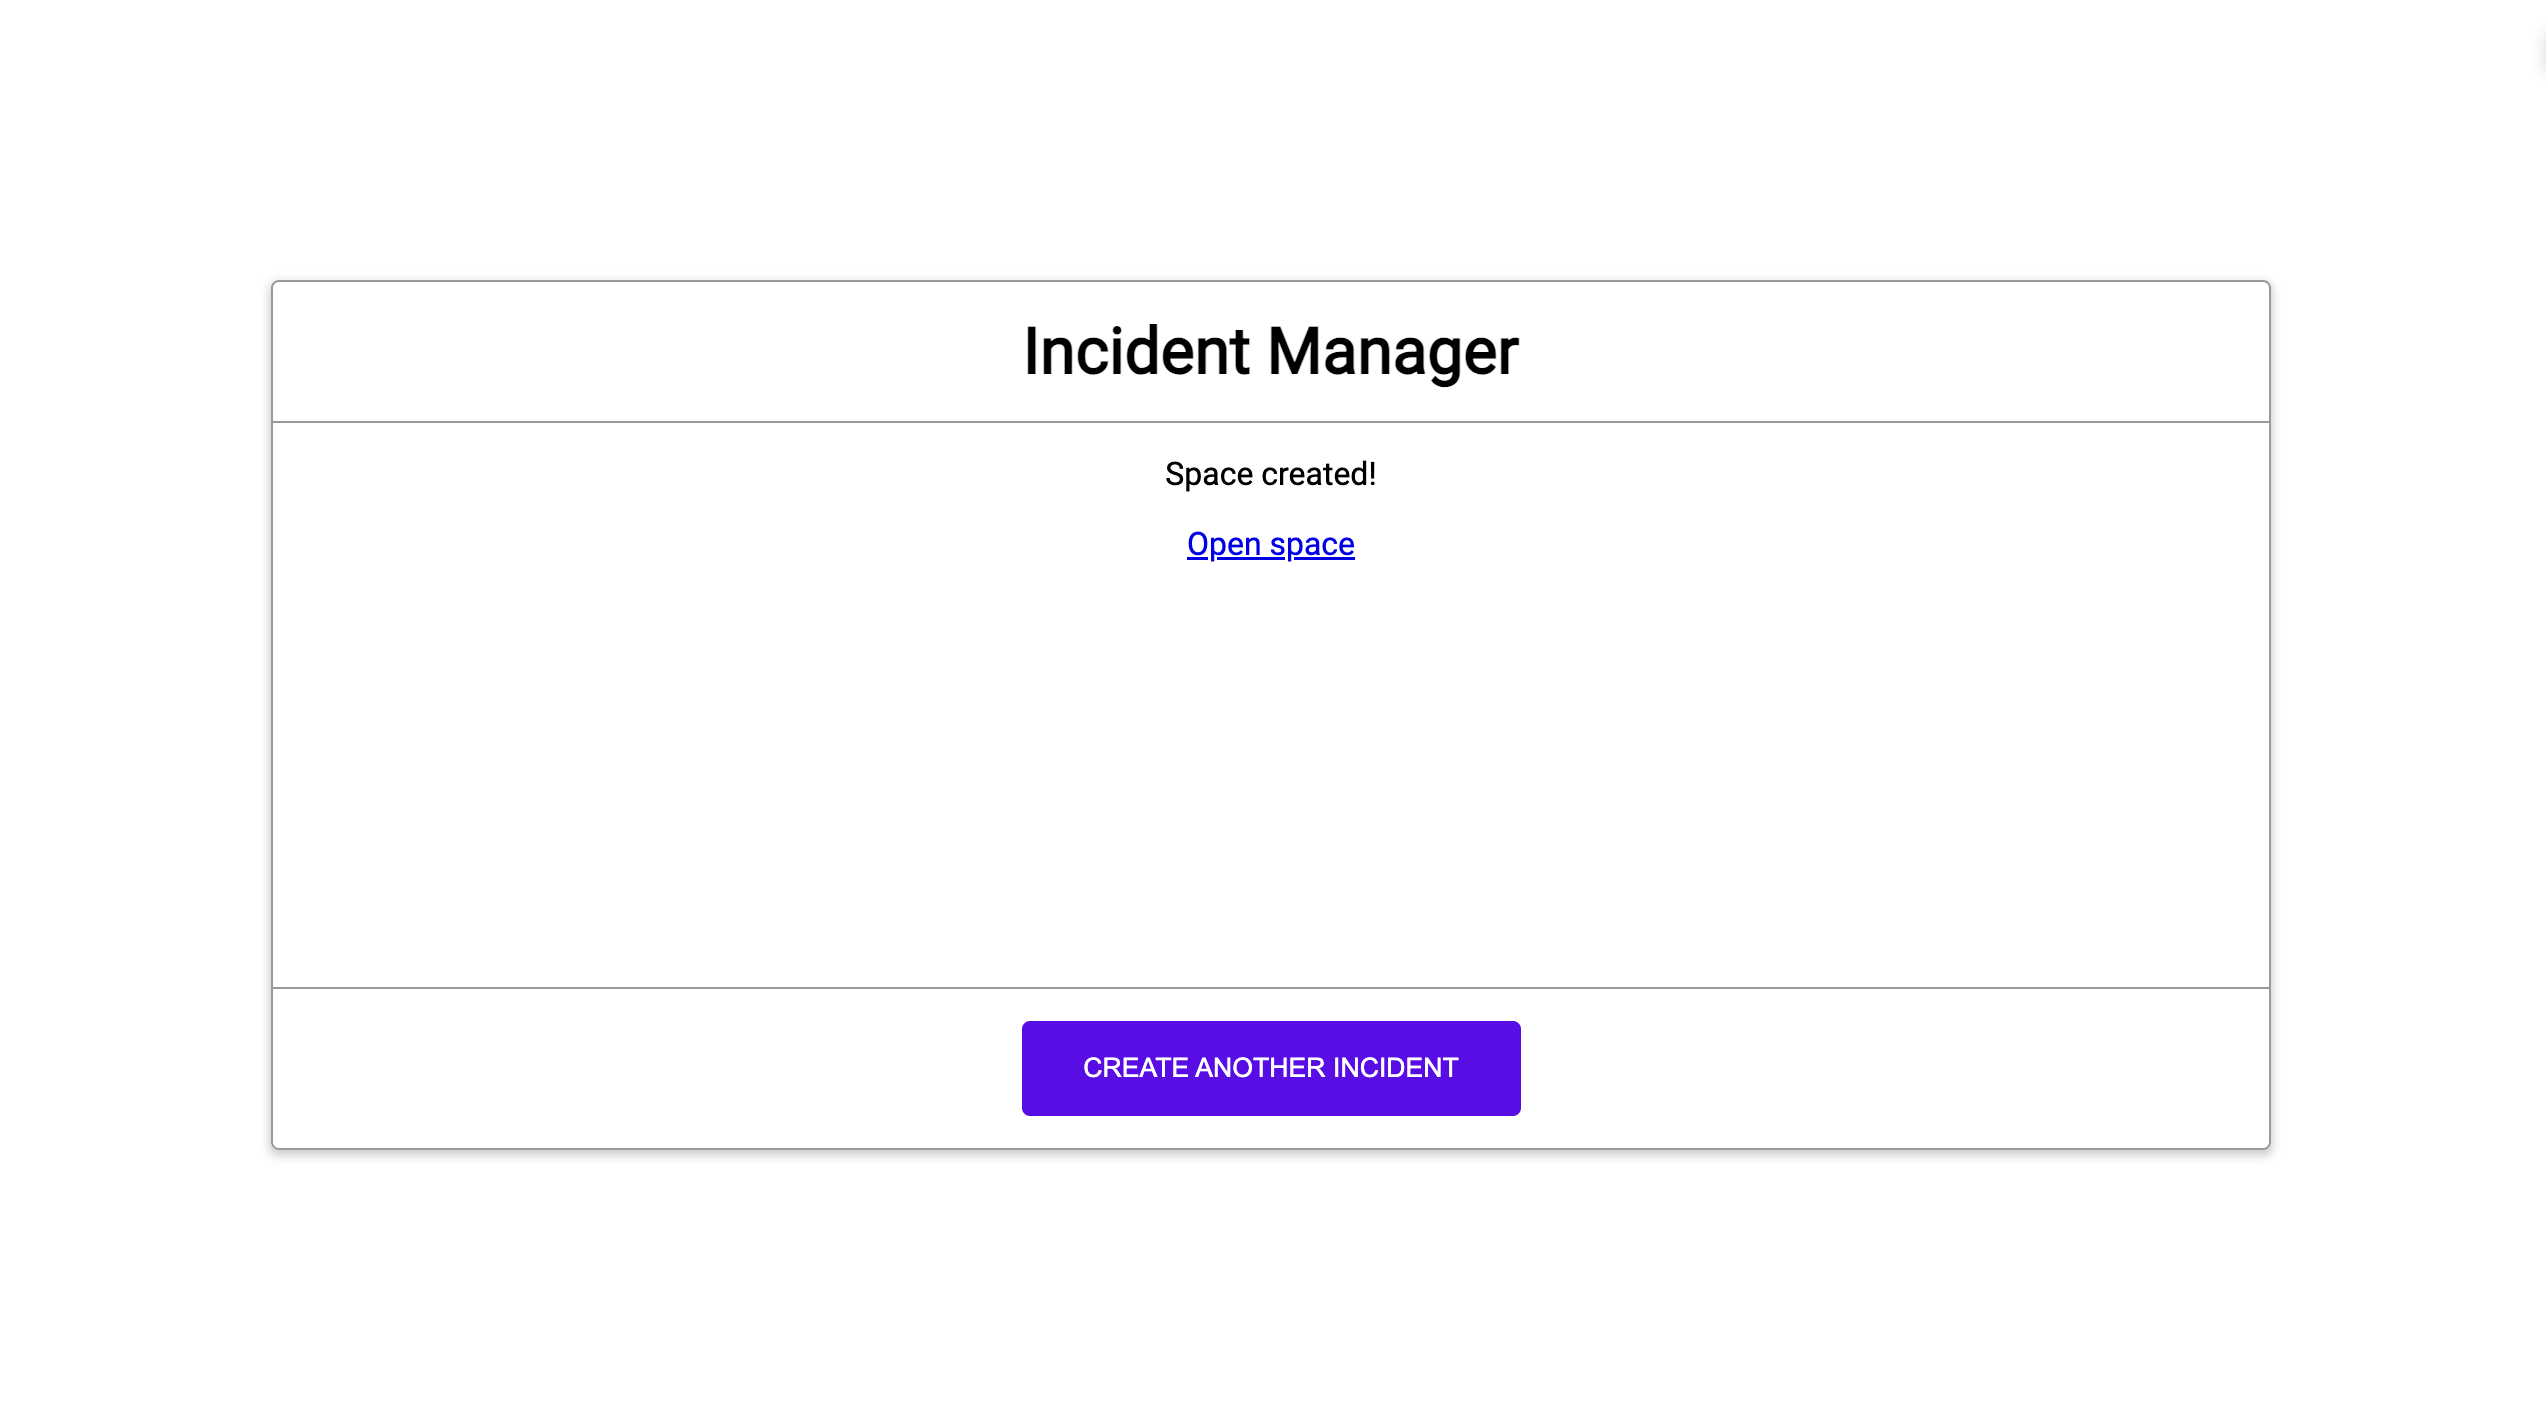
creating spaceจะปรากฏขึ้นหลังจากสร้างพื้นที่ทำงานแล้ว
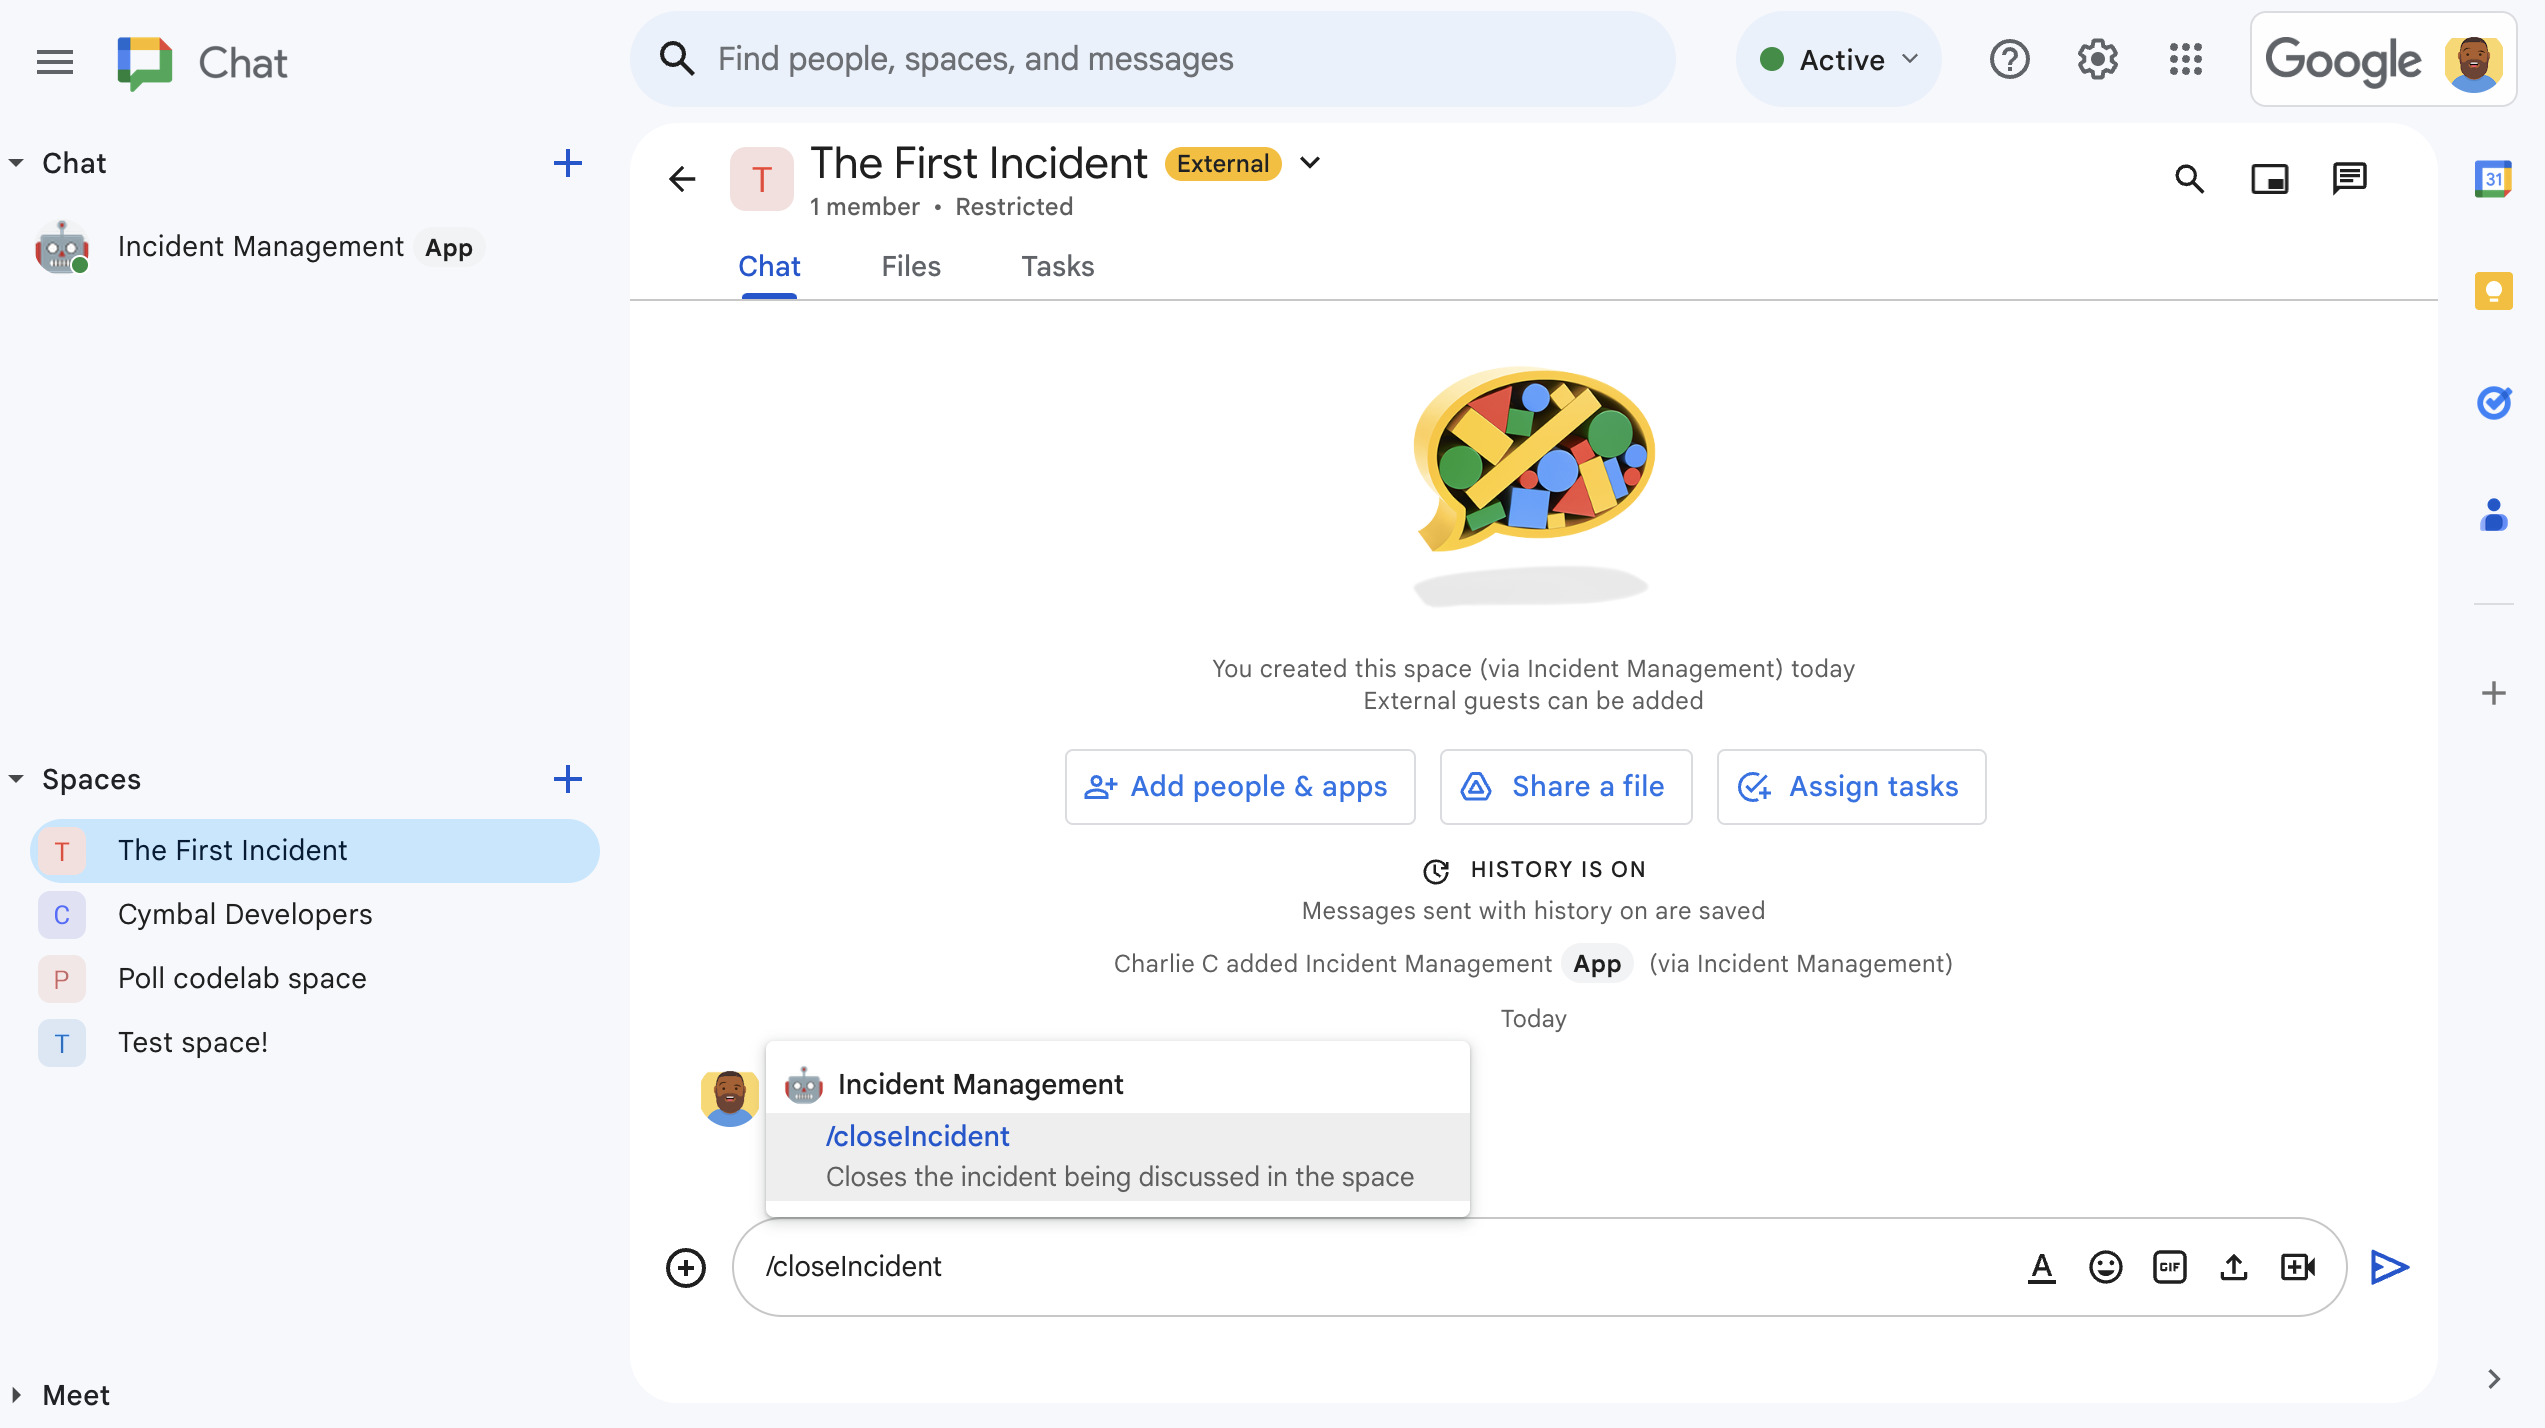
Space created!ข้อความจะปรากฏขึ้น คลิกเปิดพื้นที่ทำงาน ซึ่งจะเปิดพื้นที่ทำงานใน Chat ในแท็บใหม่คุณและผู้ตอบสนองต่อเหตุการณ์คนอื่นๆ สามารถส่งข้อความในพื้นที่ทำงานได้ (ไม่บังคับ) แอปจะสรุปข้อความเหล่านี้โดยใช้ Vertex AI และแชร์เอกสารสรุป
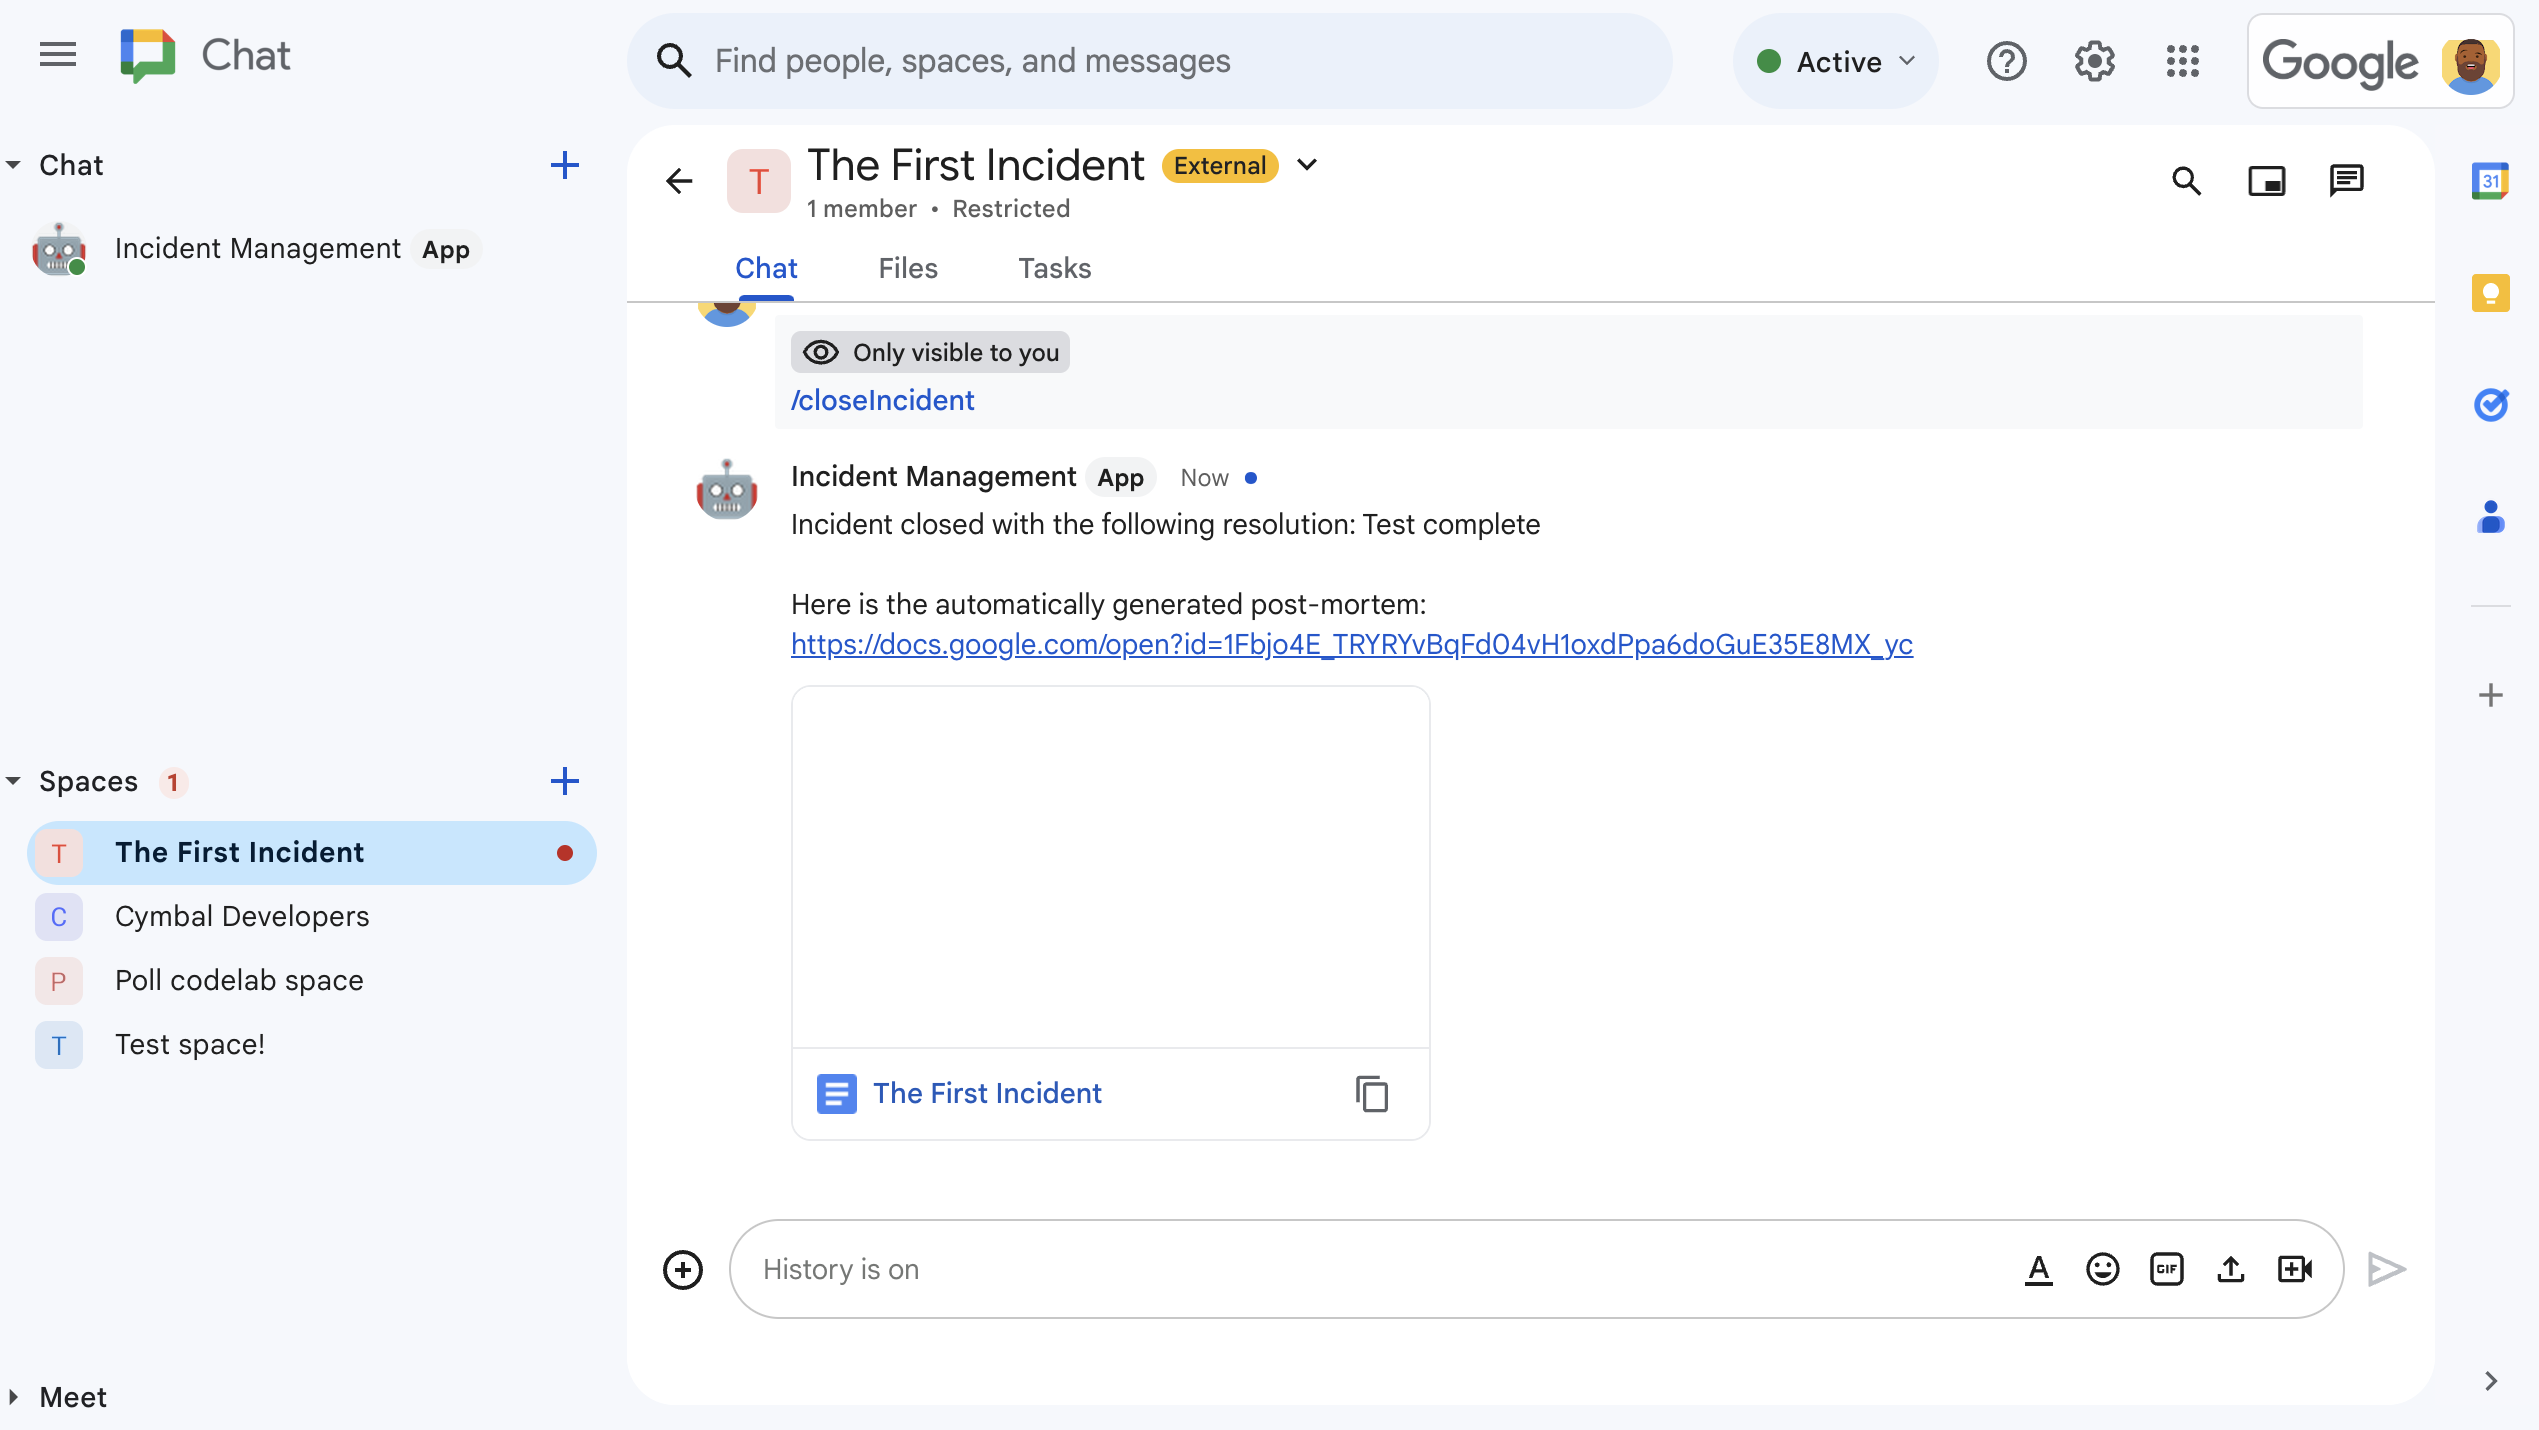
หากต้องการสิ้นสุดการตอบสนองต่อเหตุการณ์และเริ่มกระบวนการแก้ไข ให้พิมพ์
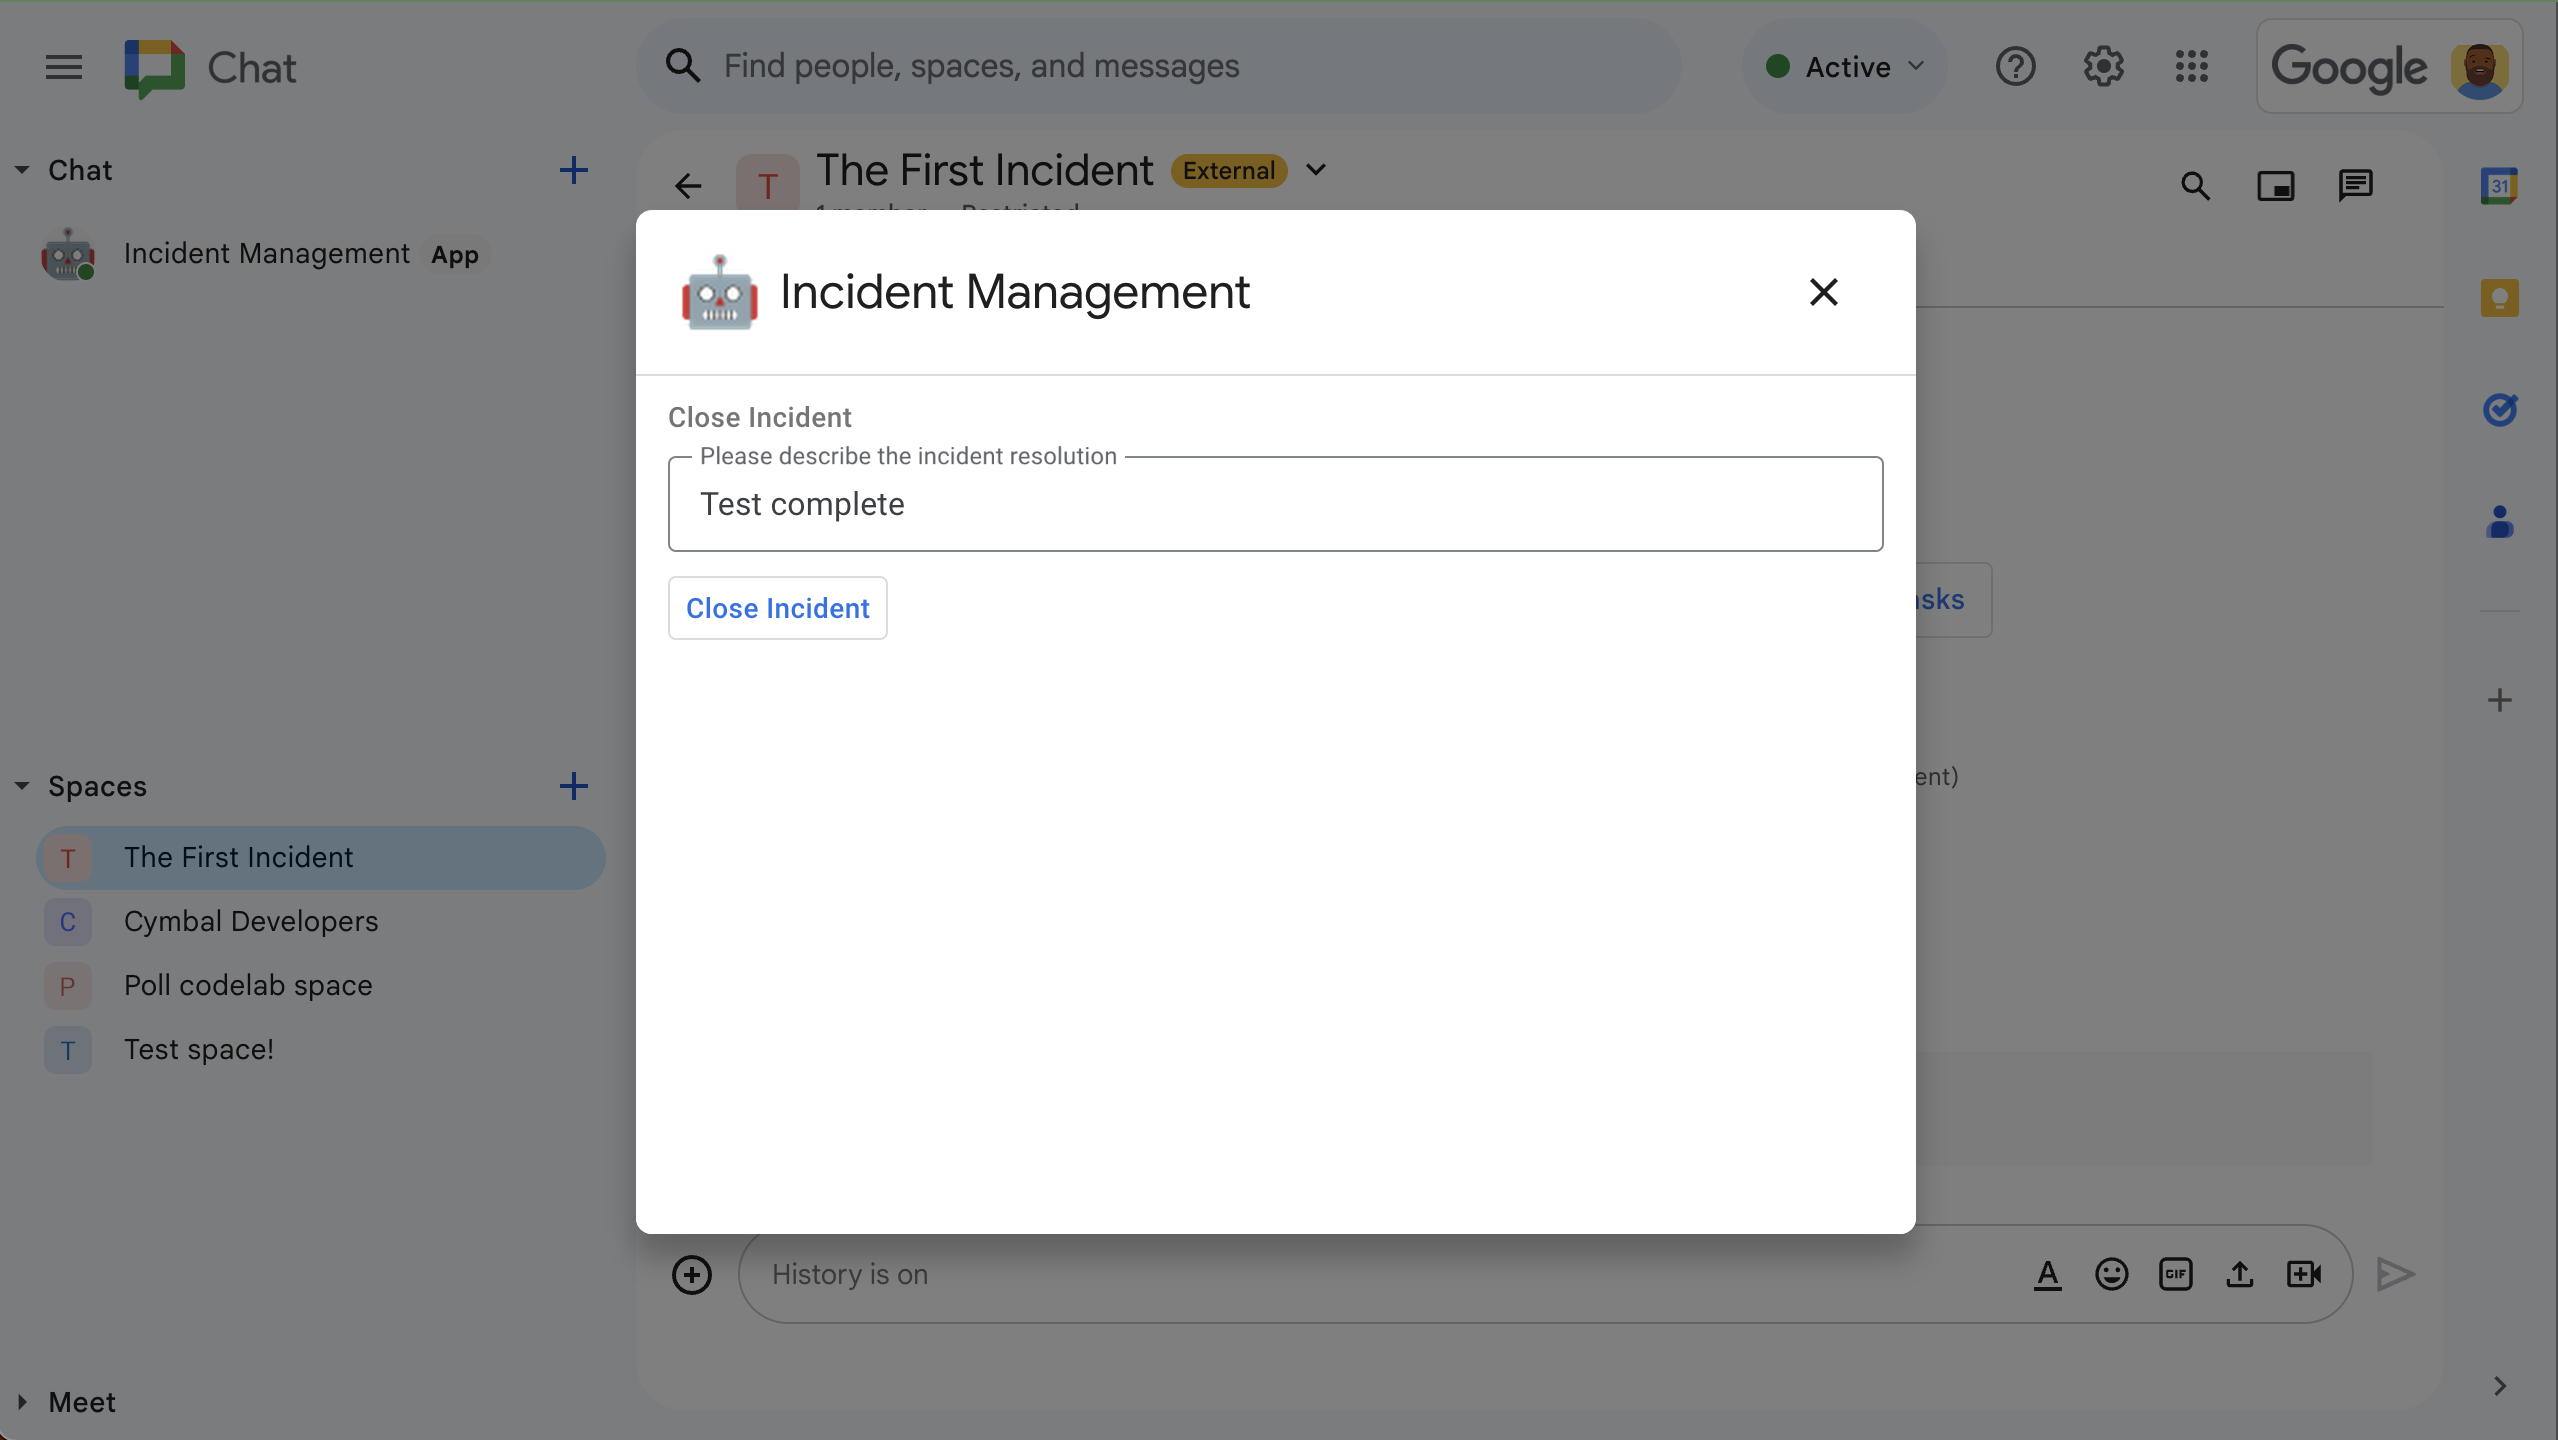
/closeIncidentในแชทสเปซ กล่องโต้ตอบการจัดการเหตุการณ์ จะเปิดขึ้นในปิดเหตุการณ์ ให้ป้อนคำอธิบายสำหรับการแก้ไขเหตุการณ์ เช่น
Test completeคลิกปิดเหตุการณ์
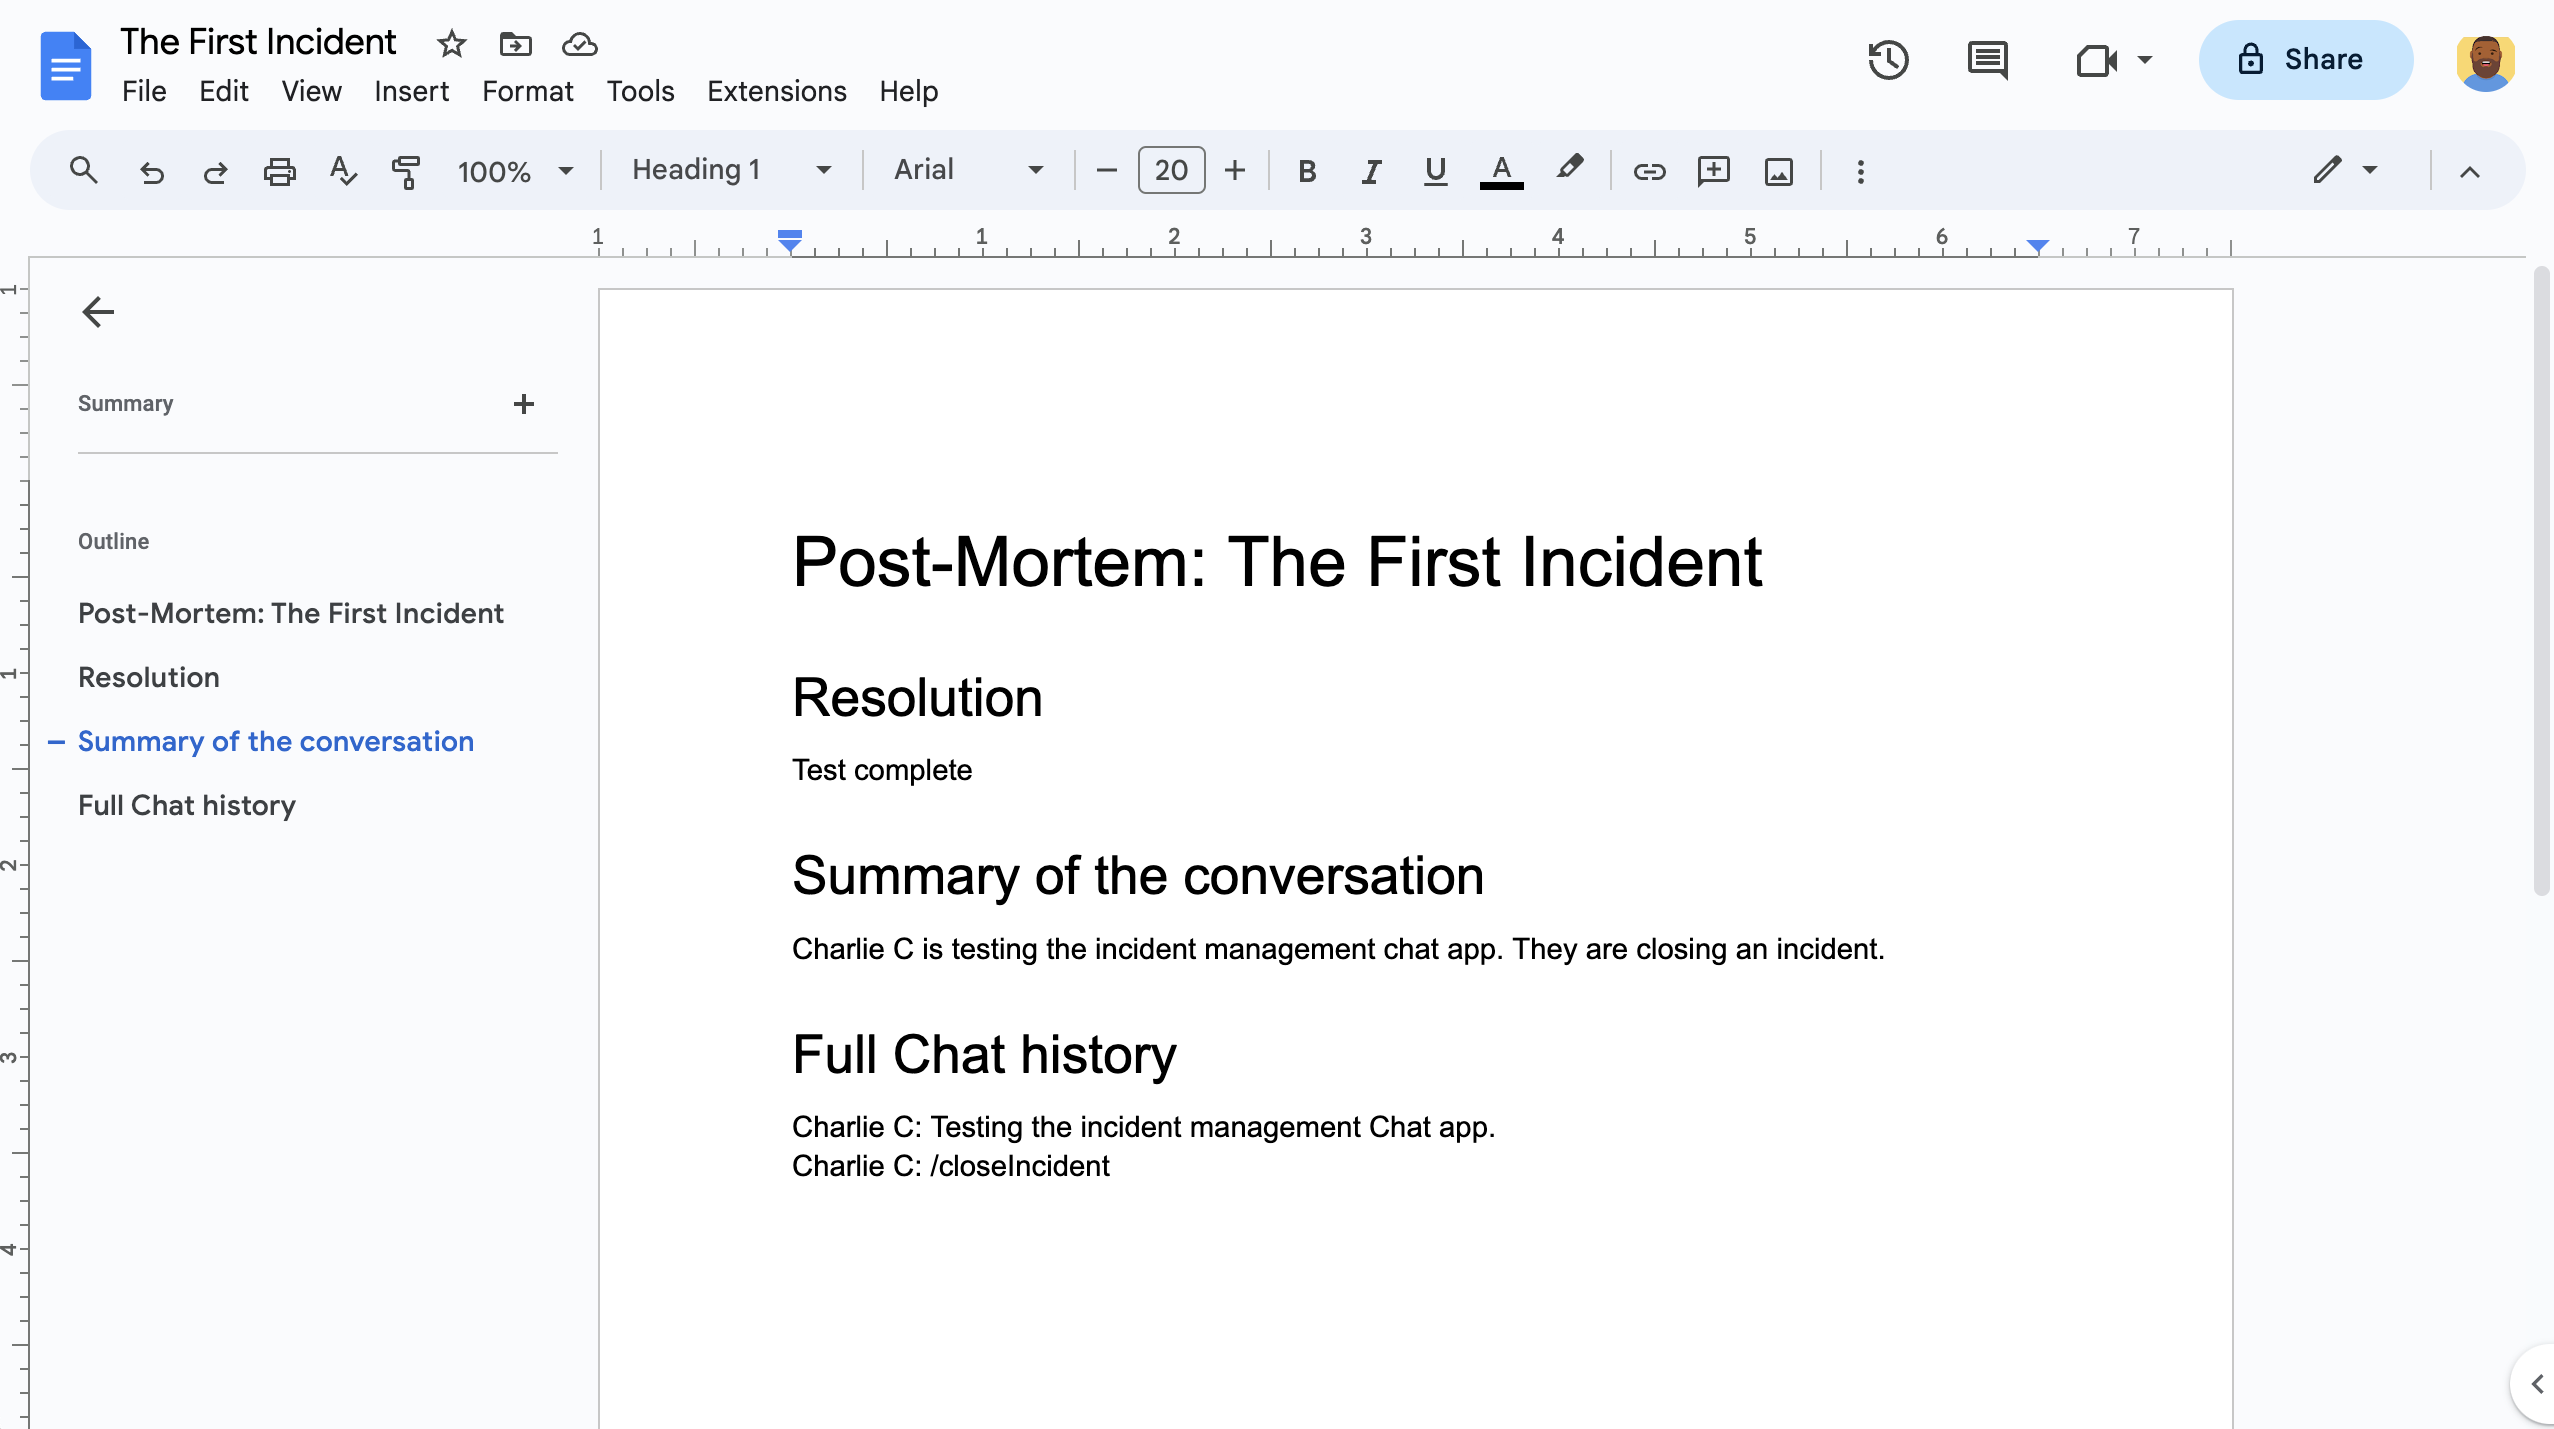
แอปการจัดการเหตุการณ์จะแสดงข้อความในพื้นที่ สรุปข้อความเหล่านั้น ด้วย Vertex AI วางสรุปในเอกสาร Google เอกสาร และแชร์ เอกสารในพื้นที่
ล้างข้อมูล
เราขอแนะนำให้คุณลบโปรเจ็กต์ Cloud เพื่อหลีกเลี่ยงการเรียกเก็บเงินจากบัญชี Google Cloud สำหรับทรัพยากรที่ใช้ในบทแนะนำนี้
- ใน Google Cloud Console ให้ไปที่หน้าจัดการทรัพยากร คลิก เมนู > IAM และผู้ดูแลระบบ > จัดการทรัพยากร
- ในรายการโปรเจ็กต์ ให้เลือกโปรเจ็กต์ที่ต้องการลบ แล้วคลิก ลบ
- ในกล่องโต้ตอบ ให้พิมพ์รหัสโปรเจ็กต์ แล้วคลิกปิดเพื่อลบ โปรเจ็กต์
หัวข้อที่เกี่ยวข้อง
- ตอบคำถามตามการสนทนาในแชทด้วยแอป Gemini AI Chat
- จัดการโปรเจ็กต์ด้วย Google Chat, Vertex AI และ Firestore
- แอปการตอบสนองต่อเหตุการณ์จะตรวจสอบสิทธิ์ด้วยข้อมูลเข้าสู่ระบบของผู้ใช้เพื่อเรียกใช้ API
และเรียกใช้บริการของ Google Cloud เช่น Chat API และ Vertex AI API
ซึ่งหมายความว่าผู้ใช้ที่เริ่มต้นเหตุการณ์ต้องมีสิทธิ์เข้าถึงบริการเหล่านี้
หากต้องการทำให้แอปมีประสิทธิภาพมากขึ้น ให้ลองเรียกใช้ Vertex AI API
ด้วยบัญชีบริการแทนข้อมูลเข้าสู่ระบบของผู้ใช้ที่เรียกใช้
/closeIncidentคำสั่ง Slash หากต้องการความช่วยเหลือในการกำหนดค่าบัญชีบริการ สำหรับ Vertex AI API โปรดดู ใช้บัญชีบริการที่กำหนดเอง