

Google 文档 API 的一个实用应用是将一个或多个数据来源中的信息合并到文档中。
本页简要介绍了如何从外部来源获取数据并将其插入到现有模板文档中。
模板是一种特殊类型的文档,其中包含从该模板创建的所有文档的相同固定文本,以及可放置其他动态文本的指定占位符。例如,合同模板可能包含固定内容,以及接收者的姓名、地址和其他详细信息的占位符。然后,您的应用可以将客户特定数据合并到模板中,以创建最终文档。
这种方法之所以有用,有以下几个原因:
设计人员可以使用 Google 文档编辑器轻松微调文档的设计。这比在应用中调整参数以设置呈现的布局要容易得多。
将内容与呈现方式分开是一种众所周知的设计原则,具有许多优势。
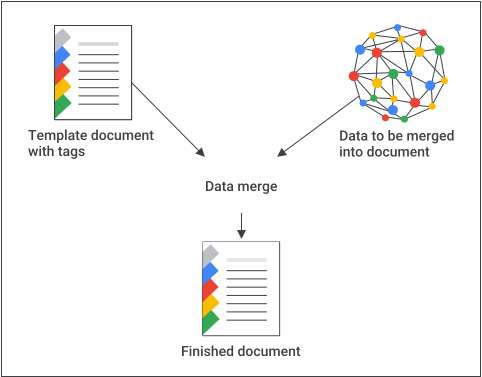
基本方法
以下示例展示了如何使用文档 API 将数据合并到文档中:
使用占位符内容创建文档,以帮助您进行设计和格式设置。您要替换的任何文本格式都会保留。
对于要插入的每个元素,请将占位符内容替换为标记。请务必使用不太可能正常出现的字符串。例如, 可能是一个不错的标记。
{{account-holder-name}}在代码中,使用 Google Drive API 制作文档副本。
在代码中,使用文档 API 的
batchUpdate()方法,并使用文档名称,并添加ReplaceAllTextRequest。
文档 ID 引用文档,并且可以从网址中派生
https://docs.google.com/document/d/DOCUMENT_ID/edit
示例
请看以下示例,该示例使用真实值替换模板所有标签页中的 2 个字段,以生成最终文档。
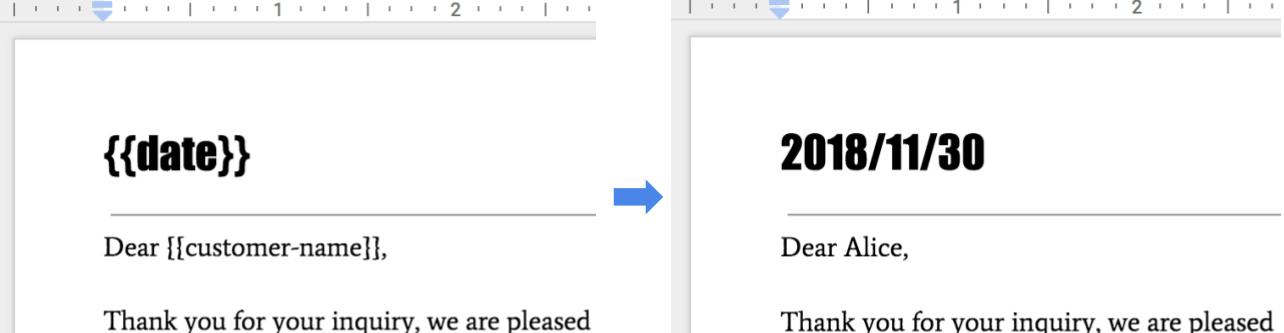
如需执行此合并,您可以使用以下代码。
Java
String customerName = "Alice"; DateTimeFormatter formatter = DateTimeFormatter.ofPattern("yyyy/MM/dd"); String date = formatter.format(LocalDate.now()); Listrequests = new ArrayList<>(); // One option for replacing all text is to specify all tab IDs. requests.add(new Request() .setReplaceAllText(new ReplaceAllTextRequest() .setContainsText(new SubstringMatchCriteria() .setText("{{customer-name}}") .setMatchCase(true)) .setReplaceText(customerName) .setTabsCriteria(new TabsCriteria() .addTabIds(TAB_ID_1) .addTabIds(TAB_ID_2) .addTabIds(TAB_ID_3)))); // Another option is to omit TabsCriteria if you are replacing across all tabs. requests.add(new Request() .setReplaceAllText(new ReplaceAllTextRequest() .setContainsText(new SubstringMatchCriteria() .setText("{{date}}") .setMatchCase(true)) .setReplaceText(date))); BatchUpdateDocumentRequest body = new BatchUpdateDocumentRequest(); service.documents().batchUpdate(DOCUMENT_ID, body.setRequests(requests)).execute();
Node.js
  let customerName = 'Alice';
  let date = yyyymmdd()
  let requests = [
    // One option for replacing all text is to specify all tab IDs.
    {
      replaceAllText: {
        containsText: {
          text: '{{customer-name}}',
          matchCase: true,
        },
        replaceText: customerName,
        tabsCriteria: {
          tabIds: [TAB_ID_1, TAB_ID_2, TAB_ID_3],
        },
      },
    },
    // Another option is to omit TabsCriteria if you are replacing across all tabs.
    {
      replaceAllText: {
        containsText: {
          text: '{{date}}',
          matchCase: true,
        },
        replaceText: date,
      },
    },
  ];

  google.options({auth: auth});
  google
      .discoverAPI(
          'https://docs.googleapis.com/$discovery/rest?version=v1&key={YOUR_API_KEY}')
      .then(function(docs) {
        docs.documents.batchUpdate(
            {
              documentId: '1yBx6HSnu_gbV2sk1nChJOFo_g3AizBhr-PpkyKAwcTg',
              resource: {
                requests,
              },
            },
            (err, {data}) => {
              if (err) return console.log('The API returned an error: ' + err);
              console.log(data);
            });
      });
Python
customer_name = 'Alice'
date = datetime.datetime.now().strftime("%y/%m/%d")

requests = [
        # One option for replacing all text is to specify all tab IDs.
        {
        'replaceAllText': {
            'containsText': {
                'text': '{{customer-name}}',
                'matchCase':  'true'
            },
            'replaceText': customer_name,
            'tabsCriteria': {
                'tabIds': [TAB_ID_1, TAB_ID_2, TAB_ID_3],
            },
        }},
        # Another option is to omit TabsCriteria if you are replacing across all tabs.
        {
        'replaceAllText': {
            'containsText': {
                'text': '{{date}}',
                'matchCase':  'true'
            },
            'replaceText': str(date),
        }
    }
]

result = service.documents().batchUpdate(
    documentId=DOCUMENT_ID, body={'requests': requests}).execute()
管理模板
对于应用定义和拥有的模板文档,请使用代表应用的专用账号创建模板。 服务账号 是一个不错的选择,可以避免 Google Workspace 政策限制共享带来的复杂问题。
从模板创建文档实例时,请始终使用最终用户凭据。这样,用户就可以完全掌控生成的文档,并避免与云端硬盘中每个用户的限制相关的扩缩问题。
如需使用服务账号创建模板,请使用应用凭据执行以下步骤:
- 使用文档 API 中的 documents.create 创建文档。
- 更新权限,以允许文档收件人使用 permissions.create 读取文档。
- 更新权限,以允许模板作者使用 permissions.create 写入文档。
- 根据需要修改模板。
如需创建文档实例,请使用用户凭据执行以下步骤:
- 使用 files.copy在 Drive API 中创建模板副本。
- 使用文档 API 中的 documents.batchUpdate 替换值。