
本教程将展示如何构建一个能实时响应突发事件的 Google Chat 扩展应用。在响应突发事件时,该应用会自动创建并填充一个 Chat 聊天室,通过消息、应用命令和对话框协助解决突发事件,并利用 AI 将突发事件响应过程总结成一份 Google 文档。
突发事件是指需要团队立即采取行动来解决的事件。事件示例包括:
- 在客户关系管理 (CRM) 平台中创建了时间敏感型支持请求,需要服务团队协作解决。
- 系统离线,提醒一组站点可靠性工程师 (SRE),以便他们共同努力使系统恢复在线。
- 发生高震级地震,应急人员需要协调应对措施。
在本教程中,当有人通过点击网页上的按钮报告突发事件时,系统会开始发送突发事件提醒。该网页会要求用户输入基本突发事件信息(标题、说明和响应者的电子邮件地址),从而模拟突发事件。
了解事件管理 Chat 应用的实际应用情况:
-
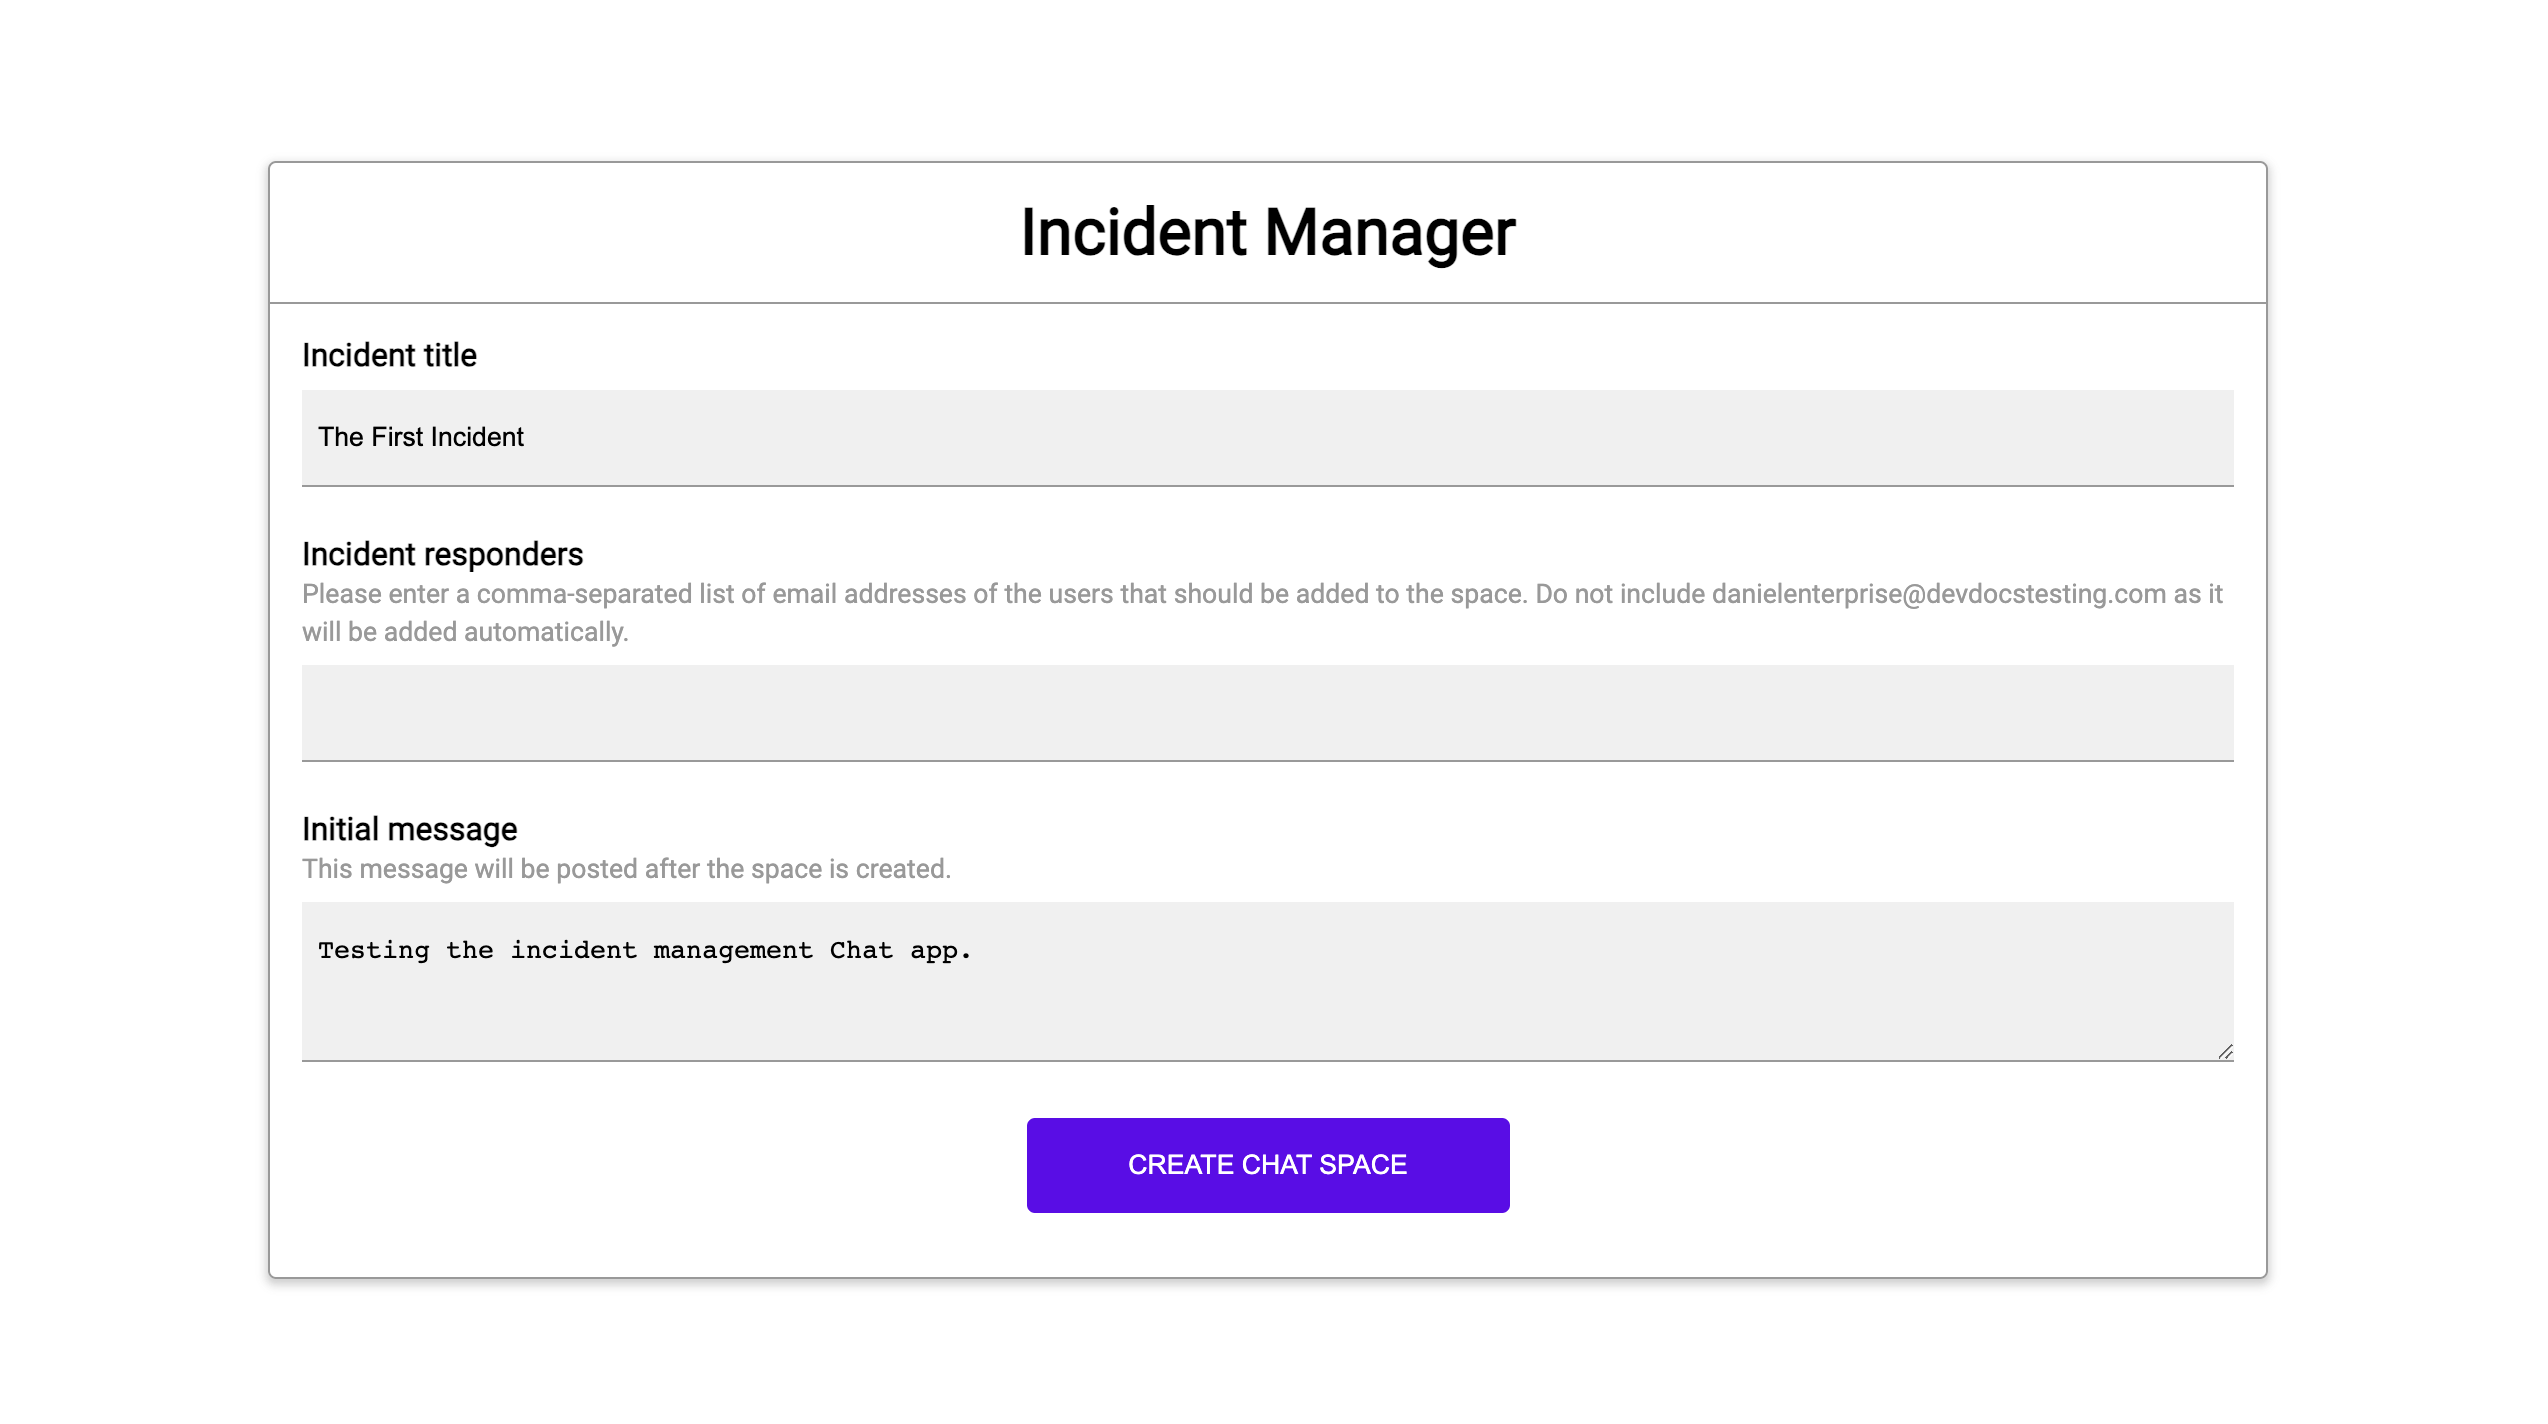
图 1. 用户可以报告事件的网站。 -
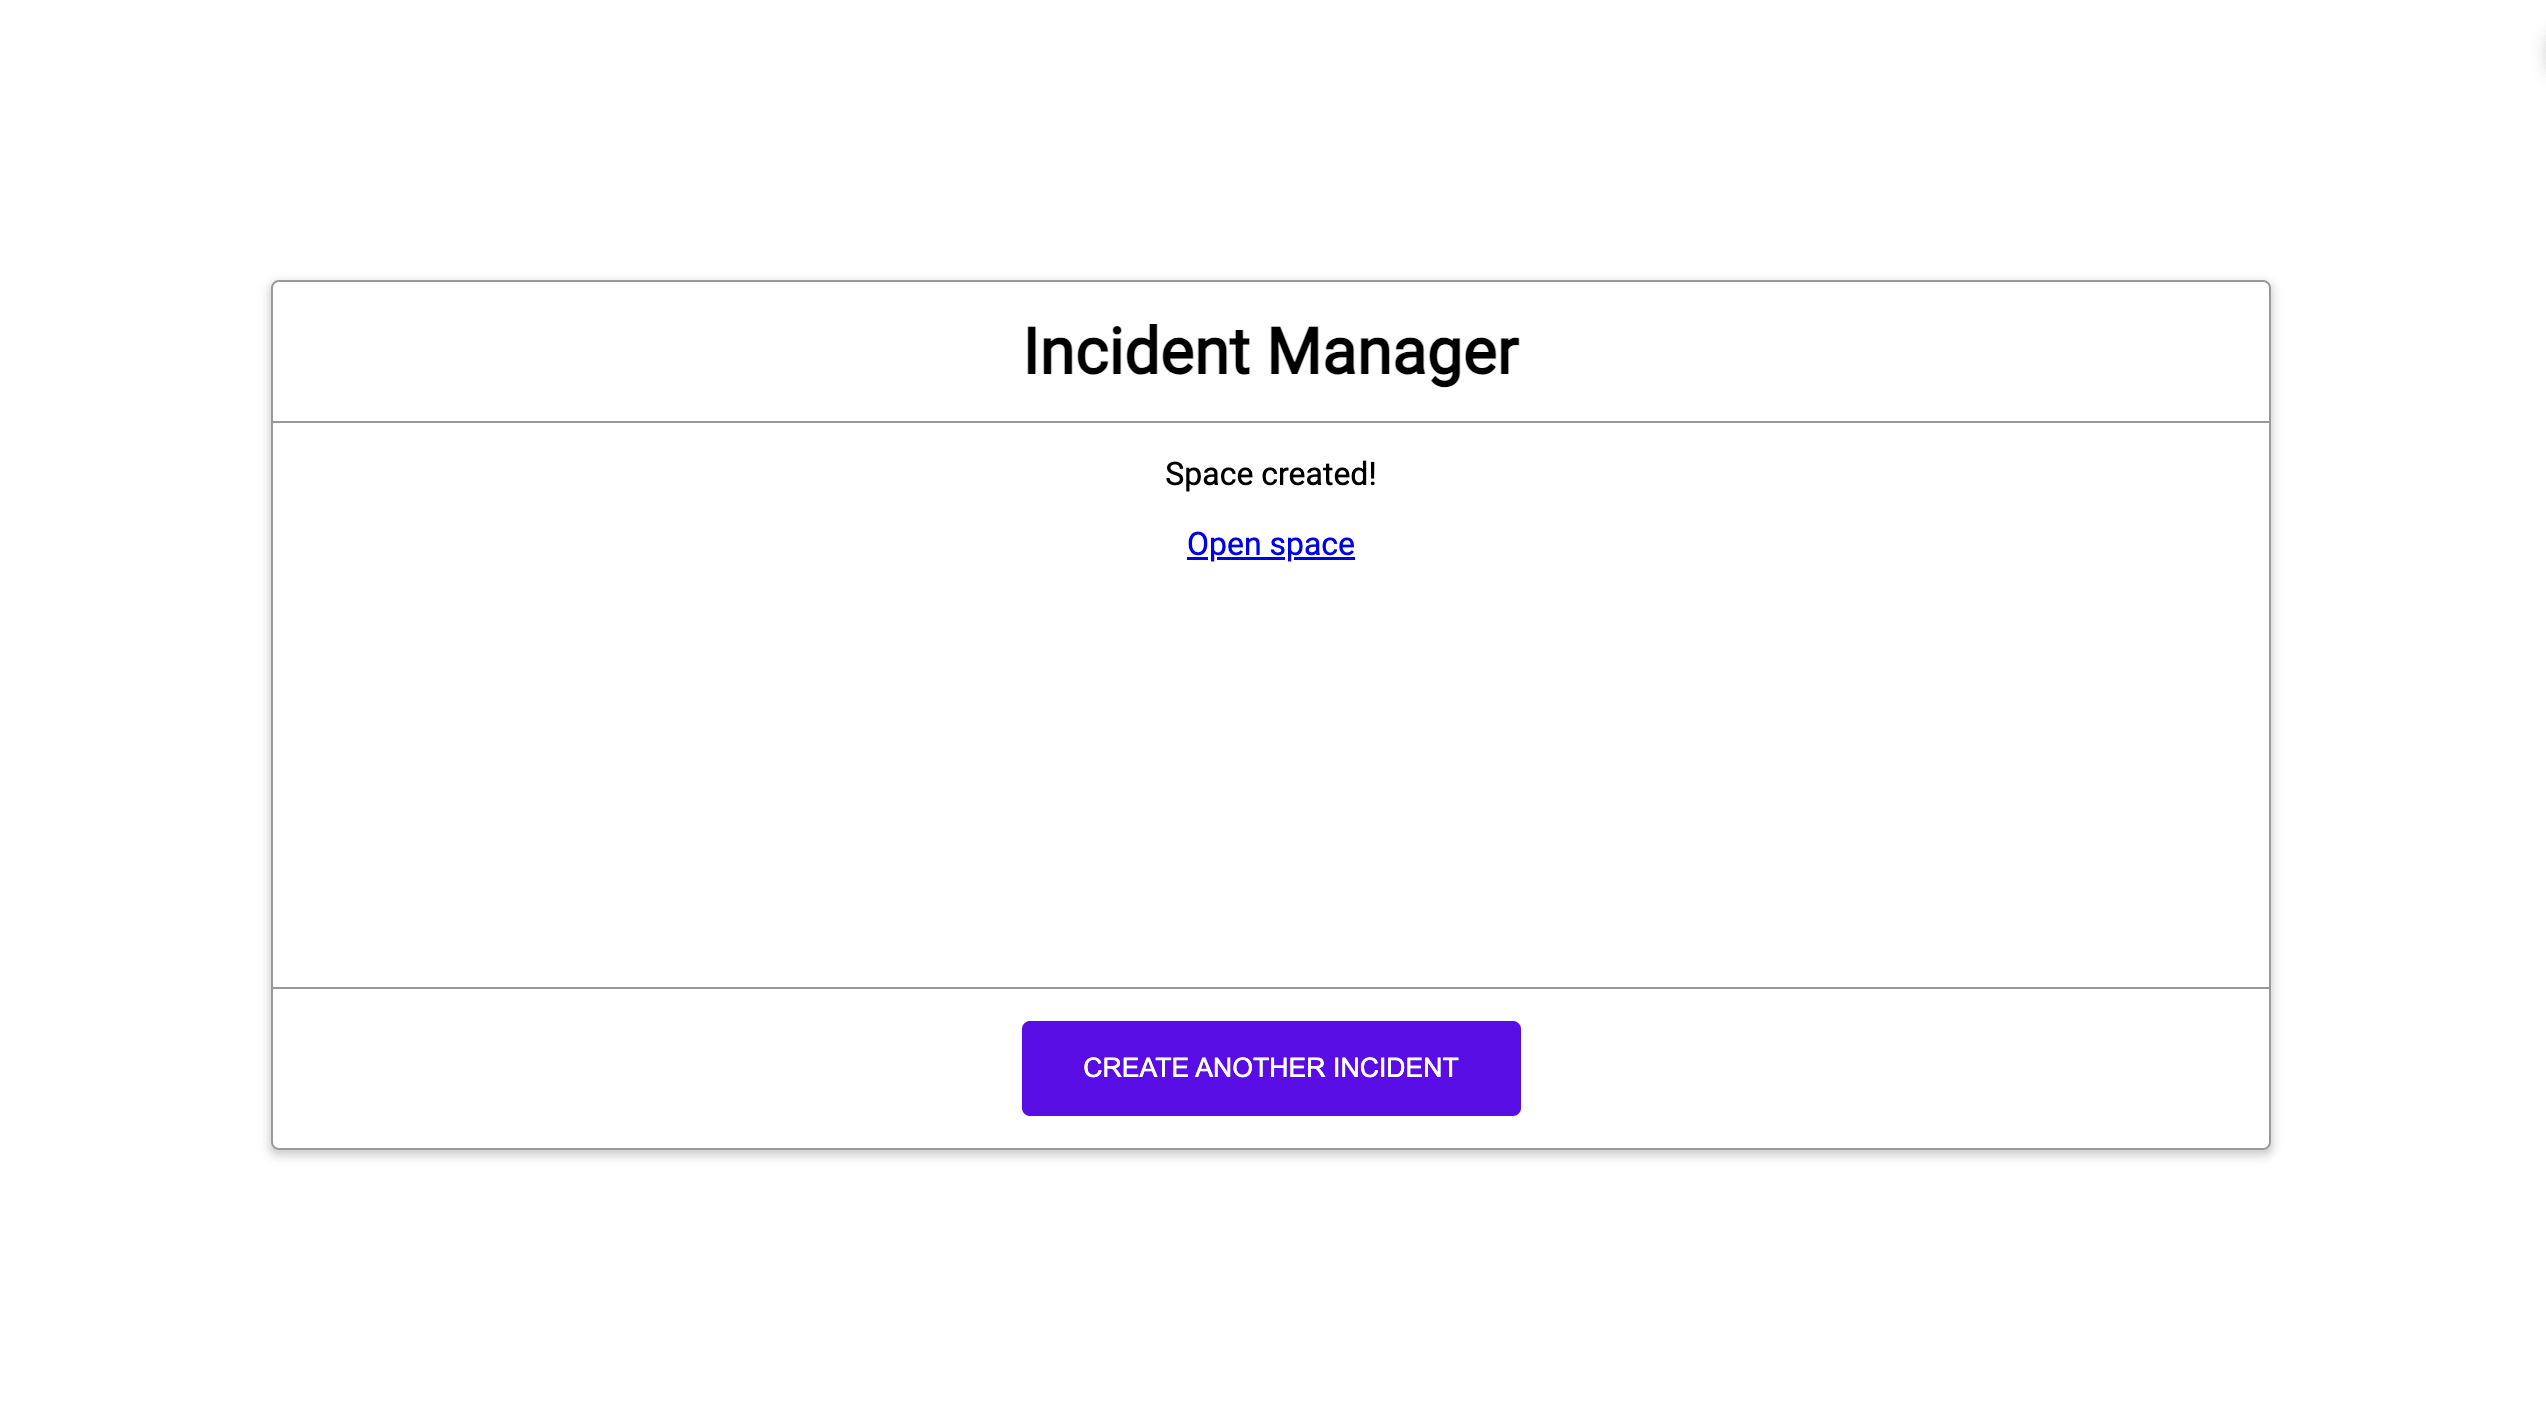
图 2. 有关突发事件 Chat 聊天室已创建的通知。 -
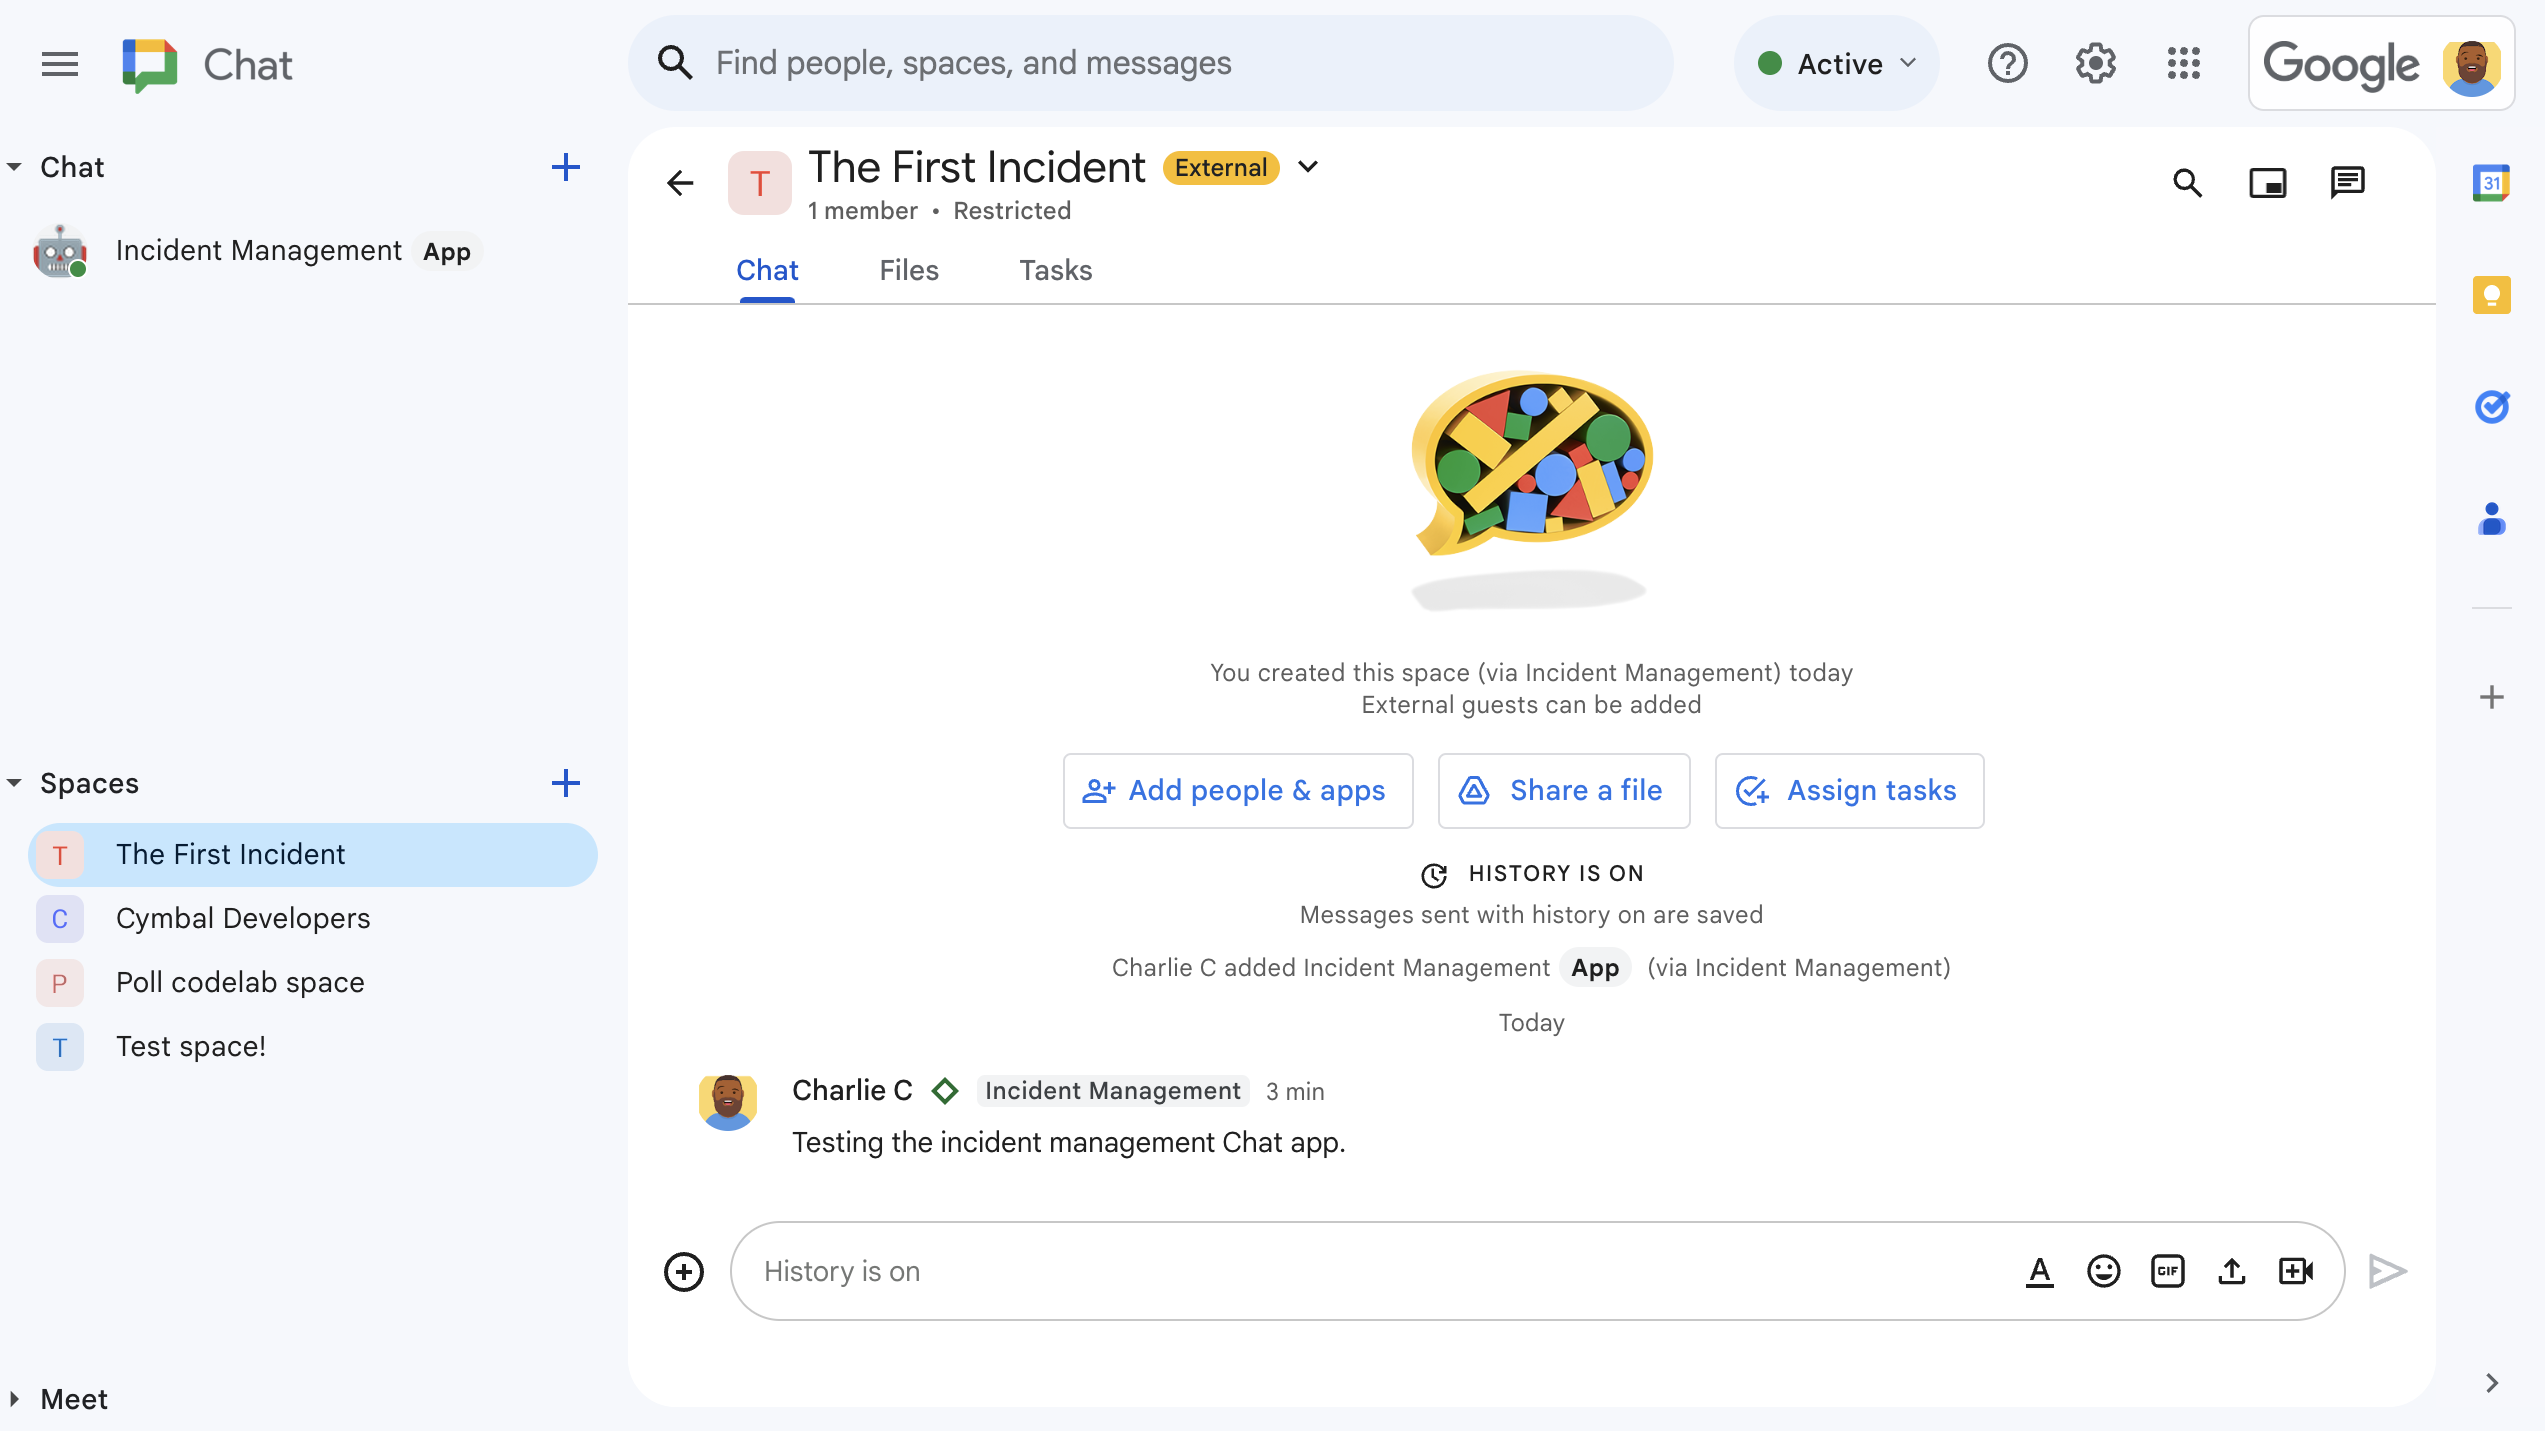
图 3. 突发事件响应 Chat 聊天室。 -

图 4. 使用快速命令解决突发事件。 -
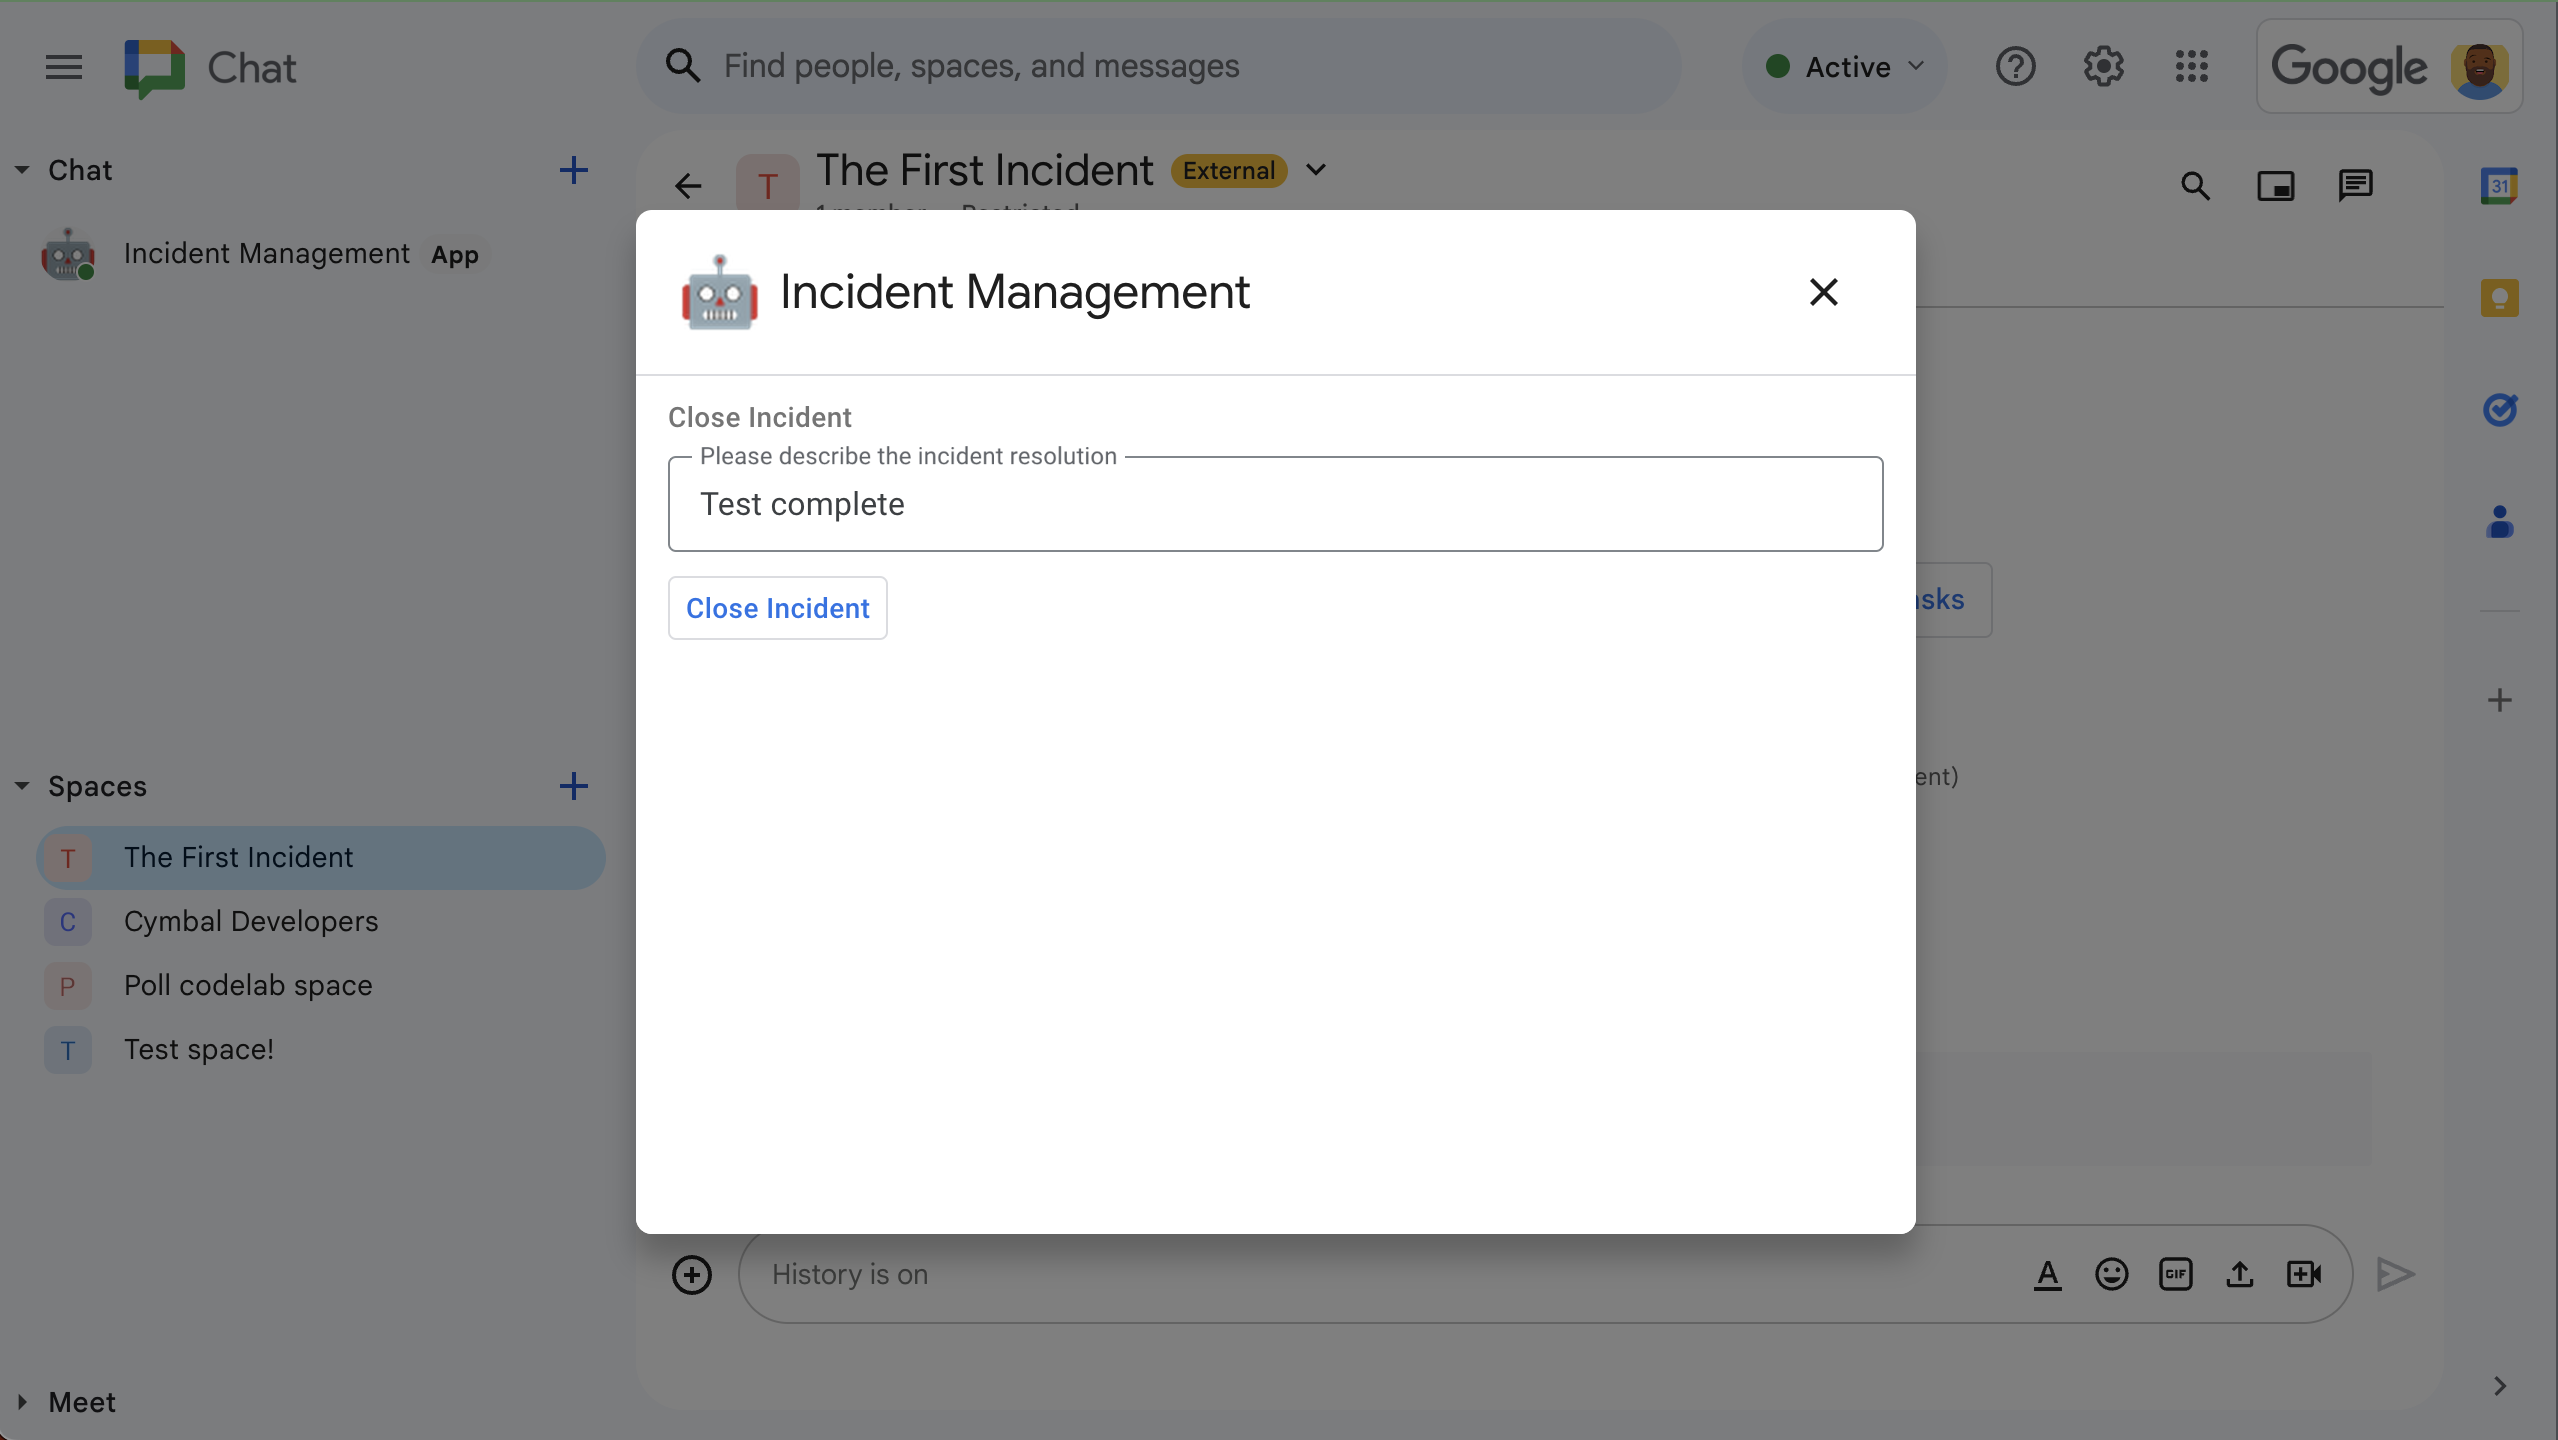
图 5.突发事件解决对话框。 -
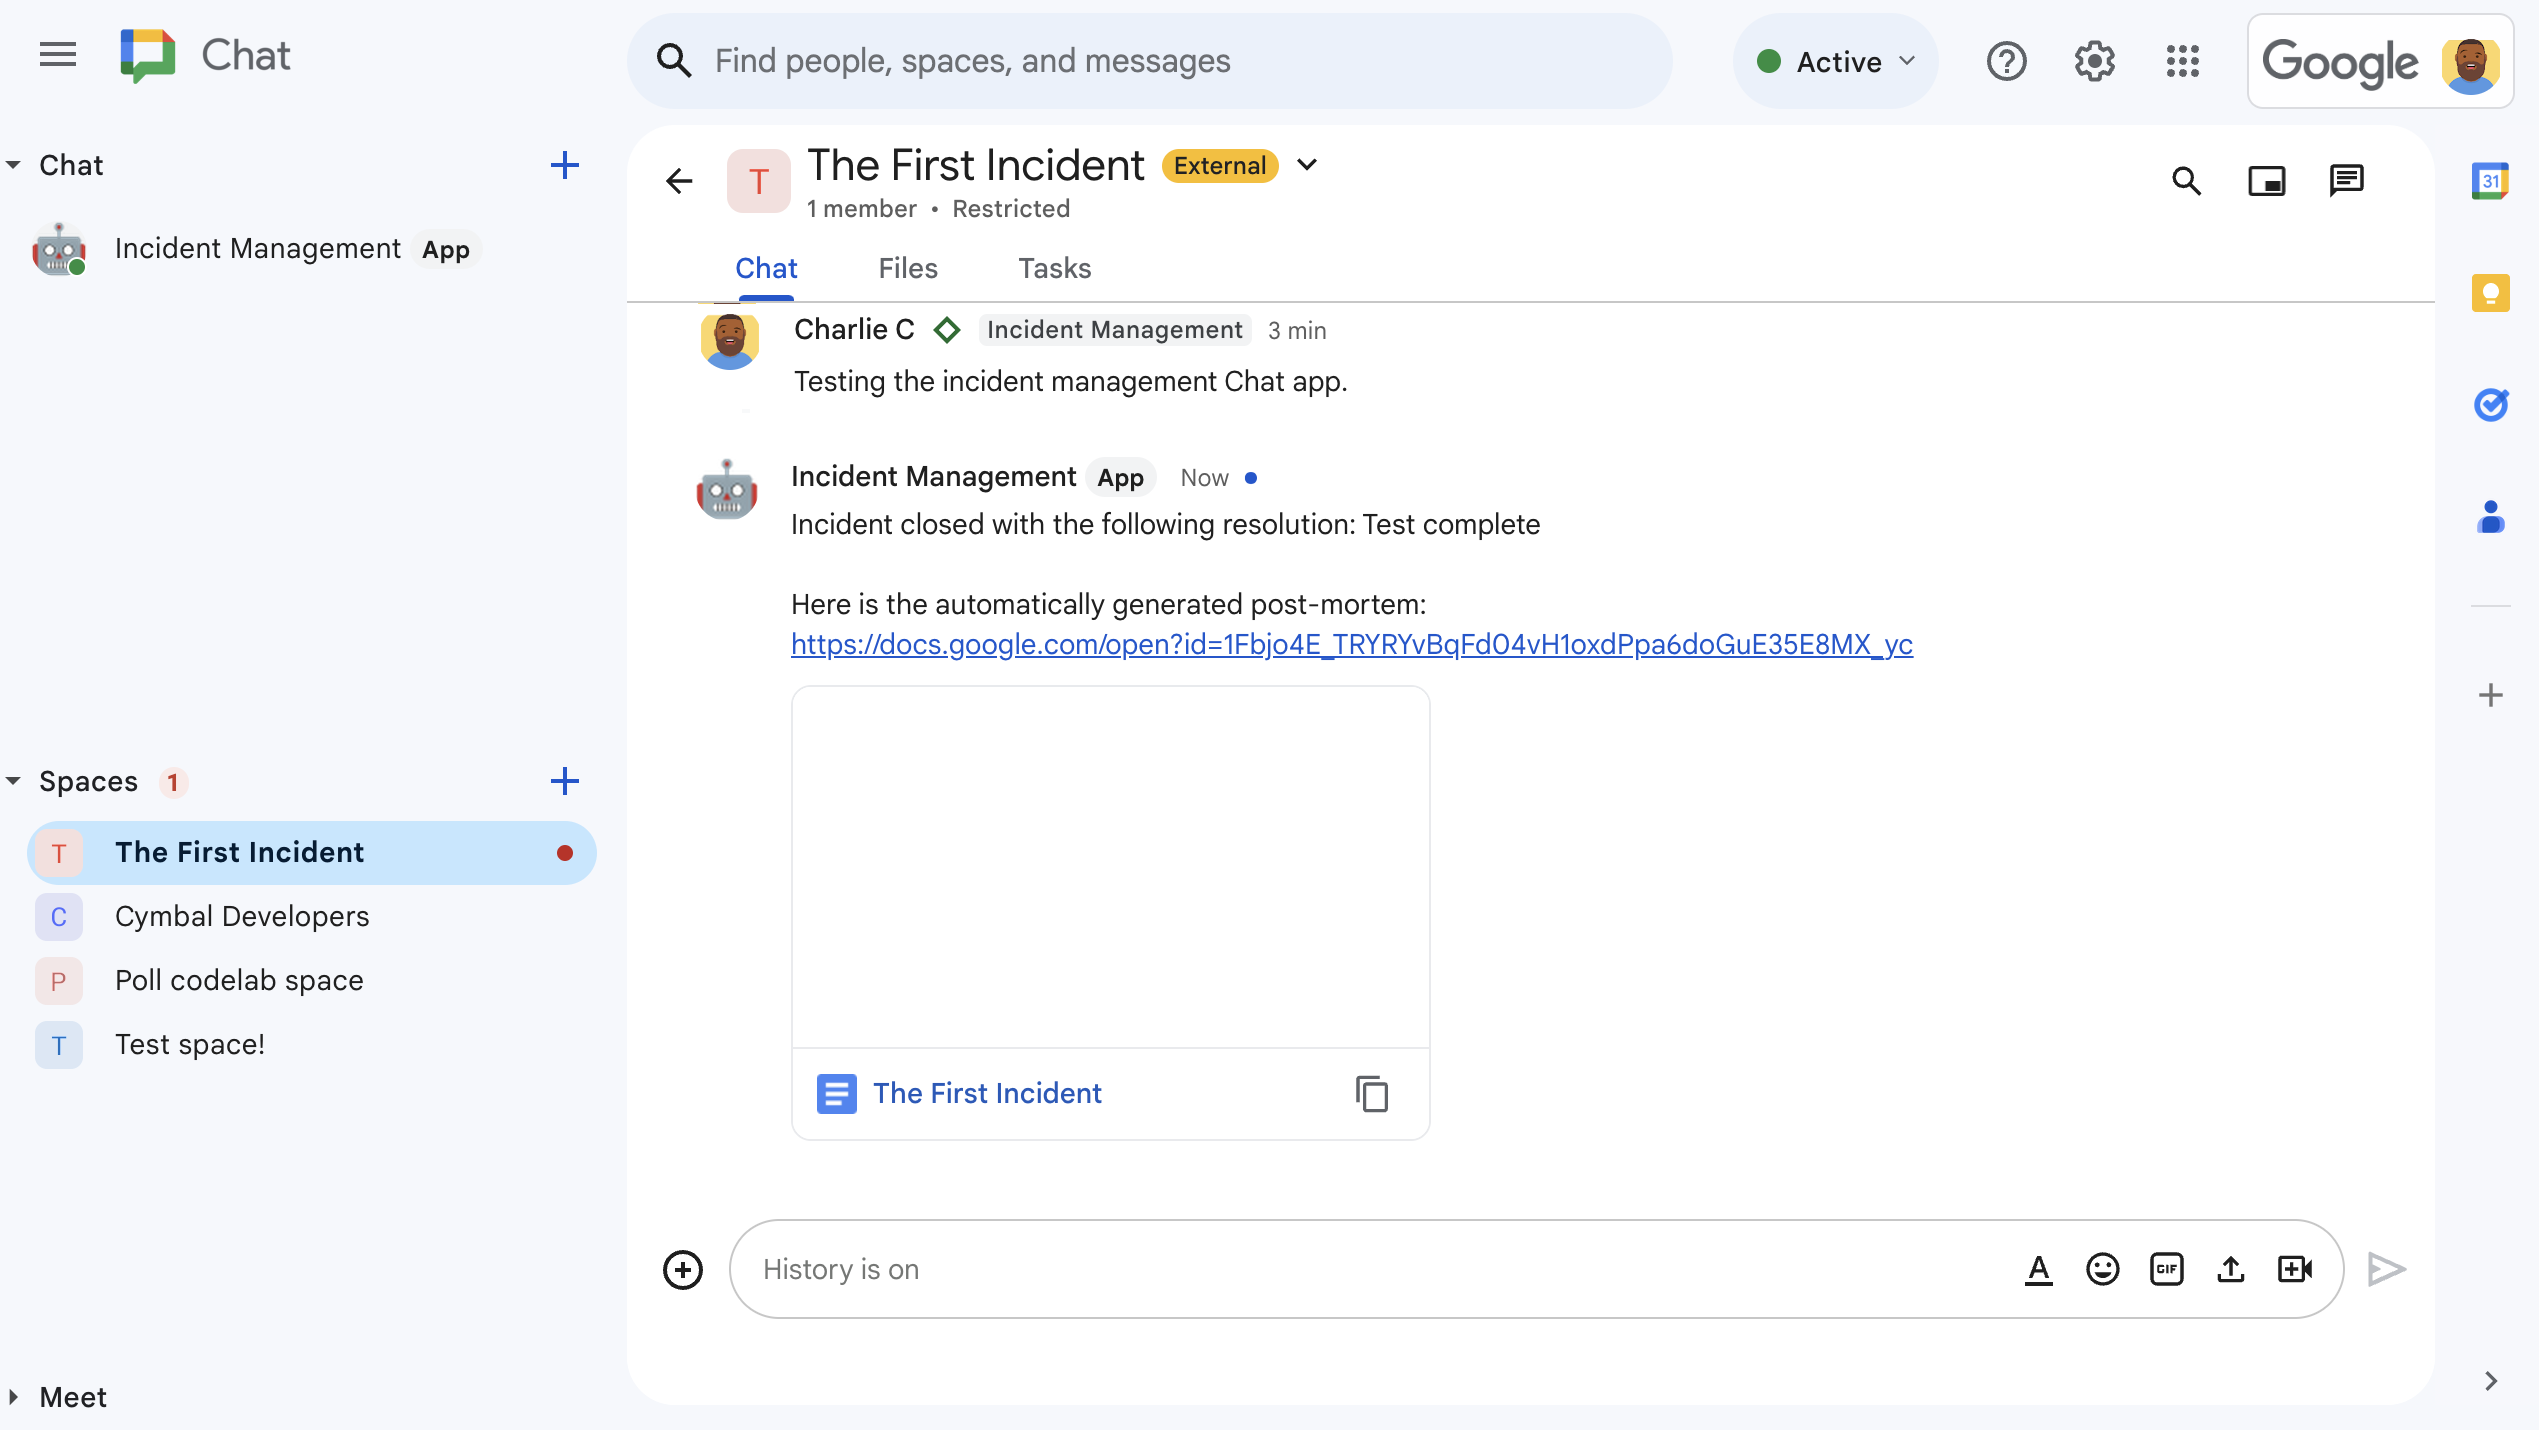
图 6.聊天室中共享的突发事件解决情况 Google 文档。 -
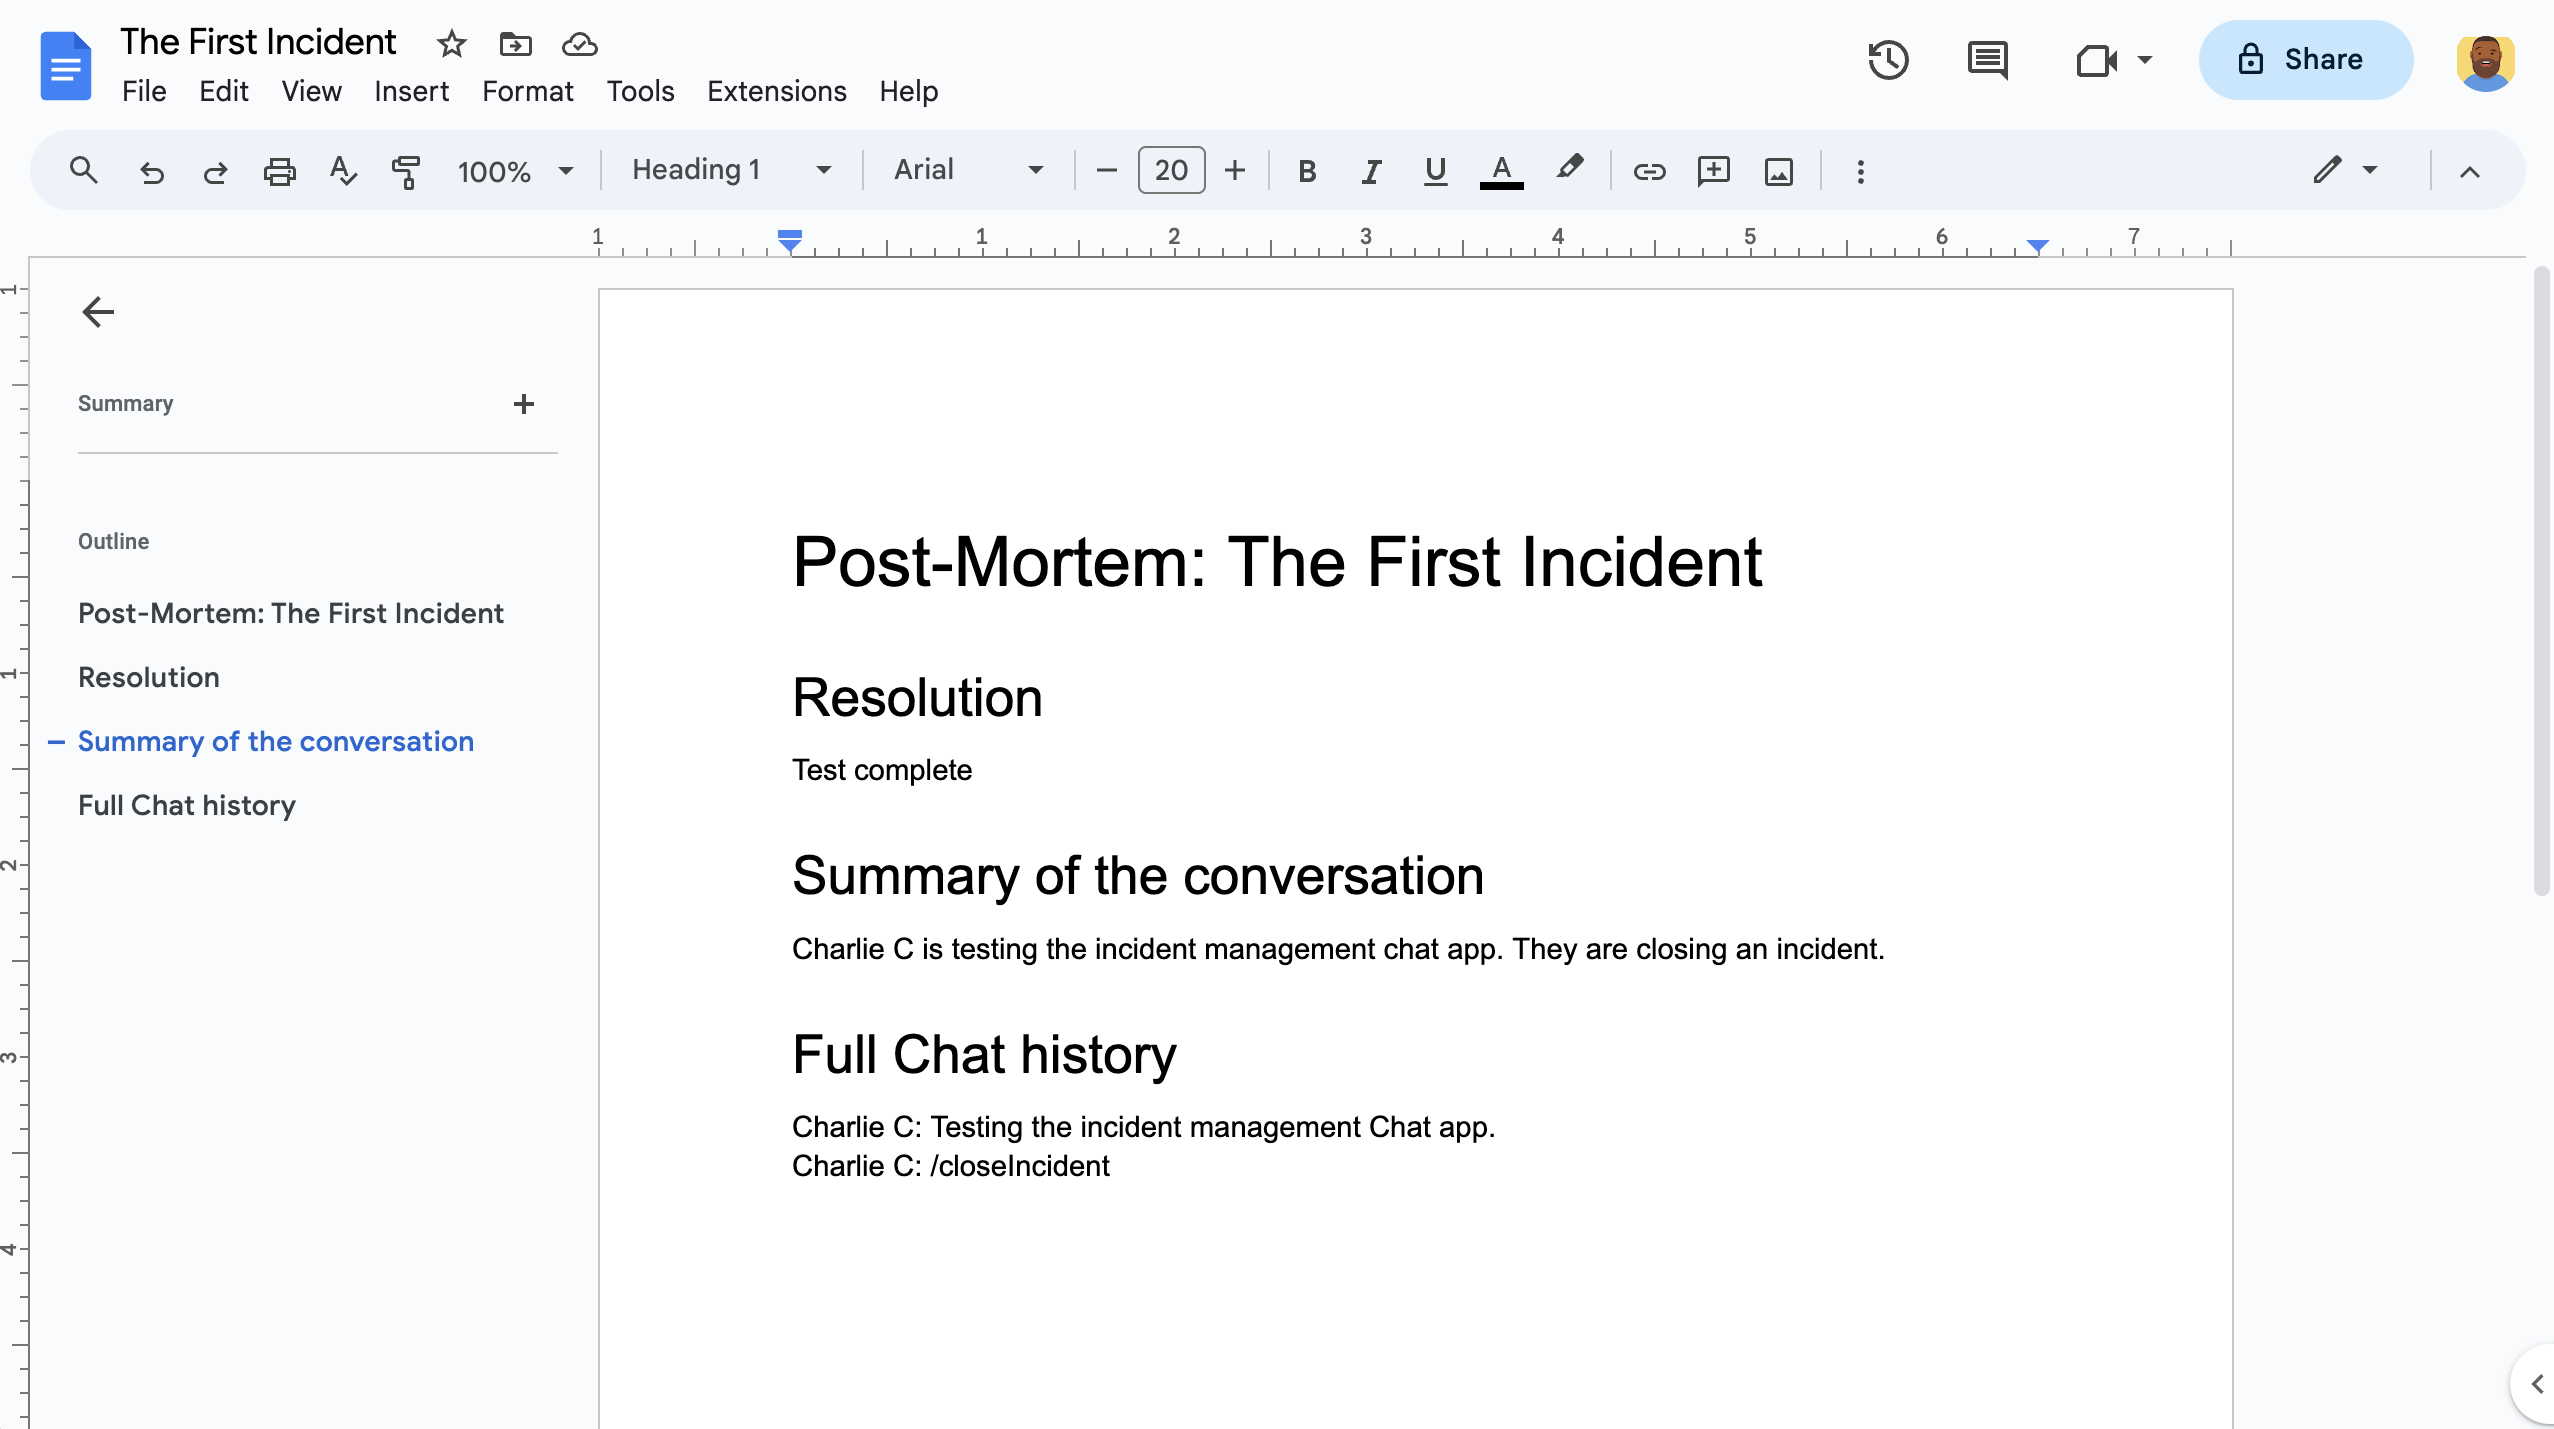
图 7. 包含 AI 总结的事件解决情况的 Google 文档。
前提条件
如果您需要为组织启用以下任何前提条件,请让您的 Google Workspace 管理员启用它们:
- 拥有可访问 Google Chat 的 Google Workspace 商务版或企业版账号。
- 为 Google Workspace 启用目录(联系人共享)。事件应用会使用该目录查找事件响应者的联系信息,例如姓名和电子邮件地址。事件响应者必须是贵组织中拥有 Google Chat 账号的 Google Workspace 用户。
目标
- 构建一个可响应突发事件的 Chat 应用。
- 通过以下方式帮助用户应对突发事件:
- 创建突发事件响应空间。
- 发布总结突发事件和响应的消息。
- 支持通过互动式 Chat 应用功能进行协作。
- 使用 Vertex AI 总结对话和解决方案。
架构
下图展示了事件响应 Google Chat 应用使用的 Google Workspace 和 Google Cloud 资源的架构。
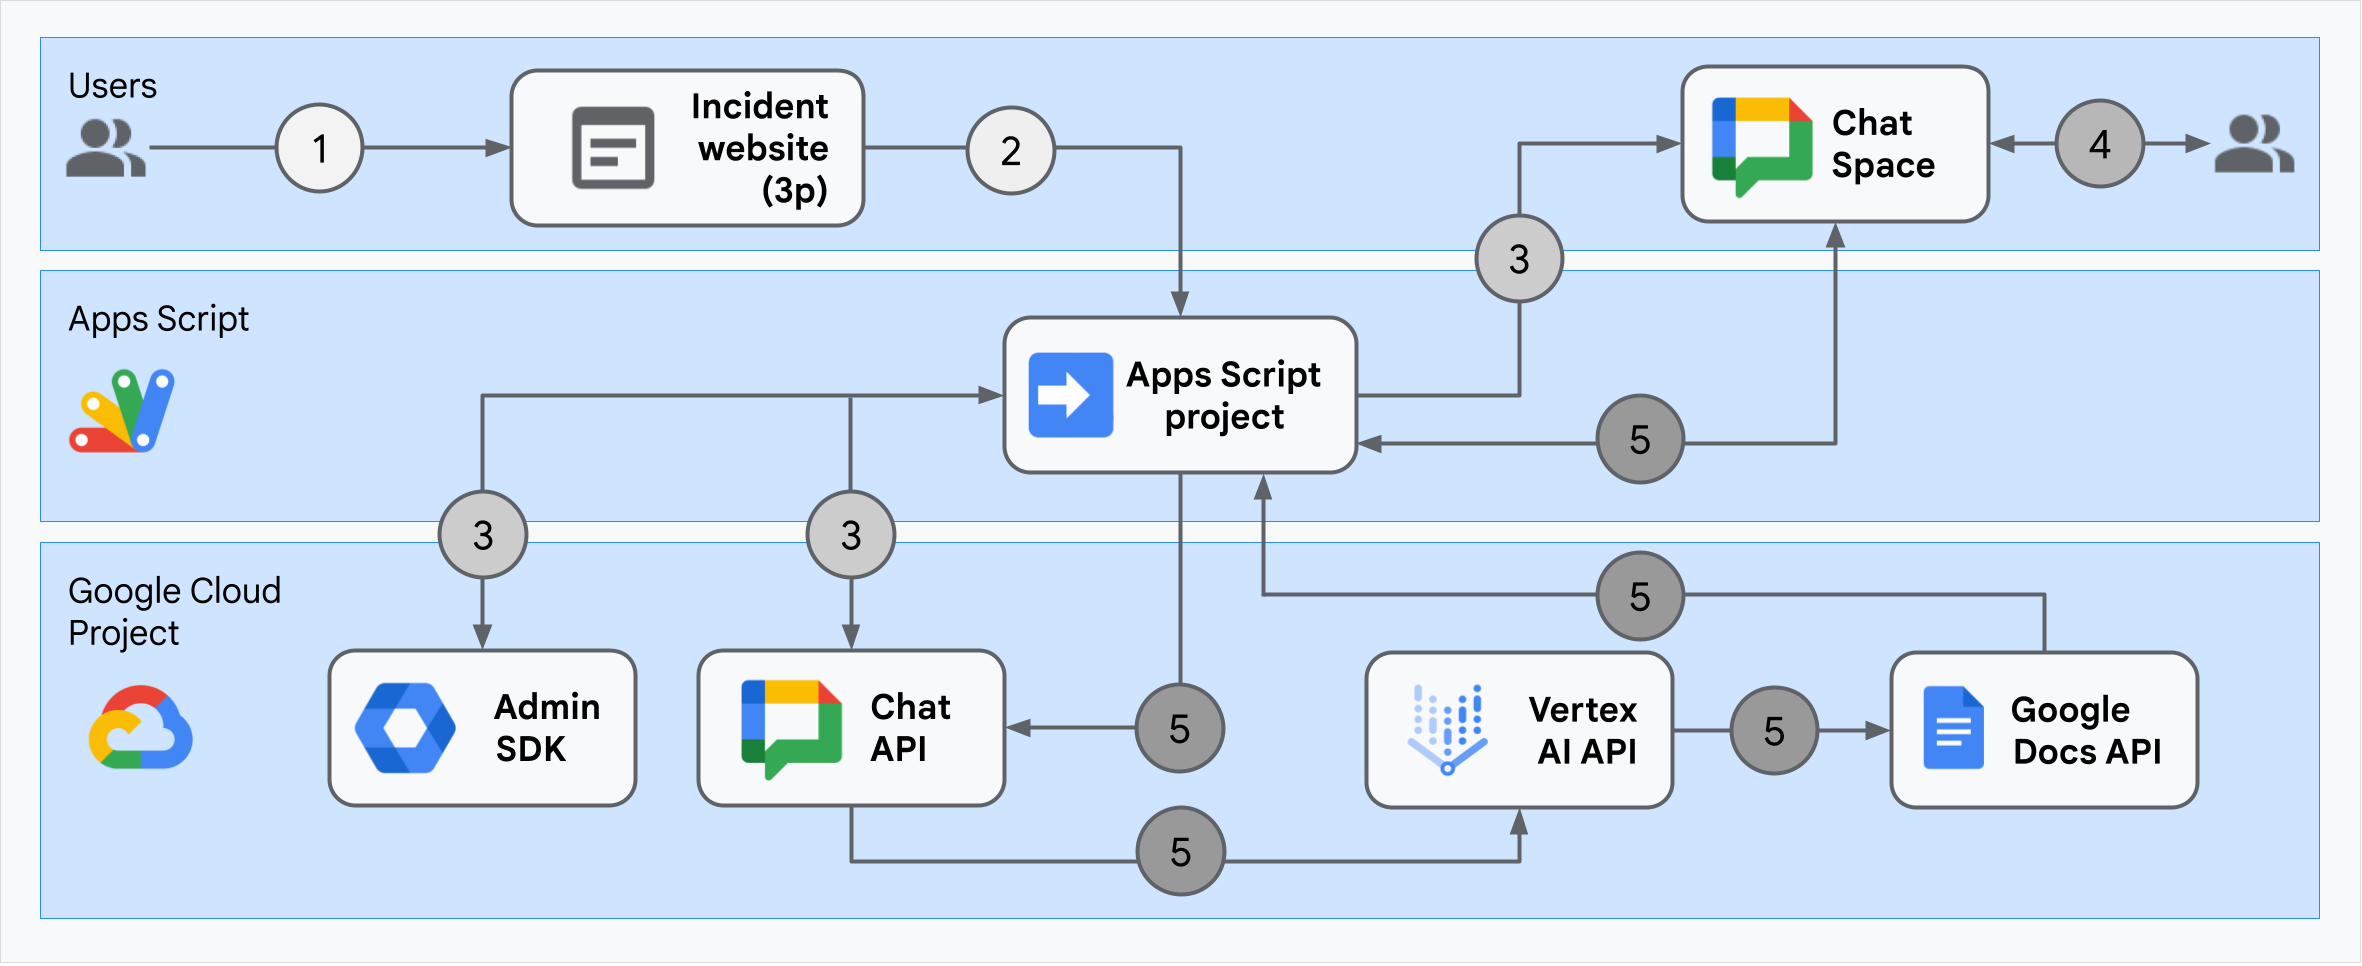
此架构展示了突发事件响应 Google Chat 应用如何处理突发事件和解决方案。
用户通过托管在 Apps 脚本上的外部网站发起突发事件。
网站向 Google Chat 应用(也托管在 Apps 脚本上)发送异步 HTTP 请求。
突发事件响应 Google Chat 应用会处理该请求:
Apps 脚本 Admin SDK 服务可获取团队成员信息,例如用户 ID 和电子邮件地址。
通过使用 Apps 脚本高级 Chat 服务向 Chat API 发送一组 HTTP 请求,突发事件响应 Google Chat 应用会创建一个突发事件聊天室,向其中添加团队成员,并向该聊天室发送消息。
团队成员在 Chat 聊天室中讨论突发事件。
团队成员调用快速命令来表明事件已解决。
使用 Apps 脚本高级聊天服务对 Chat API 进行 HTTP 调用,可列出所有 Chat 聊天室的消息。
Vertex AI 接收所列消息并生成摘要。
Apps 脚本
DocumentApp服务会创建一个 Google 文档,并将 Vertex AI 的摘要添加到该文档中。突发事件响应 Google Chat 应用会调用 Chat API 来发送一条消息,其中包含指向总结文档的链接。
准备环境
本部分介绍如何为 Chat 应用创建和配置 Google Cloud 项目。
创建 Google Cloud 项目
Google API 控制台
- 在 Google API 控制台中,依次前往菜单 > IAM 和管理 > 创建项目。
-
在 Project Name 字段中,输入项目的描述性名称。
可选:如需修改项目 ID,请点击修改。项目创建后,项目 ID 便无法更改,因此请选择满足项目生命周期需求的 ID。
- 在位置字段中,点击浏览以显示项目的潜在位置。然后,点击选择。
- 点击创建。Google API 控制台会转到“信息中心”页面,您的项目会在几分钟内创建完毕。
gcloud CLI
在以下任一开发环境中,访问 Google Cloud CLI (gcloud):
-
Cloud Shell:如需使用已设置 gcloud CLI 的在线终端,请激活 Cloud Shell。
激活 Cloud Shell -
本地 shell:如需使用本地开发环境,请安装并初始化 gcloud CLI。
如需创建云项目,请使用gcloud projects create命令:gcloud projects create PROJECT_ID
为云项目启用结算功能
Google API 控制台
- 在 Google API 控制台中,前往结算。依次点击 菜单 > 结算 > 我的项目。
- 在选择组织中,选择与您的 Google Cloud 项目关联的组织。
- 在项目行中,打开操作菜单 (),点击更改结算信息,然后选择 Cloud Billing 账号。
- 点击设置账号。
gcloud CLI
- 如需列出可用的结算账号,请运行以下命令:
gcloud billing accounts list - 将结算账号与 Google Cloud 项目相关联:
gcloud billing projects link PROJECT_ID --billing-account=BILLING_ACCOUNT_ID替换以下内容:
PROJECT_ID是您要为其启用结算功能的云项目的项目 ID。BILLING_ACCOUNT_ID是要与 Google Cloud 项目关联的结算账号 ID。
启用 API
Google API 控制台
在 Google API 控制台中,启用 Google Chat API、Google Docs API、Admin SDK API 和 Vertex AI API。
确认您要在正确的云项目中启用 API,然后点击下一步。
确认您要启用正确的 API,然后点击启用。
gcloud CLI
如有必要,请使用
gcloud config set project命令将当前 Cloud 项目设置为您创建的项目:gcloud config set project PROJECT_ID将 PROJECT_ID 替换为您创建的云项目的项目 ID。
使用
gcloud services enable命令启用 Google Chat API、Google Docs API、Admin SDK API 和 Vertex AI API:gcloud services enable chat.googleapis.com docs.googleapis.com admin.googleapis.com aiplatform.googleapis.com
设置身份验证和授权
通过身份验证和授权,Chat 应用可以访问 Google Workspace 和 Google Cloud 中的资源,以处理突发事件响应。
在本教程中,您将内部发布应用,因此可以使用占位信息。在向外部发布应用之前,请将权限请求页面的占位信息替换为真实信息。
在 Google API 控制台中,依次前往“菜单”图标 > Google Auth 平台 > 品牌推广。
如果您已配置 Google Auth 平台,则可以在品牌推广、受众群体和数据访问中配置以下 OAuth 权限请求页面设置。 如果您看到一条消息,提示尚未配置 Google Auth 平台,请点击开始使用:
- 在应用信息下,在应用名称中输入
Incident Management with User Auth。 - 在用户支持邮箱中,选择您的电子邮件地址或合适的 Google 群组。
- 点击下一步。
- 在受众下,选择内部。如果您无法选择内部,请选择外部。
- 点击下一步。
- 在联系信息下,输入一个电子邮件地址,以便您接收有关项目变更的通知。
- 点击下一步。
- 在完成部分,查看 Google API 服务用户数据政策,如果您同意该政策,请选择我同意 Google API 服务:用户数据政策。
- 点击继续。
- 点击创建。
- 如果您为用户类型选择了外部,请添加测试用户:
- 点击受众群体。
- 在测试用户下,点击添加用户。
- 输入您的电子邮件地址和任何其他已获授权的测试用户,然后点击保存。
- 在应用信息下,在应用名称中输入
依次点击数据访问权限 > 添加或移除范围。系统会显示一个面板,其中列出了您在 Google Cloud 云项目中启用的每个 API 的范围。
在手动添加范围下,粘贴以下范围:
https://www.googleapis.com/auth/chat.spaces.createhttps://www.googleapis.com/auth/chat.membershipshttps://www.googleapis.com/auth/chat.memberships.apphttps://www.googleapis.com/auth/chat.messageshttps://www.googleapis.com/auth/documentshttps://www.googleapis.com/auth/admin.directory.user.readonlyhttps://www.googleapis.com/auth/script.external_requesthttps://www.googleapis.com/auth/userinfo.emailhttps://www.googleapis.com/auth/cloud-platform
点击添加到表格。
点击更新。
选择应用所需的范围后,在数据访问页面上点击保存。
创建并部署 Chat 应用
在下一部分中,您将复制并更新包含 Chat 应用所需的所有应用代码的整个 Apps 脚本项目,因此无需复制并粘贴每个文件。
有些函数会在名称末尾添加下划线,例如 ChatApp.gs 中的 concatenateAllSpaceMessages_()。当在浏览器中打开事件初始化网页时,下划线会隐藏该函数。
如需了解详情,请参阅私有函数。
Apps 脚本支持两种文件类型:.gs脚本和 .html文件。为了遵守此支持,应用的客户端 JavaScript 包含在 HTML 文件中的 <script /> 标记内,而其 CSS 包含在 <style /> 标记内。
您也可以选择在 GitHub 上查看整个项目。
以下是对每个文件的简要说明:
Consts.gs定义了其他代码文件引用的常量,包括您的云项目 ID、Vertex AI 位置 ID、用于关闭突发事件的快速命令 ID 和 Gemini 模型。
查看
Consts.gs个代码ChatApp.gs处理 Chat 互动事件,包括消息、按钮点击、应用命令和对话框。通过打开一个对话框来收集突发事件解决详细信息,以响应
Close incident快速命令。通过调用 Chat API 中的spaces.messages.list方法读取聊天室中的消息。 使用 Apps 脚本中的 Admin SDK Directory 服务获取用户 ID。查看
ChatApp.gs个代码ChatSpaceCreator.gs接收用户在突发事件初始化网页上输入的表单数据,并使用这些数据通过创建和填充聊天室来设置聊天室,然后发布有关突发事件的消息。
查看
ChatSpaceCreator.gs个代码DocsApi.gs调用 Google Docs API 在用户的 Google 云端硬盘中创建 Google 文档,并将
VertexAiApi.gs中创建的突发事件信息摘要写入该文档。查看
DocsApi.gs个代码VertexAiApi.gs使用 Vertex AI 总结聊天室中的对话。此摘要会发布在
DocsAPI.gs中专门创建的文档中。查看
VertexAiApi.gs个代码WebController.gs提供突发事件初始化网站。
查看
WebController.gs个代码Index.html包含突发事件初始化网站的 HTML。
查看
Index.html个代码JavaScript.html处理表单行为,包括提交、错误和清除,适用于突发事件初始化网站。它通过
WebController.gs中的自定义include函数包含在Index.html中。查看
JavaScript.html个代码Stylesheet.html突发事件初始化网站的 CSS。它通过
WebController.gs中的自定义include函数包含在Index.html中。查看
Stylesheet.html个代码
查找您的 Cloud 项目编号和 ID
在 Google API 控制台中,前往您的云项目。
依次点击“设置和实用程序”图标 > 项目设置。
记下项目编号和项目 ID 字段中的值。您将在后续部分中使用这些变量。
创建 Apps 脚本项目
如需创建 Apps 脚本项目并将其与您的云项目相关联,请执行以下操作:
- 点击以下按钮,打开 Incident Management Chat app with User Auth Apps 脚本项目。
打开项目 - 点击 概览。
- 在概览页面上,点击
 复制。
复制。 为您的 Apps 脚本项目副本命名:
点击 Copy of Incident Management Chat app with User Auth。
在项目标题中,输入
Incident Management Chat app with User Auth。点击重命名。
在复制的 Apps 脚本项目中,前往
Consts.gs文件,并将PROJECT_ID设置为您的云项目的 ID。
设置 Apps 脚本项目的云项目
- 在您的 Apps 脚本项目中,点击
 项目设置。
项目设置。 - 在 Google Cloud Platform (GCP) 项目下,点击更改项目。
- 在 GCP 项目编号中,粘贴您的云项目项目编号。
- 点击设置项目。云项目和 Apps 脚本项目现已关联。
创建 Apps 脚本测试部署
现在,所有代码都已就绪,接下来部署 Apps 脚本项目。在 Google Cloud 中配置 Chat 应用时,您需要使用部署 ID。
在 Apps 脚本中,打开突发事件响应应用的项目。
依次点击部署 > 测试部署。
如果 Google Workspace 加购项和 Web 应用尚未选中,请点击选择类型旁边的部署类型
,然后选择 Google Workspace 加购项和 Web 应用。Apps 脚本会为 Web 应用提供部署 ID 和网址。
记下 Web 应用网址,以便稍后在开始处理突发事件时访问该网址。 复制部署 ID。在 Google API 控制台中配置 Chat 应用时,您需要使用此 ID。
点击完成。
在 Google API 控制台中配置 Chat 应用
本部分介绍了如何在 Google API 控制台中配置 Google Chat API,其中包含有关 Chat 应用的信息,包括您刚刚从 Apps 脚本项目中创建的部署的 ID。
在 Google API 控制台中,依次点击菜单 > API 和服务 > 已启用的 API 和服务 > Google Chat API > 配置。
在应用名称中,输入
Incident Management with User Auth。在头像网址中,输入
https://developers.google.com/chat/images/quickstart-app-avatar.png。在说明中,输入
Responds to incidents。点击启用互动功能切换开关,以切换到开启位置。
在功能下,选择加入聊天室和群组对话。
在连接设置下,选择 Apps 脚本。
在部署 ID 中,粘贴您之前从 Apps 脚本项目部署中复制的 Apps 脚本部署 ID。
注册完全实现的 Chat 应用使用的快捷命令:
在命令下,点击添加命令。
在命令 ID 中,输入
1。在说明中,输入
Closes the incident being discussed in the space.在命令类型下,选择快速命令。
在快速命令名称中,输入
Close incident。选择对话框。
点击完成。命令已注册并列出。
在公开范围下,选择面向 Workspace 网域中的特定人员和群组提供此 Chat 扩展应用,然后输入您的电子邮件地址。
在日志下,选择将错误记录到 Logging。
点击保存。系统会显示一条“配置已保存”消息,表示应用已准备好进行测试。
测试 Chat 应用
如需测试突发事件管理 Chat 应用,请从网页发起突发事件,并验证该 Chat 应用是否按预期运行:
前往 Apps 脚本部署 Web 应用网址。
当 Apps 脚本请求访问您的数据的权限时,请点击查看权限,使用您 Google Workspace 网域中的相应 Google 账号登录,然后点击允许。
系统会打开突发事件初始化网页。输入测试信息:
- 在突发事件标题中,输入
The First Incident。 - (可选)在突发事件响应人员中,输入其他突发事件响应人员的电子邮件地址。他们必须是 Google Workspace 组织中拥有 Google Chat 账号的用户,否则聊天室创建会失败。请勿输入您自己的电子邮件地址,因为系统会自动添加。
- 在初始消息中,输入
Testing the incident management Chat app.
- 在突发事件标题中,输入
点击创建聊天室。系统会显示一条
creating space消息。创建聊天室后,系统会显示一条
Space created!消息。点击打开聊天室,系统会在新标签页中打开 Chat 中的相应聊天室。您和其他突发事件响应者可以选择在空间中发送消息。该应用使用 Vertex AI 总结这些消息,并分享回顾文档。
如需结束突发事件响应并开始解决流程,请在 Chat 聊天室中启动快捷指令
Close incident。系统会打开一个突发事件管理对话框。在关闭突发事件中,输入突发事件解决情况的说明,例如
Test complete。点击关闭突发事件。
突发事件管理应用会列出聊天室中的消息,使用 Vertex AI 对这些消息进行总结,将总结内容粘贴到 Google 文档中,然后在聊天室中分享该文档。
清理
为避免系统因本教程中使用的资源向您的 Google Cloud 账号收取费用,我们建议您删除云项目。
- 在 Google API 控制台中,前往管理资源页面。依次点击 菜单 > IAM 和管理 > 管理资源。
- 在项目列表中,选择要删除的项目,然后点击删除 。
- 在对话框中输入项目 ID,然后点击关停以删除项目。
相关主题
- 借助可在整个 Google Workspace 中使用的 AI 智能体规划行程
- 使用 Gemini AI Chat 应用,根据 Chat 对话内容回答问题
- 使用 Google Chat、Vertex AI 和 Firestore 管理项目
- 使用 ADK AI 智能体和 Gemini 模型对陈述进行事实核查
- 在 Chat 应用中集成基本 AI 概念
- 使用 Apps 脚本将 Chat 应用构建为 Google Workspace 插件