
これは、Classroom アドオンのチュートリアル シリーズの6 つ目のチュートリアルです。
このチュートリアルでは、前のチュートリアルのステップの例を変更して、採点対象のアクティビティ タイプのアタッチメントを作成します。また、プログラムで成績を Google Classroom に渡すこともできます。この成績は、教師の採点簿に下書きの成績として表示されます。
このチュートリアルは、成績を Classroom に返す方法が 2 つあるという点で、このシリーズの他のチュートリアルとは少し異なります。どちらも、デベロッパーとユーザーの操作性に異なる影響を与えます。Classroom アドオンを設計する際は、両方を検討してください。実装オプションについて詳しくは、添付ファイルの操作に関するガイドページをご覧ください。
API の採点機能は省略可です。アクティビティ タイプのアタッチメントで使用できます。
このチュートリアルでは、次の作業を行います。
- 以前の Classroom API への添付ファイル作成リクエストを変更して、添付ファイルの成績分母も設定します。
- 生徒の提出物をプログラムで採点し、添付ファイルの成績分子を設定する。
- ログイン済みまたはオフラインの教師の認証情報を使用して、提出物の成績を Classroom に渡す 2 つの方法を実装します。
完了すると、パスバック動作がトリガーされた後、成績が Classroom の採点簿に表示されます。正確なタイミングは、実装方法によって異なります。
この例では、前回のチュートリアルのアクティビティを再利用します。このアクティビティでは、有名なランドマークの画像が表示され、その名前を入力するよう求められます。受講生が正しい名前を入力した場合は添付ファイルに満点を与え、それ以外の場合は 0 点にします。
Classroom アドオン API の採点機能について
アドオンでは、アタッチメントの成績の分子と分母の両方を設定できます。これらは、API の pointsEarned 値と maxPoints 値を使用してそれぞれ設定されます。Classroom UI の添付カードには、設定されている maxPoints 値が表示されます。
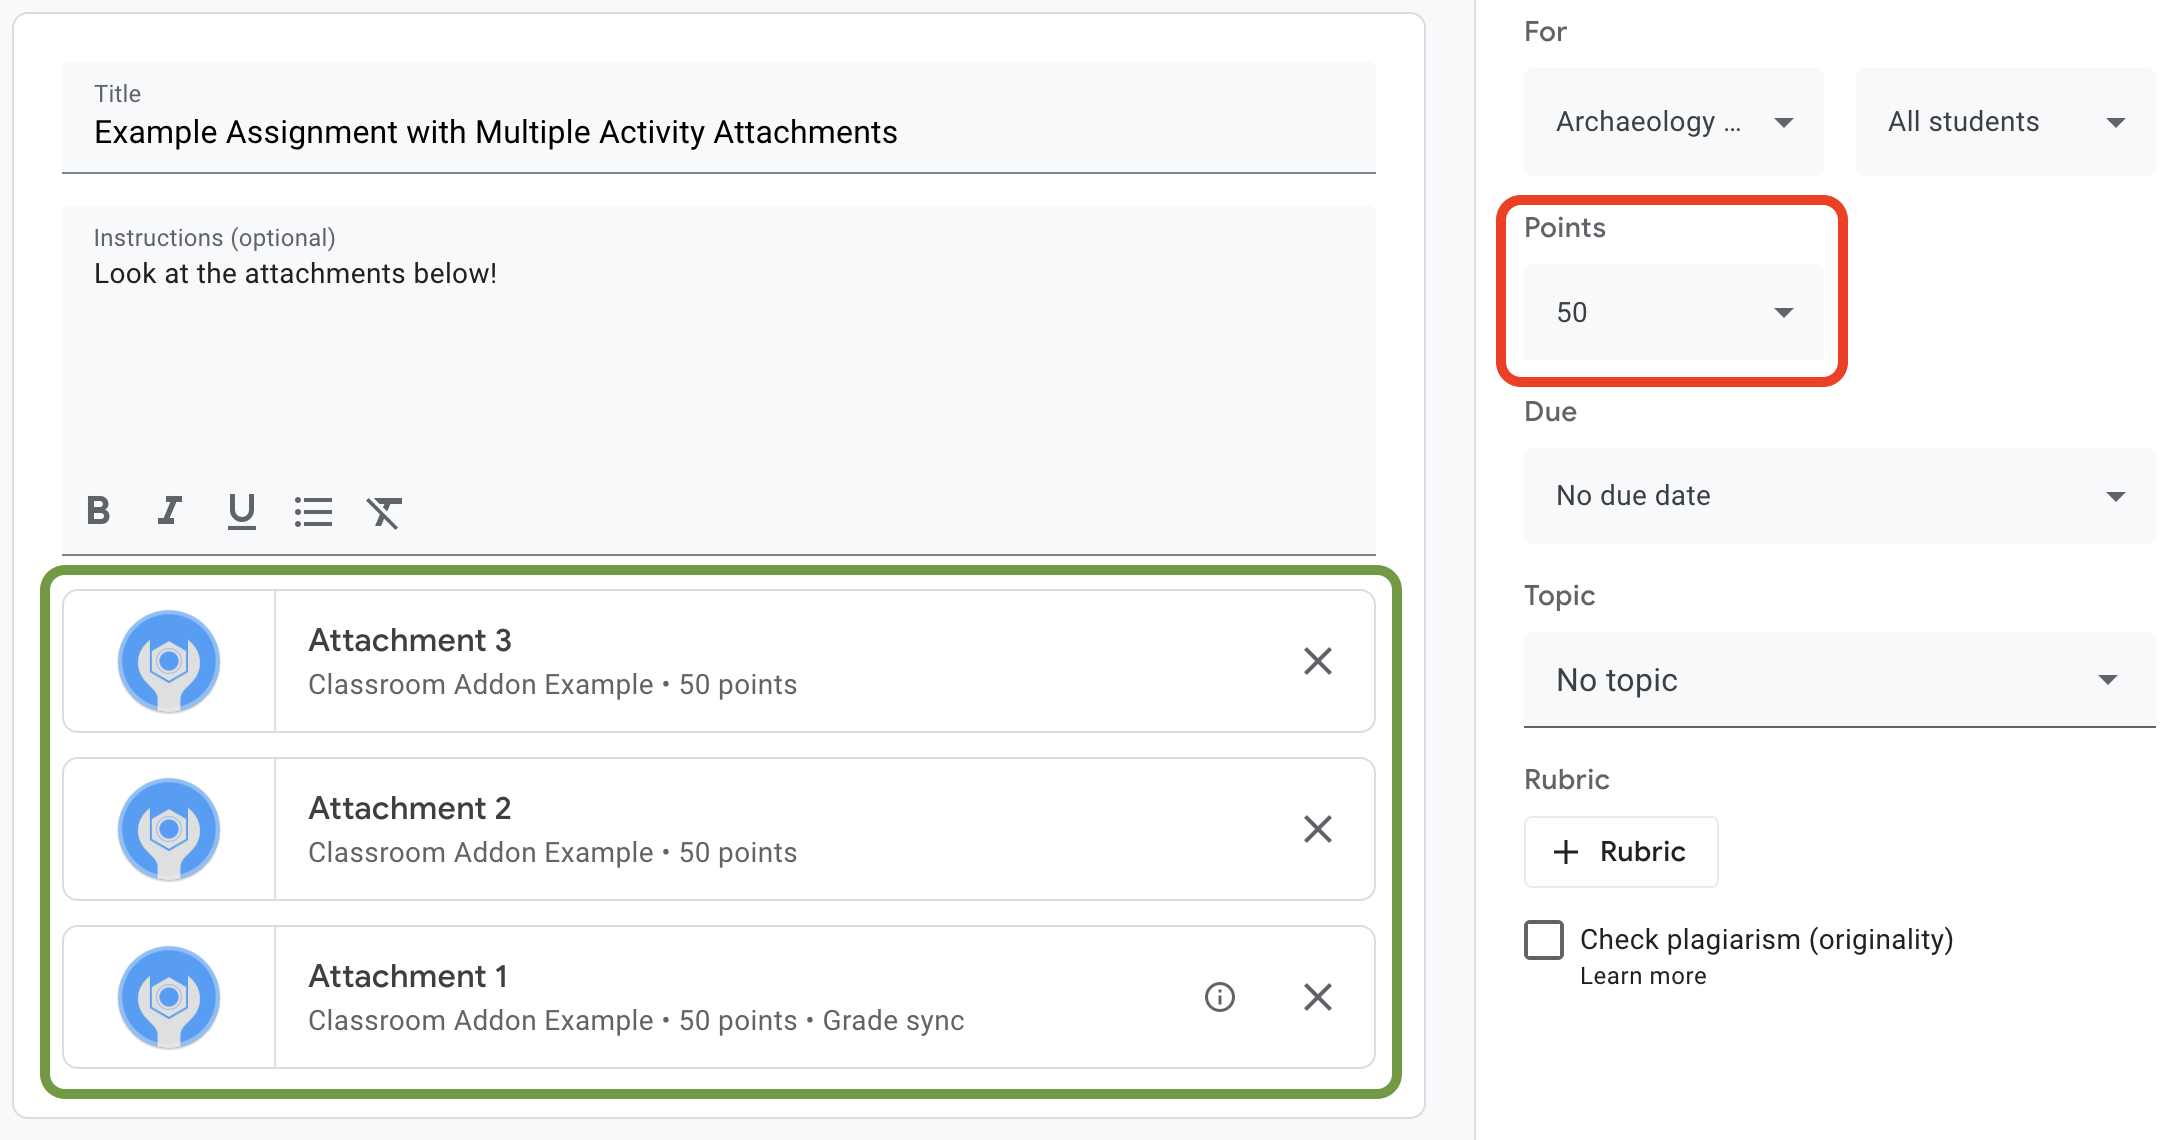
図 1. maxPoints が設定された 3 つのアドオン添付カードを含む課題作成 UI。
Classroom アドオン API を使用すると、添付ファイルの成績の設定を構成し、獲得スコアを設定できます。これは、課題の成績とは異なります。ただし、課題の成績の設定は、添付カードに [成績の同期] ラベルが付いている添付ファイルの成績設定に従います。[成績の同期] 添付ファイルで生徒の提出物に pointsEarned を設定すると、課題に対する生徒の仮成績も設定されます。
通常、maxPoints を設定する課題に追加された最初のアタッチメントには「成績の同期」ラベルが付きます。「成績の同期」ラベルの例については、図 1 の課題作成 UI の例をご覧ください。[添付ファイル 1] カードに [Grade sync] ラベルが付いており、赤いボックス内の課題の評価が 50 点に更新されていることに注目してください。また、図 1 には 3 つのアタッチメント カードが表示されていますが、[Grade sync] ラベルが付いているのは 1 枚のみです。これは現在の実装の重要な制限事項です。「成績の同期」ラベルを設定できるのは 1 つのアタッチメントのみです。
maxPoints が設定されているアタッチメントが複数ある場合、「成績の同期」が設定されているアタッチメントを削除しても、残りのアタッチメントで「成績の同期」が有効になることはありません。maxPoints を設定する別のアタッチメントを追加すると、新しいアタッチメントで成績の同期が有効になり、課題の最大成績が調整されて一致します。「成績の同期」ラベルが付いている添付ファイルや、特定の課題に添付されている添付ファイルの数をプログラムで確認するメカニズムはありません。
添付ファイルの最大評価を設定する
このセクションでは、アタッチメントの成績の分母(すべての生徒が提出で獲得できる最高得点)の設定について説明します。これを行うには、アタッチメントの maxPoints 値を設定します。
採点機能を有効にするには、既存の実装にわずかな変更を加えるだけで済みます。アタッチメントを作成する場合は、studentWorkReviewUri、teacherViewUri、その他のアタッチメント フィールドを含む同じ AddOnAttachment オブジェクトに maxPoints 値を追加します。
新しい課題のデフォルトの最大スコアは 100 です。成績が正しく設定されていることを確認できるように、maxPoints を 100 以外の値に設定することをおすすめします。デモとして、maxPoints を 50 に設定します。
attachment オブジェクトの作成時に、courses.courseWork.addOnAttachments エンドポイントに CREATE リクエストを送信する直前に maxPoints フィールドを追加します。提供されている例に沿って作成した場合、これは webapp/attachment_routes.py ファイルにあります。
attachment = {
    # Specifies the route for a teacher user.
    "teacherViewUri": {
        "uri":
            flask.url_for(
                "load_activity_attachment",
                _scheme='https',
                _external=True),
    },
    # Specifies the route for a student user.
    "studentViewUri": {
        "uri":
            flask.url_for(
                "load_activity_attachment",
                _scheme='https',
                _external=True)
    },
    # Specifies the route for a teacher user when the attachment is
    # loaded in the Classroom grading view.
    "studentWorkReviewUri": {
        "uri":
            flask.url_for(
                "view_submission", _scheme='https', _external=True)
    },
    # Sets the maximum points that a student can earn for this activity.
    # This is the denominator in a fractional representation of a grade.
    "maxPoints": 50,
    # The title of the attachment.
    "title": f"Attachment {attachment_count}",
}
このデモでは、maxPoints 値をローカルの添付ファイル データベースにも保存します。これにより、後で生徒の提出物を採点するときに API 呼び出しを追加で行う必要がなくなります。ただし、教師がアドオンとは別に課題の評価設定を変更する可能性があります。courses.courseWork エンドポイントに GET リクエストを送信して、割り当てレベルの maxPoints 値を確認します。この場合、CourseWork.id フィールドに itemId を渡します。
次に、データベース モデルを更新して、アタッチメントの maxPoints 値も保持するようにします。CREATE レスポンスの maxPoints 値を使用することをおすすめします。
まず、Attachment テーブルに max_points フィールドを追加します。サンプルに沿って作成した場合、この値は webapp/models.py ファイルにあります。
# Database model to represent an attachment.
class Attachment(db.Model):
    # The attachmentId is the unique identifier for the attachment.
    attachment_id = db.Column(db.String(120), primary_key=True)

    # The image filename to store.
    image_filename = db.Column(db.String(120))

    # The image caption to store.
    image_caption = db.Column(db.String(120))

    # The maximum number of points for this activity.
    max_points = db.Column(db.Integer)
courses.courseWork.addOnAttachments CREATE リクエストに戻ります。レスポンスで返された maxPoints 値を保存します。
new_attachment = Attachment(
    # The new attachment's unique ID, returned in the CREATE response.
    attachment_id=resp.get("id"),
    image_filename=key,
    image_caption=value,
    # Store the maxPoints value returned in the response.
    max_points=int(resp.get("maxPoints")))
db.session.add(new_attachment)
db.session.commit()
添付ファイルに最大評価が設定されました。これで、この動作をテストできるようになります。新しい課題に添付ファイルを追加すると、添付ファイル カードに [成績の同期] ラベルが表示され、課題の [点数] の値が変更されます。
Classroom で生徒の提出物の成績を設定する
このセクションでは、添付ファイルの成績の分子(添付ファイルに対する個々の生徒のスコア)の設定について説明します。これを行うには、生徒の提出物の pointsEarned 値を設定します。
ここで重要な決定を下す必要があります。アドオンが pointsEarned を設定するためのリクエストを発行する方法です。
問題は、pointsEarned を設定するには teacher OAuth スコープが必要なことです。生徒ユーザーに teacher スコープを付与しないでください。生徒がアドオンを操作する際に、生徒ビューの iframe ではなく教師ビューの iframe が読み込まれるなど、予期しない動作が発生する可能性があります。したがって、pointsEarned の設定方法は次の 2 つです。
- ログインしている教師の認証情報を使用する。
- 保存された(オフライン)教師の認証情報を使用する。
以降のセクションでは、各実装を説明する前に、各アプローチのトレードオフについて説明します。提供されている例では、成績を Classroom に渡すための両方のアプローチを示しています。提供されている例を実行する際にアプローチを選択する方法については、以下の言語固有の手順をご覧ください。
webapp/attachment_routes.py ファイルの上部にある SET_GRADE_WITH_LOGGED_IN_USER_CREDENTIALS 宣言を見つけます。ログインした教師の認証情報を使用して成績を返すには、この値を True に設定します。生徒がアクティビティを送信したときに保存されている認証情報を使用して成績を返すようにするには、この値を False に設定します。
ログインした教師の認証情報を使用して成績を設定する
ログイン中のユーザーの認証情報を使用して、pointsEarned を設定するためのリクエストを発行します。これは、これまでの実装の残りの部分をミラーリングしているため、直感的で、実現にほとんど労力がかかりません。
ただし、教師は [生徒の課題の確認] iframe で生徒の提出物のみを操作します。これには重要な意味があります。
- 教師が Classroom UI で操作を行うまで、Classroom に成績は入力されません。
- 教師は、すべての生徒の成績を入力するために、すべての生徒の提出物を開く必要がある場合があります。
- Classroom が成績を受け取ってから Classroom UI に表示されるまでに、少し時間がかかります。通常は 5 ~ 10 秒ですが、30 秒ほどかかることもあります。
これらの要因が組み合わさると、教師はクラスの成績を完全に入力するために、かなりの時間を費やす手動作業を行う必要が生じる可能性があります。
このアプローチを実装するには、既存の学生の課題のレビュー ルートに API 呼び出しを 1 つ追加します。
生徒の提出物と添付ファイルのレコードを取得したら、生徒の提出物を評価し、結果の成績を保存します。AddOnAttachmentStudentSubmission オブジェクトの pointsEarned フィールドに評価を設定します。最後に、リクエスト本文に AddOnAttachmentStudentSubmission インスタンスを含めて、courses.courseWork.addOnAttachments.studentSubmissions エンドポイントに PATCH リクエストを発行します。また、PATCH リクエストの updateMask に pointsEarned を指定する必要があります。
# Look up the student's submission in our database.
student_submission = Submission.query.get(flask.session["submissionId"])

# Look up the attachment in the database.
attachment = Attachment.query.get(student_submission.attachment_id)

grade = 0

# See if the student response matches the stored name.
if student_submission.student_response.lower(
) == attachment.image_caption.lower():
    grade = attachment.max_points

# Create an instance of the Classroom service.
classroom_service = ch._credential_handler.get_classroom_service()

# Build an AddOnAttachmentStudentSubmission instance.
add_on_attachment_student_submission = {
    # Specifies the student's score for this attachment.
    "pointsEarned": grade,
}

# Issue a PATCH request to set the grade numerator for this attachment.
patch_grade_response = classroom_service.courses().courseWork(
).addOnAttachments().studentSubmissions().patch(
    courseId=flask.session["courseId"],
    itemId=flask.session["itemId"],
    attachmentId=flask.session["attachmentId"],
    submissionId=flask.session["submissionId"],
    # updateMask is a list of fields being modified.
    updateMask="pointsEarned",
    body=add_on_attachment_student_submission).execute()
オフラインの教師認証情報を使用して成績を設定する
成績を設定するための 2 つ目の方法では、添付ファイルを作成した教師の保存された認証情報を使用する必要があります。この実装では、事前に承認された教師の更新トークンとアクセス トークンを使用して認証情報を作成し、これらの認証情報を使用して pointsEarned を設定する必要があります。
このアプローチの重要な利点は、Classroom UI に教師の操作を必要とせずに成績が入力されるため、上記の問題を回避できることです。その結果、エンドユーザーは採点がシームレスで効率的であると認識します。また、この方法では、生徒がアクティビティを完了したときや非同期的に成績を返すタイミングを選択できます。
このアプローチを実装するには、次のタスクを完了します。
- アクセス トークンを保存するようにユーザー データベース レコードを変更します。
- 教師 ID を保存するようにアタッチメント データベース レコードを変更します。
- 教師の認証情報を取得し、必要に応じて新しい Classroom サービス インスタンスを作成します。
- 提出物の成績を設定します。
このデモでは、生徒がアクティビティを完了したとき(生徒ビュー ルートで生徒がフォームを送信したとき)に成績を設定します。
アクセス トークンを保存するようにユーザー データベース レコードを変更する
API 呼び出しを行うには、更新トークンとアクセス トークンの 2 つの一意のトークンが必要です。ここまでチュートリアル シリーズを進めてきた場合は、User テーブル スキーマにすでに更新トークンが保存されているはずです。認証フローの一部としてアクセス トークンを受け取るため、ログイン済みユーザーでのみ API 呼び出しを行う場合は、更新トークンを保存するだけで十分です。
ただし、ログインしたユーザー以外のユーザーとして呼び出しを行う必要があるため、認証フローは使用できません。そのため、アクセス トークンは更新トークンと併せて保存する必要があります。アクセス トークンを追加するように User テーブル スキーマを更新します。
提供されている例では、これは webapp/models.py ファイルにあります。
# Database model to represent a user.
class User(db.Model):
    # The user's identifying information:
    id = db.Column(db.String(120), primary_key=True)
    display_name = db.Column(db.String(80))
    email = db.Column(db.String(120), unique=True)
    portrait_url = db.Column(db.Text())

    # The user's refresh token, which will be used to obtain an access token.
    # Note that refresh tokens will become invalid if:
    # - The refresh token has not been used for six months.
    # - The user revokes your app's access permissions.
    # - The user changes passwords.
    # - The user belongs to a Google Cloud organization
    #   that has session control policies in effect.
    refresh_token = db.Column(db.Text())

    # An access token for this user.
    access_token = db.Column(db.Text())
次に、User レコードを作成または更新するコードを更新して、アクセス トークンも保存するようにします。
提供されている例では、webapp/credential_handler.py ファイルにあります。
def save_credentials_to_storage(self, credentials):
    # Issue a request for the user's profile details.
    user_info_service = googleapiclient.discovery.build(
        serviceName="oauth2", version="v2", credentials=credentials)
    user_info = user_info_service.userinfo().get().execute()
    flask.session["username"] = user_info.get("name")
    flask.session["login_hint"] = user_info.get("id")

    # See if we have any stored credentials for this user. If they have used
    # the add-on before, we should have received login_hint in the query
    # parameters.
    existing_user = self.get_credentials_from_storage(user_info.get("id"))

    # If we do have stored credentials, update the database.
    if existing_user:
        if user_info:
            existing_user.id = user_info.get("id")
            existing_user.display_name = user_info.get("name")
            existing_user.email = user_info.get("email")
            existing_user.portrait_url = user_info.get("picture")

        if credentials and credentials.refresh_token is not None:
            existing_user.refresh_token = credentials.refresh_token
            # Update the access token.
            existing_user.access_token = credentials.token

    # If not, this must be a new user, so add a new entry to the database.
    else:
        new_user = User(
            id=user_info.get("id"),
            display_name=user_info.get("name"),
            email=user_info.get("email"),
            portrait_url=user_info.get("picture"),
            refresh_token=credentials.refresh_token,
            # Store the access token as well.
            access_token=credentials.token)

        db.session.add(new_user)

    db.session.commit()
教師 ID を保存するようにアタッチメント データベース レコードを変更する
アクティビティの成績を設定するには、pointsEarned をコースの教師として設定するように呼び出します。これを行うには、次の方法があります。
- 教師の認証情報とコース ID のローカル マッピングを保存します。ただし、同じ教師が特定のコースと関連付けられているとは限りません。
- Classroom API の
coursesエンドポイントにGETリクエストを発行して、現在の教師を取得します。次に、ローカル ユーザー レコードをクエリして、一致する教師の認証情報を探します。 - アドオン アタッチメントを作成するときに、ローカル アタッチメント データベースに教師 ID を保存します。次に、生徒ビューの iframe に渡された
attachmentIdから教師の認証情報を取得します。
この例では、生徒がアクティビティの添付ファイルを完了したときに成績を設定するため、最後のオプションを示しています。
データベースの Attachment テーブルに教師 ID フィールドを追加します。
提供されている例では、webapp/models.py ファイルにあります。
# Database model to represent an attachment.
class Attachment(db.Model):
    # The attachmentId is the unique identifier for the attachment.
    attachment_id = db.Column(db.String(120), primary_key=True)

    # The image filename to store.
    image_filename = db.Column(db.String(120))

    # The image caption to store.
    image_caption = db.Column(db.String(120))

    # The maximum number of points for this activity.
    max_points = db.Column(db.Integer)

    # The ID of the teacher that created the attachment.
    teacher_id = db.Column(db.String(120))
次に、Attachment レコードを作成または更新するコードを更新して、クリエイターの ID も保存します。
提供されている例では、これは webapp/attachment_routes.py ファイルの create_attachments メソッドにあります。
# Store the attachment by id.
new_attachment = Attachment(
    # The new attachment's unique ID, returned in the CREATE response.
    attachment_id=resp.get("id"),
    image_filename=key,
    image_caption=value,
    max_points=int(resp.get("maxPoints")),
    teacher_id=flask.session["login_hint"])
db.session.add(new_attachment)
db.session.commit()
教師の認証情報を取得する
生徒ビューの iframe を提供するルートを見つけます。生徒の回答をローカル データベースに保存した直後に、ローカル ストレージから教師の認証情報を取得します。前の 2 つのステップで準備を整えているので、これは簡単な作業です。また、これらの情報を使用して、教師ユーザー用の Classroom サービスの新しいインスタンスを作成することもできます。
提供されている例では、これは webapp/attachment_routes.py ファイルの load_activity_attachment メソッドにあります。
# Create an instance of the Classroom service using the tokens for the
# teacher that created the attachment.

# We're assuming that there are already credentials in the session, which
# should be true given that we are adding this within the Student View
# route; we must have had valid credentials for the student to reach this
# point. The student credentials will be valid to construct a Classroom
# service for another user except for the tokens.
if not flask.session.get("credentials"):
    raise ValueError(
        "No credentials found in session for the requested user.")

# Make a copy of the student credentials so we don't modify the original.
teacher_credentials_dict = deepcopy(flask.session.get("credentials"))

# Retrieve the requested user's stored record.
teacher_record = User.query.get(attachment.teacher_id)

# Apply the user's tokens to the copied credentials.
teacher_credentials_dict["refresh_token"] = teacher_record.refresh_token
teacher_credentials_dict["token"] = teacher_record.access_token

# Construct a temporary credentials object.
teacher_credentials = google.oauth2.credentials.Credentials(
    **teacher_credentials_dict)

# Refresh the credentials if necessary; we don't know when this teacher last
# made a call.
if teacher_credentials.expired:
    teacher_credentials.refresh(Request())

# Request the Classroom service for the specified user.
teacher_classroom_service = googleapiclient.discovery.build(
    serviceName=CLASSROOM_API_SERVICE_NAME,
    version=CLASSROOM_API_VERSION,
    credentials=teacher_credentials)
提出物の成績を設定する
以降の手順は、ログインした教師の認証情報を使用する場合と同じです。ただし、前の手順で取得した教師の認証情報を使用して呼び出す必要があります。
# Issue a PATCH request as the teacher to set the grade numerator for this
# attachment.
patch_grade_response = teacher_classroom_service.courses().courseWork(
).addOnAttachments().studentSubmissions().patch(
    courseId=flask.session["courseId"],
    itemId=flask.session["itemId"],
    attachmentId=flask.session["attachmentId"],
    submissionId=flask.session["submissionId"],
    # updateMask is a list of fields being modified.
    updateMask="pointsEarned",
    body=add_on_attachment_student_submission).execute()
アドオンをテストする
前のチュートリアルと同様に、教師としてアクティビティ タイプの添付ファイルを含む課題を作成し、生徒として回答を送信してから、[生徒の課題の確認] iframe で提出物を開きます。実装方法に応じて、成績が異なるタイミングで表示されます。
- 生徒がアクティビティを完了したときに成績を返却するように選択した場合は、生徒の課題の確認の iframe を開く前に、UI に下書きの成績が表示されているはずです。課題を開いたときの生徒リストや、[生徒の提出物の確認] iframe の横にある [成績] ボックスでも確認できます。
- 教師が [生徒の課題の確認] iframe を開いたときに成績を返すように選択した場合、iframe の読み込み直後に [成績] ボックスに成績が表示されます。前述のように、この処理には 30 秒ほどかかることがあります。その後、特定の生徒の成績が他の Classroom 採点簿ビューにも表示されます。
生徒に正しいスコアが表示されていることを確認します。
これで、これで、次のステップである Google Classroom の外部で添付ファイルを作成するに進むことができます。