
Spring Integration 提供訊息傳輸機制,可透過 MessageChannels 交換 Messages。它會使用管道轉接程式與外部系統通訊。
在本練習中,我們將建立兩個應用程式,並使用 Spring Cloud GCP 提供的 Spring Integration 管道轉接程式進行通訊。這些轉接程式會讓 Spring Integration 使用 Google Cloud Pub/Sub 做為訊息交換後端。
您會瞭解如何使用 Cloud Shell 和 Cloud SDK gcloud 指令。
本教學課程使用 Spring Boot 入門指南中的範例程式碼。
課程內容
- 如何使用 Spring Integration 和 Spring Cloud GCP,透過 Google Cloud Pub/Sub 在應用程式之間交換訊息
軟硬體需求
您會如何使用這個教學課程?
您對建構 HTML/CSS 網頁應用程式的體驗滿意嗎?
您對使用 Google Cloud Platform 服務的體驗有何評價?
自行設定環境
如果您還沒有 Google 帳戶 (Gmail 或 Google 應用程式),請先建立帳戶。登入 Google Cloud Platform 主控台 (console.cloud.google.com),然後建立新專案:


請記住專案 ID,這是所有 Google Cloud 專案中不重複的名稱 (上述名稱已遭占用,因此不適用於您,抱歉!)。本程式碼研究室稍後會將其稱為 PROJECT_ID。
接著,您必須在 Cloud 控制台中啟用帳單,才能使用 Google Cloud 資源。
完成本程式碼研究室的費用不應超過數美元,但如果您決定使用更多資源,或是將資源繼續執行 (請參閱本文件結尾的「清除」一節),則可能會增加費用。
Google Cloud Platform 新使用者享有價值 $300 美元的免費試用期。
Google Cloud Shell
雖然您可以透過筆電遠端操作 Google Cloud,但在本程式碼研究室中,我們將使用 Google Cloud Shell,這是可在雲端執行的指令列環境。
啟用 Google Cloud Shell
在 GCP 主控台的右上角工具列中,按一下 Cloud Shell 圖示:

然後按一下「啟動 Cloud Shell」:

佈建並連線至環境的作業只需幾分鐘的時間:

這部虛擬機器搭載各種您需要的開發工具,提供永久的 5 GB 主目錄,而且在 Google Cloud 中運作,可大幅提升網路效能和驗證功能。您只需要瀏覽器或 Google Chromebook,就能完成這個實驗室的大部分工作 (甚至全部)。
連線至 Cloud Shell 後,您應會發現自己通過驗證,且專案已設為您的「PROJECT_ID」PROJECT_ID。
在 Cloud Shell 中執行下列指令,確認您已通過驗證:
gcloud auth list
指令輸出
Credentialed accounts:
 - <myaccount>@<mydomain>.com (active)
gcloud config list project
指令輸出
[core]
project = <PROJECT_ID>
如未設定,請輸入下列指令設定專案:
gcloud config set project <PROJECT_ID>
指令輸出
Updated property [core/project].
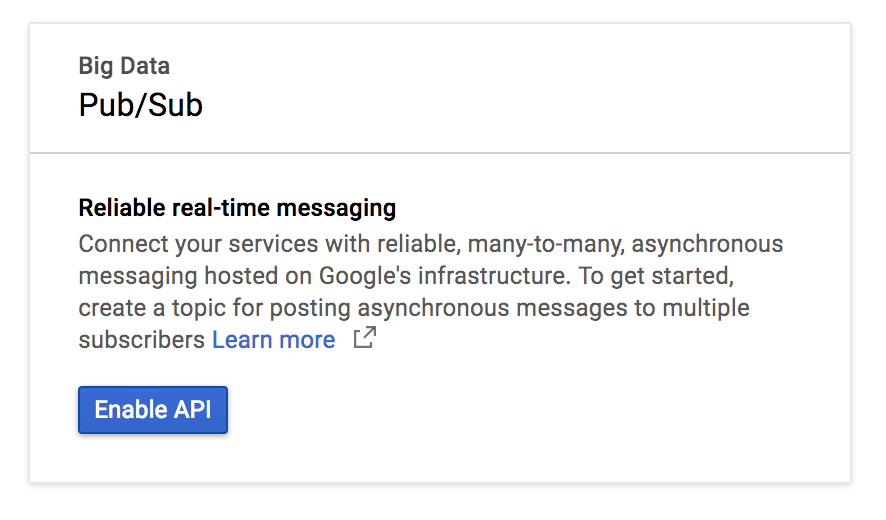
前往 Google Cloud Pub/Sub 主題頁面,然後啟用 API。
按一下 [Create Topic] (建立主題)。
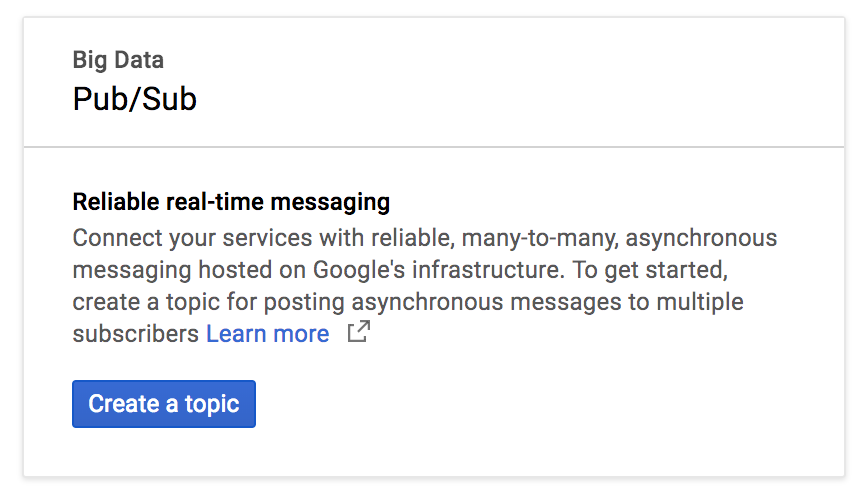
輸入 exampleTopic 做為主題名稱,然後按一下「Create」。

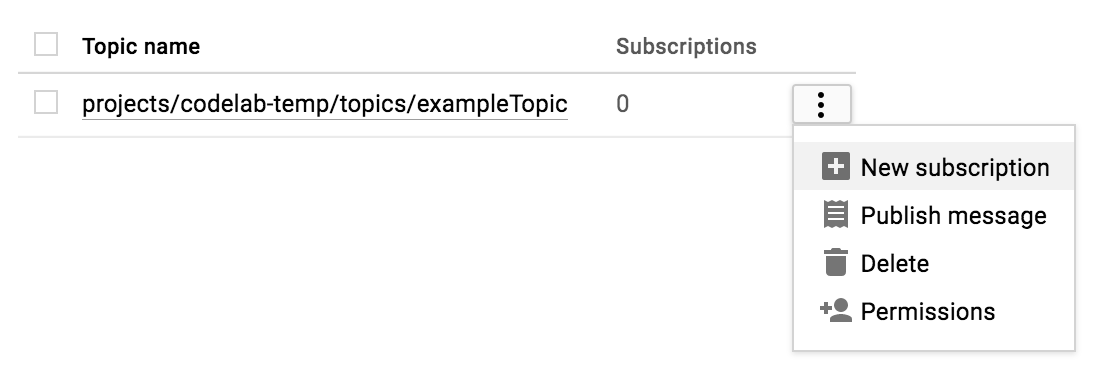
建立主題後,請留在「主題」頁面。找到剛建立的主題,按下行尾的三個垂直點,然後點選「新增訂閱」。
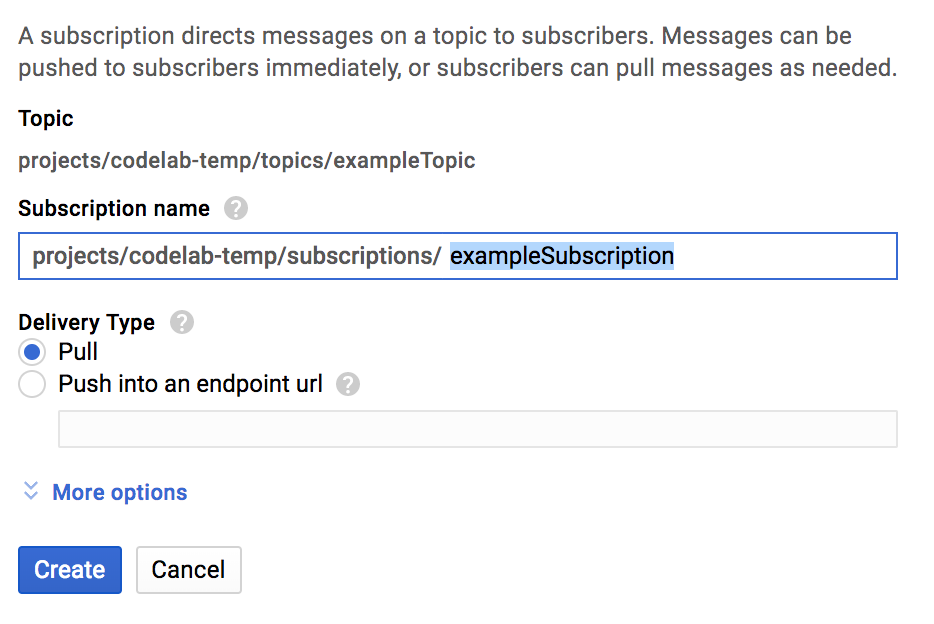
在訂閱名稱文字方塊中輸入 exampleSubscription,然後按一下「建立」。
啟動 Cloud Shell 後,您可以使用指令列,透過 Spring Initializr 產生兩個新的 Spring Boot 應用程式:
$ curl https://start.spring.io/starter.tgz \
  -d bootVersion=2.0.6.RELEASE \
  -d dependencies=web \
  -d baseDir=spring-integration-sender | tar -xzvf -
$ curl https://start.spring.io/starter.tgz \
  -d bootVersion=2.0.6.RELEASE \
  -d baseDir=spring-integration-receiver | tar -xzvf -
現在來建立訊息傳送應用程式。切換至傳送應用程式的目錄。
$ cd spring-integration-sender我們希望應用程式能將訊息寫入頻道。訊息進入管道後,會由輸出管道介面卡擷取,並從一般 Spring 訊息轉換為 Google Cloud Pub/Sub 訊息,然後發布至 Google Cloud Pub/Sub 主題。
如要讓應用程式寫入管道,可以使用 Spring Integration 訊息傳輸閘道。使用 vim、emacs 或 nano 的文字編輯器,在 DemoApplication 類別中宣告 PubsubOutboundGateway 介面。
src/main/java/com/example/demo/DemoApplication.java
...
import org.springframework.integration.annotation.MessagingGateway;

@SpringBootApplication
public class DemoApplication {

        ...

        @MessagingGateway(defaultRequestChannel = "pubsubOutputChannel")
        public interface PubsubOutboundGateway {

                void sendToPubsub(String text);
        }
}
我們現在有傳送訊息至管道的機制,但訊息進入管道後會傳送至何處?
我們需要輸出管道介面卡,才能取用管道中的新訊息,並將這些訊息發布至 Google Cloud Pub/Sub 主題。
src/main/java/com/example/demo/DemoApplication.java
...
import org.springframework.cloud.gcp.pubsub.core.PubSubTemplate;
import org.springframework.context.annotation.Bean;
import org.springframework.integration.annotation.ServiceActivator;
import org.springframework.cloud.gcp.pubsub.integration.outbound.PubSubMessageHandler;
import org.springframework.messaging.MessageHandler;

@SpringBootApplication
public class DemoApplication {

        ...

        @Bean
        @ServiceActivator(inputChannel = "pubsubOutputChannel")
        public MessageHandler messageSender(PubSubTemplate pubsubTemplate) {
                return new PubSubMessageHandler(pubsubTemplate, "exampleTopic");
        }
}
@ServiceActivator 註解會導致系統將此 MessageHandler 套用至 inputChannel 中的任何新訊息。在本例中,我們會呼叫輸出管道介面卡 PubSubMessageHandler,將訊息發布至 Google Cloud Pub/Sub 的 exampleTopic 主題。
有了管道轉接器,我們現在可以自動連線 PubsubOutboundGateway 物件,並用來將訊息寫入管道。
src/main/java/com/example/demo/DemoApplication.java
...
import org.springframework.beans.factory.annotation.Autowired;
import org.springframework.web.bind.annotation.PostMapping;
import org.springframework.web.bind.annotation.RequestParam;
import org.springframework.web.servlet.view.RedirectView;

@SpringBootApplication
public class DemoApplication {

...

        @Autowired
        private PubsubOutboundGateway messagingGateway;

        @PostMapping("/postMessage")
        public RedirectView postMessage(@RequestParam("message") String message) {
                this.messagingGateway.sendToPubsub(message);
                return new RedirectView("/");
        }
}
由於有 @PostMapping 註解,我們現在有一個端點會監聽 HTTP POST 要求,但必須同時將 @RestController 註解新增至 DemoApplication 類別,將其標示為 REST 控制器。
src/main/java/com/example/demo/DemoApplication.java
import org.springframework.web.bind.annotation.RestController;

@SpringBootApplication
@RestController
public class DemoApplication {
  ...
}
如要執行應用程式,我們只需要新增必要的依附元件。
pom.xml
<project>
  ...
  <!-- Add Spring Cloud GCP Dependency BOM -->
  <dependencyManagement>
        <dependencies>
                <dependency>
                        <groupId>org.springframework.cloud</groupId>
                        <artifactId>spring-cloud-gcp-dependencies</artifactId>
                        <version>1.0.0.RELEASE</version>
                        <type>pom</type>
                        <scope>import</scope>
                </dependency>
        </dependencies>
  </dependencyManagement>

  <dependencies>
        ...
        <!-- Add Pub/Sub Starter -->
        <dependency>
                <groupId>org.springframework.cloud</groupId>
                <artifactId>spring-cloud-gcp-starter-pubsub</artifactId>
        </dependency>

        <!-- Add Spring Integration -->
        <dependency>
                <groupId>org.springframework.integration</groupId>
                <artifactId>spring-integration-core</artifactId>
        </dependency>

  </dependencies>

</project>
執行傳送端應用程式。
# Set the Project ID in environmental variable
$ export GOOGLE_CLOUD_PROJECT=`gcloud config list \
  --format 'value(core.project)'`
$ ./mvnw spring-boot:run
應用程式正在監聽通訊埠 8080 和端點 /postMessage 上含有訊息的 POST 要求,但稍後會再說明這點。
我們剛建立的應用程式會透過 Google Cloud Pub/Sub 傳送訊息。現在,我們要建立另一個應用程式,接收並處理這些訊息。
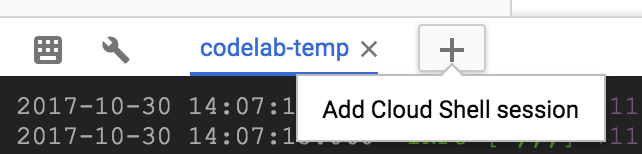
按一下 + 開啟新的 Cloud Shell 工作階段。
接著,在新的 Cloud Shell 工作階段中,將目錄變更為接收器應用程式的目錄:
$ cd spring-integration-receiver在先前的應用程式中,訊息閘道宣告為我們建立了外送管道。由於我們不會使用訊息閘道接收訊息,因此需要自行宣告 MessageChannel,讓系統知道要將來信傳送至何處。
src/main/java/com/example/demo/DemoApplication.java
...
import org.springframework.context.annotation.Bean;
import org.springframework.integration.channel.DirectChannel;
import org.springframework.messaging.MessageChannel;

@SpringBootApplication
public class DemoApplication {

        ...

        @Bean
        public MessageChannel pubsubInputChannel() {
                return new DirectChannel();
        }
}
我們需要入站管道介面卡,才能接收 Google Cloud Pub/Sub 傳送的訊息,並將訊息轉送至 pubsubInputChannel。
src/main/java/com/example/demo/DemoApplication.java
...
import org.springframework.beans.factory.annotation.Qualifier;
import org.springframework.cloud.gcp.pubsub.core.PubSubTemplate;
import org.springframework.cloud.gcp.pubsub.integration.inbound.PubSubInboundChannelAdapter;

@SpringBootApplication
public class DemoApplication {
        ...

        @Bean
        public PubSubInboundChannelAdapter messageChannelAdapter(
                        @Qualifier("pubsubInputChannel") MessageChannel inputChannel,
                        PubSubTemplate pubSubTemplate) {
                PubSubInboundChannelAdapter adapter =
                                new PubSubInboundChannelAdapter(pubSubTemplate, "exampleSubscription");
                adapter.setOutputChannel(inputChannel);

                return adapter;
        }
}
這個介面卡會繫結至 pubsubInputChannel,並接聽 Google Cloud Pub/Sub exampleSubscription 訂閱項目中的新訊息。
我們有一個頻道,會將收到的訊息發布到該頻道,但該如何處理這些訊息?
讓我們使用 @ServiceActivator 處理這些訊息,該函式會在 pubsubInputChannel 收到新訊息時觸發。
src/main/java/com/example/demo/DemoApplication.java
...
import org.apache.commons.logging.Log;
import org.apache.commons.logging.LogFactory;
import org.springframework.integration.annotation.ServiceActivator;

@SpringBootApplication
public class DemoApplication {

        ...

        private static final Log LOGGER = LogFactory.getLog(DemoApplication.class);

        @ServiceActivator(inputChannel = "pubsubInputChannel")
        public void messageReceiver(String payload) {
                LOGGER.info("Message arrived! Payload: " + payload);
        }
}
在本例中,我們只會記錄訊息酬載。
我們需要新增必要的依附元件。
pom.xml
<project>
  ...
  <!-- Add Spring Cloud GCP Dependency BOM -->
  <dependencyManagement>
        <dependencies>
                <dependency>
                        <groupId>org.springframework.cloud</groupId>
                        <artifactId>spring-cloud-gcp-dependencies</artifactId>
                        <version>1.0.0.RELEASE</version>
                        <type>pom</type>
                        <scope>import</scope>
                </dependency>
        </dependencies>
  </dependencyManagement>

  <dependencies>
        ...
        <!-- Add Pub/Sub Starter -->
        <dependency>
                <groupId>org.springframework.cloud</groupId>
                <artifactId>spring-cloud-gcp-starter-pubsub</artifactId>
        </dependency>

        <!-- Add Spring Integration -->
        <dependency>
                <groupId>org.springframework.integration</groupId>
                <artifactId>spring-integration-core</artifactId>
        </dependency>

  </dependencies>

</project>
執行接收器應用程式。
$ ./mvnw spring-boot:run現在,您傳送至傳送端應用程式的任何訊息,都會記錄在接收端應用程式中。如要測試,請開啟新的 Cloud Shell 工作階段,並向傳送端應用程式發出 HTTP POST 要求。
$ curl --data "message=Hello world!" localhost:8080/postMessage接著,請確認接收端應用程式是否已記錄您傳送的訊息!
INFO: Message arrived! Payload: Hello world!刪除您為本練習建立的訂閱項目和主題。
$ gcloud beta pubsub subscriptions delete exampleSubscription
$ gcloud beta pubsub topics delete exampleTopic
您設定了兩個 Spring Boot 應用程式,使用 Google Cloud Pub/Sub 的 Spring Integration 管道轉接程式。這些應用程式會彼此交換訊息,完全不會與 Google Cloud Pub/Sub API 互動。
您已瞭解如何使用 Google Cloud Pub/Sub 的 Spring Integration 管道轉接程式!
瞭解詳情
- Google Cloud Pub/Sub:https://cloud.google.com/pubsub/
- GCP 上的 Spring 專案:http://cloud.spring.io/spring-cloud-gcp/
- Spring on GCP GitHub 存放區:https://github.com/spring-cloud/spring-cloud-gcp
- 在 Google Cloud Platform 上使用 Java:https://cloud.google.com/java/
授權
這項內容採用的授權為 Creative Commons 姓名標示 2.0 通用授權。