
Google Cloud Datastore は、自動スケーリングと高パフォーマンスを実現し、アプリケーション開発を簡素化するように構築された NoSQL ドキュメント データベースです。
学習内容
- Cloud Datastore を使用して Spring Boot で Java オブジェクトを保存して取得する方法
必要なもの
このチュートリアルの利用方法をお選びください。
Google Cloud Platform サービスのご利用経験についてどのように評価されますか?
セルフペース型の環境設定
Google アカウント(Gmail または Google Apps)をお持ちでない場合は、1 つ作成する必要があります。Google Cloud Platform のコンソール(console.cloud.google.com)にログインし、新しいプロジェクトを作成します。


プロジェクト ID を忘れないようにしてください。プロジェクト ID はすべての Google Cloud プロジェクトを通じて一意の名前にする必要があります(上記の名前はすでに使用されているので使用できません)。以降、このコードラボでは PROJECT_ID と呼びます。
次に、Google Cloud リソースを使用するために、Cloud Console で課金を有効にする必要があります。
この Codelab の操作をすべて行っても、費用は数ドル程度です。ただし、その他のリソースを使いたい場合や、実行したままにしておきたいステップがある場合は、追加コストがかかる可能性があります(このドキュメントの最後にある「クリーンアップ」セクションをご覧ください)。
Google Cloud Platform の新規ユーザーは、300 ドル分の無料トライアルをご利用いただけます。
Google Cloud Shell の有効化
GCP Console で右上のツールバーにある Cloud Shell アイコンをクリックします。

[Cloud Shell の起動] をクリックします。

プロビジョニングと環境への接続にはそれほど時間はかかりません。

この仮想マシンには、必要な開発ツールがすべて準備されています。5 GB の永続ホーム ディレクトリが用意されており、Google Cloud で稼働するため、ネットワーク パフォーマンスが充実しており認証もスムーズです。このラボでの作業のほとんどは、ブラウザまたは Google Chromebook から実行できます。
Cloud Shell に接続すると、すでに認証は完了しており、プロジェクトに各自の PROJECT_ID が設定されています。
Cloud Shell で次のコマンドを実行して、認証されたことを確認します。
gcloud auth list
コマンド出力
Credentialed accounts:
 - <myaccount>@<mydomain>.com (active)
gcloud config list project
コマンド出力
[core]
project = <PROJECT_ID>
上記のようになっていない場合は、次のコマンドで設定できます。
gcloud config set project <PROJECT_ID>
コマンド出力
Updated property [core/project].
GCP Console で、[メニュー] -> [Datastore]([ストレージ] セクション)に移動します。
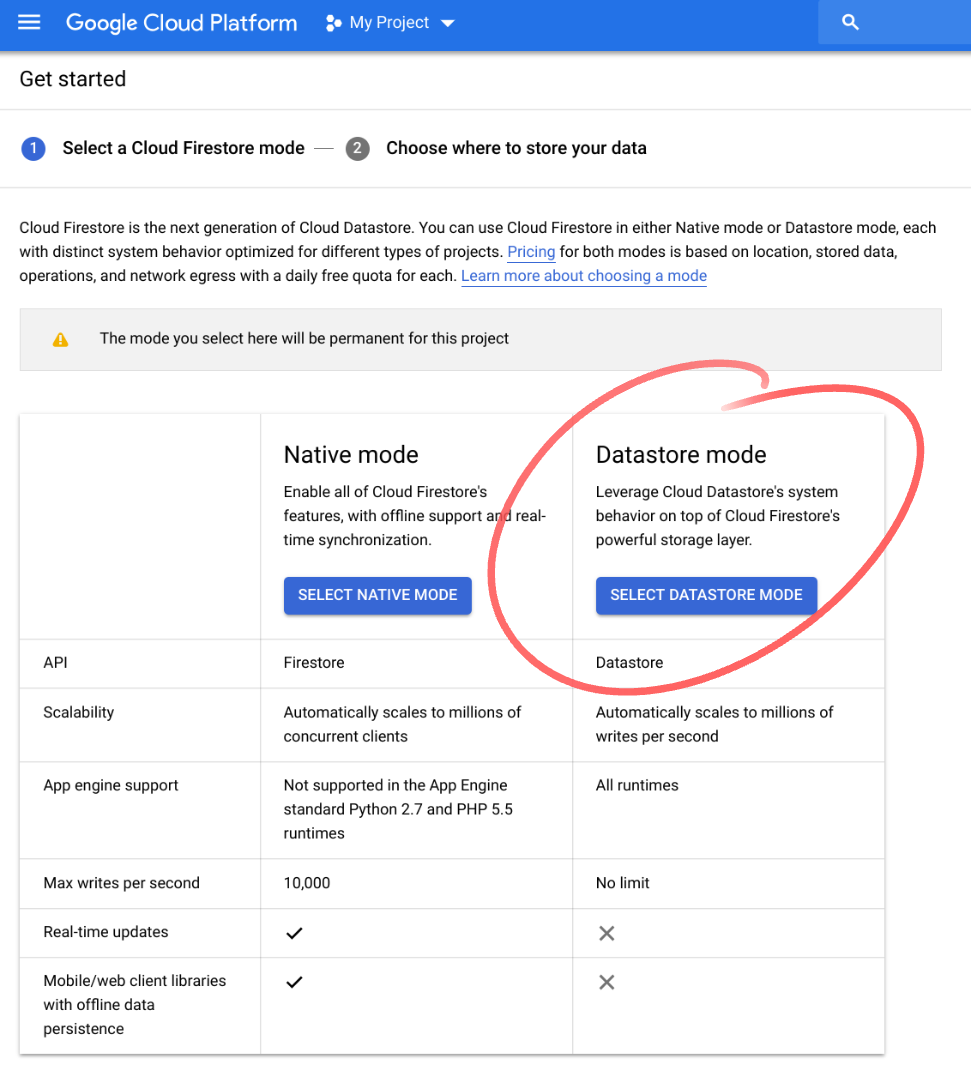
現在のプロジェクトで Datastore を使用したことがない場合は、[Cloud Firestore モードを選択] 画面が表示されます。[Datastore モード] オプションを選択します。
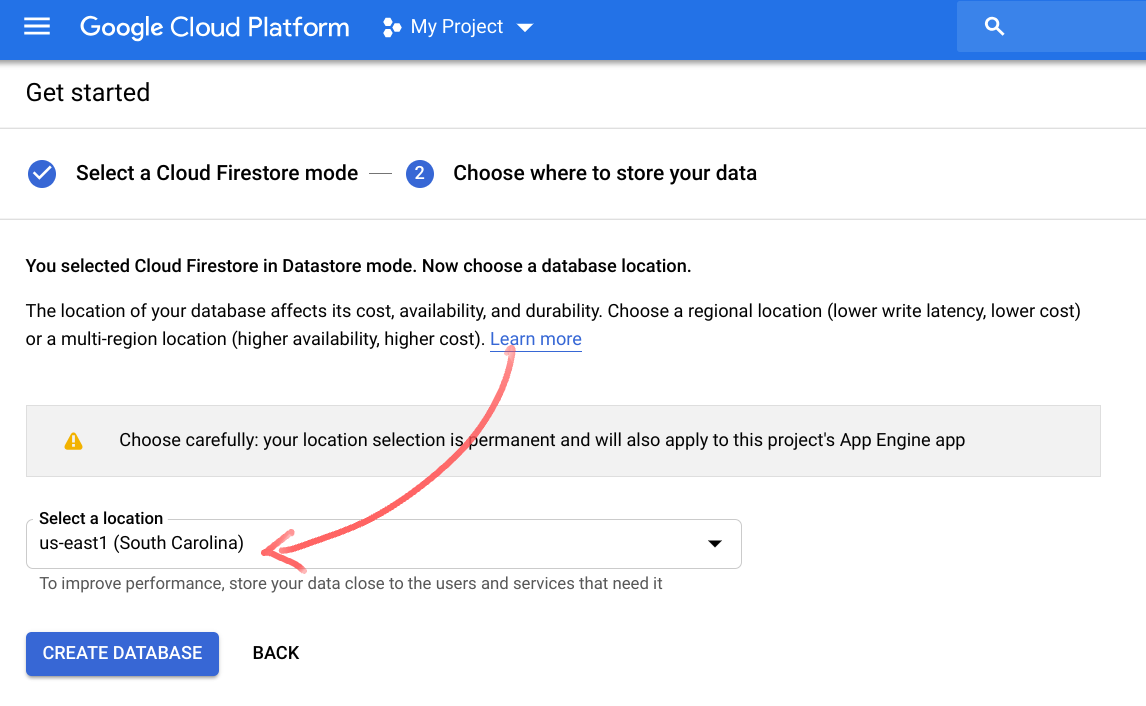
その後、[データの保存場所を選択] 画面が表示されます。[us-east1] または別のリージョン ロケーションを選択して、[データベースを作成] をクリックします。
CloudShell 環境から次のコマンドを使用して、新しい Spring Boot アプリケーションを初期化およびブートストラップします。
$ curl https://start.spring.io/starter.tgz \
  -d packaging=war \
  -d dependencies=cloud-gcp \
  -d baseDir=datastore-example \
  -d bootVersion=2.1.1.RELEASE | tar -xzvf -
これにより、Maven の pom.xml、Maven ラッパー、アプリケーションのエントリポイントとともに、新しい Maven プロジェクトを含む新しい datastore-example/ ディレクトリが作成されます。
このアプリケーションは、ユーザーがコマンドを入力して結果を確認するための CLI を提供します。書籍を表すクラスを作成し、Datastore リポジトリを使用して Cloud Datastore に保存します。
また、pom.xml に必要な依存関係をもう 1 つ追加する必要があります。
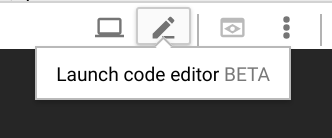
Cloud Shell メニューから [エディタを立ち上げる] をクリックして、ウェブ コードエディタを開きます。
エディタが読み込まれたら、pom.xml ファイルを変更して、Spring Data Cloud Datastore Spring Boot スターターの依存関係を追加します。
pom.xml
<project>
  ...
  <dependencies>
        ...
        <!-- Add GCP Datastore Starter -->
        <dependency>
                <groupId>org.springframework.cloud</groupId>
                <artifactId>spring-cloud-gcp-starter-data-datastore</artifactId>
        </dependency>

        <!-- Add Spring Shell Starter -->
        <dependency>
                <groupId>org.springframework.shell</groupId>
                <artifactId>spring-shell-starter</artifactId>
                <version>2.0.0.RELEASE</version>
        </dependency>

  </dependencies>
</project>
エディタを使用して、次の内容で Book クラスを作成します。
datastore-example/src/main/java/com/example/demo/Book.java
package com.example.demo;

import org.springframework.cloud.gcp.data.datastore.core.mapping.Entity;
import org.springframework.data.annotation.Id;


@Entity(name = "books")
public class Book {
        @Id
        Long id;

        String title;

        String author;

        int year;

        public Book(String title, String author, int year) {
                this.title = title;
                this.author = author;
                this.year = year;
        }

        public long getId() {
                return this.id;
        }

        @Override
        public String toString() {
                return "Book{" +
                                "id=" + this.id +
                                ", title='" + this.title + '\'' +
                                ", author='" + this.author + '\'' +
                                ", year=" + this.year +
                                '}';
        }
}
ご覧のとおり、これはシンプルな POJO です。クラスには @Entity アノテーションが付けられています。これは、クラスを Datastore に保存できることと、種類名(種類は SQL データベースのテーブルのようなものです。詳細については、ドキュメントをご覧ください)を指定することを示します。種類名は省略可能です。省略すると、種類名はクラス名に基づいて生成されます。
id プロパティに @Id アノテーションを付けたことに注意してください。これは、このフィールドを Datastore キーの識別子部分として使用することを意味します。すべての Datastore エンティティには識別子が必要です。サポートされるタイプは String と Long です。
toString メソッドをオーバーライドして、オブジェクトの文字列表現を読みやすくします。これは、オブジェクトを出力するときに役立ちます。
ファイルを保存するのを忘れないでください。
次の内容で BookRepository クラスを作成します。
datastore-example/src/main/java/com/example/demo/BookRepository.java
package com.example.demo;

import java.util.List;

import org.springframework.cloud.gcp.data.datastore.repository.DatastoreRepository;


public interface BookRepository extends DatastoreRepository<Book, Long> {

  List<Book> findByAuthor(String author);

  List<Book> findByYearGreaterThan(int year);

  List<Book> findByAuthorAndYear(String author, int year);

}
このインターフェースは DatastoreRepository<Book, Long> を拡張します。ここで、Book はドメインクラス、Long は Id 型です。リポジトリで 3 つのクエリ メソッドを宣言します。これらのメソッドの実装は、バックグラウンドで自動的に生成されます。
1 つ目は findByAuthor です。このメソッドの実装では、ユーザーが指定した値を条件フィルタで使用して、作成者フィールドとの等価性をチェックするクエリが実行されます。
findByYearGreaterThan メソッドは、ユーザーが指定した値より大きい year フィールドをフィルタするクエリを実行します。
findByAuthorAndYear は、著者フィールドと年フィールドがユーザーが指定した値と一致するエンティティを検索するクエリを実行します。
メイン アプリケーションの DemoApplication クラスを開き、次のように変更します。
datastore-example/src/main/java/com/example/demo/DemoApplication.java
package com.example.demo;

import java.util.List;

import com.google.common.collect.Lists;

import org.springframework.beans.factory.annotation.Autowired;
import org.springframework.boot.SpringApplication;
import org.springframework.boot.autoconfigure.SpringBootApplication;
import org.springframework.shell.standard.ShellComponent;
import org.springframework.shell.standard.ShellMethod;

@ShellComponent
@SpringBootApplication
public class DemoApplication {
  @Autowired
  BookRepository bookRepository;

  public static void main(String[] args) {
     SpringApplication.run(DemoApplication.class, args);
  }

  @ShellMethod("Saves a book to Cloud Datastore: save-book <title> <author> <year>")
  public String saveBook(String title, String author, int year) {
     Book savedBook = this.bookRepository.save(new Book(title, author, year));
     return savedBook.toString();
  }

  @ShellMethod("Loads all books")
  public String findAllBooks() {
     Iterable<Book> books = this.bookRepository.findAll();
     return Lists.newArrayList(books).toString();
  }

  @ShellMethod("Loads books by author: find-by-author <author>")
  public String findByAuthor(String author) {
     List<Book> books = this.bookRepository.findByAuthor(author);
     return books.toString();
  }

  @ShellMethod("Loads books published after a given year: find-by-year-after <year>")
  public String findByYearAfter(int year) {
     List<Book> books = this.bookRepository.findByYearGreaterThan(year);
     return books.toString();
  }

  @ShellMethod("Loads books by author and year: find-by-author-year <author> <year>")
  public String findByAuthorYear(String author, int year) {
     List<Book> books = this.bookRepository.findByAuthorAndYear(author, year);
     return books.toString();
  }

  @ShellMethod("Removes all books")
  public void removeAllBooks() {
     this.bookRepository.deleteAll();
  }
}
クラスに @ShellComponent アノテーションを付けたことに注目してください。これにより、このクラスを CLI コマンドのソースとして使用することを Spring に通知します。@ShellMethod アノテーションが付いたメソッドは、アプリケーションで CLI コマンドとして公開されます。
ここでは、BookRepository インターフェースで宣言したメソッド(findByAuthor、findByYearGreaterThan、findByAuthorAndYear)を使用します。また、save、findAll、deleteAll の 3 つの組み込みメソッドも使用します。
saveBook メソッドを見てみましょう。タイトル、著者、年についてユーザーが指定した値を使用して Book オブジェクトを作成します。ご覧のとおり、id の値は指定していません。そのため、保存時に自動的に割り当てられ、id フィールドに割り当てられます。save メソッドは Book 型のオブジェクトを受け取り、Cloud Datastore に保存します。id フィールドを含むすべてのフィールドが入力された Book オブジェクトを返します。最後に、このオブジェクトの文字列表現を返します。
残りのメソッドも同様に機能します。渡されたパラメータを適切なリポジトリ メソッドに渡し、文字列化された結果を返します。
アプリケーションをビルドして起動するには、Cloud Shell で次のコマンドを実行します(pom.xml が配置されているプロジェクト datastore-example/ のルートから)。
$ mvn spring-boot:run
ビルド ステージが成功すると、spring ロゴが表示され、シェル プロンプトが表示されます。
 .   ____          _            __ _ _
 /\\ / ___'_ __ _ _(_)_ __  __ _ \ \ \ \
( ( )\___ | '_ | '_| | '_ \/ _` | \ \ \ \
 \\/  ___)| |_)| | | | | || (_| |  ) ) ) )
  '  |____| .__|_| |_|_| |_\__, | / / / /
 =========|_|==============|___/=/_/_/_/
 :: Spring Boot ::        (v2.1.1.RELEASE)


shell:>
これで、先ほど定義したコマンドを試すことができます。コマンドのリストを表示するには、ヘルプ コマンドを使用します。
shell:> help
...
find-all-books: Loads all books
find-by-author: Loads books by author: find-by-author <author>
find-by-author-year: Loads books by author and year: find-by-author-year <author> <year>
find-by-year-after: Loads books published after a given year: find-by-year-after <year>
remove-all-books: Removes all books
save-book: Saves a book to Cloud Datastore: save-book <title> <author> <year>
次のようにしてください。
save-bookコマンドを使用して書籍をいくつか作成します。find-all-booksコマンドを使用して検索を実行する- 特定の著者の書籍を検索する(
find-by-author <author>) - 特定の年以降に出版された書籍を検索する(
find-by-year-after <year>) - 特定の著者と年で書籍を検索する(
find-by-author-year <author> <year>)
エンティティが Cloud Datastore にどのように保存されているかを確認するには、GCP Console に移動し、[メニュー -> Datastore(ストレージ セクション) -> エンティティ] に移動します(必要に応じて、[default] 名前空間と [books] 種類を選択します)。
クリーンアップするには、アプリケーション シェルから remove-all-books コマンドを使用してすべての書籍を削除します。
shell:> remove-all-books
アプリケーションを終了するには、quit コマンドを入力してから Ctrl+C キーを押します。
この Codelab では、Cloud Datastore からオブジェクトを保存して取得できるインタラクティブな CLI アプリケーションを作成しました。
詳細
- Cloud Datastore: https://cloud.google.com/datastore/
- Spring Shell: https://projects.spring.io/spring-shell/
- GCP プロジェクトの Spring: http://cloud.spring.io/spring-cloud-gcp/
- Spring on GCP GitHub リポジトリ: https://github.com/spring-cloud/spring-cloud-gcp
- Google Cloud Platform での Java: https://cloud.google.com/java/
ライセンス
この作業はクリエイティブ・コモンズの表示 2.0 汎用ライセンスにより使用許諾されています。