
Google Cloud Datastore 是專為自動調整資源配置、發揮高效能及協助開發應用程式所打造的 NoSQL 文件資料庫。
課程內容
- 如何使用 Cloud Datastore 在 Spring Boot 中儲存及擷取 Java 物件
軟硬體需求
您會如何使用本教學課程?
您對使用 Google Cloud Platform 服務的體驗有何評價?
自行設定環境
如果您還沒有 Google 帳戶 (Gmail 或 Google 應用程式),請先建立帳戶。登入 Google Cloud Platform 主控台 (console.cloud.google.com),然後建立新專案:


請記住專案 ID,這是所有 Google Cloud 專案中不重複的名稱 (上述名稱已遭占用,因此不適用於您,抱歉!)。本程式碼研究室稍後會將其稱為 PROJECT_ID。
接著,您必須在 Cloud 控制台中啟用帳單,才能使用 Google Cloud 資源。
完成本程式碼研究室的費用不應超過數美元,但如果您決定使用更多資源,或是將資源繼續執行 (請參閱本文件結尾的「清除」一節),則可能會增加費用。
Google Cloud Platform 新使用者享有價值 $300 美元的免費試用期。
啟用 Google Cloud Shell
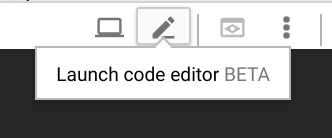
在 GCP 主控台的右上角工具列中,按一下 Cloud Shell 圖示:

然後按一下「啟動 Cloud Shell」:

佈建並連線至環境的作業只需幾分鐘的時間:

這部虛擬機器搭載各種您需要的開發工具,提供永久的 5 GB 主目錄,而且在 Google Cloud 中運作,可大幅提升網路效能和驗證功能。您只需要瀏覽器或 Google Chromebook,就能完成這個實驗室的大部分工作 (甚至全部)。
連線至 Cloud Shell 後,您應會發現自己通過驗證,且專案已設為您的「PROJECT_ID」PROJECT_ID。
在 Cloud Shell 中執行下列指令,確認您已通過驗證:
gcloud auth list
指令輸出
Credentialed accounts:
 - <myaccount>@<mydomain>.com (active)
gcloud config list project
指令輸出
[core]
project = <PROJECT_ID>
如未設定,請輸入下列指令設定專案:
gcloud config set project <PROJECT_ID>
指令輸出
Updated property [core/project].
在 GCP 控制台中,前往「選單」->「Datastore」(位於「儲存空間」部分)。
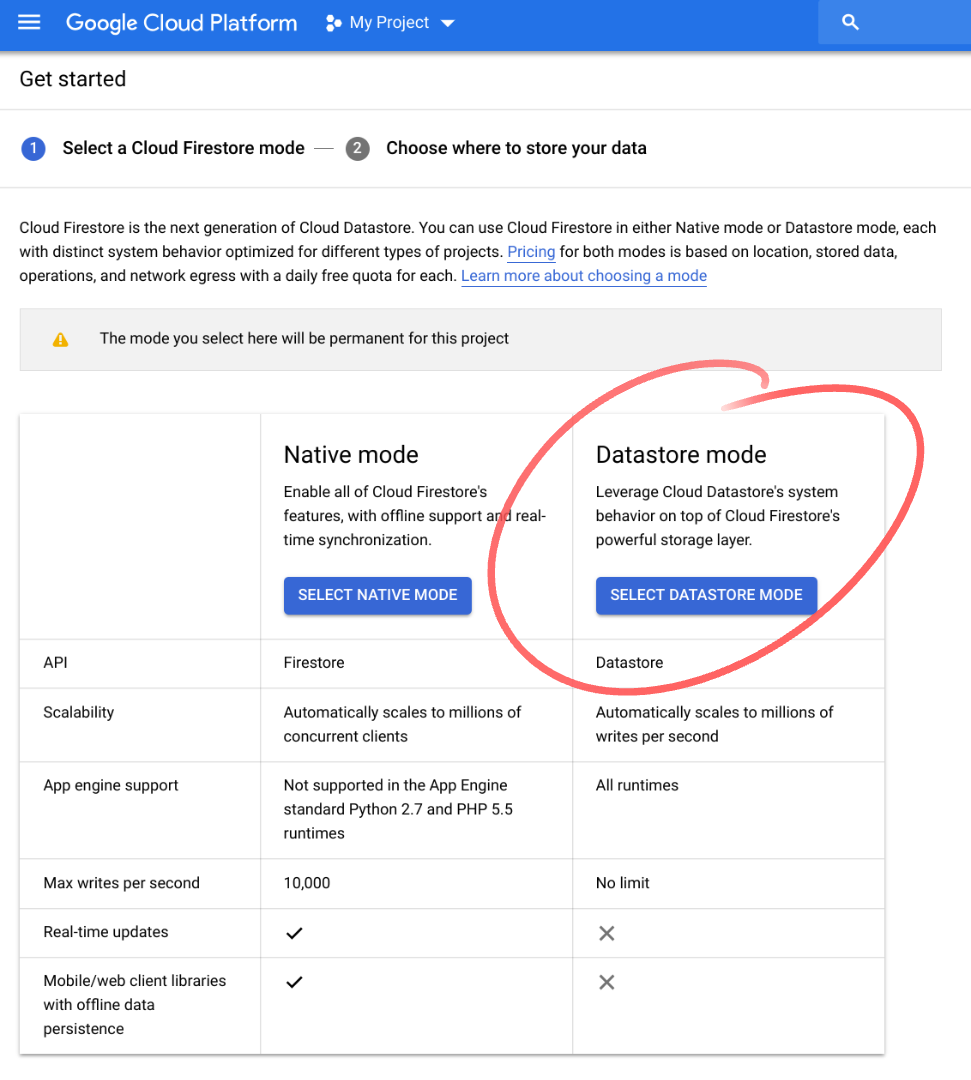
如果您從未在目前專案中使用 Datastore,系統會顯示「選取 Cloud Firestore 模式」畫面。選取「Datastore 模式」選項。
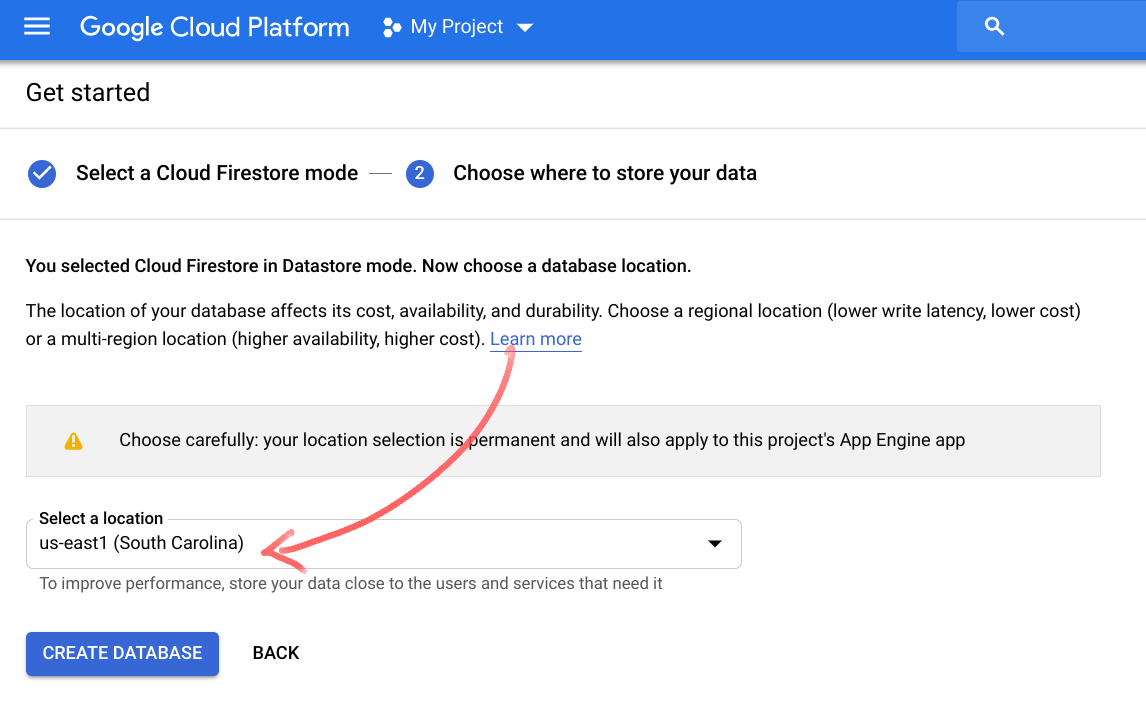
接著會看到「選擇資料的儲存位置」畫面。選取「us-east1」或其他區域位置,然後按一下「建立資料庫」:
在 Cloud Shell 環境中,使用下列指令初始化並啟動新的 Spring Boot 應用程式:
$ curl https://start.spring.io/starter.tgz \
  -d packaging=war \
  -d dependencies=cloud-gcp \
  -d baseDir=datastore-example \
  -d bootVersion=2.1.1.RELEASE | tar -xzvf -
這會建立新的 datastore-example/ 目錄和新的 Maven 專案,以及 Maven 的 pom.xml、Maven 包裝函式和應用程式進入點。
我們的應用程式會提供 CLI,供使用者輸入指令並查看結果。我們會建立類別來代表書籍,然後使用 Datastore Repository 將其儲存至 Cloud Datastore。
我們還需要在 pom.xml 中新增一個必要的依附元件。
按一下 Cloud Shell 選單中的「啟動程式碼編輯器」,開啟網頁程式碼編輯器。
編輯器載入後,請修改 pom.xml 檔案,新增 Spring Data Cloud Datastore Spring Boot 啟動器依附元件:
pom.xml
<project>
  ...
  <dependencies>
        ...
        <!-- Add GCP Datastore Starter -->
        <dependency>
                <groupId>org.springframework.cloud</groupId>
                <artifactId>spring-cloud-gcp-starter-data-datastore</artifactId>
        </dependency>

        <!-- Add Spring Shell Starter -->
        <dependency>
                <groupId>org.springframework.shell</groupId>
                <artifactId>spring-shell-starter</artifactId>
                <version>2.0.0.RELEASE</version>
        </dependency>

  </dependencies>
</project>
使用編輯器建立 Book 類別,並加入以下內容:
datastore-example/src/main/java/com/example/demo/Book.java
package com.example.demo;

import org.springframework.cloud.gcp.data.datastore.core.mapping.Entity;
import org.springframework.data.annotation.Id;


@Entity(name = "books")
public class Book {
        @Id
        Long id;

        String title;

        String author;

        int year;

        public Book(String title, String author, int year) {
                this.title = title;
                this.author = author;
                this.year = year;
        }

        public long getId() {
                return this.id;
        }

        @Override
        public String toString() {
                return "Book{" +
                                "id=" + this.id +
                                ", title='" + this.title + '\'' +
                                ", author='" + this.author + '\'' +
                                ", year=" + this.year +
                                '}';
        }
}
如您所見,這是簡單的 POJO。這個類別會使用 @Entity 註解,表示可儲存在 Datastore 中,並提供種類名稱 (將種類視為 SQL 資料庫中的資料表,詳情請參閱說明文件)。種類名稱為選用項目,如果省略,系統會根據類別名稱產生種類名稱。
請注意,我們使用 @Id 為 id 屬性加上註解。這表示我們希望這個欄位做為 Datastore 金鑰的 ID 部分。每個 Datastore 實體都需要 ID。支援的類型包括 String 和 Long。
我們覆寫 toString 方法,讓物件的字串表示法更易於解讀,這在列印物件時會很有用。
別忘了儲存檔案!
使用以下內容建立 BookRepository 類別:
datastore-example/src/main/java/com/example/demo/BookRepository.java
package com.example.demo;

import java.util.List;

import org.springframework.cloud.gcp.data.datastore.repository.DatastoreRepository;


public interface BookRepository extends DatastoreRepository<Book, Long> {

  List<Book> findByAuthor(String author);

  List<Book> findByYearGreaterThan(int year);

  List<Book> findByAuthorAndYear(String author, int year);

}
介面會擴充 DatastoreRepository<Book, Long> ,其中 Book 是網域類別,而 Long 是 Id 型別。我們在存放區中宣告了三種查詢方法,這些方法的實作會在幕後自動產生。
第一個是 findByAuthor。如您所料,這個方法的實作會執行查詢,在條件篩選器中使用使用者提供的值,判斷是否與作者欄位相等。
findByYearGreaterThan 方法會執行查詢,篩選出年份欄位大於使用者提供值的資料。
findByAuthorAndYear 執行查詢,尋找作者和年份欄位與使用者提供的值相符的實體。
開啟主要應用程式 DemoApplication 類別,並修改成如下所示:
datastore-example/src/main/java/com/example/demo/DemoApplication.java
package com.example.demo;

import java.util.List;

import com.google.common.collect.Lists;

import org.springframework.beans.factory.annotation.Autowired;
import org.springframework.boot.SpringApplication;
import org.springframework.boot.autoconfigure.SpringBootApplication;
import org.springframework.shell.standard.ShellComponent;
import org.springframework.shell.standard.ShellMethod;

@ShellComponent
@SpringBootApplication
public class DemoApplication {
  @Autowired
  BookRepository bookRepository;

  public static void main(String[] args) {
     SpringApplication.run(DemoApplication.class, args);
  }

  @ShellMethod("Saves a book to Cloud Datastore: save-book <title> <author> <year>")
  public String saveBook(String title, String author, int year) {
     Book savedBook = this.bookRepository.save(new Book(title, author, year));
     return savedBook.toString();
  }

  @ShellMethod("Loads all books")
  public String findAllBooks() {
     Iterable<Book> books = this.bookRepository.findAll();
     return Lists.newArrayList(books).toString();
  }

  @ShellMethod("Loads books by author: find-by-author <author>")
  public String findByAuthor(String author) {
     List<Book> books = this.bookRepository.findByAuthor(author);
     return books.toString();
  }

  @ShellMethod("Loads books published after a given year: find-by-year-after <year>")
  public String findByYearAfter(int year) {
     List<Book> books = this.bookRepository.findByYearGreaterThan(year);
     return books.toString();
  }

  @ShellMethod("Loads books by author and year: find-by-author-year <author> <year>")
  public String findByAuthorYear(String author, int year) {
     List<Book> books = this.bookRepository.findByAuthorAndYear(author, year);
     return books.toString();
  }

  @ShellMethod("Removes all books")
  public void removeAllBooks() {
     this.bookRepository.deleteAll();
  }
}
請注意,我們如何使用 @ShellComponent 為類別加上註解。這會通知 Spring,我們要將這個類別做為 CLI 指令的來源。以 @ShellMethod 註解的方法會以 CLI 指令的形式公開在應用程式中。
這裡我們使用在 BookRepository 介面中宣告的方法:findByAuthor、findByYearGreaterThan、findByAuthorAndYear。此外,我們還使用了三種內建方法:save、findAll 和 deleteAll。
我們來看看 saveBook 方法。我們會使用使用者提供的書名、作者和年份值,建立 Book 物件。如您所見,我們並未提供 id 值,因此系統會在儲存時自動分配該值,並指派給 ID 欄位。save 方法會接受 Book 類型的物件,並將其儲存至 Cloud Datastore。系統會傳回 Book 物件,其中包含所有填入的欄位,包括 id 欄位。最後,我們會傳回這個物件的字串表示法。
其餘方法運作方式類似:接受傳遞至適當存放區方法的參數,並傳回字串化結果。
如要建構及啟動應用程式,請在 Cloud Shell 中執行下列指令 (從專案根目錄 datastore-example/ 所在位置執行):pom.xml
$ mvn spring-boot:run
建構階段完成後,畫面上會顯示 Spring 標誌和殼層提示:
 .   ____          _            __ _ _
 /\\ / ___'_ __ _ _(_)_ __  __ _ \ \ \ \
( ( )\___ | '_ | '_| | '_ \/ _` | \ \ \ \
 \\/  ___)| |_)| | | | | || (_| |  ) ) ) )
  '  |____| .__|_| |_|_| |_\__, | / / / /
 =========|_|==============|___/=/_/_/_/
 :: Spring Boot ::        (v2.1.1.RELEASE)


shell:>
現在您可以試用先前定義的指令。如要查看指令清單,請使用 help 指令:
shell:> help
...
find-all-books: Loads all books
find-by-author: Loads books by author: find-by-author <author>
find-by-author-year: Loads books by author and year: find-by-author-year <author> <year>
find-by-year-after: Loads books published after a given year: find-by-year-after <year>
remove-all-books: Removes all books
save-book: Saves a book to Cloud Datastore: save-book <title> <author> <year>
請嘗試按照下列步驟操作:
- 使用
save-book指令建立幾本書籍 - 使用
find-all-books指令執行搜尋 - 尋找特定作者的書籍 (
find-by-author <author>) - 尋找特定年份後出版的書籍 (
find-by-year-after <year>) - 依特定作者和年份尋找書籍 (
find-by-author-year <author> <year>)
如要查看實體在 Cloud Datastore 中的儲存方式,請前往 GCP 主控台,依序點選「選單」->「Datastore」(位於「Storage」部分) ->「Entities」(實體) (如有需要,請選取「[default]」命名空間和「books」種類)。
如要清除,請使用應用程式殼層中適當命名的 remove-all-books 指令移除所有書籍。
shell:> remove-all-books
如要結束應用程式,請使用 quit 指令,然後按下 Ctrl+C。
在本程式碼研究室中,您已建立互動式 CLI 應用程式,可從 Cloud Datastore 儲存及擷取物件!
瞭解詳情
- Cloud Datastore:https://cloud.google.com/datastore/
- Spring Shell:https://projects.spring.io/spring-shell/
- GCP 上的 Spring 專案:http://cloud.spring.io/spring-cloud-gcp/
- Spring on GCP GitHub 存放區:https://github.com/spring-cloud/spring-cloud-gcp
- 在 Google Cloud Platform 上使用 Java:https://cloud.google.com/java/
授權
這項內容採用的授權為 Creative Commons 姓名標示 2.0 通用授權。