1. 准备工作
此 Codelab 旨在帮助您了解如何使用 Maps JavaScript 中的仿真 3D 地图创建您的首个 3D 地图。您将学习有关加载 Maps JavaScript API 的正确组件、显示您的第一个 3D 地图以及在地图上绘制地图项的基础知识。
构建内容。

在此 Codelab 中,您将构建一个 3D Web 应用,用于执行以下操作:
- 动态加载 Maps JavaScript API。
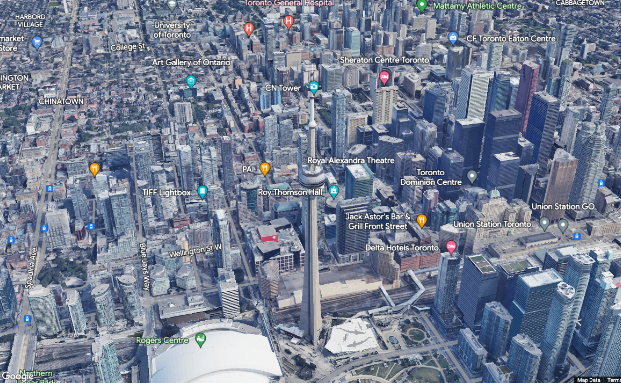
- 显示以多伦多 CN 塔为中心的 3D 地图。
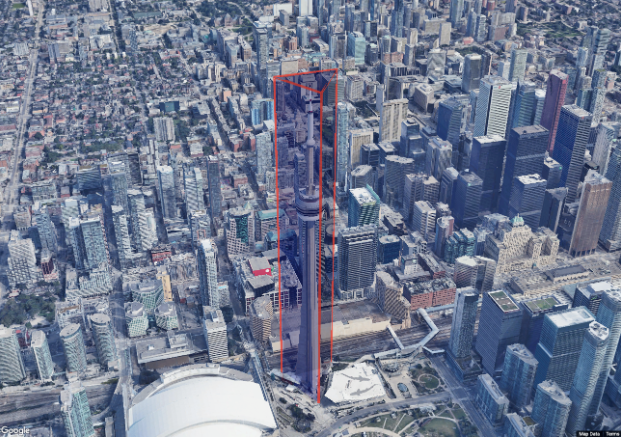
- 显示地点周围的边界。
- 关闭 3D 地图上的地图注点。
- 将边界延伸以覆盖相应位置。
学习内容
- Google Maps Platform 使用入门。
- 使用动态库导入功能通过 JavaScript 代码动态加载 Maps JavaScript API。
- 使用 Map3DElement 类加载 3D 地图。
- 使用多边形和 extrusion 在地图上绘制。
2. 前提条件
您需要熟悉此处的各项内容,才能完成此 Codelab。如果您已经能够熟练使用 Google Maps Platform,请直接跳到该 Codelab!
所需的 Google Maps Platform 产品
在此 Codelab 中,您将使用以下 Google Maps Platform 产品:
- Maps JavaScript API
是的,这就是向网页添加 3D 地图所需的全部操作,非常简单!
完成此 Codelab 的其他要求
要完成此 Codelab,您需要以下账号、服务和工具:
- 已启用结算功能的 Google Cloud 账号
- 已启用 Maps JavaScript API 的 Google Maps Platform API 密钥
- 具备 JavaScript、HTML 和 CSS 方面的基础知识
- 您常用的文本编辑器或 IDE,用于保存要查看的修改后的文件
- 一个网络浏览器,用于在工作时查看文件
3. 进行设置
设置 Google Maps Platform
如果您还没有已启用结算功能的 Google Cloud Platform 账号和项目,请参阅 Google Maps Platform 使用入门指南,创建结算账号和项目。
- 在 Cloud Console 中,点击项目下拉菜单,选择要用于此 Codelab 的项目。

4. 加载 Maps JavaScript API
按照“设置”部分中的所有步骤操作后,您就可以开始构建自己的首个 3D 地图了。
创建您能想象到的最简单的网页。
首先,我们将创建一个非常基本的网页来托管所有代码。您可以在自己选择的任何编辑器或平台中执行此操作。
 <!DOCTYPE html>
 <html>
   <head>
    <title>3D Maps Codelab</title>
     <style>
      html,
      body {
        height: 100%;
        margin: 0;
        padding: 0;
      }
    </style>
   </head>
   <body>
   </body>
 </html>
添加代码并使用 3dmap.html 等名称将文件保存到可访问的位置,然后在网络浏览器中打开该文件以查看网页的当前状态,并检查是否有任何错误。
与 2D 地图一样,3D 地图的基础是 Maps JavaScript API,因此您需要先加载该 API。
您可以通过多种方式执行此操作,具体方法请参阅文档的加载 Maps JavaScript API 部分。
在本演示中,我们将使用更现代的动态库导入方法,因为这样您只需控制需要加载的元素,从而缩减下载大小和启动时间。
添加动态加载器
如需使用动态加载器,请务必将以下脚本标记添加到您的网页中,并在适当的位置添加您自己的 API 密钥(您可以在第 2 步中获取)。将此脚本标记放置在基本网页的正文部分之间。
  <script async defer>
    (g => { var h, a, k, p = "The Google Maps JavaScript API", c = "google", l = "importLibrary", q = "__ib__", m = document, b = window; b = b[c] || (b[c] = {}); var d = b.maps || (b.maps = {}), r = new Set, e = new URLSearchParams, u = () => h || (h = new Promise(async (f, n) => { await (a = m.createElement("script")); e.set("libraries", [...r] + ""); for (k in g) e.set(k.replace(/[A-Z]/g, t => "_" + t[0].toLowerCase()), g[k]); e.set("callback", c + ".maps." + q); a.src = `https://maps.${c}apis.com/maps/api/js?` + e; d[q] = f; a.onerror = () => h = n(Error(p + " could not load.")); a.nonce = m.querySelector("script[nonce]")?.nonce || ""; m.head.append(a) })); d[l] ? console.warn(p + " only loads once. Ignoring:", g) : d[l] = (f, ...n) => r.add(f) && u().then(() => d[l](f, ...n)) })({
      key: "YOUR_API_KEY",
      v: "alpha",
    });
  </script>
请注意,在产品发布的此阶段,我们使用的是该 API 的Alpha 分支来访问 3D 地图。此版本包含产品的大部分实验性功能,可让您在开发早期访问权限代码时对其进行测试,以便在发布时可以使用。
现在,您应该有一个包含动态加载器的基本网页(如果您打开该网页,视图将是空白的,但应该不会有错误),现在,我们可以添加 3D 地图了。
如果您的代码因某种原因而无法运行,您可以前往第 6 步,将其与最终结果进行比较,看看哪里出了问题。
如需了解页面可能无法正常运行的原因,请查看浏览器中的错误控制台以调试原因。错误页面提供了有关如何针对不同浏览器执行此操作的说明,还说明了各种错误消息,并提供了 API 可能无法正常运行的一些常见原因。在整个开发过程中,您可以使用此资源来找出任何实现可能存在的问题。
5. 显示地图
现在,我们已经准备好向页面添加第一个 3D 地图了!
3D 地图是使用 google.maps.maps3d.Map3DElement 类创建的,该类可让我们创建和使用 3D 地图实例。在此 Codelab 中,我们将直接使用 3D 地图对象,而不是通过 HTML 标记。
创建初始化函数并加载库
首先,我们将创建一个用于将元素加载到页面中的函数。查看代码,我们首先创建一个异步函数,以便在继续执行其余代码之前确保整个元素已加载。然后,我们会在页面加载时运行 init 函数。
将此代码添加到网页正文部分的加载脚本后面。
  <script>
    async function init() {
      const { Map3DElement, MapMode } = await google.maps.importLibrary("maps3d");
    }
    init();
  </script>
请注意,我们使用 await 表达式来确保在继续操作之前加载该库。
创建 3D 地图元素并指定位置
接下来,我们需要指定要显示地图视图的位置。对于 3D 地图,您可以使用多种不同的参数来设置视图。这些是指描述您在场景中所看内容的虚拟相机参数。
我们来创建一个 CN 塔的视图,看起来应该有点像这样。

首先,我们需要指定要查看的坐标。这些报告由两个不同的视图组成
- 我们要查看的点,包括其海拔。
- 朝向该点的虚拟相机的距离和方向。
通过下图,您可以大致了解这些设置的运作方式。

元素的中心是您正在注视的点,范围是您与对象之间的距离,倾斜度是您查看图片的角度。如果您还想控制对象的航向和滚动,也可以设置这些属性,但我们在这里不会使用这些属性。
现在,我们将在网页上创建 3D 地图,在导入库后,将以下代码添加到网页的 init 部分。
  const map3DElement = new Map3DElement({
      center: { lat: 43.6425, lng: -79.3871, altitude: 400 },
      range: 1000,
      tilt: 60,
      mode: MapMode.HYBRID,
  });

  document.body.append(map3DElement);
首先,我们创建元素并设置适当的位置参数,然后在页面上添加该组件(如果需要,我们可以将其分配给现有的 div)。
现在,您的代码应如下所示的示例所示:
<!DOCTYPE html>
<html>

<head>
    <title>3D Maps Codelab</title>
    <style>
        html,
        body {
            height: 100%;
            margin: 0;
            padding: 0;
        }
    </style>
</head>

<body>
    <script async defer>
        (g => { var h, a, k, p = "The Google Maps JavaScript API", c = "google", l = "importLibrary", q = "__ib__", m = document, b = window; b = b[c] || (b[c] = {}); var d = b.maps || (b.maps = {}), r = new Set, e = new URLSearchParams, u = () => h || (h = new Promise(async (f, n) => { await (a = m.createElement("script")); e.set("libraries", [...r] + ""); for (k in g) e.set(k.replace(/[A-Z]/g, t => "_" + t[0].toLowerCase()), g[k]); e.set("callback", c + ".maps." + q); a.src = `https://maps.${c}apis.com/maps/api/js?` + e; d[q] = f; a.onerror = () => h = n(Error(p + " could not load.")); a.nonce = m.querySelector("script[nonce]")?.nonce || ""; m.head.append(a) })); d[l] ? console.warn(p + " only loads once. Ignoring:", g) : d[l] = (f, ...n) => r.add(f) && u().then(() => d[l](f, ...n)) })({
            key: "YOUR_API_KEY",
            v: "alpha",
        });
    </script>
    <script>
        async function init() {
            const { Map3DElement, MapMode } = await google.maps.importLibrary("maps3d");

            const map3DElement = new Map3DElement({
                center: { lat: 43.6425, lng: -79.3871, altitude: 400 },
                range: 1000,
                tilt: 60,
                mode: MapMode.HYBRID
            });

            document.body.append(map3DElement);
        }

        init();
    </script>
</body>
</html>
现在,我们可以保存文件,然后在浏览器中打开该网页,看看它是否正常运行。我们应该会看到摄像头俯视塔楼,如图所示。先试玩一下,然后再继续操作,在塔上方添加一个盒子。

6. 添加和拉伸地图项
现在,我们已经有了 3D 地图,接下来我们来突出显示某个对象,让用户知道它是感兴趣的对象。在本例中,我们将使用多边形和 extrusion 函数在 CN 塔周围创建一个盒子,使其看起来像以下视图。

隐藏杂项
您可能首先会注意到,我们已关闭地图注点。在此地图中,我们希望将焦点放在塔本身上,因此需要移除其他视觉元素。
为此,我们需要添加更改代码以隐藏标签。将地图的模式行更新为“卫星”,以隐藏点。
mode: MapMode.SATELLITE,
设置此属性会停用地图上的标签,这不仅包括地图注点,还包括道路和边界线,从而创建一个“干净”的位置视图。
添加多边形并设置其样式
下一步是将多边形添加到页面中。这可以分两个步完成。首先,我们需要加载包含所需信息的函数,然后指定多边形的样式详细信息,例如其颜色或是否显示在其他地图项后面。
首先,我们使用以下代码行将所需的类添加到页面中。
const { Polygon3DElement, AltitudeMode } = await google.maps.importLibrary("maps3d");
这会将 Polygon3DElement 和 AltitudeMode 类加载到页面中,这些类是将多边形对象添加到视图中所必需的。
多边形可以具有许多不同的设置来控制视图,从描边粗细、颜色(通过名称或十六进制值)和边界和填充设置的不透明度,到控制它是否显示在其他地图项或建筑物后面,例如:绘制被遮挡的路段。如需了解详情,请参阅 Polygon3DElement 类的文档。
我们需要设置的另一个功能是,以挤出方式绘制多边形。这意味着,在设定的海拔高度绘制多边形,然后将其延伸到地面。这会为多边形提供一个高度,就像一个盒子一样(如上图所示)。这还要求我们为多边形设置海拔模式,因此我们需要加载上述 AltitudeMode 常量。如需拉伸多边形,此值需要设置为 ABSOLUTE 或 RELATIVE_TO_GROUND,以便根据多边形顶点的高度获取正确的位置。
该代码会创建一个包含这些属性的字面量对象,然后可用于创建 Polygon3DElement 对象,如下所示:
  const polygonOptions = {
    strokeColor: "#EA433580",
    strokeWidth: 4,
    fillColor: "#0000FF80",
    altitudeMode: "ABSOLUTE",
    extruded: true,
    drawsOccludedSegments: true,
  }

  const towerPolygon = new google.maps.maps3d.Polygon3DElement(polygonOptions);
现在,我们已经创建了多边形对象,还必须设置其地理坐标。多边形可以同时具有内外坐标,具体取决于其表示方式,innerCoordinates 用于指定多边形内的剪裁形式,而 outerCoordinates 用于定义多边形的外边界。由于这是多边形而非线条,因此坐标的起点和终点需要位于同一点,才能形成完整的形状。
您可以使用 LatLng 或 LatLngAltitude 对象或字面量的数组指定坐标,我们可以看到基本多边形的坐标。
  towerPolygon.outerCoordinates = [
    { lat: 43.6427196, lng: -79.3876802, altitude: 600 },
    { lat: 43.6421742, lng: -79.3869184, altitude: 600 },
    { lat: 43.643001, lng: -79.3866475, altitude: 600 },
    { lat: 43.6427196, lng: -79.3876802, altitude: 600 }
  ];
现在,我们已经为多边形设置了样式和坐标,可以将其添加到页面中了。多边形是地图元素的子元素,需要添加到页面中的现有地图对象。将以下代码添加到页面中。
map3DElement.append(towerPolygon);
完成后,我们应该会得到以下完整实现,如图所示(但会使用您自己的 API 密钥)。现在,我们可以运行该页面并查看结果了。
<!DOCTYPE html>
<html>

<head>
    <title>3D Maps Codelab</title>
    <style>
        html,
        body {
            height: 100%;
            margin: 0;
            padding: 0;
        }
    </style>
</head>

<body>
    <script async defer>
        (g => { var h, a, k, p = "The Google Maps JavaScript API", c = "google", l = "importLibrary", q = "__ib__", m = document, b = window; b = b[c] || (b[c] = {}); var d = b.maps || (b.maps = {}), r = new Set, e = new URLSearchParams, u = () => h || (h = new Promise(async (f, n) => { await (a = m.createElement("script")); e.set("libraries", [...r] + ""); for (k in g) e.set(k.replace(/[A-Z]/g, t => "_" + t[0].toLowerCase()), g[k]); e.set("callback", c + ".maps." + q); a.src = `https://maps.${c}apis.com/maps/api/js?` + e; d[q] = f; a.onerror = () => h = n(Error(p + " could not load.")); a.nonce = m.querySelector("script[nonce]")?.nonce || ""; m.head.append(a) })); d[l] ? console.warn(p + " only loads once. Ignoring:", g) : d[l] = (f, ...n) => r.add(f) && u().then(() => d[l](f, ...n)) })({
            key: "YOUR_API_KEY",
            v: "alpha",
        });
    </script>
    <script>
        async function init() {
            const { Map3DElement, MapMode } = await google.maps.importLibrary("maps3d");

            const map3DElement = new Map3DElement({
                center: { lat: 43.6425, lng: -79.3871, altitude: 400 },
                range: 1000,
                tilt: 60,
                mode: MapMode.SATELLITE,
            });

            const { Polygon3DElement, AltitudeMode } = await google.maps.importLibrary("maps3d");

            const polygonOptions = {
                strokeColor: "#EA433580",
                strokeWidth: 4,
                fillColor: "#0000FF80",
                fillOpacity: 0.2,
                altitudeMode: "ABSOLUTE",
                extruded: true,
                drawsOccludedSegments: true,
            }

            const towerPolygon = new google.maps.maps3d.Polygon3DElement(polygonOptions);

            towerPolygon.outerCoordinates = [
                { lat: 43.6427196, lng: -79.3876802, altitude: 600 },
                { lat: 43.6421742, lng: -79.3869184, altitude: 600 },
                { lat: 43.643001, lng: -79.3866475, altitude: 600 },
                { lat: 43.6427196, lng: -79.3876802, altitude: 600 }
            ];

            map3DElement.append(towerPolygon);

            document.body.append(map3DElement);
        }

        init();
    </script>

</body>
</html>
如果代码正确无误,您应该会看到一个页面,其中包含以下 3D 地图和多边形。

您使用 Google Maps Platform 成功构建了首个 3D 地图,包括加载 Maps JavaScript API、创建 3D 地图和添加 extruded polygon。
7. 接下来做什么?
在此 Codelab 中,您了解了可以使用 Maps JavaScript API 执行的操作方面的基础知识。接下来,请尝试为地图添加下面的部分地图项:
- 添加一个用于开启和关闭地图注点的按钮。
- 添加一些线条,用于显示往返不同地点的路线。
- 设置一些边界限制,以控制用户可以将视图移至何处。
- 了解适用于 Maps JavaScript API 的其他库,通过这些库可实现更多服务,例如地点或路线。
如需继续了解如何在网页上使用 Google Maps Platform 和 3D 的更多方式,请访问以下链接:
