1. Prima di iniziare
Questo tutorial spiega come aggiungere e impostare lo stile degli indicatori 3D nella tua applicazione. Scoprirai anche come animare la tua applicazione sorvolando e girando intorno a luoghi specifici.
Questo tutorial si basa sui concetti trattati nel primo codelab. Se non l'hai ancora fatto, completa il codelab per acquisire le conoscenze di base necessarie per questa applicazione.
Attività previste
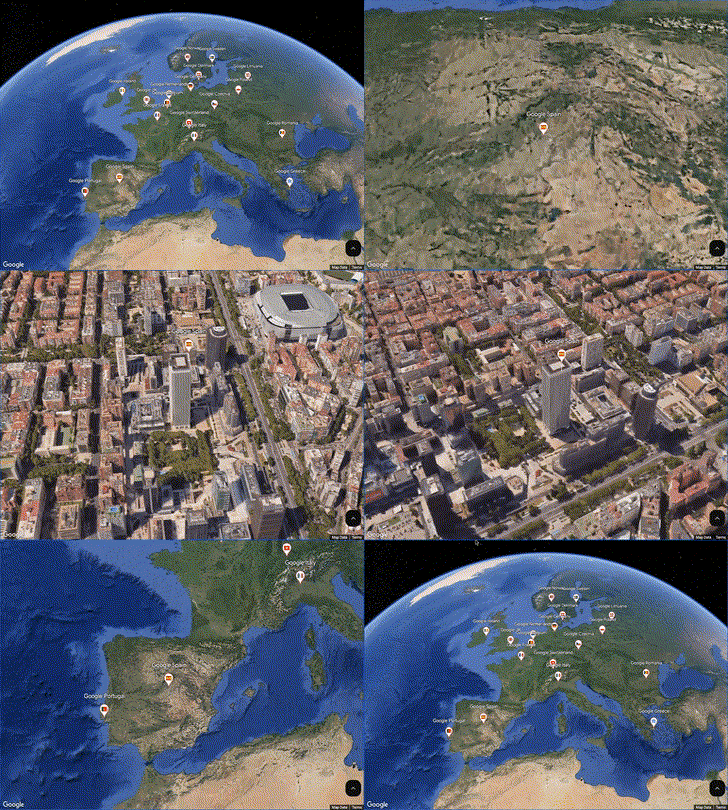
Questa applicazione fornisce una panoramica dei principali uffici di Google in Europa. Gli utenti possono selezionare un ufficio, volarci sopra e intorno per esplorarlo, quindi diminuire lo zoom per tornare alla visualizzazione generale. Queste funzionalità, che si trovano comunemente nelle applicazioni di viaggi ed esplorazione, offrono un'esperienza più immersiva per gli utenti.
In questo codelab, creerai un'app web 3D che esegue le seguenti operazioni:
- Carica l'API Maps JavaScript in modo dinamico.
- Aggiunge indicatori 3D alla mappa.
- Applica gli stili agli indicatori utilizzando gli SVG.
- Aggiunta la possibilità di volare verso e intorno agli indicatori.
- Estrae le posizioni dal codice in un array.
Obiettivi didattici
- Come funzionano gli indicatori.
- Come applicare uno stile agli indicatori.
- Come funziona l'animazione con le funzioni integrate.
- Posizioni della fotocamera rispetto alle posizioni dei punti per una migliore inquadratura.
- Trucchi utili per acquisire i parametri della fotocamera in modo da inquadrare meglio gli articoli.
Prerequisiti
Per completare questo codelab, devi acquisire familiarità con gli elementi riportati di seguito. Se hai già dimestichezza con Google Maps Platform, vai al Codelab.
Prodotti Google Maps Platform obbligatori
In questo Codelab utilizzerai i seguenti prodotti Google Maps Platform:
- API Maps JavaScript
Altri requisiti per questo codelab
Per completare questo codelab, ti serviranno i seguenti account, servizi e strumenti:
- Un account Google Cloud con la fatturazione attivata.
- Una chiave API Google Maps Platform con l'API Maps JavaScript attivata.
- Conoscenza di base di JavaScript, HTML e CSS.
- Un editor di testo o un IDE a tua scelta per salvare una modifica di un file da visualizzare.
- Un browser web per visualizzare il file durante il lavoro.
2. Configurazione
Configurare Google Maps Platform
Se non hai ancora un account Google Cloud e un progetto con la fatturazione abilitata, consulta la guida Introduzione a Google Maps Platform per creare un account di fatturazione e un progetto.
- Nella console Cloud, fai clic sul menu a discesa del progetto e seleziona il progetto che vuoi utilizzare per questo codelab.

- Abilita le API e gli SDK di Google Maps Platform richiesti per questo codelab nel Google Cloud Marketplace. Per farlo, segui i passaggi descritti in questo video o in questa documentazione.
- Genera una chiave API nella pagina Credenziali di Cloud Console. Puoi seguire la procedura descritta in questo video o in questa documentazione. Tutte le richieste a Google Maps Platform richiedono una chiave API.
3. Mappamondo semplice
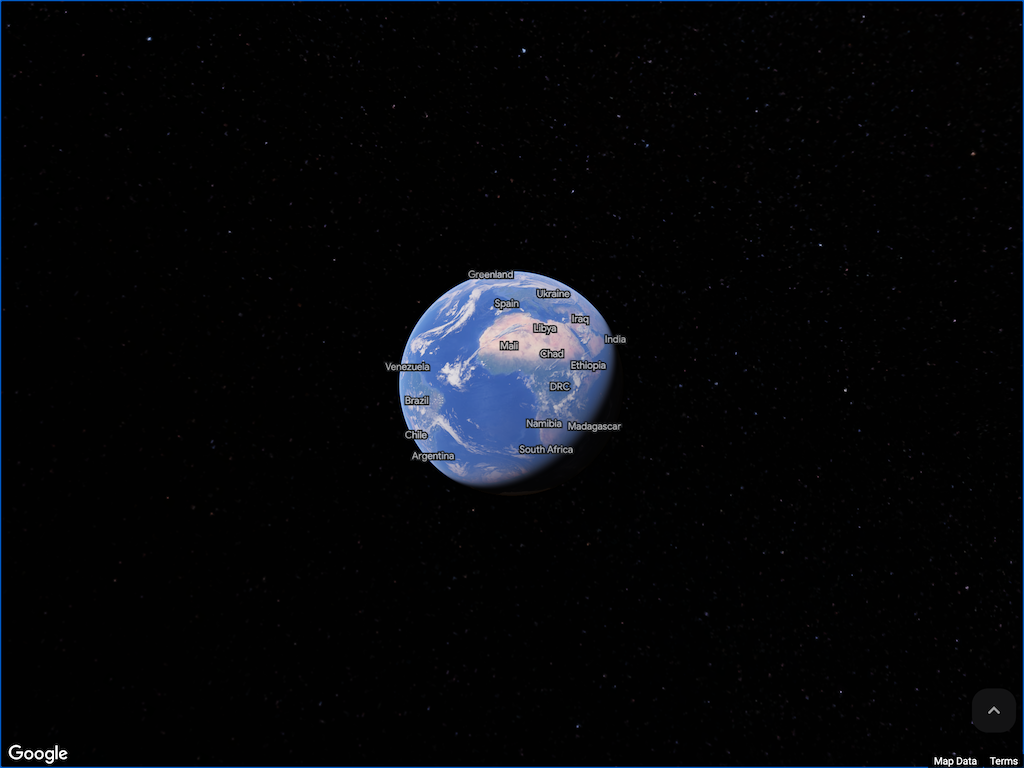
Per iniziare a creare l'applicazione, è essenziale stabilire la configurazione di base. In questo modo verrà visualizzata la Terra nella sua forma più essenziale, come mostrato nell'immagine:
Aggiungi il codice per la pagina iniziale
Per aggiungere il globo al sito, devi aggiungere il seguente codice alla pagina. Verrà aggiunta una sezione per il caricatore dell'API Maps JavaScript e una funzione di inizializzazione che crea l'elemento mappa 3D all'interno della pagina in cui aggiungerai il codice per gli indicatori.
Assicurati di aggiungere la tua chiave (creata nella sezione di configurazione) alla pagina, altrimenti l'elemento 3D non potrà essere inizializzato.
<!DOCTYPE html>
<html>
   <head>
       <title>Step 1 - Simple Globe</title>
       <style>
           body {
               height: 100vh;
               margin: 0;
           }
       </style>
   </head>

   <body>
       <script>
           (g => { var h, a, k, p = "The Google Maps JavaScript API", c = "google", l = "importLibrary", q = "__ib__", m = document, b = window; b = b[c] || (b[c] = {}); var d = b.maps || (b.maps = {}), r = new Set, e = new URLSearchParams, u = () => h || (h = new Promise(async (f, n) => { await (a = m.createElement("script")); e.set("libraries", [...r] + ""); for (k in g) e.set(k.replace(/[A-Z]/g, t => "_" + t[0].toLowerCase()), g[k]); e.set("callback", c + ".maps." + q); a.src = `https://maps.${c}apis.com/maps/api/js?` + e; d[q] = f; a.onerror = () => h = n(Error(p + " could not load.")); a.nonce = m.querySelector("script[nonce]")?.nonce || ""; m.head.append(a) })); d[l] ? console.warn(p + " only loads once. Ignoring:", g) : d[l] = (f, ...n) => r.add(f) && u().then(() => d[l](f, ...n)) })({
               key: "<INSERT API KEY>",
               v: "alpha",
               // Use the 'v' parameter to indicate the version to use (weekly, beta, alpha, etc.).
               // Add other bootstrap parameters as needed, using camel case.
           });
       </script>
       <script>
           let map3D = null;

           async function init() {
               const { Map3DElement, MapMode } = await google.maps.importLibrary("maps3d");

               map3D = new Map3DElement({
                   mode: MapMode.HYBRID,
               });

               document.body.append(map3D);
           }
           init();
       </script>
   </body>
</html>
A questo punto, puoi iniziare a inquadrare la località di interesse, come farai nel passaggio successivo.
4. Inquadra la prima visualizzazione
Ora che hai creato una mappa con una vista del globo, il passaggio successivo dell'implementazione consiste nell'inquadrare la posizione di partenza corretta. In questo modo, l'utente può avere una panoramica immediata del luogo in cui sta lavorando.
Sebbene questo esempio si concentri sugli uffici di Google in Europa, puoi applicare questo approccio a qualsiasi località in tutto il mondo, da un intero paese a un singolo isolato. La velocità e la flessibilità del prodotto ti consentono di scalare l'applicazione da globale a locale con modifiche minime al codice.
Inizierai con l'inquadratura iniziale per ottenere la mappa 3D come questa:

Inquadrare la fotocamera su Europa
Per ottenere la visualizzazione mostrata, devi inquadrare correttamente il display, come se stessi posizionando una videocamera nello spazio che guarda verso il basso sulla posizione.
A questo scopo, è possibile utilizzare una serie di parametri nel controllo mappa per impostare i dettagli della videocamera. Nel diagramma puoi vedere come interagiscono i parametri nel mondo "reale". Nello specifico, ci sono il punto centrale verso cui la videocamera è rivolta e la distanza da dove stai guardando (l'intervallo). Devi anche impostare l'inclinazione della prospettiva della videocamera (altrimenti guarderai direttamente verso il basso sulla Terra).

L'impostazione finale, heading, determina la direzione della fotocamera. Viene misurato come offset dal nord. Questi valori vengono applicati all'elemento mappa 3D come oggetto per configurare la visualizzazione iniziale. Puoi visualizzarlo nel codice con il costruttore Element 3D aggiornato.
map3D = new Map3DElement({
    center: { lat: 46.717, lng: 7.075, altitude: 2175.130 },
    range: 5814650,
    tilt: 33,
    heading: 4.36,
    mode: MapMode.HYBRID
});
Acquisisci i parametri della fotocamera
L'inquadratura di una vista in una mappa 3D richiede un posizionamento preciso della fotocamera, che può essere difficile da ottenere solo tramite codice. Per semplificare questa procedura, utilizza questo utile trucco: aggiungi una funzione alla pagina che acquisisca i parametri della videocamera quando fai clic sulla visualizzazione richiesta. I parametri verranno visualizzati nella console e saranno pronti per essere copiati nelle impostazioni della videocamera dell'oggetto.
Puoi trovare il codice che potresti utilizzare in un secondo momento, poiché è stato aggiunto all'esempio di questa pagina mostrato, anche se non sarà presente nell'esempio delle pagine successive perché non è necessario per il codelab, ma è qualcosa da ricordare se vuoi creare demo più immersive grazie a un posizionamento migliore della videocamera.
map3D.addEventListener('gmp-click', (event) => {
   console.log("camera: { center: { lat: " + map3D.center.lat + ", lng : " + map3D.center.lng + ", altitude: " + map3D.center.altitude + " }, range: " + map3D.range + ", tilt: " + map3D.tilt + " ,heading: " + map3D.heading + ", }");
   console.log("{ lat: " + event.position.lat + ", lng : " + event.position.lng + ", altitude: " + event.position.altitude + " }");
   // Stop the camera animation when the map is clicked.
   map3D.stopCameraAnimation();
});
Tieni presente l'utilizzo della funzione stopCameraAnimation. Se la pagina aumenta lo zoom o esegue un'orbita, è utile poter interrompere l'animazione in modo da acquisire la posizione visualizzata in quel momento. Questo frammento di codice ti consente di farlo. Per ulteriori dettagli, consulta la documentazione di stopCameraAnimation.
Esempio di output del clic, come mostrato nella console.
camera: { center: { lat: 51.39870122020001, lng : -0.08573187165829443, altitude: 51.66845062662254 }, range: 716.4743880553578, tilt: 50.5766672986501 ,heading: -1.048260134782318, }
step2.html:40 { lat: 51.398158351120536, lng : -0.08561139388593597, altitude: 51.860469133677626 }
Il testo della fotocamera può essere utilizzato come input JSON in una serie di oggetti in 3D Maps, mentre il secondo output è la posizione effettiva del punto in cui si è verificato il clic, utile anche per creare punti o qualsiasi altro elemento per il posizionamento degli indicatori.
Ora che la pagina è inquadrata correttamente, puoi aggiungere gli indicatori. Vai al passaggio successivo per scoprire come.
Soluzione della sezione
Per questo passaggio, la pagina completata viene fornita come soluzione per verificare l'implementazione. (se la copi, assicurati di utilizzare la tua chiave API).
<!DOCTYPE html>
<html>

<head>
   <title>Step 2 - Europe View</title>
   <style>
       body {
           height: 100vh;
           margin: 0;
       }
   </style>
</head>

<body>
   <script>
       (g => { var h, a, k, p = "The Google Maps JavaScript API", c = "google", l = "importLibrary", q = "__ib__", m = document, b = window; b = b[c] || (b[c] = {}); var d = b.maps || (b.maps = {}), r = new Set, e = new URLSearchParams, u = () => h || (h = new Promise(async (f, n) => { await (a = m.createElement("script")); e.set("libraries", [...r] + ""); for (k in g) e.set(k.replace(/[A-Z]/g, t => "_" + t[0].toLowerCase()), g[k]); e.set("callback", c + ".maps." + q); a.src = `https://maps.${c}apis.com/maps/api/js?` + e; d[q] = f; a.onerror = () => h = n(Error(p + " could not load.")); a.nonce = m.querySelector("script[nonce]")?.nonce || ""; m.head.append(a) })); d[l] ? console.warn(p + " only loads once. Ignoring:", g) : d[l] = (f, ...n) => r.add(f) && u().then(() => d[l](f, ...n)) })({
           key: "<INSERT API KEY>",
           v: "alpha",
           // Use the 'v' parameter to indicate the version to use (weekly, beta, alpha, etc.).
           // Add other bootstrap parameters as needed, using camel case.
       });
   </script>
<script>
       let map3D = null;

       async function init() {
           const { Map3DElement, MapMode } = await google.maps.importLibrary("maps3d");

           map3D = new Map3DElement({
                center: { lat: 46.717, lng: 7.075, altitude: 2175.130 },
                range: 5814650,
                tilt: 33,
                heading: 4.36,
                mode: MapMode.HYBRID,
            });

           map3D.addEventListener('gmp-click', (event) => {
               console.log("camera: { center: { lat: " + map3D.center.lat + ", lng : " + map3D.center.lng + ", altitude: " + map3D.center.altitude + " }, range: " + map3D.range + ", tilt: " + map3D.tilt + " ,heading: " + map3D.heading + ", }");
               console.log("{ lat: " + event.position.lat + ", lng : " + event.position.lng + ", altitude: " + event.position.altitude + " }");

               map3D.stopCameraAnimation();
           });

           document.body.append(map3D);
       }
       init();
   </script>

</body>

</html>
5. Indicatore semplice
In questa sezione imparerai ad aggiungere il primo indicatore. Innanzitutto, scoprirai informazioni generali sugli indicatori.
Le mappe 3D supportano la creazione di due diversi tipi di indicatori, Marker3DElement e Marker3DInteractiveElement, la cui scelta dipende dal fatto che tu voglia attivare o meno i clic sugli indicatori. A parte questo, sono essenzialmente uguali, quindi dovrai prima creare un Marker3DElement e poi eseguirne l'"upgrade" a Marker3DInteractiveElement nei passaggi successivi.
Puoi visualizzare la soluzione completa per questo passaggio qui:

Aggiungere un po' di altezza agli indicatori
La prima cosa da sapere è che gli indicatori sono 3D, come tutto il resto nella mappa 3D. Ciò significa che la posizione può avere un'altezza (altitudine) e che questa altezza può essere rappresentativa come posizione rispetto al livello del mare, al suolo, alla mesh o impostata per essere bloccata sul suolo e ignorare l'altitudine. Puoi trovare ulteriori dettagli nella sezione Costanti di altitudine della documentazione di AltitudeMode.
Puoi anche impostare se il marker è estruito o meno utilizzando il valore estruded. In questo modo, viene stabilito se l'indicatore avrà una piccola linea tracciata fino al suolo per mostrare la posizione effettiva in relazione all'altezza, utile per individuare i punti sul suolo. Un esempio è la sede di Google nel Regno Unito. Entrambi sono estrusi e la loro posizione è impostata su un'altezza assoluta. La prima a 75 metri e la seconda a 125 metri.
|
|
Altitudine 75 metri. | Altitudine 125 metri. |
Nascondere o mostrare gli indicatori con occlusione e collisione
Anche se potrebbe non essere importante nella nostra dimostrazione, poiché le posizioni sono abbastanza distanti, per gli indicatori che potrebbero sovrapporsi o trovarsi dietro gli edifici puoi controllare cosa succede con i valori collisionBehavior o drawsWhenOccluded.
Per il comportamento di collisione sono disponibili le seguenti opzioni:
REQUIRED: (valore predefinito) mostra sempre l'indicatore indipendentemente dalla collisione.OPTIONAL_AND_HIDES_LOWER_PRIORITYMostra l'indicatore solo se non si sovrappone ad altri indicatori. Se due indicatori di questo tipo si sovrappongono, viene mostrato quello con il valorezIndexpiù alto. Se hanno lo stessozIndex, viene mostrata quella con la posizione sullo schermo verticale più bassa.REQUIRED_AND_HIDES_OPTIONALMostra sempre l'indicatore indipendentemente dalla collisione e nascondi eventuali indicatori o etichetteOPTIONAL_AND_HIDES_LOWER_PRIORITYche si sovrappongono all'indicatore.
Le differenze nella visualizzazione degli indicatori in base al comportamento di collisione definito sono mostrate nelle immagini. Tutti gli indicatori vengono visualizzati quando viene impostato REQUIRED, ma se utilizzi REQUIRED_AND_HIDES_OPTIONAL, in questo caso verranno visualizzati gli indicatori più in basso sullo schermo (se vuoi, puoi modificare l'indice z per visualizzare altri indicatori in alto).
|
|
OBBLIGATORIO | REQUIRED_AND_HIDES_OPTIONAL |
Per l'occlusione, puoi scegliere se disegnare o meno gli indicatori dietro gli edifici. Come mostrato nell'immagine seguente. Quando drawsWhenOccluded è impostato su true, i marker vengono visualizzati leggermente attenuati quando vengono disegnati dietro gli edifici. Se è impostato su false, i marker vengono nascosti quando si trovano dietro un edificio. Maggiori dettagli sono disponibili nella seguente tabella:
|
|
|
|
Come accennato, gli indicatori nascosti dalla collisione verranno visualizzati attenuati se è consentito il disegno di indicatori coperti. Nell'immagine puoi vedere alcuni indicatori nascosti dagli edifici e altri nascosti da altri indicatori.
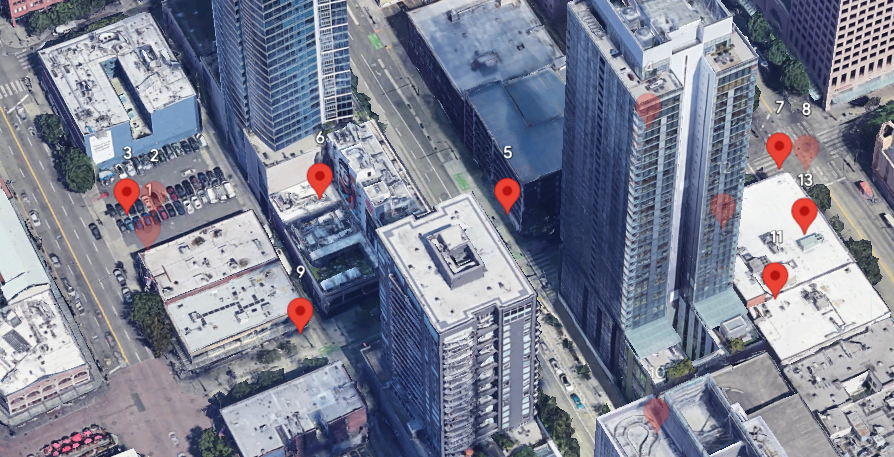
Per ulteriori dettagli, consulta l'esempio collision-behavior in una mappa 2D.
Cancellare la tela
Ora è il momento di creare il primo indicatore. Per assicurarti che l'utente si concentri sugli indicatori, puoi disattivare le etichette predefinite nella mappa 3D.
Imposta il valore mode dell'elemento mappa 3D su SATELLITE.
Per ulteriori informazioni, consulta mode.
map3D = new Map3DElement({
    center: { lat: 46.717, lng: 7.075, altitude: 2175.130 },
    range: 5814650,
    tilt: 33,
    heading: 4.36,
    mode: MapMode.SATELLITE
});
Il risultato è la seguente mappa 3D:

Aggiungi il primo indicatore
Con una tela vuota, ora puoi aggiungere il primo indicatore. I parametri principali includono posizione ed etichetta.
Per aggiungere un indicatore, impostane la posizione. Puoi anche includere un'etichetta, che viene visualizzata sopra l'indicatore, e altri elementi come descritto nella documentazione di Marker3DElement.
Per aggiungere il nostro indicatore, aggiungi il seguente codice dopo la riga che nasconde le etichette predefinite, come mostrato:
const marker = new Marker3DElement({
   position: { lat: 51.5332, lng: -0.1260, altitude: 75 },
   label: 'Google UK',
   altitudeMode: 'ABSOLUTE',
   extruded: true,
});

map3D.append(marker);
Dopo aver creato l'indicatore, aggiungilo alla mappa 3D utilizzando il metodo di accodamento. Ricorda che gli indicatori vengono memorizzati come array di elementi secondari all'interno della mappa 3D. Per modificare un indicatore, devi accedervi tramite questo array.
Assicurati che Marker3DElement venga caricato dall'API Maps JavaScript aggiungendolo all'elenco delle librerie al momento del caricamento dell'API.
const { Map3DElement, MapMode, Marker3DElement } = await google.maps.importLibrary("maps3d");
Ora, quando la pagina viene caricata, l'intera Europa sarà visibile con un indicatore sopra l'ufficio di Londra. Come mostrato nell'animazione, puoi aumentare lo zoom manualmente per vedere l'indicatore sulla posizione creata.
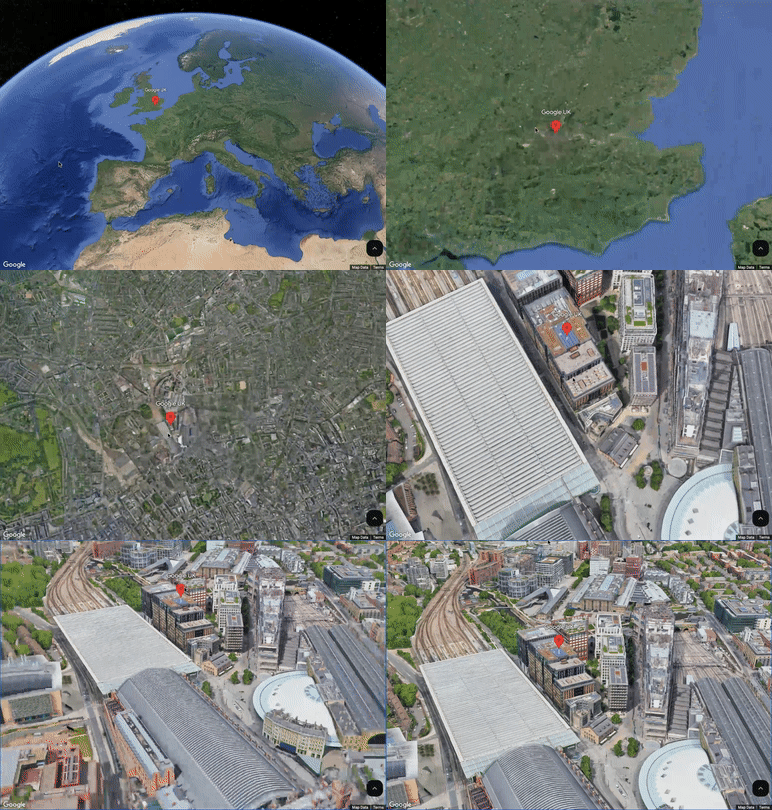
Ora che hai caricato il primo indicatore, il passaggio successivo consiste nel renderlo più gradevole.
Soluzione della sezione
Per questo passaggio, la pagina completata viene fornita come soluzione per verificare l'implementazione. Se la copi, assicurati di utilizzare la tua chiave API.
<!DOCTYPE html>
<html>

<head>
   <title>Step 3 - Simple Marker</title>
   <style>
       body {
           height: 100vh;
           margin: 0;
       }
   </style>
</head>

<body>
   <script>
       (g => { var h, a, k, p = "The Google Maps JavaScript API", c = "google", l = "importLibrary", q = "__ib__", m = document, b = window; b = b[c] || (b[c] = {}); var d = b.maps || (b.maps = {}), r = new Set, e = new URLSearchParams, u = () => h || (h = new Promise(async (f, n) => { await (a = m.createElement("script")); e.set("libraries", [...r] + ""); for (k in g) e.set(k.replace(/[A-Z]/g, t => "_" + t[0].toLowerCase()), g[k]); e.set("callback", c + ".maps." + q); a.src = `https://maps.${c}apis.com/maps/api/js?` + e; d[q] = f; a.onerror = () => h = n(Error(p + " could not load.")); a.nonce = m.querySelector("script[nonce]")?.nonce || ""; m.head.append(a) })); d[l] ? console.warn(p + " only loads once. Ignoring:", g) : d[l] = (f, ...n) => r.add(f) && u().then(() => d[l](f, ...n)) })({
           key: "<INSERT API KEY>",
           v: "alpha",
           // Use the 'v' parameter to indicate the version to use (weekly, beta, alpha, etc.).
           // Add other bootstrap parameters as needed, using camel case.
       });
   </script>
   <script>
       let map3D = null;

       async function init() {
            const { Map3DElement, MapMode, Marker3DElement } = await google.maps.importLibrary("maps3d");

            map3D = new Map3DElement({
                center: { lat: 46.717, lng: 7.075, altitude: 2175.130 },
                range: 5814650,
                tilt: 33,
                heading: 4.36,
                mode: MapMode.SATELLITE,
            });

           const marker = new Marker3DElement({
               position: { lat: 51.5332, lng: -0.1260, altitude: 75 },
               label: 'Google UK',
               altitudeMode: 'ABSOLUTE',
               extruded: true,
           });
           map3D.append(marker);

           document.body.append(map3D);
       }
       init();
   </script>
</body>

</html>
6. Indicatore SVG
In questo passaggio, renderai più gradevole l'indicatore aggiungendo una bandiera che rappresenti il paese in cui si trova. Vediamo come si fa e per farlo devi familiarizzare con PinElement.
Alla fine avrai un nuovo aspetto, come mostrato di seguito:

Personalizzazione di base con PinElement
Uno degli elementi condivisi tra gli indicatori nell'API JavaScript, che si tratti di mappe 2D o 3D, è PinElement. Mentre aggiungi un Marker3DElement a Map3DElement , aggiungi un PinElement a Marker3DElement come elemento secondario.
PinElement contiene la possibilità, a livello di base, di modificare l'indicatore normale per impostare il colore del bordo, il colore del punto interno (o del glifo) e il colore di sfondo. Puoi vederli nell'immagine che mostra un indicatore 2D.
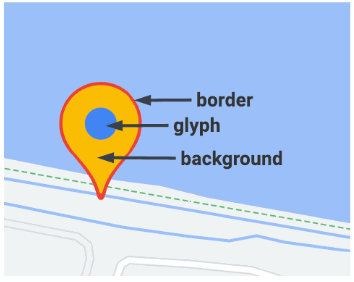
Puoi anche impostare le dimensioni di un indicatore tramite l'elemento impostando il relativo valore di scala (>1 è più grande del normale e <1 è più piccolo in proporzione).
Puoi anche sostituire il glifo con un'immagine o un file SVG se vuoi dare un aspetto più personalizzato, pur mantenendo l'aspetto standard del segnaposto della mappa PinElement.
Oltre PinElements
Per questo passaggio aggiornerai l'elemento PinElement standard con un indicatore SVG e colori diversi, ma è bene sapere che puoi cambiare completamente l'aspetto di un indicatore in modo che non assomigli nemmeno a un segnaposto sulla mappa. All'interno dell'indicatore puoi anche inserire nuove immagini tramite l'uso di modelli, come HTMLImageElement e SVGElement. Per scoprire di più su come eseguire questa operazione, consulta la documentazione Marker3DElement-Slots.
Per scoprire tutto ciò che è possibile fare, dai un'occhiata ai seguenti esempi che mostrano come applicare stili agli indicatori utilizzando diverse tecniche.
|
|
Indicatori con personalizzazione di base tramite PinElement, consulta gli esempi. | Indicatori con personalizzazione complessa tramite modello tramite SVG e immagini, consulta i samples. |
Aggiungi PinElement
Per modificare l'aspetto dell'indicatore, la prima cosa da fare è assicurarsi che la libreria PinElement sia stata aggiunta alla pagina. Per farlo, aggiungi la seguente riga di codice dopo l'importazione della libreria maps3d:
const { Map3DElement, MapMode, Marker3DElement } = await google.maps.importLibrary("maps3d");
const { PinElement } = await google.maps.importLibrary('marker');
Ora che l'elemento è stato caricato, è possibile creare e fare riferimento a PinElement. Esamina il codice, aggiungilo tra il punto in cui viene creato l'indicatore e aggiungi l'indicatore alla mappa 3D.
const marker = new Marker3DElement({
   position: { lat: 51.5332, lng: -0.1260, altitude: 75 },
   label: 'Google UK',
   altitudeMode: 'ABSOLUTE',
   extruded: true,
});

const base = document.location.href.substr(0, document.location.href.lastIndexOf("/"));

const markerPin = new PinElement({
   "background": 'white',
   "glyph": new URL(base + '/images/gb.svg'),
   "scale": 1.0,
});
marker.append(markerPin);

map3D.append(marker);
Poiché non stai caricando solo un segnaposto di base, devi eseguire una serie di operazioni oltre a configurare PinElement, con il relativo colore di sfondo e la relativa scala.
Innanzitutto, devi creare un riferimento a un'immagine SVG per l'icona della bandiera, in questo caso un'Union Jack. Puoi trovarli in una raccolta come questa all'indirizzo https://flagicons.lipis.dev/.
Una volta che hai l'icona, puoi posizionarla in un luogo che il sito può rilevare. In questo caso, puoi impostare la posizione dell'immagine come hardcoded o utilizzare la posizione attuale del sito come stub della directory, come mostrato qui con la variabile base. Puoi quindi collegarlo alla posizione sul server al flag corretto, che qui si trova in '/images/gb.svg'.
Viene creato un elemento Pin simile a quello mostrato:

Dopo aver inserito il flag e il codice nella posizione corretta, dovresti avere una mappa 3D simile a questa:
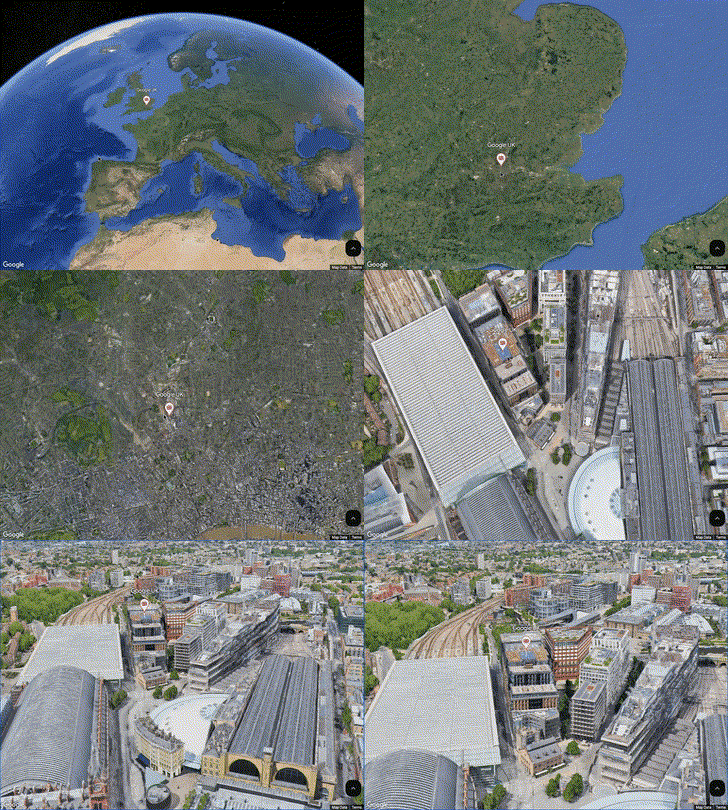
Ora che il nostro indicatore è completo, possiamo anche modificarlo in modo da renderlo selezionabile e aggiungere interattività. Lo farai nel passaggio successivo.
Soluzione della sezione
Per questo passaggio, la pagina completata viene fornita come soluzione per verificare l'implementazione. Se la copi, assicurati di utilizzare la tua chiave API.
Inoltre, non dimenticare che dovrai ottenere il file SVG (o png a tua scelta) della bandiera e salvarlo in una directory che possa essere trovata dalla tua pagina (qui è memorizzato nella cartella Immagini).
<!DOCTYPE html>
<html>

<head>
   <title>Step 4 - SVG Marker</title>
   <style>
       body {
           height: 100vh;
           margin: 0;
       }
   </style>
</head>

<body>
   <script>
       (g => { var h, a, k, p = "The Google Maps JavaScript API", c = "google", l = "importLibrary", q = "__ib__", m = document, b = window; b = b[c] || (b[c] = {}); var d = b.maps || (b.maps = {}), r = new Set, e = new URLSearchParams, u = () => h || (h = new Promise(async (f, n) => { await (a = m.createElement("script")); e.set("libraries", [...r] + ""); for (k in g) e.set(k.replace(/[A-Z]/g, t => "_" + t[0].toLowerCase()), g[k]); e.set("callback", c + ".maps." + q); a.src = `https://maps.${c}apis.com/maps/api/js?` + e; d[q] = f; a.onerror = () => h = n(Error(p + " could not load.")); a.nonce = m.querySelector("script[nonce]")?.nonce || ""; m.head.append(a) })); d[l] ? console.warn(p + " only loads once. Ignoring:", g) : d[l] = (f, ...n) => r.add(f) && u().then(() => d[l](f, ...n)) })({
           key: "<INSERT API KEY>",
           v: "alpha",
           // Use the 'v' parameter to indicate the version to use (weekly, beta, alpha, etc.).
           // Add other bootstrap parameters as needed, using camel case.
       });
   </script>
   <script>
       let map3D = null;

       async function init() {
           const { Map3DElement, MapMode, Marker3DElement } = await google.maps.importLibrary("maps3d");
           const { PinElement } = await google.maps.importLibrary('marker');

           map3D = new Map3DElement({
                center: { lat: 46.717, lng: 7.075, altitude: 2175.130 },
                range: 5814650,
                tilt: 33,
                heading: 4.36,
                mode: MapMode.SATELLITE,
           });

           const marker = new Marker3DElement({
               position: { lat: 51.5332, lng: -0.1260, altitude: 75 },
               label: 'Google UK',
               altitudeMode: 'ABSOLUTE',
               extruded: true,
           });

           const base = document.location.href.substr(0, document.location.href.lastIndexOf("/"));

           const markerPin = new PinElement({
               "background": 'white',
               "glyph": new URL(base + '/images/gb.svg'),
               "scale": 1.0,
           });
           marker.append(markerPin);

           map3D.append(marker);

           document.body.append(map3D);
       }
       init();
   </script>
</body>

</html>
7. Indicatore interattivo
Nell'ultimo passaggio è stato aggiunto un indicatore alla pagina, ma a parte l'aspetto estetico, non fa molto e devi comunque interagire con la mappa 3D nello stesso modo. Il passaggio successivo consiste nell'aggiungere la possibilità di fare qualcosa con l'indicatore quando fai clic su di esso, in modo che possa reagire all'interazione dell'utente.
Per aggiungere questa funzionalità, devi trasformare Marker3DElement in Marker3DInteractiveElement. Alla fine avrai una pagina simile, ma al suo interno un avviso verrà visualizzato facendo clic sul marker e avrà il seguente aspetto:
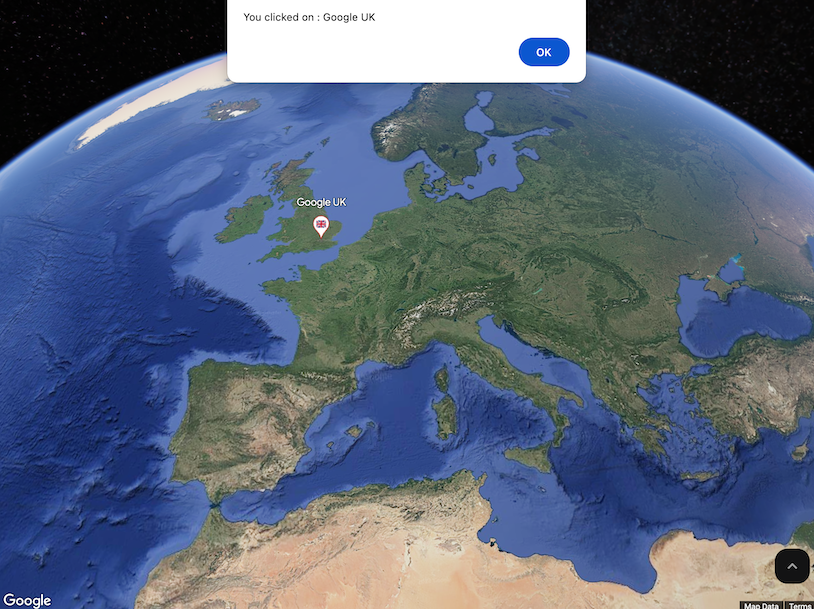
Innanzitutto, modifica la classe dell'indicatore
Per aggiungere interattività a un indicatore, devi assicurarti che utilizzi la classe corretta. Marker3DInteractiveElement è quello necessario, ma poiché si tratta di un'estensione di Marker3DElement, non devi fare altro che caricare il nuovo elemento e modificare il nome dell'elemento nel costruttore.
const { Map3DElement, MapMode, Marker3DInteractiveElement } = await google.maps.importLibrary("maps3d");
const { PinElement } = await google.maps.importLibrary('marker');

map3D = new Map3DElement({
    center: { lat: 46.717, lng: 7.075, altitude: 2175.130 },
    range: 5814650,
    tilt: 33,
    heading: 4.36,
    mode: MapMode.SATELLITE,
});

const marker = new Marker3DInteractiveElement({
   position: { lat: 51.5332, lng: -0.1260, altitude: 75 },
   label: 'Google UK',
   altitudeMode: 'ABSOLUTE',
   extruded: true,
});
In secondo luogo, aggiungi l'evento di clic all'indicatore
Aggiungi un evento di clic all'indicatore per gestire l'interazione dell'utente e rispondere. Nello snippet puoi vedere che l'evento di clic viene aggiunto all'indicatore. In questo caso viene attivato un avviso e viene visualizzato il testo che mostra l'etichetta dell'indicatore, ottenuta dal target dell'evento attivato che ci consente di accedere alla proprietà dell'etichetta. Aggiungi il seguente codice all'applicazione subito dopo la creazione dell'indicatore.
marker.addEventListener('gmp-click', (event) => {
   alert('You clicked on : ' + event.target.label);
   event.stopPropagation();
});
Nota: l'evento stopPropagation viene utilizzato per assicurarsi che tutti gli altri ascoltatori di clic nello stack vengano attivati sugli oggetti sottostanti, come la tela principale della mappa 3D.
Ora, quando esegui l'applicazione, dovresti ottenere il seguente risultato:

Grazie alla possibilità di eseguire un'azione quando viene fatto clic sull'indicatore, ora è possibile aggiungere un'animazione alla pagina nel passaggio successivo.
Soluzione della sezione
Per questo passaggio, la pagina completata viene fornita come soluzione per verificare l'implementazione. Se la copi, assicurati di utilizzare la tua chiave API.
<!DOCTYPE html>
<html>

<head>
   <title>Step 5 - Interactive Marker</title>
   <style>
       body {
           height: 100vh;
           margin: 0;
       }
   </style>
</head>

<body>
   <script>
       (g => { var h, a, k, p = "The Google Maps JavaScript API", c = "google", l = "importLibrary", q = "__ib__", m = document, b = window; b = b[c] || (b[c] = {}); var d = b.maps || (b.maps = {}), r = new Set, e = new URLSearchParams, u = () => h || (h = new Promise(async (f, n) => { await (a = m.createElement("script")); e.set("libraries", [...r] + ""); for (k in g) e.set(k.replace(/[A-Z]/g, t => "_" + t[0].toLowerCase()), g[k]); e.set("callback", c + ".maps." + q); a.src = `https://maps.${c}apis.com/maps/api/js?` + e; d[q] = f; a.onerror = () => h = n(Error(p + " could not load.")); a.nonce = m.querySelector("script[nonce]")?.nonce || ""; m.head.append(a) })); d[l] ? console.warn(p + " only loads once. Ignoring:", g) : d[l] = (f, ...n) => r.add(f) && u().then(() => d[l](f, ...n)) })({
           key: "<INSERT API KEY>",
           v: "alpha",
           // Use the 'v' parameter to indicate the version to use (weekly, beta, alpha, etc.).
           // Add other bootstrap parameters as needed, using camel case.
       });
   </script>
   <script>
       let map3D = null;

       async function init() {
           const { Map3DElement, MapMode, Marker3DInteractiveElement } = await google.maps.importLibrary("maps3d");
           const { PinElement } = await google.maps.importLibrary('marker');

           map3D = new Map3DElement({
                center: { lat: 46.717, lng: 7.075, altitude: 2175.130 },
                range: 5814650,
                tilt: 33,
                heading: 4.36,
                mode: MapMode.SATELLITE,
           });

           const marker = new Marker3DInteractiveElement({
               position: { lat: 51.5332, lng: -0.1260, altitude: 75 },
               label: 'Google UK',
               altitudeMode: 'ABSOLUTE',
               extruded: true,
           });

           marker.addEventListener('gmp-click', (event) => {
               alert('You clicked on : ' + event.target.label);
               event.stopPropagation();
           });

           const base = document.location.href.substr(0, document.location.href.lastIndexOf("/"));

           const markerPin = new PinElement({
               "background": 'white',
               "glyph": new URL(base + '/images/gb.svg'),
               "scale": 1.0,
           });
           marker.append(markerPin);

           map3D.append(marker);

           document.body.append(map3D);
       }
       init();
   </script>
</body>

</html>
8. Vai su
In questo passaggio utilizzerai la possibilità di fare clic sull'indicatore con l'animazione aggiunta per passare alla sua posizione. Puoi vedere come funziona qui.
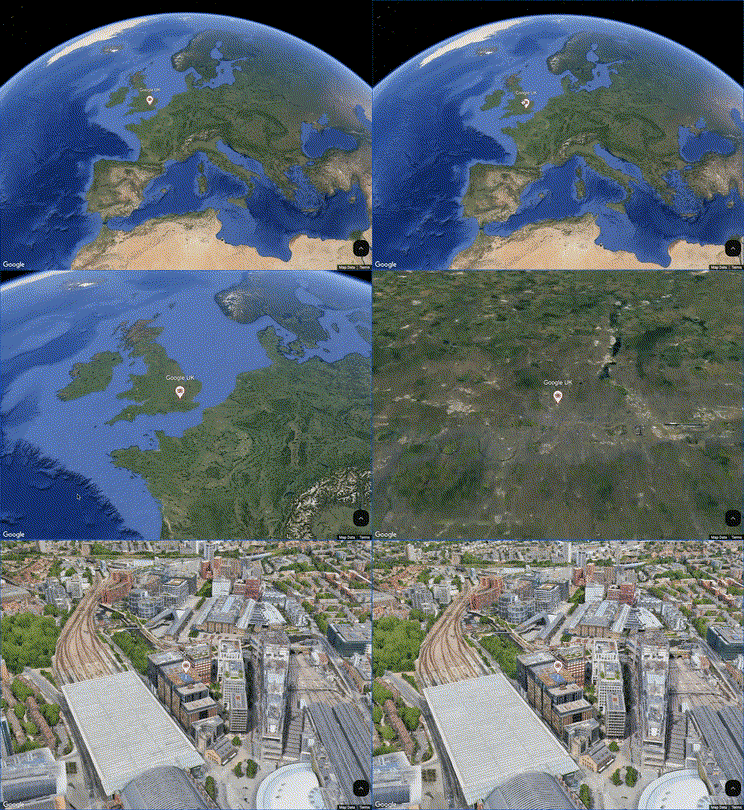
Animazione con flyCameraTo
Per aggiungerlo alla pagina, utilizzerai il metodo flyCameraTo di 3D Maps, in cui la fotocamera si anima tra la posizione in cui ti trovi e la posizione che vuoi visualizzare, eseguendo l'interpolazione tra le due e animando il volo all'interno della mappa 3D.
Quando utilizzi flyCameraTo, devi specificare FlyToAnimationOptions, che ha due proprietà: endCamera, ovvero la posizione in cui la videocamera deve puntare alla fine dell'animazione, e durationMillis, ovvero la durata in millisecondi necessaria per eseguire la transizione.
Nell'esempio, imposta la fotocamera in modo che inquadri l'edificio che corrisponde alla posizione dell'indicatore, con un'inclinazione di 65 gradi, un raggio di 500 metri e punta a nord con un'inclinazione di 0 gradi. Imposta la durata dell'animazione su 12500 millisecondi (12,5 secondi).
Sostituisci l'evento di avviso corrente nella pagina con lo snippet flyCameraTo:
marker.addEventListener('gmp-click', (event) => {
   map3D.flyCameraTo({
       endCamera: {
           center: marker.position,
           tilt: 65,
           range: 500,
           heading: 0,
       },
       durationMillis: 12500,
   });

   event.stopPropagation();
});
È tutto, ora dovresti essere in grado di aggiornare la pagina, fare clic sull'indicatore e passare a Google UK, come mostrato nell'animazione:

In questo passaggio hai aggiunto un indicatore cliccabile che fa volare la videocamera fino alla posizione dell'indicatore. Nel passaggio successivo aggiungerai la possibilità di far volare la videocamera intorno al punto in modo che orbiti intorno alla posizione.
Soluzione della sezione
Per questo passaggio, la pagina completata viene fornita come soluzione per verificare l'implementazione. Se la copi, assicurati di utilizzare la tua chiave API.
<!DOCTYPE html>
<html>

<head>
   <title>Step 6 - Zoom To</title>
   <style>
       body {
           height: 100vh;
           margin: 0;
       }
   </style>
</head>

<body>
   <script>
       (g => { var h, a, k, p = "The Google Maps JavaScript API", c = "google", l = "importLibrary", q = "__ib__", m = document, b = window; b = b[c] || (b[c] = {}); var d = b.maps || (b.maps = {}), r = new Set, e = new URLSearchParams, u = () => h || (h = new Promise(async (f, n) => { await (a = m.createElement("script")); e.set("libraries", [...r] + ""); for (k in g) e.set(k.replace(/[A-Z]/g, t => "_" + t[0].toLowerCase()), g[k]); e.set("callback", c + ".maps." + q); a.src = `https://maps.${c}apis.com/maps/api/js?` + e; d[q] = f; a.onerror = () => h = n(Error(p + " could not load.")); a.nonce = m.querySelector("script[nonce]")?.nonce || ""; m.head.append(a) })); d[l] ? console.warn(p + " only loads once. Ignoring:", g) : d[l] = (f, ...n) => r.add(f) && u().then(() => d[l](f, ...n)) })({
           key: "<INSERT API KEY>",
           v: "alpha",
           // Use the 'v' parameter to indicate the version to use (weekly, beta, alpha, etc.).
           // Add other bootstrap parameters as needed, using camel case.
       });
   </script>
   <script>
       let map3D = null;

       async function init() {
           const { Map3DElement, MapMode, Marker3DInteractiveElement } = await google.maps.importLibrary("maps3d");
           const { PinElement } = await google.maps.importLibrary('marker');

           map3D = new Map3DElement({
                center: { lat: 46.717, lng: 7.075, altitude: 2175.130 },
                range: 5814650,
                tilt: 33,
                heading: 4.36,
                mode: MapMode.SATELLITE,
           });

           const marker = new Marker3DInteractiveElement({
               position: { lat: 51.5332, lng: -0.1260, altitude: 75 },
               label: 'Google UK',
               altitudeMode: 'ABSOLUTE',
               extruded: true,
           });

           marker.addEventListener('gmp-click', (event) => {
               map3D.flyCameraTo({
                   endCamera: {
                       center: marker.position,
                       tilt: 65,
                       range: 500,
                       heading: 0,
                   },
                   durationMillis: 12500,
               });

               event.stopPropagation();
           });

           const base = document.location.href.substr(0, document.location.href.lastIndexOf("/"));

           const markerPin = new PinElement({
               "background": 'white',
               "glyph": new URL(base + '/images/gb.svg'),
               "scale": 1.0,
           });
           marker.append(markerPin);

           map3D.append(marker);

           document.body.append(map3D);
       }
       init();
   </script>
</body>

</html>
9. Vola
L'elemento finale della nostra animazione è utilizzare il metodo flyCameraAround per animare un'orbita attorno all'edificio. Alla fine avrai un'animazione che volerà verso l'edificio e poi lo circonderà come mostrato nell'animazione. Probabilmente è un po' troppo veloce per un esempio reale, ma è utile per mostrare come funziona l'azione senza che sia troppo lunga. Puoi modificare i tempi fino a trovare un valore adatto alle tue esigenze.
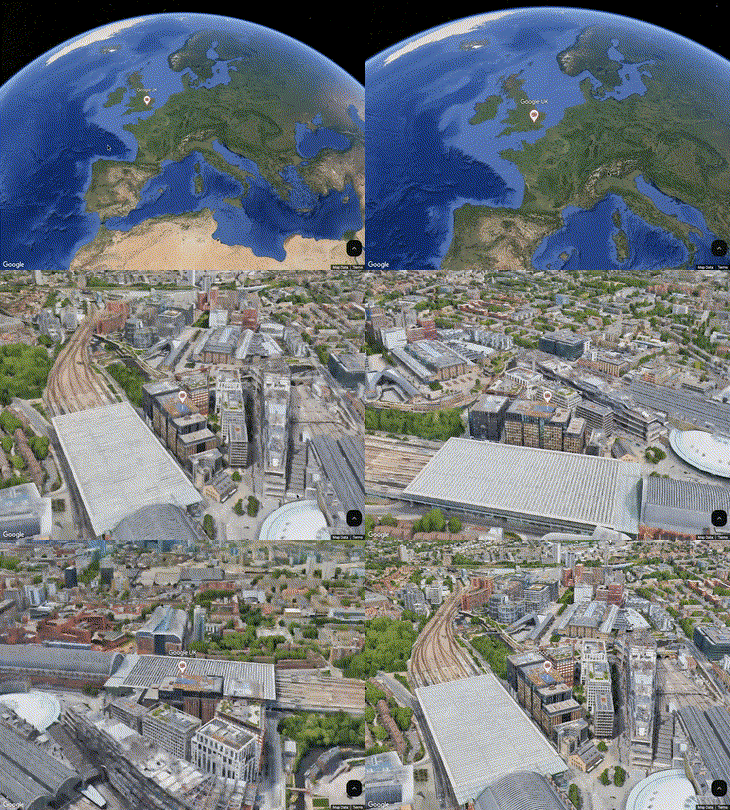
Facciamo un giro.
Il metodo flyCameraAround è simile alla funzione flyCameraTo in quanto accetta come input una serie di opzioni che controllano la posizione da orbitare, i parametri della fotocamera e il tempo in millisecondi necessario per l'orbita. Infine, puoi anche specificare il numero di rotazioni che possono verificarsi nel periodo di tempo specificato. Puoi vedere tutte le opzioni qui in FlyAroundAnimationOptions
Ma aspetta un minuto!
Nell'animazione puoi vedere l'animazione che vola verso la posizione e poi la sorvola, collegando le animazioni. A questo scopo, utilizza l'evento gmp-animationend di Maps 3D per assicurarti che l'animazione corrente sia terminata prima di attivare quella successiva. Questa animazione dovrebbe essere visualizzata una sola volta prima di arrestarsi.
Dai un'occhiata al codice e inseriscilo dopo il codice aggiunto nella sezione precedente.
marker.addEventListener('gmp-click', (event) => {
   map3D.flyCameraTo({
       endCamera: {
           center: marker.position,
           tilt: 65,
           range: 500,
           heading: 0,
       },
       durationMillis: 5000,
   });

   map3D.addEventListener('gmp-animationend', () => {
       map3D.flyCameraAround({
           camera: {
               center: marker.position,
               tilt: 65,
               range: 500,
               heading: 0,
           },
           durationMillis: 5000,
           rounds: 1
       });
   }, { once: true });

   event.stopPropagation();
});
L'aggiunta della possibilità di ascoltare l'evento gmp-animationend consente di invocare l'evento flyCameraAround. Se imposti il punto di partenza come quello utilizzato per la videocamera finale del metodo Vai a, la transizione sarà fluida (in modo da non causare movimenti bruschi in una nuova posizione). Anche in questo caso, durationMillis è impostato per controllare la durata dell'animazione. In questo caso, il metodo accetta anche un'altra opzione, rounds, che è impostata su 1.
Ciò significa che la videocamera ruoterà attorno al punto una volta ogni 5 secondi. Puoi sperimentare questi valori in base alle tue esigenze per trovare il numero più adatto a te.
A questo punto l'animazione termina, ma poiché non vuoi che l'evento gmp-animationend venga attivato di nuovo con questo bit di codice, l'orbita si ripeterà all'infinito. Per evitare questo, è possibile impostare l'opzione once su true. Ciò significa che l'evento verrà rimosso al termine, evitando l'infinito loop.
Una volta aggiunto, dovresti essere in grado di eseguire la soluzione e vedere l'animazione che vola intorno all'indicatore alla fine, come mostrato nell'animazione:
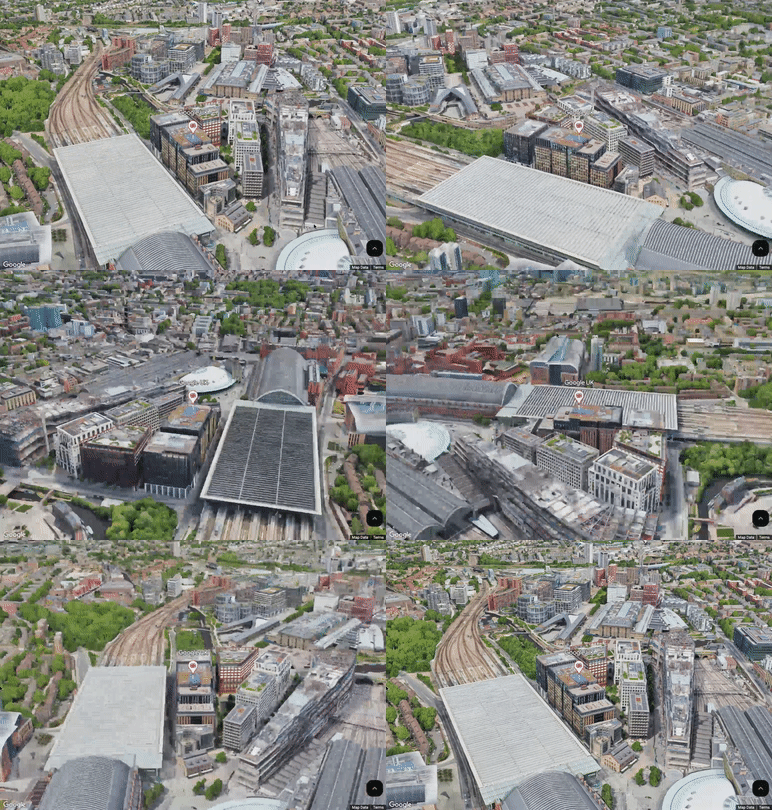
In questo passaggio hai aggiunto un indicatore su cui puoi fare clic. La videocamera si sposta quindi nella posizione dell'indicatore e nei dintorni. Nella fase successiva è il momento di iniziare ad aggiungere altri punti e di spostarci tra di essi.
Soluzione della sezione
Per questo passaggio, la pagina completata viene fornita come soluzione per verificare l'implementazione. Se la copi, assicurati di utilizzare la tua chiave API.
<!DOCTYPE html>
<html>

<head>
   <title>Step 7 - Zoom Around</title>
   <style>
       body {
           height: 100vh;
           margin: 0;
       }
   </style>
</head>

<body>
   <script>
       (g => { var h, a, k, p = "The Google Maps JavaScript API", c = "google", l = "importLibrary", q = "__ib__", m = document, b = window; b = b[c] || (b[c] = {}); var d = b.maps || (b.maps = {}), r = new Set, e = new URLSearchParams, u = () => h || (h = new Promise(async (f, n) => { await (a = m.createElement("script")); e.set("libraries", [...r] + ""); for (k in g) e.set(k.replace(/[A-Z]/g, t => "_" + t[0].toLowerCase()), g[k]); e.set("callback", c + ".maps." + q); a.src = `https://maps.${c}apis.com/maps/api/js?` + e; d[q] = f; a.onerror = () => h = n(Error(p + " could not load.")); a.nonce = m.querySelector("script[nonce]")?.nonce || ""; m.head.append(a) })); d[l] ? console.warn(p + " only loads once. Ignoring:", g) : d[l] = (f, ...n) => r.add(f) && u().then(() => d[l](f, ...n)) })({
           key: "<INSERT API KEY>",
           v: "alpha",
           // Use the 'v' parameter to indicate the version to use (weekly, beta, alpha, etc.).
           // Add other bootstrap parameters as needed, using camel case.
       });
   </script>
   <script>
       let map3D = null;

       const europeCamera = {
           center: { lat: 46.717, lng: 7.075, altitude: 2175.130 },
           range: 5814650,
           tilt: 33,
           heading: 4.36,
       };

       async function init() {
           const { Map3DElement, MapMode, Marker3DInteractiveElement } = await google.maps.importLibrary("maps3d");
           const { PinElement } = await google.maps.importLibrary('marker');

           map3D = new Map3DElement({
               ...europeCamera,
               mode: MapMode.SATELLITE,
           });

           const marker = new Marker3DInteractiveElement({
               position: { lat: 51.5332, lng: -0.1260, altitude: 75 },
               label: 'Google UK',
               altitudeMode: 'ABSOLUTE',
               extruded: true,
           });

           marker.addEventListener('gmp-click', (event) => {
               map3D.flyCameraTo({
                   endCamera: {
                       center: marker.position,
                       tilt: 65,
                       range: 500,
                       heading: 0,
                   },
                   durationMillis: 5000,
               });

               map3D.addEventListener('gmp-animationend', () => {
                   map3D.flyCameraAround({
                       camera: {
                           center: marker.position,
                           tilt: 65,
                           range: 500,
                           heading: 0,
                       },
                       durationMillis: 5000,
                       rounds: 1
                   });
               }, { once: true });

               event.stopPropagation();
           });

           const base = document.location.href.substr(0, document.location.href.lastIndexOf("/"));

           const markerPin = new PinElement({
               "background": 'white',
               "glyph": new URL(base + '/images/gb.svg'),
               "scale": 1.0,
           });
           marker.append(markerPin);

           map3D.append(marker);

           document.body.append(map3D);
       }
       init();
   </script>
</body>

</html>
10. Parigi!
Anche se Londra è una città fantastica, sembra un po' sola nella pagina, quindi iniziamo ad aggiungere alcune nuove località, a partire da Parigi. A questo scopo, è possibile utilizzare un array per contenere tutti i dettagli specifici della posizione e utilizzarlo come input per le funzioni e le variabili che impostano i parametri di visualizzazione degli indicatori e anche i movimenti verso e intorno alle posizioni della videocamera. Che, come accennato, potrebbe essere diversa dalla posizione del punto del marker per inquadrare meglio, ad esempio, un edificio.
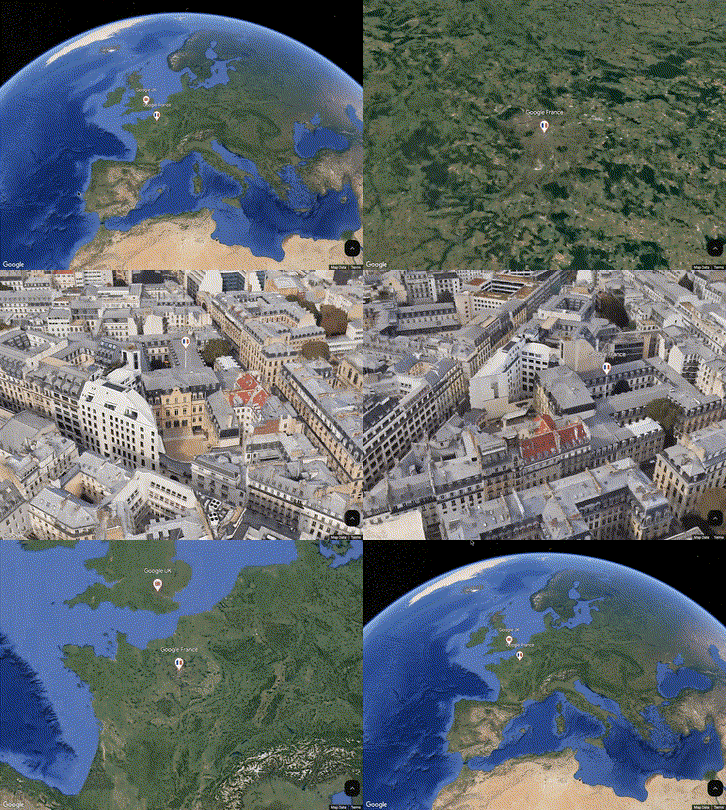
Array di località
Per non dover codificare in modo rigido tutti i dettagli di una determinata località, come la videocamera di visualizzazione, il punto del marker e le opzioni di visualizzazione, puoi utilizzare un piccolo array di oggetti JSON per contenere questi dati. Questo può essere applicato quando gli indicatori vengono creati e utilizzati nell'applicazione. Puoi vedere questo esempio nello snippet di codice, creando una variabile denominata officeLocations per contenere l'array.
Aggiungi il seguente codice appena prima della funzione di inizializzazione. Tieni inoltre presente che la variabile base è stata spostata all'esterno della funzione di inizializzazione in modo che possa essere applicata a tutte le sedi degli uffici.
const base = document.location.href.substr(0, document.location.href.lastIndexOf("/"));

const europeCamera = {
   center: { lat: 46.717, lng: 7.075, altitude: 2175.130 },
   range: 5814650,
   tilt: 33,
   heading: 4.36,
};

const officeLocations = [
   {
       "name": "Google France",
       "camera": {
           "center": { lat: 48.877276, lng: 2.329978, altitude: 48 },
           "range": 178,
           "tilt": 57.48,
           "heading": -17,
       },
       "point": { lat: 48.8775183, lng: 2.3299791, altitude: 60 },
       "pin": {
           "background": 'white',
           "glyph": new URL(base + '/images/fr.svg'),
           "scale": 1.0,
       },
   },
   {
       "name": "Google UK",
       "camera": {
           "center": { lat: 51.5332, lng: -0.1260, altitude: 38.8 },
           "range": 500,
           "tilt": 56.21672368296945,
           "heading": -31.15763027564165,
       },
       "point": { lat: 51.5332, lng: -0.1260, altitude: 75 },
       "pin": {
           "background": 'white',
           "glyph": new URL(base + '/images/gb.svg'),
           "scale": 1.0,
       },
   }]
       const base = document.location.href.substr(0, document.location.href.lastIndexOf("/"));
Ogni sede dell'ufficio ha le seguenti proprietà:
- name :il nome della stazione di ricarica.
- camera :la visualizzazione iniziale per guardare la posizione da raggiungere e le zone circostanti.
- point : la posizione in cui posizionare l'indicatore.
- pin :i dettagli del colore e delle proprietà dei simboli dei segnaposto
Un'angolazione diversa
Potresti notare che per il Regno Unito il centro della fotocamera e il punto del marker sono gli stessi (a parte l'altitudine), mentre per la Francia la fotocamera e il punto sono diversi. Questo perché, per la località in Francia, l'indicatore deve trovarsi in una posizione diversa rispetto alla visuale iniziale della fotocamera, in modo da offrire una visione migliore dell'intero edificio quando ci si avvicina e si vola intorno rispetto a quella che potrebbe essere data se si utilizza il punto dell'indicatore.
Torna in Europa
Una funzione di avere più punti è che aggiunge un requisito per potersi spostare tra di loro. Potresti utilizzare un menu a discesa per consentire la selezione, ma in questo esempio la videocamera tornerà ogni volta alla visualizzazione europea per consentire all'utente di selezionare un'altra località.
Per farlo, la visualizzazione iniziale deve essere memorizzata in una variabile che può essere utilizzata per reimpostare la fotocamera sull'intera visualizzazione dell'Europa. In questo esempio, aggiungi una nuova variabile denominata europeCamera da memorizzare per un uso successivo.
Aggiornare la funzione di inizializzazione
La prima modifica da apportare è utilizzare l'oggetto europeCamera come input durante la creazione di Map3DElement.
La seconda modifica da apportare è inserire la sezione di creazione degli indicatori in un ciclo per aggiornarla con i parametri memorizzati nelle variabili, che puoi vedere nel codice mostrato:
- office.point : la posizione dell'indicatore.
- office.name :il nome dell'ufficio utilizzato per l'etichetta dell'indicatore.
- office.camera :la posizione iniziale della videocamera.
- office.pin :le opzioni di PinElement per le differenze di visualizzazione
Inoltre, non dimenticare di scaricare un file o un'immagine SVG per la bandiera francese.
async function init() {
   const { Map3DElement, MapMode, Marker3DInteractiveElement } = await google.maps.importLibrary("maps3d");
   const { PinElement } = await google.maps.importLibrary('marker');

   map3D = new Map3DElement({
       ...europeCamera,
       mode: MapMode.SATELLITE,
   });

   officeLocations.forEach(office => {
       const marker = new Marker3DInteractiveElement({
           position: office.point,
           label: office.name,
           altitudeMode: 'ABSOLUTE',
           extruded: true,
       });

       marker.addEventListener('gmp-click', (event) => {
           map3D.flyCameraTo({
               endCamera: office.camera,
               durationMillis: 5000,
           });

           map3D.addEventListener('gmp-animationend', () => {
               map3D.flyCameraAround({
                   camera: office.camera,
                   durationMillis: 5000,
                   rounds: 1
               });

               map3D.addEventListener('gmp-animationend', () => {
                   map3D.flyCameraTo({
                       endCamera: europeCamera,
                       durationMillis: 5000,
                   });
               }, { once: true });

           }, { once: true });

           event.stopPropagation();
       });

       const markerPin = new PinElement(office.pin);
       marker.append(markerPin);

       map3D.append(marker);
   });
   document.body.append(map3D);
}
Tieni presente che dopo l'animazione flyCameraAround viene aggiunta una seconda funzione gmp-animationend per gestire il ritorno alla visualizzazione europea, utilizzando la variabile europeCamera memorizzata. Come mostrato nell'animazione:
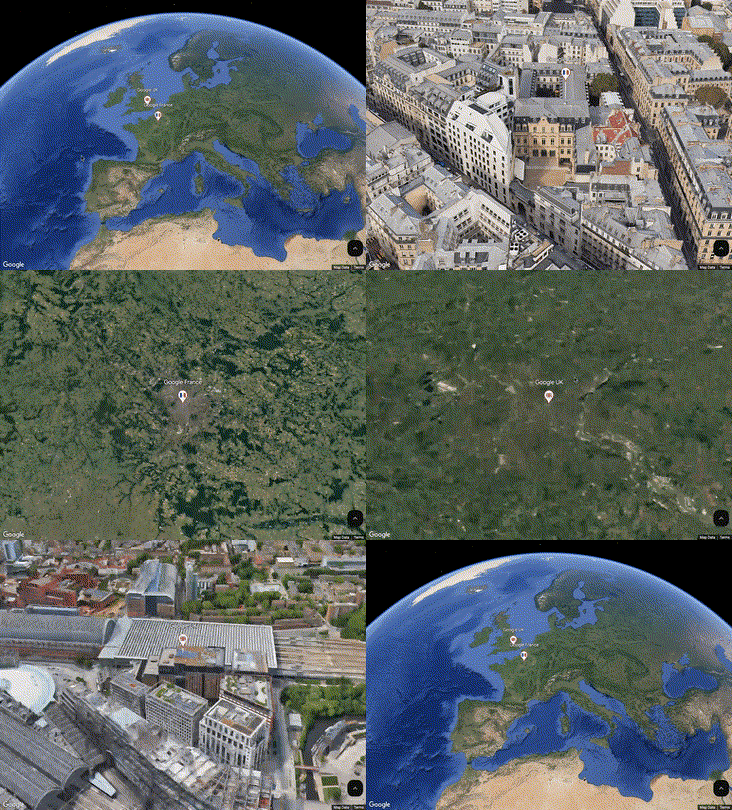
In questa fase l'applicazione è stata estesa per avere due posizioni e la possibilità di spostarsi tra di loro utilizzando l'animazione e un array di posizioni. Nella fase successiva, il resto delle sedi degli uffici verrà aggiunto all'array.
Soluzione della sezione
Per questo passaggio, la pagina completata viene fornita come soluzione per verificare l'implementazione. Se la copi, assicurati di utilizzare la tua chiave API.
Inoltre, non dimenticare che dovrai recuperare il file SVG (o PNG a tua scelta) della bandiera e archiviarlo in una directory che possa essere trovata dalla tua pagina (qui è archiviato nella cartella Immagini).
<!DOCTYPE html>
<html>

<head>
   <title>Step 8 - Paris!</title>
   <style>
       body {
           height: 100vh;
           margin: 0;
       }
   </style>
</head>

<body>
   <script>
       (g => { var h, a, k, p = "The Google Maps JavaScript API", c = "google", l = "importLibrary", q = "__ib__", m = document, b = window; b = b[c] || (b[c] = {}); var d = b.maps || (b.maps = {}), r = new Set, e = new URLSearchParams, u = () => h || (h = new Promise(async (f, n) => { await (a = m.createElement("script")); e.set("libraries", [...r] + ""); for (k in g) e.set(k.replace(/[A-Z]/g, t => "_" + t[0].toLowerCase()), g[k]); e.set("callback", c + ".maps." + q); a.src = `https://maps.${c}apis.com/maps/api/js?` + e; d[q] = f; a.onerror = () => h = n(Error(p + " could not load.")); a.nonce = m.querySelector("script[nonce]")?.nonce || ""; m.head.append(a) })); d[l] ? console.warn(p + " only loads once. Ignoring:", g) : d[l] = (f, ...n) => r.add(f) && u().then(() => d[l](f, ...n)) })({
           key: "<INSERT API KEY>",
           v: "alpha",
           // Use the 'v' parameter to indicate the version to use (weekly, beta, alpha, etc.).
           // Add other bootstrap parameters as needed, using camel case.
       });
   </script>
   <script>
       let map3D = null;

       const base = document.location.href.substr(0, document.location.href.lastIndexOf("/"));

       const europeCamera = {
           center: { lat: 46.717, lng: 7.075, altitude: 2175.130 },
           range: 5814650,
           tilt: 33,
           heading: 4.36,
       };

       const officeLocations = [
           {
               "name": "Google France",
               "camera": {
                   "center": { lat: 48.877276, lng: 2.329978, altitude: 48 },
                   "range": 178,
                   "tilt": 57.48,
                   "heading": -17,
               },
               "point": { lat: 48.8775183, lng: 2.3299791, altitude: 60 },
               "pin": {
                   "background": 'white',
                   "glyph": new URL(base + '/images/fr.svg'),
                   "scale": 1.0,
               },
           },
           {
               "name": "Google UK",
               "camera": {
                   "center": { lat: 51.5332, lng: -0.1260, altitude: 38.8 },
                   "range": 500,
                   "tilt": 56.21672368296945,
                   "heading": -31.15763027564165,
               },
               "point": { lat: 51.5332, lng: -0.1260, altitude: 75 },
               "pin": {
                   "background": 'white',
                   "glyph": new URL(base + '/images/gb.svg'),
                   "scale": 1.0,
               },
           }]

       async function init() {
           const { Map3DElement, MapMode, Marker3DInteractiveElement } = await google.maps.importLibrary("maps3d");
           const { PinElement } = await google.maps.importLibrary('marker');

           map3D = new Map3DElement({
               ...europeCamera,
               mode: MapMode.SATELLITE,
           });

           officeLocations.forEach(office => {
               const marker = new Marker3DInteractiveElement({
                   position: office.point,
                   label: office.name,
                   altitudeMode: 'ABSOLUTE',
                   extruded: true,
               });

               marker.addEventListener('gmp-click', (event) => {
                   map3D.flyCameraTo({
                       endCamera: office.camera,
                       durationMillis: 5000,
                   });

                   map3D.addEventListener('gmp-animationend', () => {
                       map3D.flyCameraAround({
                           camera: office.camera,
                           durationMillis: 5000,
                           rounds: 1
                       });

                       map3D.addEventListener('gmp-animationend', () => {
                           map3D.flyCameraTo({
                               endCamera: europeCamera,
                               durationMillis: 5000,
                           });
                       }, { once: true });

                   }, { once: true });

                   event.stopPropagation();
               });

               const markerPin = new PinElement(office.pin);
               marker.append(markerPin);

               map3D.append(marker);
           });
           document.body.append(map3D);
       }
       init();
   </script>
</body>

</html>
11. Più luoghi
Anche se l'applicazione ora dispone di tutte le funzionalità necessarie, la mappa 3D sembra ancora un po' spoglia, quindi aggiungi altre località per renderla un po' più completa. Grazie all'utilizzo di un array, è facile continuare a compilare nuove località con i relativi indicatori univoci. L'ultimo passaggio consiste nell'aggiungere indicatori finché non viene visualizzata la seguente visualizzazione.

Aggiunta di altri indicatori.
Google ha diversi uffici in molti paesi europei, quindi aggiungiamone alcuni alla mappa. È solo questione di aggiornare l'array. Potrebbe essere ricavato da un servizio web o pubblicato da un file statico da qualche parte. Nel nostro caso, per semplicità, verrà mantenuto nella stessa pagina.
Puoi aggiungere tutti gli indicatori che vuoi, che vengono rilevati dalla pagina e poi aggiunti automaticamente alla visualizzazione. Ricorda di ottenere gli indicatori corretti e di archiviarli nella directory delle immagini (o dove preferisci).
const officeLocations = [
   {
       name: "Google France",
       camera: {
           center: { lat: 48.877276, lng: 2.329978, altitude: 48 },
           range: 178,
           tilt: 57.48,
           heading: -17,
       },
       point: { lat: 48.8775183, lng: 2.3299791, altitude: 60 },
       pin: {
           background: 'white',
           glyph: new URL(base + '/images/fr.svg'),
           scale: 1.0,
       },
   },
   {
       name: "Google UK",
       camera: {
           center: { lat: 51.5332, lng: -0.1260, altitude: 38.8 },
           range: 500,
           tilt: 56.21672368296945,
           heading: -31.15763027564165,
       },
       point: { lat: 51.5332, lng: -0.1260, altitude: 75 },
       pin: {
           background: 'white',
           glyph: new URL(base + '/images/gb.svg'),
           scale: 1.0,
       },
   },
   {
       name: "Google Belgium",
       camera: {
           center: { lat: 50.83930408436509, lng: 4.38052394507952, altitude: 64.38932203802196},
           range: 466.62899893119175,
           tilt: 43.61569474716178,
           heading: 51.805907046332074,
       },
       point: { lat: 50.8392653, lng: 4.3808751, altitude: 25 },
       pin: {
           background: 'white',
           glyph: new URL(base + '/images/be.svg'),
           scale: 1.0,
       },
   },
   {
       name: "Google Czechia",
       camera: {
           center: {
               lat: 50.07004093853976,
               lng: 14.402871475443956,
               altitude: 223.39574818495532
           },
           range: 522.0365799222782,
           tilt: 62.39511972890614,
           heading: -39.150149539328304,
       },
       point: { lat: 50.0703122, lng: 14.402668199999999, altitude: 50 },
       pin: {
           background: 'white',
           glyph: new URL(base + '/images/cz.svg'),
           scale: 1.0,
       },
   },
   {
       name: "Google Denmark",
       details: "2, Sankt Petri Passage 5, 1165 København",
       camera: {
           center: {
               lat: 55.680359539635866,
               lng: 12.570460204526002,
               altitude: 30.447654757346044
           },
           range: 334.8786935049066,
           tilt: 55.38819319004654,
           heading: 149.63867461295067,
       },
       point: { lat: 55.6804504, lng: 12.570279099999999, altitude: 25 },
       pin: {
           background: 'white',
           glyph: new URL(base + '/images/dk.svg'),
           scale: 1.0,
       },
   },
   ,
   {
       name: "Google Greece",
       camera: {
           center: {
               lat: 38.038634694028055,
               lng: 23.802924946201266,
               altitude: 196.45884670344995
           },
           range: 343.57226336076565,
           tilt: 54.97375927639567,
           heading: -33.26775344055724,
       },
       point: { lat: 38.038619, lng: 23.8031622, altitude: 25 },
       pin: {
           background: 'white',
           glyph: new URL(base + '/images/gr.svg'),
           scale: 1.0,
       },
   },
   {
       name: "Google Germany",
       camera: {
           center: {
               lat: 53.55397683312404,
               lng: 9.986350507286808,
               altitude: 44.83610870143956
           },
           range: 375.3474077822466,
           tilt: 71.35078443829818,
           heading: -160.76930098951416,
       },
       point: { lat: 53.5540227, lng: 9.9863, altitude: 50 },
       pin: {
           background: 'white',
           glyph: new URL(base + '/images/de.svg'),
           scale: 1.0,
       },
   },
   {
       name: "Google Ireland",
       camera: {
           center: { lat: 53.339816899999995, lng: -6.2362644, altitude: 38.777415761228006 },
           range: 500,
           tilt: 56.21672368296945,
           heading: -31.15763027564165,
       },
       point: { lat: 53.339816899999995, lng: -6.2362644, altitude: 50 },
       pin: {
           background: 'white',
           glyph: new URL(base + '/images/ie.svg'),
           scale: 1.0,
       },
   },
   {
       name: "Google Italy",
       camera: {
           center: {
               lat: 45.486361346538224,
               lng: 9.18995496294455,
               altitude: 138.55834058400072
           },
           range: 694.9398023590038,
           tilt: 57.822470255679114,
           heading: 84.10194883488619,
       },
       point: { lat: 45.4863064, lng: 9.1894762, altitude: 50 },
       pin: {
           background: 'white',
           glyph: new URL(base + '/images/it.svg'),
           scale: 1.0,
       },
   },
   {
       name: "Google Lithuania",
       camera: {
           center: {
               lat: 54.698040606567965,
               lng: 25.30965338542576,
               altitude: 111.80276944294413
           },
           range: 412.5808304977545,
           tilt: 43.50793332082195,
           heading: -29.181098269421028,
       },
       point: { lat: 54.6981204, lng: 25.3098617, altitude: 25 },
       pin: {
           background: 'white',
           glyph: new URL(base + '/images/at.svg'),
           scale: 1.0,
       },
   },
   {
       name: "Google Netherlands",
       camera: {
           center: {
               lat: 52.33773837150874,
               lng: 4.871754560171063,
               altitude: 53.68063996154723
           },
           range: 473.1982259177312,
           tilt: 56.216523350388634,
           heading: 71.78252318033718,
       },
       point: { lat: 52.337801, lng: 4.872065999999999, altitude: 100 },
       pin: {
           background: 'white',
           glyph: new URL(base + '/images/nl.svg'),
           scale: 1.0,
       },
   },
   {
       name: "Google Norway",
       camera: {
           center: { lat: 59.90991209999999, lng: 10.726020799999999, altitude: 38.777415761228006 },
           range: 500,
           tilt: 56.21672368296945,
           heading: -31.15763027564165,
       },
       point: { lat: 59.90991209999999, lng: 10.726020799999999, altitude: 25 },
       pin: {
           background: 'white',
           glyph: new URL(base + '/images/no.svg'),
           scale: 1.0,
       },
   },
   {
       name: "Google Poland",
       camera: {
           center: { lat: 52.22844380000001, lng: 20.9851819, altitude: 38.777415761228006 },
           range: 500,
           tilt: 56.21672368296945,
           heading: -31.15763027564165,
       },
       point: { lat: 52.22844380000001, lng: 20.9851819, altitude: 25 },
       pin: {
           background: 'white',
           glyph: new URL(base + '/images/pl.svg'),
           scale: 1.0,
       },
   },
   {
       name: "Google Portugal",
       camera: {
           center: {
               lat: 38.7240122810727,
               lng: -9.150628263172639,
               altitude: 55.299662291551044
           },
           range: 337.7474313328639,
           tilt: 56.79772652682846,
           heading: 176.0722118222208,
       },
       point: { lat: 38.723915999999996, lng: -9.150629, altitude: 35 },
       pin: {
           background: 'white',
           glyph: new URL(base + '/images/pt.svg'),
           scale: 1.0,
       },
   },
   {
       name: "Google Romania",
       camera: {
           center: {
               lat: 44.43076650172983,
               lng: 26.109700164718586,
               altitude: 125.57895810814505
           },
           range: 364.25249956711923,
           tilt: 38.517539223834326,
           heading: -38.81294924429363,
       },
       point: { lat: 44.4309897, lng: 26.1095719, altitude: 75 },
       pin: {
           background: 'white',
           glyph: new URL(base + '/images/ro.svg'),
           scale: 1.0,
       },
   },
   {
       name: "Google Spain",
       camera: {
           center: {
               lat: 40.450078762608875,
               lng: -3.6930085080020856,
               altitude: 753.6446342341894
           },
           range: 845.7279793010093,
           tilt: 46.752510050599746,
           heading: 4.718779524265234,
       },
       point: { lat: 40.450294199999995, lng: -3.6927915, altitude: 175 },
       pin: {
           background: 'white',
           glyph: new URL(base + '/images/es.svg'),
           scale: 1.0,
       },
   },
   {
       name: "Google Sweden",
       camera: {
           center: {
               lat: 59.33313751316038,
               lng: 18.054618219238293,
               altitude: 16.728213706832868
           },
           range: 377.5210725830039,
           tilt: 63.59478230626709,
           heading: 98.53138488367703,
       },
       point: { lat: 59.3332093, lng: 18.0536386, altitude: 50 },
       pin: {
           background: 'white',
           glyph: new URL(base + '/images/se.svg'),
           scale: 1.0,
       },
   },
   {
       name: "Google Switzerland",
       camera: {
           center: {
               lat: 47.365411056285275,
               lng: 8.525063594405356,
               altitude: 419.2348376754488
           },
           range: 166.74918737631742,
           tilt: 59.31431457129067,
           heading: -32.620415961949206,
       },
       point: { lat: 47.365452, lng: 8.5249253, altitude: 100 },
       pin: {
           background: 'white',
           glyph: new URL(base + '/images/ch.svg'),
           scale: 1.0,
       },
   }
]
A questo punto, dovresti visualizzare una pagina completa come quella mostrata nell'immagine, che consente all'utente di fare clic su qualsiasi località, visitarla e poi tornare indietro.
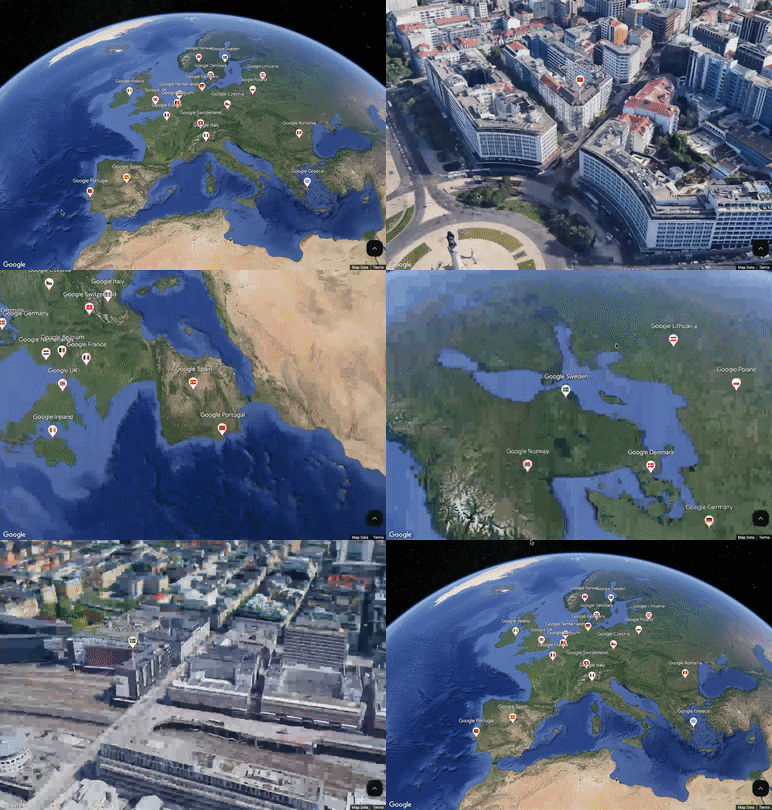
Complimenti, hai completato il codelab. Chiudiamo nella prossima sezione e cerchiamo altre novità da provare.
Soluzione della sezione
Per questo passaggio, la pagina completata viene fornita come soluzione per verificare l'implementazione. Se la copi, assicurati di utilizzare la tua chiave API.
Inoltre, non dimenticare che dovrai recuperare il file SVG (o PNG a tua scelta) della bandiera e archiviarlo in una directory che possa essere trovata dalla tua pagina (qui è archiviato nella cartella Immagini).
<!DOCTYPE html>
<html>

<head>
   <title>Step 9 - More Places!</title>
   <style>
       body {
           height: 100vh;
           margin: 0;
       }
   </style>
</head>

<body>
   <script>
       (g => { var h, a, k, p = "The Google Maps JavaScript API", c = "google", l = "importLibrary", q = "__ib__", m = document, b = window; b = b[c] || (b[c] = {}); var d = b.maps || (b.maps = {}), r = new Set, e = new URLSearchParams, u = () => h || (h = new Promise(async (f, n) => { await (a = m.createElement("script")); e.set("libraries", [...r] + ""); for (k in g) e.set(k.replace(/[A-Z]/g, t => "_" + t[0].toLowerCase()), g[k]); e.set("callback", c + ".maps." + q); a.src = `https://maps.${c}apis.com/maps/api/js?` + e; d[q] = f; a.onerror = () => h = n(Error(p + " could not load.")); a.nonce = m.querySelector("script[nonce]")?.nonce || ""; m.head.append(a) })); d[l] ? console.warn(p + " only loads once. Ignoring:", g) : d[l] = (f, ...n) => r.add(f) && u().then(() => d[l](f, ...n)) })({
           key: "<INSERT API KEY>",
           v: "alpha",
           // Use the 'v' parameter to indicate the version to use (weekly, beta, alpha, etc.).
           // Add other bootstrap parameters as needed, using camel case.
       });
   </script>
   <script>
       let map3D = null;

       const base = document.location.href.substr(0, document.location.href.lastIndexOf("/"));

       const europeCamera = {
           center: { lat: 46.717, lng: 7.075, altitude: 2175.130 },
           range: 5814650,
           tilt: 33,
           heading: 4.36,
       };

const officeLocations = [
   {
       name: "Google France",
       details: "8 Rue de Londres, 75009 Paris, France",
       camera: {
           center: { lat: 48.877276, lng: 2.329978, altitude: 48 },
           range: 178,
           tilt: 57.48,
           heading: -17,
       },
       point: { lat: 48.8775183, lng: 2.3299791, altitude: 60 },
       pin: {
           background: 'white',
           glyph: new URL(base + '/images/fr.svg'),
           scale: 1.0,
       },
   },
   {
       name: "Google UK",
       details: "6 Pancras Square, London N1C 4AG, UK",
       camera: {
           center: { lat: 51.5332, lng: -0.1260, altitude: 38.8 },
           range: 500,
           tilt: 56.21672368296945,
           heading: -31.15763027564165,
       },
       point: { lat: 51.5332, lng: -0.1260, altitude: 75 },
       pin: {
           background: 'white',
           glyph: new URL(base + '/images/gb.svg'),
           scale: 1.0,
       },
   },
   {
       name: "Google Belgium",
       details: "Chau. d'Etterbeek 180, 1040 Brussel",
       camera: {
           center: { lat: 50.83930408436509, lng: 4.38052394507952, altitude: 64.38932203802196},
           range: 466.62899893119175,
           tilt: 43.61569474716178,
           heading: 51.805907046332074,
       },
       point: { lat: 50.8392653, lng: 4.3808751, altitude: 25 },
       pin: {
           background: 'white',
           glyph: new URL(base + '/images/be.svg'),
           scale: 1.0,
       },
   },
   {
       name: "Google Czechia",
       details: "Stroupežnického 3191/17, 150 00 Praha 5-Smíchov",
       camera: {
           center: {
               lat: 50.07004093853976,
               lng: 14.402871475443956,
               altitude: 223.39574818495532
           },
           range: 522.0365799222782,
           tilt: 62.39511972890614,
           heading: -39.150149539328304,
       },
       point: { lat: 50.0703122, lng: 14.402668199999999, altitude: 50 },
       pin: {
           background: 'white',
           glyph: new URL(base + '/images/cz.svg'),
           scale: 1.0,
       },
   },
   {
       name: "Google Denmark",
       details: "2, Sankt Petri Passage 5, 1165 København",
       camera: {
           center: {
               lat: 55.680359539635866,
               lng: 12.570460204526002,
               altitude: 30.447654757346044
           },
           range: 334.8786935049066,
           tilt: 55.38819319004654,
           heading: 149.63867461295067,
       },
       point: { lat: 55.6804504, lng: 12.570279099999999, altitude: 25 },
       pin: {
           background: 'white',
           glyph: new URL(base + '/images/dk.svg'),
           scale: 1.0,
       },
   },
   ,
   {
       name: "Google Greece",
       details: "Fragkokklisias 6, Athina 151 25",
       camera: {
           center: {
               lat: 38.038634694028055,
               lng: 23.802924946201266,
               altitude: 196.45884670344995
           },
           range: 343.57226336076565,
           tilt: 54.97375927639567,
           heading: -33.26775344055724,
       },
       point: { lat: 38.038619, lng: 23.8031622, altitude: 25 },
       pin: {
           background: 'white',
           glyph: new URL(base + '/images/gr.svg'),
           scale: 1.0,
       },
   },
   {
       name: "Google Germany",
       details: "ABC-Straße 19, 20354 Hamburg",
       camera: {
           center: {
               lat: 53.55397683312404,
               lng: 9.986350507286808,
               altitude: 44.83610870143956
           },
           range: 375.3474077822466,
           tilt: 71.35078443829818,
           heading: -160.76930098951416,
       },
       point: { lat: 53.5540227, lng: 9.9863, altitude: 50 },
       pin: {
           background: 'white',
           glyph: new URL(base + '/images/de.svg'),
           scale: 1.0,
       },
   },
   {
       name: "Google Ireland",
       details: "Gordon House, 4 Barrow St, Grand Canal Dock, Dublin 4, D04 V4X7",
       camera: {
           center: { lat: 53.339816899999995, lng: -6.2362644, altitude: 38.777415761228006 },
           range: 500,
           tilt: 56.21672368296945,
           heading: -31.15763027564165,
       },
       point: { lat: 53.339816899999995, lng: -6.2362644, altitude: 50 },
       pin: {
           background: 'white',
           glyph: new URL(base + '/images/ie.svg'),
           scale: 1.0,
       },
   },
   {
       name: "Google Italy",
       details: "Isola Building C, Via Federico Confalonieri, 4, 20124 Milano",
       camera: {
           center: {
               lat: 45.486361346538224,
               lng: 9.18995496294455,
               altitude: 138.55834058400072
           },
           range: 694.9398023590038,
           tilt: 57.822470255679114,
           heading: 84.10194883488619,
       },
       point: { lat: 45.4863064, lng: 9.1894762, altitude: 50 },
       pin: {
           background: 'white',
           glyph: new URL(base + '/images/it.svg'),
           scale: 1.0,
       },
   },
   {
       name: "Google Lithuania",
       details: "Vilnius Tech Park, Antakalnis st. 17, 2nd building, LT-10312, Vilnius",
       camera: {
           center: {
               lat: 54.698040606567965,
               lng: 25.30965338542576,
               altitude: 111.80276944294413
           },
           range: 412.5808304977545,
           tilt: 43.50793332082195,
           heading: -29.181098269421028,
       },
       point: { lat: 54.6981204, lng: 25.3098617, altitude: 25 },
       pin: {
           background: 'white',
           glyph: new URL(base + '/images/at.svg'),
           scale: 1.0,
       },
   },
   {
       name: "Google Netherlands",
       details: "Claude Debussylaan 34, 1082 MD Amsterdam",
       camera: {
           center: {
               lat: 52.33773837150874,
               lng: 4.871754560171063,
               altitude: 53.68063996154723
           },
           range: 473.1982259177312,
           tilt: 56.216523350388634,
           heading: 71.78252318033718,
       },
       point: { lat: 52.337801, lng: 4.872065999999999, altitude: 100 },
       pin: {
           background: 'white',
           glyph: new URL(base + '/images/nl.svg'),
           scale: 1.0,
       },
   },
   {
       name: "Google Norway",
       details: "Bryggegata 6, 0250 Oslo",
       camera: {
           center: { lat: 59.90991209999999, lng: 10.726020799999999, altitude: 38.777415761228006 },
           range: 500,
           tilt: 56.21672368296945,
           heading: -31.15763027564165,
       },
       point: { lat: 59.90991209999999, lng: 10.726020799999999, altitude: 25 },
       pin: {
           background: 'white',
           glyph: new URL(base + '/images/no.svg'),
           scale: 1.0,
       },
   },
   {
       name: "Google Poland",
       details: "Rondo Daszynskiego 2, 00-843 Warsaw",
       camera: {
           center: { lat: 52.22844380000001, lng: 20.9851819, altitude: 38.777415761228006 },
           range: 500,
           tilt: 56.21672368296945,
           heading: -31.15763027564165,
       },
       point: { lat: 52.22844380000001, lng: 20.9851819, altitude: 25 },
       pin: {
           background: 'white',
           glyph: new URL(base + '/images/pl.svg'),
           scale: 1.0,
       },
   },
   {
       name: "Google Portugal",
       details: "R. Duque de Palmela 37 Piso 4, 1250-097 Lisboa",
       camera: {
           center: {
               lat: 38.7240122810727,
               lng: -9.150628263172639,
               altitude: 55.299662291551044
           },
           range: 337.7474313328639,
           tilt: 56.79772652682846,
           heading: 176.0722118222208,
       },
       point: { lat: 38.723915999999996, lng: -9.150629, altitude: 35 },
       pin: {
           background: 'white',
           glyph: new URL(base + '/images/pt.svg'),
           scale: 1.0,
       },
   },
   {
       name: "Google Romania",
       details: "Bulevardul Corneliu Coposu 6-8, București 030167",
       camera: {
           center: {
               lat: 44.43076650172983,
               lng: 26.109700164718586,
               altitude: 125.57895810814505
           },
           range: 364.25249956711923,
           tilt: 38.517539223834326,
           heading: -38.81294924429363,
       },
       point: { lat: 44.4309897, lng: 26.1095719, altitude: 75 },
       pin: {
           background: 'white',
           glyph: new URL(base + '/images/ro.svg'),
           scale: 1.0,
       },
   },
   {
       name: "Google Spain",
       details: "Torre Picasso, Pl. Pablo Ruiz Picasso, 1, Tetuán, 28020 Madrid",
       camera: {
           center: {
               lat: 40.450078762608875,
               lng: -3.6930085080020856,
               altitude: 753.6446342341894
           },
           range: 845.7279793010093,
           tilt: 46.752510050599746,
           heading: 4.718779524265234,
       },
       point: { lat: 40.450294199999995, lng: -3.6927915, altitude: 175 },
       pin: {
           background: 'white',
           glyph: new URL(base + '/images/es.svg'),
           scale: 1.0,
       },
   },
   {
       name: "Google Sweden",
       details: "Kungsbron 2, 111 22 Stockholm",
       camera: {
           center: {
               lat: 59.33313751316038,
               lng: 18.054618219238293,
               altitude: 16.728213706832868
           },
           range: 377.5210725830039,
           tilt: 63.59478230626709,
           heading: 98.53138488367703,
       },
       point: { lat: 59.3332093, lng: 18.0536386, altitude: 50 },
       pin: {
           background: 'white',
           glyph: new URL(base + '/images/se.svg'),
           scale: 1.0,
       },
   },
   {
       name: "Google Switzerland",
       details: "Brandschenkestrasse 110, 8002 Zürich",
       camera: {
           center: {
               lat: 47.365411056285275,
               lng: 8.525063594405356,
               altitude: 419.2348376754488
           },
           range: 166.74918737631742,
           tilt: 59.31431457129067,
           heading: -32.620415961949206,
       },
       point: { lat: 47.365452, lng: 8.5249253, altitude: 100 },
       pin: {
           background: 'white',
           glyph: new URL(base + '/images/ch.svg'),
           scale: 1.0,
       },
   }
]

       async function init() {
           const { Map3DElement, MapMode, Marker3DInteractiveElement } = await google.maps.importLibrary("maps3d");
           const { PinElement } = await google.maps.importLibrary('marker');

           map3D = new Map3DElement({
               ...europeCamera,
               mode: MapMode.SATELLITE,
           });

           officeLocations.forEach(office => {
               const marker = new Marker3DInteractiveElement({
                   position: office.point,
                   label: office.name,
                   altitudeMode: 'RELATIVE_TO_GROUND',
                   extruded: true,
               });

               marker.addEventListener('gmp-click', (event) => {
                   map3D.flyCameraTo({
                       endCamera: office.camera,
                       durationMillis: 2000,
                   });

                   map3D.addEventListener('gmp-animationend', () => {
                       map3D.flyCameraAround({
                           camera: office.camera,
                           durationMillis: 2000,
                           rounds: 1
                       });

                       map3D.addEventListener('gmp-animationend', () => {
                           map3D.flyCameraTo({
                               endCamera: europeCamera,
                               durationMillis: 2000,
                           });
                       }, { once: true });

                   }, { once: true });

                   event.stopPropagation();
               });

               const markerPin = new PinElement(office.pin);
               marker.append(markerPin);

               map3D.append(marker);
           });
           document.body.append(map3D);
       }
       init();
   </script>
</body>

</html>
12. Passaggi successivi
In questo codelab hai appreso le nozioni di base su cosa puoi fare con la funzionalità 3D nell'API Maps JavaScript. A questo punto, prova ad aggiungere alcune di queste funzionalità alla mappa:
- Aggiungi un elenco a discesa per consentire la selezione di un ufficio.
- Utilizza alcune delle altre opzioni di stile degli indicatori per aggiungere un po' di brio.
- Dai un'occhiata alle librerie aggiuntive disponibili per l'API Maps JavaScript che attivano funzionalità aggiuntive, come Places per mostrare la valutazione di ogni ufficio utilizzando il relativo ID luogo.
Per scoprire di più su come utilizzare Google Maps Platform e 3D sul web, consulta questi link:


