Bắt đầu nhanh bằng Python
Sử dụng bộ sưu tập để sắp xếp ngăn nắp các trang
Lưu và phân loại nội dung dựa trên lựa chọn ưu tiên của bạn.
Dự án này cho bạn biết cách triển khai
Đồ thuỷ tinh minh hoạ chức năng chính của Google Mirror API.
Để xem bản minh hoạ đầy đủ hoạt động của dự án bắt đầu nhanh, hãy truy cập
https://glass-python-starter-demo.appspot.com.
Nếu không, hãy đọc tiếp để xem cách triển khai phiên bản của riêng bạn.
Tải xuống trên GitHub
Điều kiện tiên quyết
SDK App Engine dành cho Python –
Dự án bắt đầu nhanh Python được triển khai bằng App Engine. Bạn cần
Python App Engine SDK để phát triển và triển khai dự án.
Chạy trình cài đặt nếu phù hợp với nền tảng của bạn hoặc giải nén tệp zip
ở nơi thuận tiện.
Tạo một phiên bản Google App Engine
Bạn cần lưu trữ dự án bắt đầu nhanh trên một phiên bản của Google App Engine:
- Truy cập http://appspot.com.
- Nhấp vào Create Application (Tạo ứng dụng) và tạo một phiên bản Google App Engine công khai được lưu trữ trên
appspot.com
.
- Cung cấp Mã nhận dạng ứng dụng cho ứng dụng và để trạng thái xác thực Mở cho tất cả Google
Người dùng tài khoản. Sau này, bạn sẽ cần mã nhận dạng ứng dụng để định cấu hình dự án bắt đầu nhanh.
Tạo dự án Bảng điều khiển API của Google
Tiếp theo, hãy cấp quyền truy cập vào Google Mirror API:
- Chuyển đến bảng điều khiển API của Google và tạo một dự án API mới.
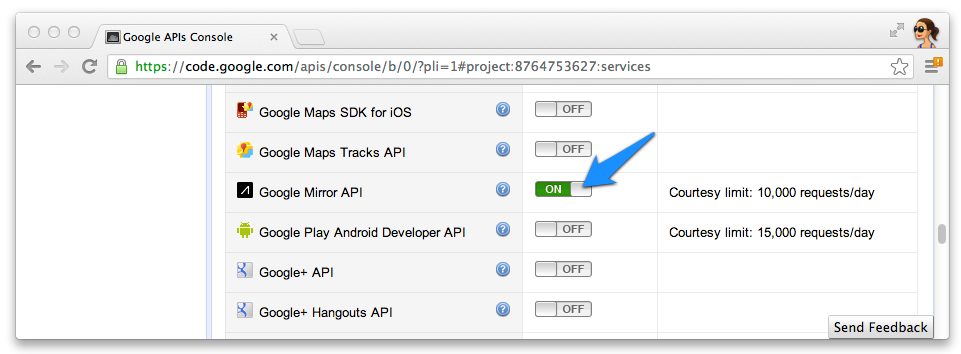
- Nhấp vào Dịch vụ rồi bật Google Mirror API cho dự án mới của bạn.

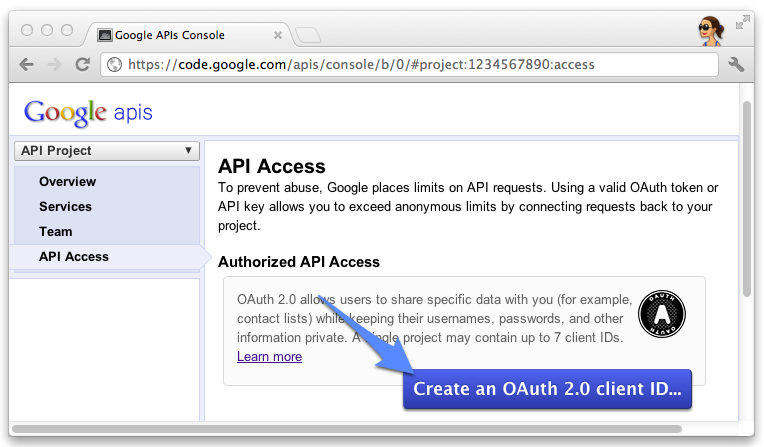
- Nhấp vào Quyền truy cập API rồi tạo mã ứng dụng khách OAuth 2.0 cho một ứng dụng web.

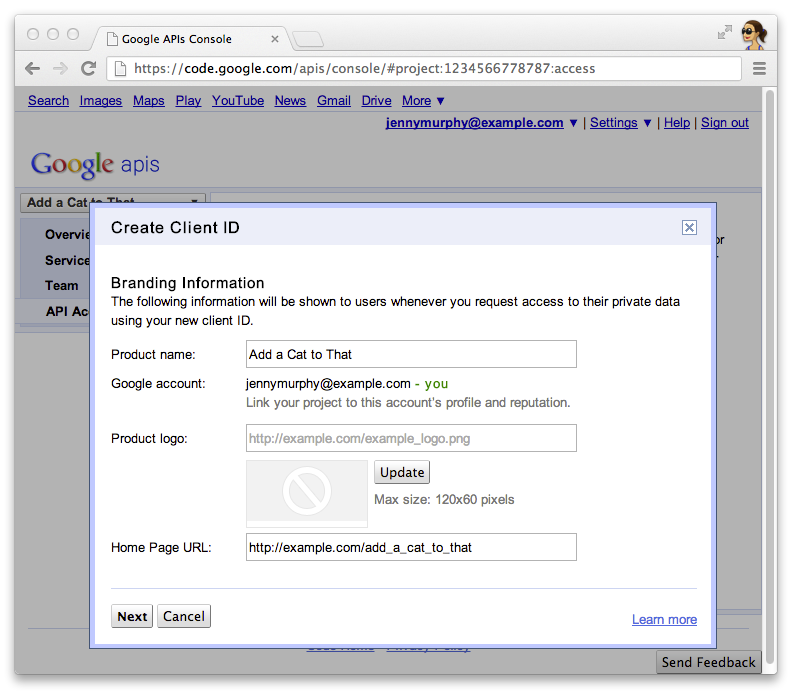
- Chỉ định tên và biểu tượng sản phẩm cho Đồ thuỷ tinh của bạn. Các trường này xuất hiện khi cấp quyền sử dụng OAuth
màn hình hiển thị cho người dùng.

- Chọn Web application (Ứng dụng web) rồi chỉ định giá trị bất kỳ cho tên máy chủ, chẳng hạn như
localhost

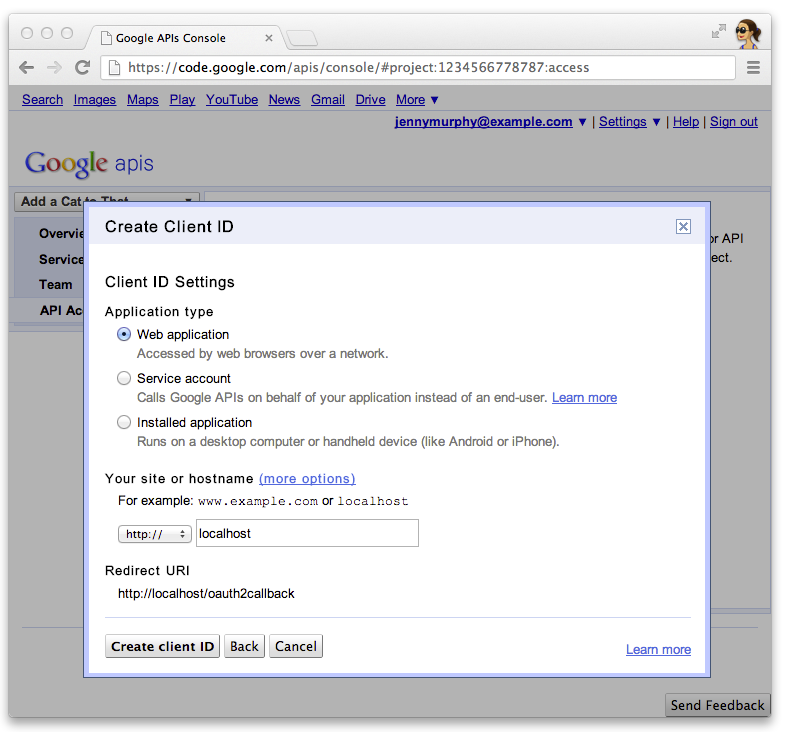
- Nhấp vào Edit settings... (Chỉnh sửa chế độ cài đặt...) cho Client-ID để chỉ định URI chuyển hướng. Nêu rõ
http://localhost:8080/oauth2callback
và URL gọi lại cho App Engine của bạn
ví dụ: https://myappengineinstance.appspot.com/oauth2callback
.

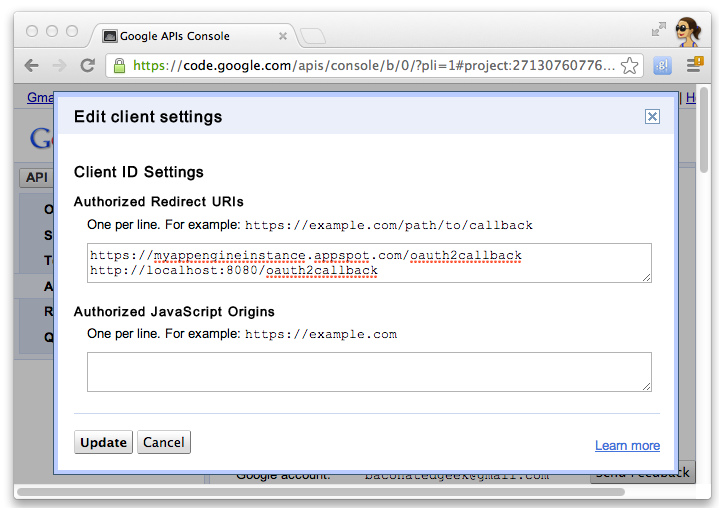
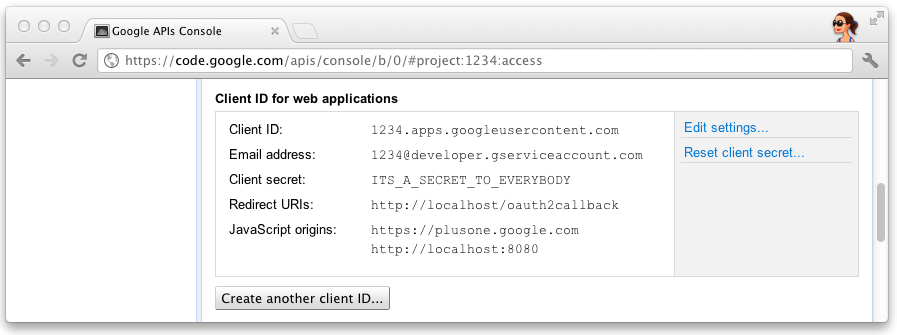
- Ghi lại mã ứng dụng khách và mã bí mật từ Bảng điều khiển API của Google. Bạn sẽ cần
để định cấu hình dự án bắt đầu nhanh.

Định cấu hình dự án
Định cấu hình dự án Bắt đầu nhanh để sử dụng thông tin ứng dụng API:
- Nhập mã ứng dụng khách và mật khẩu của bạn trong
client_secrets.json
:
{
"web": {
"client_id": "1234.apps.googleusercontent.com",
"client_secret": "ITS_A_SECRET_TO_EVERYBODY",
"redirect_uris": [
],
"auth_uri": "https://accounts.google.com/o/oauth2/auth",
"token_uri": "https://accounts.google.com/o/oauth2/token"
}
}
- Tạo tệp
session.secret
để lưu trữ các cookie của phiên hoạt động:
$ python -c "import os; print os.urandom(64)" > session.secret
- Chỉnh sửa
app.yaml
để nhập mã ứng dụng App Engine của bạn:
application: your_app_engine_application_id
version: 1
runtime: python27
api_version: 1
threadsafe: true
...
Triển khai dự án
Nhấn nút Deploy (Triển khai) màu xanh dương trong giao diện GUI Khởi chạy App Engine hoặc chạy shell này
để triển khai mã của bạn:
$ appcfg.py --oauth2 update .
Trừ phi có lưu ý khác, nội dung của trang này được cấp phép theo Giấy phép ghi nhận tác giả 4.0 của Creative Commons và các mẫu mã lập trình được cấp phép theo Giấy phép Apache 2.0. Để biết thông tin chi tiết, vui lòng tham khảo Chính sách trang web của Google Developers. Java là nhãn hiệu đã đăng ký của Oracle và/hoặc các đơn vị liên kết với Oracle.
Cập nhật lần gần đây nhất: 2025-07-25 UTC.
[null,null,["Cập nhật lần gần đây nhất: 2025-07-25 UTC."],[[["\u003cp\u003eThis project provides a simple implementation of Glassware demonstrating the core functionality of the Google Mirror API.\u003c/p\u003e\n"],["\u003cp\u003eTo run the project, you need the App Engine SDK for Python, a Google App Engine instance, and a Google APIs Console project with the Google Mirror API enabled.\u003c/p\u003e\n"],["\u003cp\u003eConfiguration involves setting up your client ID and secret, generating a session secret file, and updating the \u003ccode\u003eapp.yaml\u003c/code\u003e with your App Engine application ID.\u003c/p\u003e\n"],["\u003cp\u003eDeploy the project using the App Engine Launcher GUI or the \u003ccode\u003eappcfg.py\u003c/code\u003e command-line tool.\u003c/p\u003e\n"]]],[],null,["# Python Quick Start\n\nThis project shows you how to implement a simple\npiece of Glassware that demos the major functionality of the Google Mirror API.\n\nTo see a fully-working demo of the quick start project, go to\n[https://glass-python-starter-demo.appspot.com](https://glass-java-starter-demo.appspot.com).\nOtherwise, read on to see how to deploy your own version.\n\n[Download on GitHub](https://github.com/googleglass/mirror-quickstart-python)\n\nPrerequisites\n-------------\n\n[The App Engine SDK for Python](/appengine/downloads#Google_App_Engine_SDK_for_Python) -\nThe Python quick start project is implemented using App Engine. You need\nthe Python App Engine SDK to develop and deploy your project.\nRun the installer if appropriate for your platform, or extract the zip file\nin a convenient place.\n\nCreating a Google App Engine instance\n-------------------------------------\n\nYou'll need to host the quick start project on an instance of Google App Engine:\n\n1. Go to \u003chttp://appspot.com\u003e.\n2. Click **Create Application** and create a public Google App Engine instance hosted on `appspot.com`.\n3. Give the application an **Application Identifier** and leave the authentication **Open to all Google\n Accounts users**. You'll need the application identifier later to configure the quick start project.\n\nCreating a Google APIs Console project\n--------------------------------------\n\nNext, enable access to the Google Mirror API:\n\n1. Go to the [Google APIs console](https://code.google.com/apis/console/) and create a new API project.\n2. Click **Services** and enable the Google Mirror API for your new project.\n3. Click **API Access** and create an OAuth 2.0 client ID for a web application.\n4. Specify the product name and icon for your Glassware. These fields appear on the OAuth grant screen presented to your users.\n5. Select **Web application** and specify any value for the hostname, such as `localhost`\n6. Click **Edit settings...** for the client ID to specify redirect URIs. Specify `http://localhost:8080/oauth2callback` and the callback URL for your App Engine instance, for example, `https://myappengineinstance.appspot.com/oauth2callback`.\n7. Make note of the client ID and secret from the Google APIs Console. You'll need it to configure the quick start project.\n\nConfiguring the project\n-----------------------\n\nConfigure the Quick Start project to use your API client information:\n\n1. Enter your client ID and secret in `client_secrets.json`: \n\n ```python\n {\n \"web\": {\n \"client_id\": \"1234.apps.googleusercontent.com\",\n \"client_secret\": \"ITS_A_SECRET_TO_EVERYBODY\",\n \"redirect_uris\": [\n ],\n \"auth_uri\": \"https://accounts.google.com/o/oauth2/auth\",\n \"token_uri\": \"https://accounts.google.com/o/oauth2/token\"\n }\n }\n ```\n2. Generate a `session.secret` file to store session cookies: \n\n ```python\n $ python -c \"import os; print os.urandom(64)\" \u003e session.secret\n ```\n3. Edit `app.yaml` to enter your App Engine application ID: \n\n ```python\n application: your_app_engine_application_id\n version: 1\n runtime: python27\n api_version: 1\n threadsafe: true\n ...\n ```\n\nDeploying the project\n---------------------\n\nPress the blue **Deploy** button in the App Engine Launch GUI interface or run this shell\ncommand to deploy your code: \n\n $ appcfg.py --oauth2 update ."]]