您可以使用簡單的 REST API 插入、更新、讀取及刪除靜態資訊卡。此外,您也可以在靜態資訊卡中附加物件,例如地點或媒體。
運作方式
根據預設,靜態資訊卡會位於 Glass 時鐘的右側,並在傳送時顯示與使用者相關的資訊。不過,這類資訊卡不像即時資訊卡需要立即處理,使用者可以自行選擇何時閱讀或採取行動。
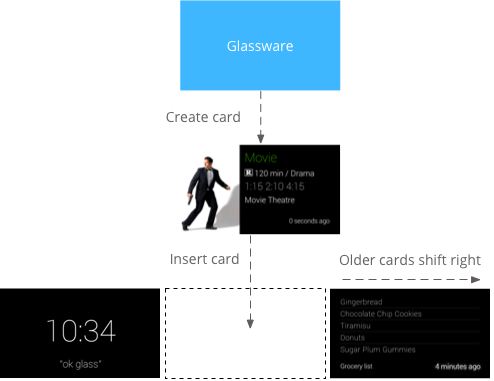
當 Glassware 在時間軸中插入靜態資訊卡時,Glass 可能會播放通知音效來提醒使用者。所有先前的靜態資訊卡也會向右移動,並在 7 天後或有 200 張資訊卡更新後從時間軸上消失。
使用時機
靜態資訊卡非常適合在發生重要事件時,向使用者提供定期通知。舉例來說,新聞發布服務會在重大新聞發生時傳送相關內容。Mirror API 靜態資訊卡也可以透過 OPEN_URI 選單項目啟動即時資訊卡或沉浸式體驗。這樣一來,您就能建立混合式互動,將靜態資訊卡用於通知,並使用即時資訊卡或沉浸式資訊卡,打造更具互動性的體驗。
如需時間軸項目的完整操作清單,請參閱參考說明文件。
插入靜態資訊卡
如要插入靜態資訊卡 (時間軸項目),請將時間軸項目的 JSON 表示法 張貼至 REST 端點。
時間軸項目中的大部分欄位皆為選填欄位。最簡單的時間軸項目只包含簡短的文字訊息,如下所示:
原始 HTTP
POST /mirror/v1/timeline HTTP/1.1
Host: www.googleapis.com
Authorization: Bearer {auth token}
Content-Type: application/json
Content-Length: 26

{ "text": "Hello world" }
Java
TimelineItem timelineItem = new TimelineItem();
timelineItem.setText("Hello world");
service.timeline().insert(timelineItem).execute();
Python
timeline_item = {'text': 'Hello world'}
service.timeline().insert(body=timeline_item).execute()
成功後,您會收到 201 Created 回應代碼,其中包含已建立項目的完整副本。以上述範例來說,成功的回應可能如下所示:
原始 HTTP
HTTP/1.1 201 Created
Date: Tue, 25 Sep 2012 23:30:11 GMT
Content-Type: application/json
Content-Length: 303

{
 "kind": "glass#timelineItem",
 "id": "1234567890",
 "selfLink": "https://www.googleapis.com/mirror/v1/timeline/1234567890",
 "created": "2012-09-25T23:28:43.192Z",
 "updated": "2012-09-25T23:28:43.192Z",
 "etag": "\"G5BI0RWvj-0jWdBrdWrPZV7xPKw/t25selcGS3uDEVT6FB09hAG-QQ\"",
 "text": "Hello world"
}
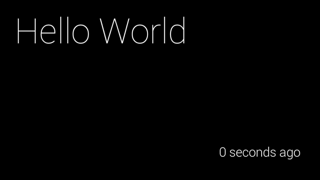
插入的項目會顯示在使用者的時間軸上,如下所示:
插入含有附件的時間軸項目
一張圖片勝過千言萬語,而且比您在時間軸項目中放入的內容還要多。為此,您也可以在時間軸項目中附加圖片和影片。以下是如何插入含有相片附件的時間軸項目的範例:
原始 HTTP
POST /upload/mirror/v1/timeline HTTP/1.1
Host: www.googleapis.com
Authorization: Bearer {auth token}
Content-Type: multipart/related; boundary="mymultipartboundary"
Content-Length: {length}

--mymultipartboundary
Content-Type: application/json; charset=UTF-8

{ "text": "A solar eclipse of Saturn. Earth is also in this photo. Can you find it?" }
--mymultipartboundary
Content-Type: image/jpeg
Content-Transfer-Encoding: binary

[binary image data]
--mymultipartboundary--
Java
TimelineItem timelineItem = new TimelineItem();
timelineItem.setText("Hello world");
InputStreamContent mediaContent = new InputStreamContent(contentType, attachment);
service.timeline().insert(timelineItem, mediaContent).execute();
Python
timeline_item = {'text': 'Hello world'}
media_body = MediaIoBaseUpload(
    io.BytesIO(attachment), mimetype=content_type, resumable=True)
service.timeline().insert(body=timeline_item, media_body=media_body).execute()
在 Glass 上,附有圖片的時間軸項目會顯示如下:

附加影片
如果您要將影片檔案附加至時間軸項目,建議您串流傳輸影片,而非一次上傳整個酬載。Google Mirror API 支援使用 HTTP 即時串流、漸進式下載和即時串流通訊協定 (RTSP) 進行串流。防火牆通常會封鎖 RTSP,因此請盡可能使用其他選項。
如要串流播放影片,請使用 PLAY_VIDEO 內建選單項目,並指定影片網址做為選單項目的 payload。詳情請參閱「新增內建選單項目」和「支援的媒體格式」。
分頁
您可以分頁顯示不符合單一時間軸資訊卡內容的時間軸項目,但這些項目應與同一個資訊卡建立關聯。分頁項目都會共用相同的 timeline.id,因此會擁有相同的選單項目。使用者輕觸分頁式時間軸項目時,系統會顯示「Read more」選單項目。
Glass 會自動分頁顯示顯示 text 的時間軸項目。如要讓 Glass 自動分頁顯示 html,請使用 article 標記,並將其類別屬性設為 auto-paginate,如以下範例所示:
<article class="auto-paginate">
 <h3>Very long list</h3>
 <ul>
   <li>First item</li>
   <li>Second item</li>
   <li>Third item</li>
   <li>Fourth item</li>
   <li>Fifth item</li>
   <li>Sixth item</li>
   <li>...</li>
 </ul>
<article>
如要手動分頁,請在每張資訊卡中使用 article 標記所需的內容。Glass 會在個別的子時間軸資訊卡中顯示每個 article 標記的內容。舉例來說,您可以使用以下 HTML 建立分頁式時間軸項目:
<article>
 <section>
   <p>First page</p>
 </section>
</article>

<article>
 <section>
   <p>Second page</p>
 </section>
</article>

<article>
 <section>
   <p>Third page</p>
 </section>
</article>
根據預設,分頁式時間軸項目的第一張資訊卡會顯示為封面資訊卡,並在使用者選取「Read more」選單項目時再次顯示。如要避免在輕觸「Read more」後再次顯示第一張資訊卡,您可以為第一個 <article> 標記指定 cover-only CSS 類別:
<article class="cover-only">
...
cover-only 類別也支援自動分頁的時間軸項目:
<article class="auto-paginate cover-only">
...
組合
您可以使用捆綁功能將相關但不同的項目分組,例如電子郵件會話串中的個別郵件。套裝組合含有主要封面資訊卡,使用者只要輕觸即可顯示子時間軸,其中包含套裝組合中的其他資訊卡。套裝組合與一般時間軸資訊卡的差異在於套裝組合的封面資訊卡右上角有折角。
如要將時間軸項目組合起來,請為這些項目建立相同的 bundleId 值。最近新增的項目是套裝組合的封面資訊卡。
下圖顯示套裝組合封面卡,右上角有折角,下方有兩張套裝組合卡。



讀取時間軸項目
您的服務可以存取所有建立的時間軸項目,以及所有與該服務共用的時間軸項目。以下說明如何列出服務可見的時間軸項目。
原始 HTTP
GET /mirror/v1/timeline HTTP/1.1
Host: www.googleapis.com
Authorization: Bearer {auth token}
Java
TimelineItem timelineItem = new TimelineItem();
service.timeline().list().execute();
Python
service.timeline().list().execute()
您可以使用其他 REST 作業來取得、更新和刪除時間軸項目。
存取附件
您可以透過名為 attachments 的陣列屬性,存取時間軸項目的附件。接著,您可以透過附件的 contentUrl 屬性或附件端點,取得附件的二進位資料。
原始 HTTP
GET /mirror/v1/timeline/{itemId}/attachments/{attachmentId} HTTP/1.1
Host: www.googleapis.com
Authorization: Bearer {auth token}
Java
TimelineItem item = service.timeline().get(itemId).execute();
String attachmentId = item.getAttachments().get(0).getId();
service.attachments().get(itemId, attachmentId).executeAsInputStream();
建立選單項目
選單項目可讓使用者要求與時間軸資訊卡相關的動作,並提供兩種類型:內建選單項目和自訂選單項目。
內建選單項目可讓你使用 Glass 提供的特殊功能,例如朗讀時間軸資訊卡、前往某個地點、分享圖片或回覆訊息:

自訂選單項目可讓應用程式顯示 Glassware 專屬的行為,您也可以提供符合品牌形象的選單項目圖示。
新增內建選單項目
您可以在插入 menuItems array 時填入資料,將內建選單項目新增至時間軸項目。如要使用內建選單項目,您只需填入每個 menuItem 的 action。
原始 HTTP
HTTP/1.1 201 Created
Date: Tue, 25 Sep 2012 23:30:11 GMT
Content-Type: application/json
Content-Length: 303

{
  "text": "Hello world",
  "menuItems": [
    {
      "action": "REPLY"
    }
  ]
}
定義自訂選單項目
如果內建選單項目無法滿足需求,您可以在插入或更新時間軸項目時,按照下列步驟建立自訂選單項目和自訂動作:
- 將
menuItem.action指定為CUSTOM。 - 指定
menuItem.id。當使用者輕觸自訂選單項目時,Glassware 會收到通知,並填入menuItem.id。這樣您就能判斷通知來源。 - 指定
menuItem.values即可新增在 Glass 上顯示的iconUrl和displayName。將iconUrl指向 50 x 50 的 PNG 圖片,該圖片應為白色,且具有透明背景。 指定
displayTime。如果您未指定displayTime,只要使用者輕觸自訂選單項目,時間軸項目就會移至時間軸前端。
原始 HTTP
HTTP/1.1 201 Created
Date: Tue, 25 Sep 2012 23:30:11 GMT
Content-Type: application/json
Content-Length: 303

{
  "text": "Hello world",
  "displayTime": "2013-08-08T22:47:31-07:00",
  "menuItems": [
    {
      "action": "CUSTOM",
      "id": "complete"
      "values": [{
        "displayName": "Complete",
        "iconUrl": "http://example.com/icons/complete.png"
      }]
    }
  ]
}
允許使用者將時間軸資訊卡釘選
您可以建立選單項目,讓使用者釘選時間軸資訊卡,這樣一來,時間軸資訊卡就會永久顯示在主時鐘資訊卡的左側。使用者也可以使用相同的選單項目取消釘選資訊卡。
固定選單項目是內建的選單項目,因此您只需為 menuItem 提供 TOGGLE_PINNED
action 即可。
原始 HTTP
HTTP/1.1 201 Created
Date: Tue, 25 Sep 2012 23:30:11 GMT
Content-Type: application/json
Content-Length: 303

{
  "text": "You can pin or unpin this card.",
 "menuItems": [
    {
      "action": "TOGGLE_PINNED"
    }
  ...
 ]
}
訂閱
您可以使用 Mirror API 訂閱通知,當使用者對時間軸項目採取特定動作,或使用者位置更新時,系統就會傳送通知。訂閱通知時,您會提供用於處理通知的回呼網址。
接收通知
Mirror API 的通知會以 POST 要求傳送至訂閱的端點,其中包含 JSON 要求主體。
原始 HTTP
{
  "collection": "timeline",
  "itemId": "3hidvm0xez6r8_dacdb3103b8b604_h8rpllg",
  "operation": "UPDATE",
  "userToken": "harold_penguin",
  "verifyToken": "random_hash_to_verify_referer",
  "userActions": [
    {
      "type": "<TYPE>",
      "payload": "<PAYLOAD>"
    }
  ]
}
Java
import com.google.api.client.json.JsonFactory;
import com.google.api.client.json.jackson.JacksonFactory;
import com.google.api.services.mirror.model.Notification;

import java.io.IOException;
import java.io.InputStream;
// ...

public class MyClass {
  // ...

  /**
    * Parse a request body into a Notification object.
    *
    * @param requestBody The notification payload sent by the Mirror API.
    * @return Parsed notification payload if successful, {@code null} otherwise.
    */
  static Notification parseNotification(InputStream requestBody) {
    try {
      JsonFactory jsonFactory = new JacksonFactory();

      return jsonFactory.fromInputStream(requetBody, Notification.class);
    } catch (IOException e) {
      System.out.println("An error occurred: " + e);
      return null;
    }
  }

  // ...
}
Python
import json

def parse_notification(request_body):
  """Parse a request body into a notification dict.

  Params:
    request_body: The notification payload sent by the Mirror API as a string.
  Returns:
    Dict representing the notification payload.
  """
  return json.load(request_body)
如果沒有發生錯誤,您的服務必須以 200 OK HTTP 狀態碼回應 API。如果您的服務回應錯誤代碼,Mirror API 可能會嘗試重新傳送通知給您的服務。
通知類型
Mirror API 會針對不同事件傳送不同的通知酬載。
回覆
使用者已使用內建的 REPLY 選單項目回覆您的時間軸項目:
{
  "collection": "timeline",
  "itemId": "3hidvm0xez6r8_dacdb3103b8b604_h8rpllg",
  "operation": "INSERT",
  "userToken": "harold_penguin",
  "verifyToken": "random_hash_to_verify_referer",
  "userActions": [
    {
      "type": "REPLY"
    }
  ]
}
itemId 屬性會設為包含以下項目的 ID:
inReplyTo屬性設為回覆的時間軸項目的ID。- 將
text屬性設為文字轉錄內容。 recipients屬性設為回覆的時間軸項目的creator(如有)。
範例:
{
  "kind": "glass#timelineItem",
  "id": "3hidvm0xez6r8_dacdb3103b8b604_h8rpllg",
  "inReplyTo": "3236e5b0-b282-4e00-9d7b-6b80e2f47f3d",
  "text": "This is a text reply",
  "recipients": [
    {
      "id": "CREATOR_ID",
      "displayName": "CREATOR_DISPLAY_NAME",
      "imageUrls": [
        "CREATOR_IMAGE_URL"
      ]
    }
  ]
}
刪除
使用者已刪除時間軸項目:
{
  "collection": "timeline",
  "itemId": "3hidvm0xez6r8_dacdb3103b8b604_h8rpllg",
  "operation": "DELETE",
  "userToken": "harold_penguin",
  "verifyToken": "random_hash_to_verify_referer",
  "userActions": [
    {
      "type": "DELETE"
    }
  ]
}
itemId 屬性會設為已刪除項目的 ID。除了 ID 和 isDeleted 屬性,項目不再包含其他中繼資料。
已選取自訂選單項目
使用者選取了服務設定的自訂選單項目:
{
  "collection": "timeline",
  "itemId": "3hidvm0xez6r8_dacdb3103b8b604_h8rpllg",
  "operation": "UPDATE",
  "userToken": "harold_penguin",
  "userActions": [
    {
      "type": "CUSTOM",
      "payload": "PING"
    }
  ]
}
itemId 屬性會設為使用者選取的選單項目 ID。
userActions 陣列包含使用者對此項目採取的自訂動作清單。您的服務應相應地處理這些動作。
位置更新
目前使用者可使用新位置:
{
  "collection": "locations",
  "itemId": "latest",
  "operation": "UPDATE",
  "userToken": "harold_penguin",
  "verifyToken": "random_hash_to_verify_referer"
}
當 Glassware 收到位置更新時,請向 glass.locations.get 端點傳送要求,以便擷取最新已知位置。Glassware 會每 10 分鐘收到一次位置更新。
語音指令
使用者已啟用語音指令,例如:「Ok Glass,記下『Cat Stream』,Chipotle 的生日是明天」。系統會傳送以下通知至 Glassware:
{
  "collection": "timeline",
  "operation": "INSERT",
  "userToken": "chipotle's_owner",
  "verifyToken": "mew mew mew",
  "itemId": "<ITEM_ID>",
  "userActions": [
    {“type”: "LAUNCH"}
  ]
}
您可以透過 userActions 屬性中的 LAUNCH 值,將這項通知與其他通知區分開。
接著,您可以使用 itemId 中的值擷取時間軸項目:
{
  "id": "<ITEM_ID>",
  "text": "Chipotle's birthday is tomorrow",
  "recipients": [
    {"id": "CAT_STREAM"}
  ]
}
recipients 屬性包含聯絡人的 id,代表所使用的語音指令。
