使用业界标准 OAuth 2.0 隐式和授权代码流程关联账号。您的服务必须支持符合 OAuth 2.0 标准的授权和令牌交换端点。
在隐式流程中,Google 会在用户的浏览器中打开您的授权端点。成功登录后,您将向 Google 返回一个长期访问令牌。现在,此访问令牌会包含在 Google 发送的每个请求中。
在授权代码流程中,您需要两个端点:
授权端点,用于向尚未登录的用户显示登录界面。授权端点还会创建一个短期授权代码,以记录用户对所请求访问权限的同意情况。
令牌交换端点,负责两种类型的交换:
- 使用授权代码换取长期有效的刷新令牌和短期有效的访问令牌。当用户完成账号关联流程时,就会发生此交换。
- 将长期有效的刷新令牌换成短期有效的访问令牌。当 Google 需要新的访问令牌(因为现有访问令牌已过期)时,就会发生这种交换。
选择 OAuth 2.0 流程
虽然隐式流程更易于实现,但 Google 建议通过隐式流程签发的访问令牌永不过期。这是因为,在隐式流程中,令牌过期后,系统会强制用户重新关联其账号。如果您出于安全考虑需要令牌过期,我们强烈建议您改用授权码流程。
设计准则
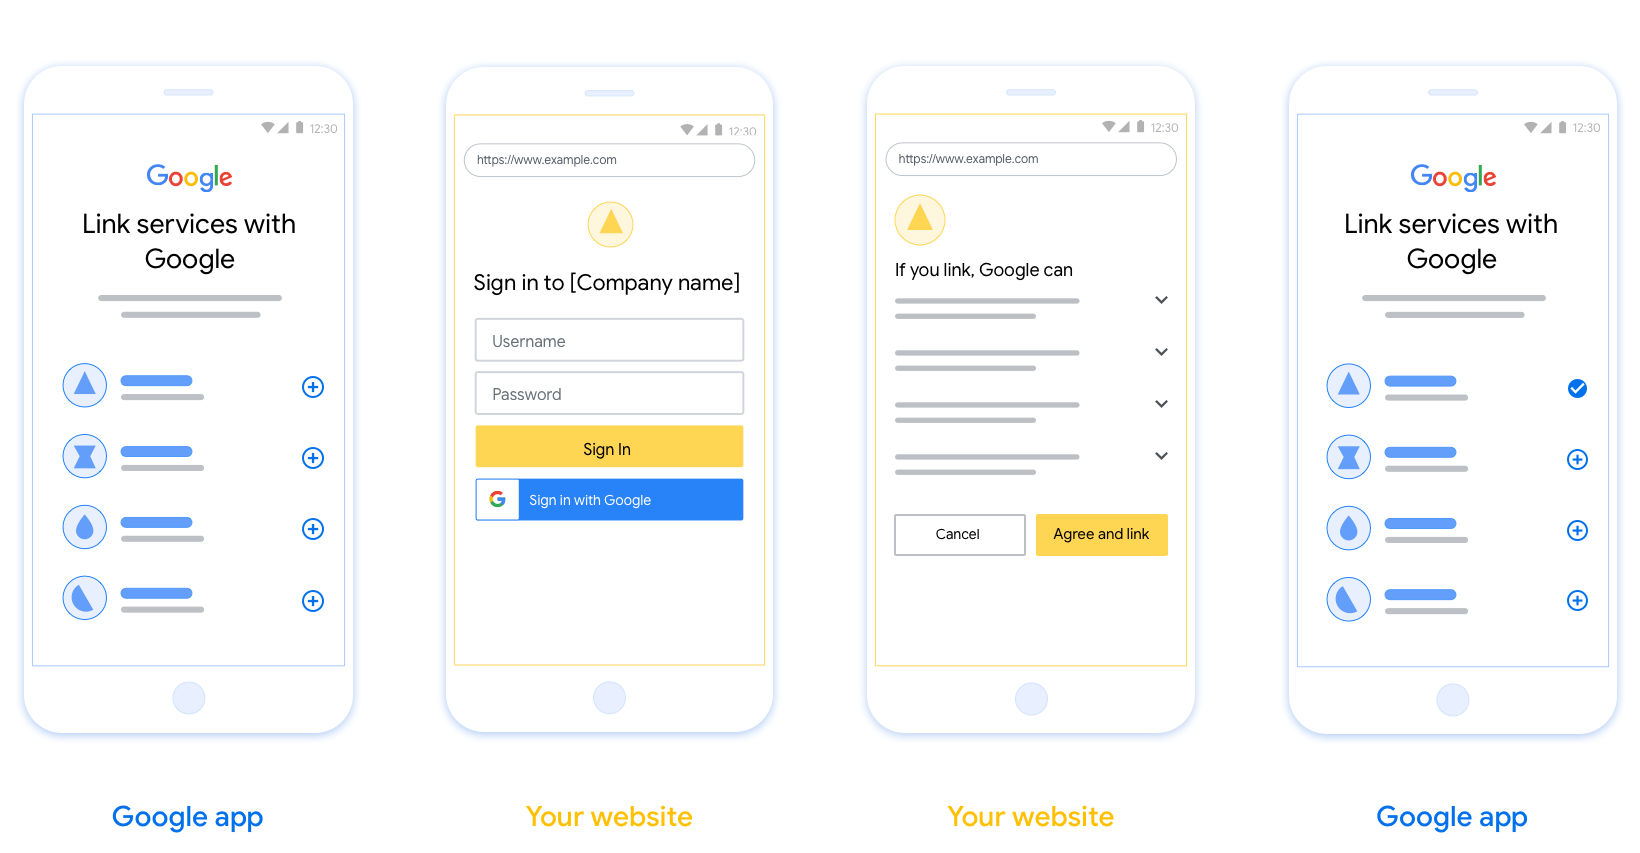
本部分介绍了您为 OAuth 关联流程托管的用户屏幕的设计要求和建议。在 Google 应用调用该 API 后,您的平台会向用户显示登录 Google 页面和账号关联意见征求界面。同意关联账号后,系统会将用户重定向回 Google 的应用。
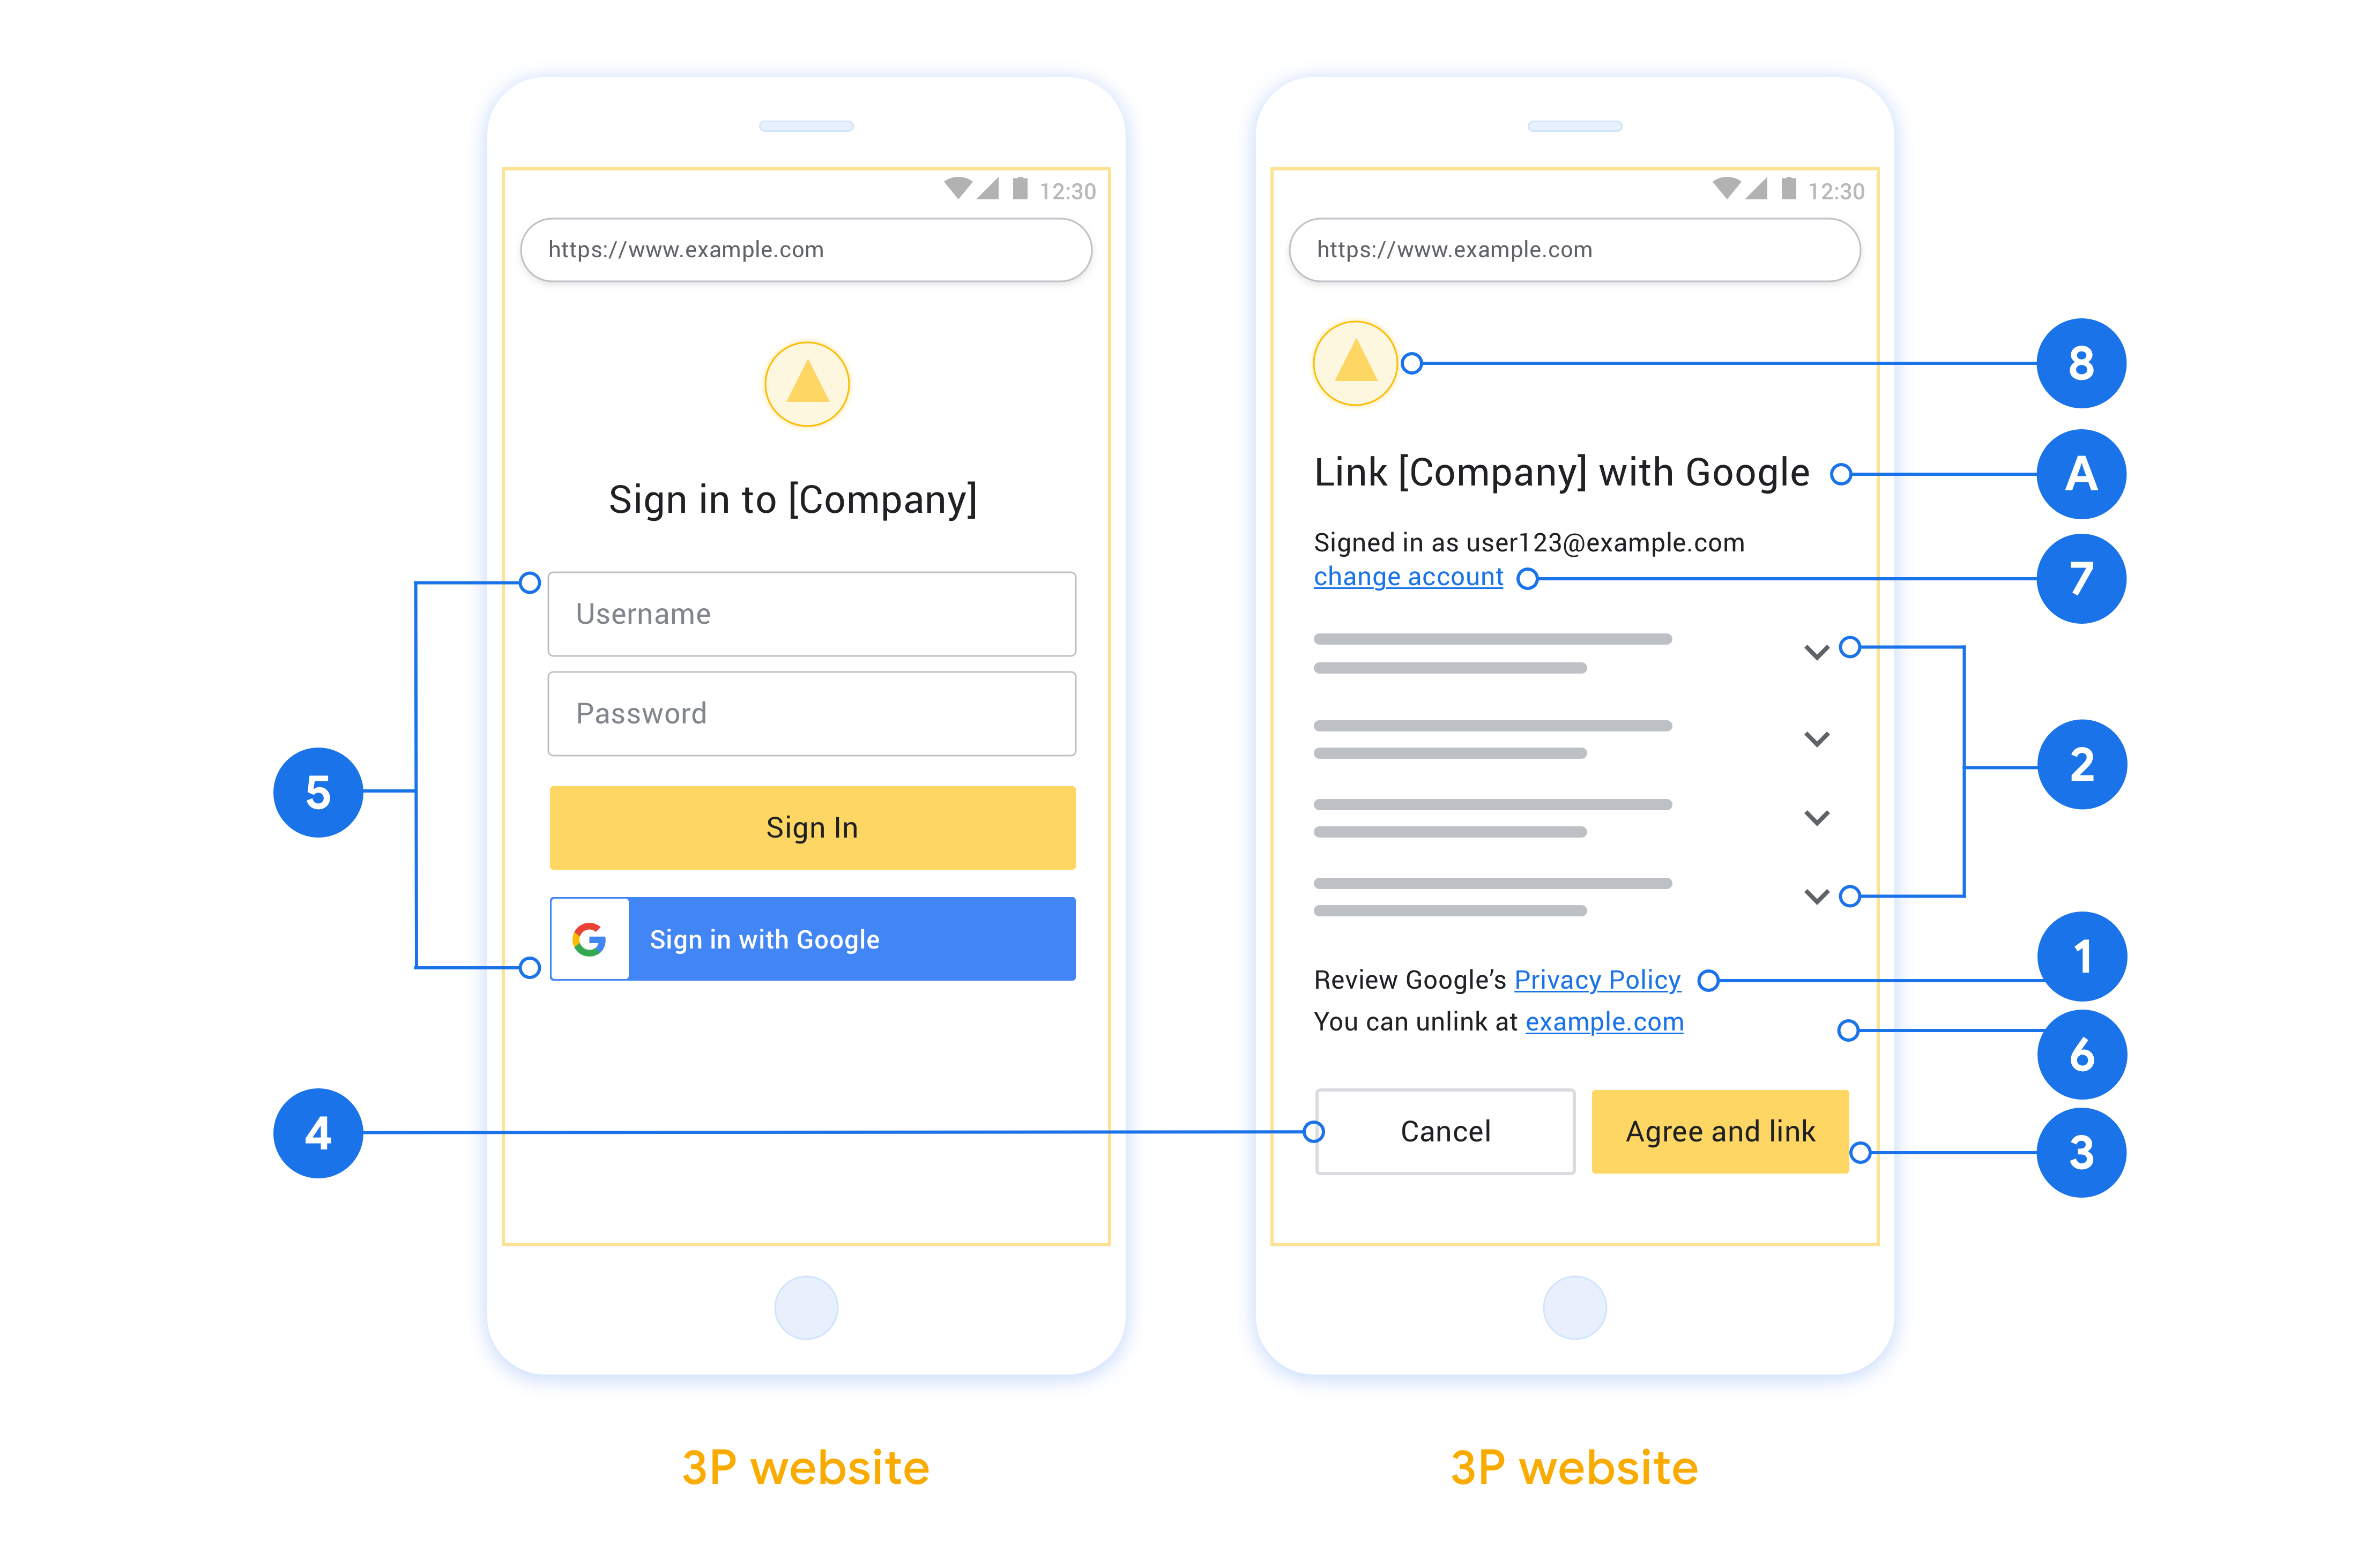
要求
- 您必须说明用户的账号将与 Google 相关联,而非 Google Home 或 Google 助理等特定 Google 产品相关联。
建议
建议您执行以下操作:
显示 Google 的隐私权政策。在同意屏幕上添加指向 Google 隐私权政策的链接。
要共享的数据。使用清晰简洁的语言告知用户 Google 需要哪些用户数据以及原因。
添加醒目的号召性用语。在用户同意页面上提供明确的号召性用语,例如“同意并关联”。这是因为用户需要了解他们需要与 Google 分享哪些数据才能关联账号。
可以取消。为用户提供返回或取消链接的途径,如果用户选择不进行关联。
明确的登录流程。确保用户有明确的 Google 账号登录方法,例如用户名和密码字段或使用 Google 账号登录。
能够解除关联。提供一种可让用户解除关联的机制,例如指向您平台上账号设置的网址。或者,您也可以添加指向 Google 账号的链接,以便用户管理其关联的账号。
能够更改用户账号。建议用户切换账号的方法。如果用户通常拥有多个账号,这种做法尤为有益。
- 如果用户必须关闭意见征求界面才能切换账号,请向 Google 发送可恢复的错误,以便用户可以使用 OAuth 关联和隐式流程登录所需的账号。
添加您的徽标。在意见征求页面上显示您的公司徽标。 按照您的样式准则放置徽标。如果您还想显示 Google 的徽标,请参阅徽标和商标。
创建项目
如需创建使用账号关联的项目,请执行以下操作:
- 点击 Create project。
- 输入名称或接受生成的建议。
- 确认或修改所有剩余字段。
- 点击创建。
如需查看项目 ID,请执行以下操作:
- 在着陆页的表格中找到您的项目。项目 ID 会显示在 ID 列中。
配置 OAuth 权限请求页面
Google 账号关联流程包含一个权限请求页面,该页面会告知用户哪个应用在请求访问其数据、请求访问哪些类型的数据,以及适用的条款。您需要先配置 OAuth 权限请求页面,然后才能生成 Google API 客户端 ID。
- 打开 Google API 控制台的 OAuth 同意屏幕页面。
- 如果出现提示,请选择您刚刚创建的项目。
在“OAuth 同意屏幕”页面上,填写表单,然后点击“保存”按钮。
应用名称:征求用户同意的应用的名称。名称应准确反映您的应用,并与用户在其他位置看到的应用名称保持一致。应用名称将显示在账号关联权限请求界面上。
应用徽标:权限请求页面上显示的一张图片,用以让用户认出您的应用。徽标会显示在账号关联权限请求页面和账号设置中
支持电子邮件地址:供用户就其同意问题与您联系。
Google API 的范围:借助范围,您的应用可以访问用户的非公开 Google 数据。对于 Google 账号关联使用情形,默认范围(电子邮件地址、个人资料、openid)就足够了,您无需添加任何敏感范围。一般来说,最佳做法是在需要访问权限时逐步请求权限范围,而不是提前请求。了解详情。
已获授权的网域:为了保护您和您的用户,Google 只允许使用 OAuth 进行身份验证的应用使用已获授权的网域。应用的链接必须托管在已获授权的网域上。了解详情。
应用首页链接:应用的首页。必须托管在已获授权的网域上。
应用隐私权政策链接:显示在 Google 账号关联意见征求界面上。必须托管在已获授权的网域上。
应用服务条款链接(可选):必须托管在已获授权的网域上。
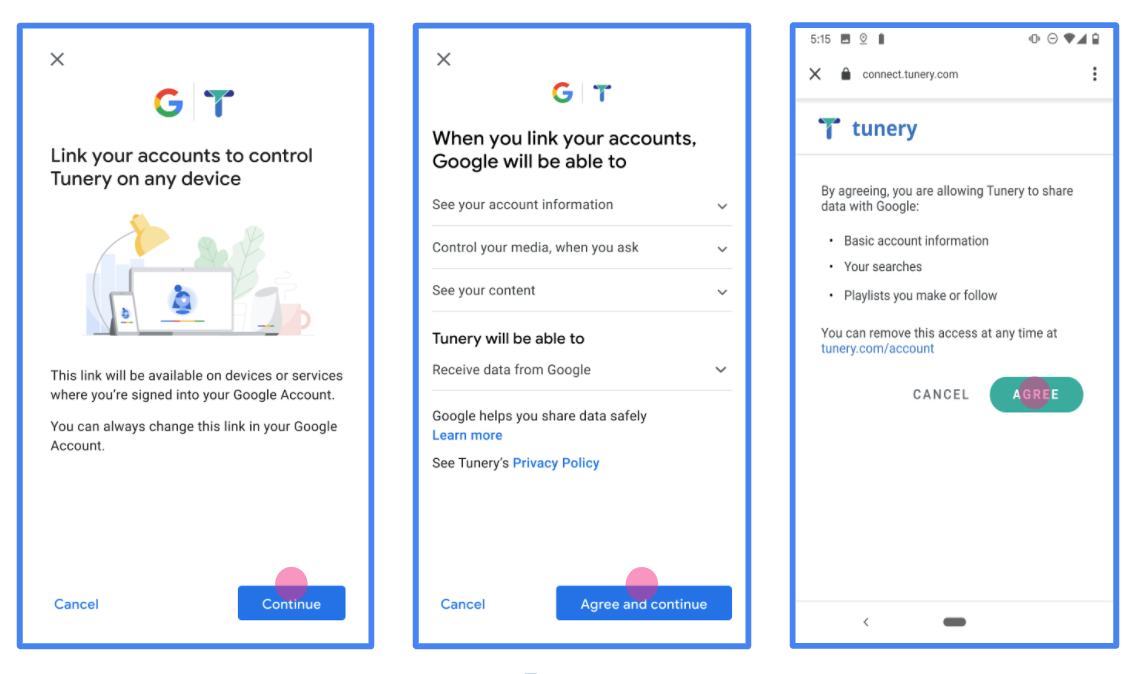
图 1. 虚构应用 Tunery 的 Google 账号关联意见征求界面
查看“验证状态”,如果您的应用需要验证,请点击“提交以供验证”按钮,提交应用以供验证。如需了解详情,请参阅 OAuth 验证要求。
实现 OAuth 服务器
授权代码流程的 OAuth 2.0 服务器实现包括 两个端点,您的服务会通过 HTTPS 提供这两个端点。第一个端点 是授权端点,负责查找或获取 就数据访问征求用户意见。授权端点会提供一个 尚未登录的用户的登录界面,并记录同意情况 请求的访问权限。第二个端点是令牌交换端点, 用于获取加密字符串(称为令牌),以授权用户 访问您的服务。
当 Google 应用需要调用您的某个服务的 API 时,Google 会使用 将这些端点组合在一起,以获取用户调用这些 API 的权限 。
由 Google 发起的 OAuth 2.0 授权代码流程会话包含 以下流程:
- Google 会在用户的浏览器中打开您的授权端点。如果流 在用户通过纯语音设备上针对某个 Action 启动,Google 会将 将代码执行到手机上
- 用户登录(如果尚未登录),并授予 Google 以下权限: 访问您的 API 访问其数据(如果尚未授权)。
- 您的服务会创建授权代码并将其返回给 Google。待办事项 因此,请使用授权代码将用户的浏览器重定向回 Google。 附件。
- Google 会将授权代码发送到您的令牌交换端点, 验证代码的真实性并返回访问令牌和 刷新令牌。访问令牌是一个短期有效的令牌 作为访问 API 的凭据。刷新令牌长期有效 Google 可以存储该令牌,以便在用户首次访问该令牌时, 过期。
- 在用户完成账号关联流程后, 从 Google 发送的请求中包含访问令牌。
处理授权请求
需要使用 OAuth 2.0 授权代码执行账号关联的情况 流程中,Google 会通过请求将用户发送到您的授权端点 包含以下参数:
| 授权端点参数 | |
|---|---|
client_id |
您分配给 Google 的客户 ID。 |
redirect_uri |
此请求的响应发送到的网址。 |
state |
将一个在 重定向 URI。 |
scope |
可选:一组以空格分隔的范围字符串,用于指定 Google 请求授权的数据 |
response_type |
要在响应中返回的值的类型。对于 OAuth 2.0
授权代码流程中,响应类型始终为 code。
|
user_locale |
“Google 账号语言设置” RFC5646 格式,用于将您的内容本地化为用户首选语言。 |
例如,如果您的授权端点位于
https://myservice.example.com/auth 时,请求可能如下所示:
GET https://myservice.example.com/auth?client_id=GOOGLE_CLIENT_ID&redirect_uri=REDIRECT_URI&state=STATE_STRING&scope=REQUESTED_SCOPES&response_type=code&user_locale=LOCALE
为了让授权端点能够处理登录请求,请执行以下操作 步骤:
- 验证
client_id是否与您分配给 Google 的 Client ID 匹配,以及redirect_uri与 Google 为您的服务提供的重定向网址是否匹配。这些检查对于防止 访问意外或配置错误的客户端应用。如果你支持多种 OAuth 2.0 流程,还应确认response_type是否为code。 - 检查用户是否已登录您的服务。如果用户没有登录, 完成服务的登录或注册流程。
- 生成授权代码,以供 Google 用于访问您的 API。 授权代码可以是任何字符串值,但它必须是唯一的 代表用户、令牌对应的客户端以及代码的有效期 而且不可猜测出来。您通常需要进行授权 会在大约 10 分钟后过期。
- 确认
redirect_uri参数指定的网址包含 以下表单:https://oauth-redirect.googleusercontent.com/r/YOUR_PROJECT_ID https://oauth-redirect-sandbox.googleusercontent.com/r/YOUR_PROJECT_ID
- 将用户的浏览器重定向到
redirect_uri参数。添加您在 以及您在重定向时返回未经修改的原始状态值 方法是附加code和state参数。以下是 生成的网址示例:https://oauth-redirect.googleusercontent.com/r/YOUR_PROJECT_ID?code=AUTHORIZATION_CODE&state=STATE_STRING
处理令牌交换请求
您的服务的令牌交换端点负责处理两种令牌 广告交易平台:
- 交换访问令牌和刷新令牌的授权代码
- 用刷新令牌换取访问令牌
令牌交换请求包含以下参数:
| 令牌交换端点参数 | |
|---|---|
client_id |
用于将请求来源标识为 Google 的字符串。此字符串必须 在您的系统中注册为 Google 的唯一标识符。 |
client_secret |
您在 Google 中为您的服务注册的密钥字符串。 |
grant_type |
所交换的令牌的类型。是
authorization_code 或 refresh_token。 |
code |
如果值为 grant_type=authorization_code,则此参数为
Google 通过您的登录或令牌交换收到的代码
端点。 |
redirect_uri |
如果值为 grant_type=authorization_code,则此参数为
初始授权请求中使用的网址。 |
refresh_token |
如果值为 grant_type=refresh_token,则此参数为
刷新令牌 Google 从您的令牌交换端点收到的令牌。 |
交换访问令牌和刷新令牌的授权代码
用户登录且您的授权端点返回一个短期有效的 授权代码发送给 Google,Google 会向您的令牌交换发送请求 端点使用授权代码交换访问令牌和刷新 令牌。
对于这些请求,grant_type 的值为 authorization_code,
的 code 值是您先前授予的授权代码的值
。以下是发送
访问令牌和刷新令牌的授权代码:
POST /token HTTP/1.1
Host: oauth2.example.com
Content-Type: application/x-www-form-urlencoded

client_id=GOOGLE_CLIENT_ID&client_secret=GOOGLE_CLIENT_SECRET&grant_type=authorization_code&code=AUTHORIZATION_CODE&redirect_uri=REDIRECT_URI
要将授权代码交换为访问令牌和刷新令牌,您的
令牌交换端点通过执行以下命令来响应 POST 请求:
步骤:
- 验证
client_id是否将请求来源标识为已获授权的请求来源 来源,并且client_secret与预期值匹配。 - 请确认授权代码有效且未过期, 请求中指定的客户端 ID 与 授权代码。
- 确认
redirect_uri参数指定的网址完全相同 初始授权请求中使用的值。 - 如果您无法验证上述所有条件,则返回 HTTP
正文为
{"error": "invalid_grant"}的 400 Bad Request 错误。 - 否则,使用授权代码中的用户 ID 来生成刷新 令牌和访问令牌。这些标记可以是任何字符串值, 必须唯一地代表用户和令牌对应的客户端, 不得被猜到对于访问令牌,请记录 令牌,通常是在您发出令牌一个小时后。 刷新令牌不会过期。
- 在 HTTPS 响应的正文中返回以下 JSON 对象:
{
"token_type": "Bearer",
"access_token": "ACCESS_TOKEN",
"refresh_token": "REFRESH_TOKEN",
"expires_in": SECONDS_TO_EXPIRATION
}
Google 会存储用户的访问令牌和刷新令牌,并存储相关记录 访问令牌的有效期。访问令牌过期后,Google 会使用 刷新令牌,以从令牌交换端点获取新的访问令牌。
用刷新令牌换取访问令牌
访问令牌过期后,Google 会向您的令牌交换发送请求 端点将刷新令牌交换为新的访问令牌。
对于这些请求,grant_type 的值为 refresh_token,值
“refresh_token”是您之前授予的刷新令牌的值
Google。以下是交换刷新令牌的请求示例
获取访问令牌:
POST /token HTTP/1.1
Host: oauth2.example.com
Content-Type: application/x-www-form-urlencoded

client_id=GOOGLE_CLIENT_ID&client_secret=GOOGLE_CLIENT_SECRET&grant_type=refresh_token&refresh_token=REFRESH_TOKEN
如需将刷新令牌交换为访问令牌,令牌交换端点
来响应 POST 请求:
- 验证
client_id是否将请求来源标识为 Google,并client_secret与预期值一致。 - 请确认刷新令牌有效,以及在 请求与刷新令牌所关联的客户端 ID 相匹配。
- 如果您无法验证上述所有条件,则返回 HTTP 400
正文为
{"error": "invalid_grant"}的 Bad Request 错误。 - 否则,请使用刷新令牌中的用户 ID 来生成访问权限 令牌。这些标记可以是任何字符串值,但它们必须是唯一的 代表用户和客户端,而不得 猜测。对于访问令牌,请记录令牌的到期时间, 通常在您发出令牌一小时后发送
- 在 HTTPS 的正文中返回以下 JSON 对象
回答:
{
"token_type": "不记名",
"access_token": "ACCESS_TOKEN",
“expires_in”:SECONDS_TO_EXPIRATION
}
处理 userinfo 请求
userinfo 端点是受 OAuth 2.0 保护的资源,会返回关联用户的声明。实现和托管 userinfo 端点是可选的,但以下用例除外:
从您的令牌端点成功检索到访问令牌后,Google 会向您的 userinfo 端点发送请求,以检索关联用户的基本个人资料信息。
| userinfo 端点请求标头 | |
|---|---|
Authorization header |
Bearer 类型的访问令牌。 |
例如,如果您的 userinfo 端点可通过
https://myservice.example.com/userinfo 时,请求可能如下所示:
GET /userinfo HTTP/1.1
Host: myservice.example.com
Authorization: Bearer ACCESS_TOKEN
为了让 userinfo 端点能够处理请求,请执行以下步骤:
- 从 Authorization 标头中提取访问令牌,并返回与访问令牌相关联的用户的信息。
- 如果访问令牌无效,则使用
WWW-Authenticate响应标头返回 HTTP 401 Unauthorized 错误。下面是一个 userinfo 错误响应示例:HTTP/1.1 401 Unauthorized WWW-Authenticate: error="invalid_token", error_description="The Access Token expired"
如果访问令牌有效,则返回 HTTPS 正文中包含以下 JSON 对象的 HTTP 200 响应 回答:
{ "sub": "USER_UUID", "email": "EMAIL_ADDRESS", "given_name": "FIRST_NAME", "family_name": "LAST_NAME", "name": "FULL_NAME", "picture": "PROFILE_PICTURE", }userinfo 端点响应 sub系统中用于识别用户的唯一 ID。 email用户的电子邮件地址。 given_name可选:用户的名字。 family_name可选:用户的姓氏。 name可选:用户的全名。 picture可选:用户的个人资料照片。
验证您的实现
您可以使用 OAuth 2.0 Playground 工具验证您的实现。
在该工具中,执行以下步骤:
- 点击配置 以打开 OAuth 2.0 配置窗口。
- 在 OAuth flow 字段中,选择 Client-side(客户端)。
- 在 OAuth 端点字段中,选择自定义。
- 在相应字段中指定您的 OAuth 2.0 端点和您分配给 Google 的客户端 ID。
- 在第 1 步部分,不要选择任何 Google 范围。请将此字段留空或输入对服务器有效的范围(如果您不使用 OAuth 范围,则可以输入任意字符串)。完成后,点击授权 API。
- 在 Step 2 和 Step 3 部分中,完成 OAuth 2.0 流程,并验证每个步骤是否按预期运行。
您可以使用 Google 账号关联演示版工具验证您的实现。
在该工具中,执行以下步骤:
- 点击使用 Google 账号登录按钮。
- 选择您要关联的账号。
- 输入服务 ID。
- (可选)输入您要请求访问权限的一个或多个范围。
- 点击开始演示。
- 当系统提示时,请确认您同意或拒绝关联请求。
- 确认您已被重定向到您的平台。