Association de comptes Google avec OAuth

Les comptes sont associés à l'aide des flux implicites et codes d'autorisation OAuth 2.0 standards dans l'industrie. Votre service doit prendre en charge les points de terminaison d'autorisation et d'échange de jetons conformes à OAuth 2.0.

In the implicit flow, Google opens your authorization endpoint in the user's browser. After successful sign in, you return a long-lived access token to Google. This access token is now included in every request sent from Google.

In the authorization code flow, you need two endpoints:

  • The authorization endpoint, which presents the sign-in UI to your users that aren't already signed in. The authorization endpoint also creates a short-lived authorization code to record users' consent to the requested access.

  • The token exchange endpoint, which is responsible for two types of exchanges:

    1. Exchanges an authorization code for a long-lived refresh token and a short-lived access token. This exchange happens when the user goes through the account linking flow.
    2. Exchanges a long-lived refresh token for a short-lived access token. This exchange happens when Google needs a new access token because the one it had expired.

Choose an OAuth 2.0 flow

Although the implicit flow is simpler to implement, Google recommends that access tokens issued by the implicit flow never expire. This is because the user is forced to link their account again after a token expires with the implicit flow. If you need token expiration for security reasons, we strongly recommend that you use the authorization code flow instead.

Design guidelines

This section describes the design requirements and recommendations for the user screen that you host for OAuth linking flows. After it's called by Google's app, your platform displays a sign in to Google page and account linking consent screen to the user. The user is directed back to Google's app after giving their consent to link accounts.

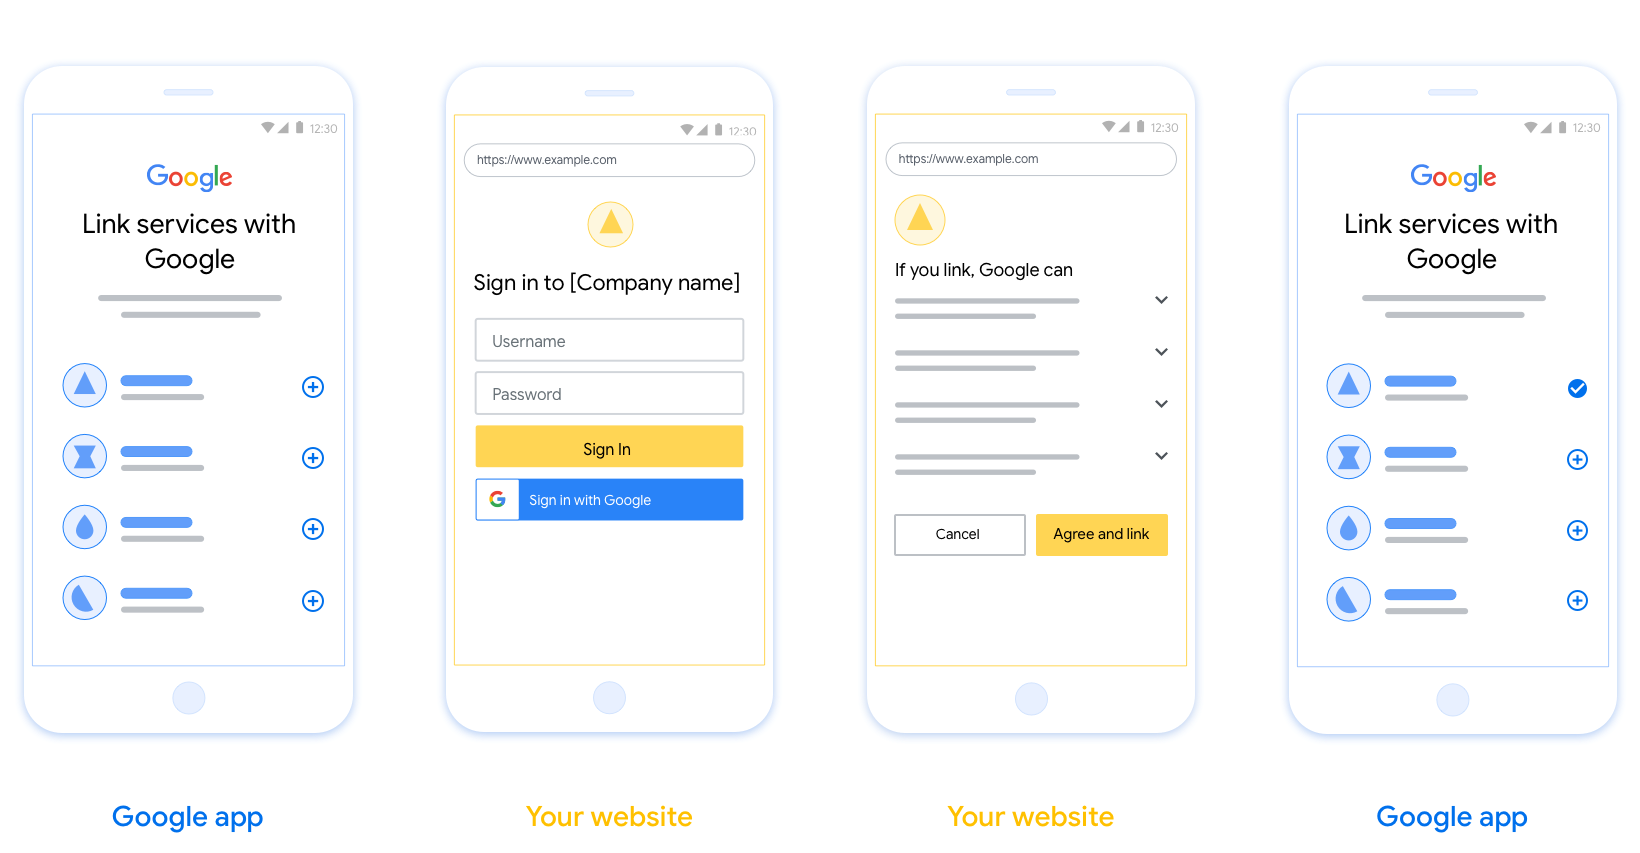
This figure shows the steps for a user to link their Google account
            to your authentication system. The first screenshot shows
            user-initiated linking from your platform. The second image shows
            user sign-in to Google, while the third shows the user consent and
            confirmation for linking their Google account with your app. The
            final screenshot shows a successfully linked user account in the
            Google app.
Figure 1. Account linking user sign in to Google and consent screens.

Requirements

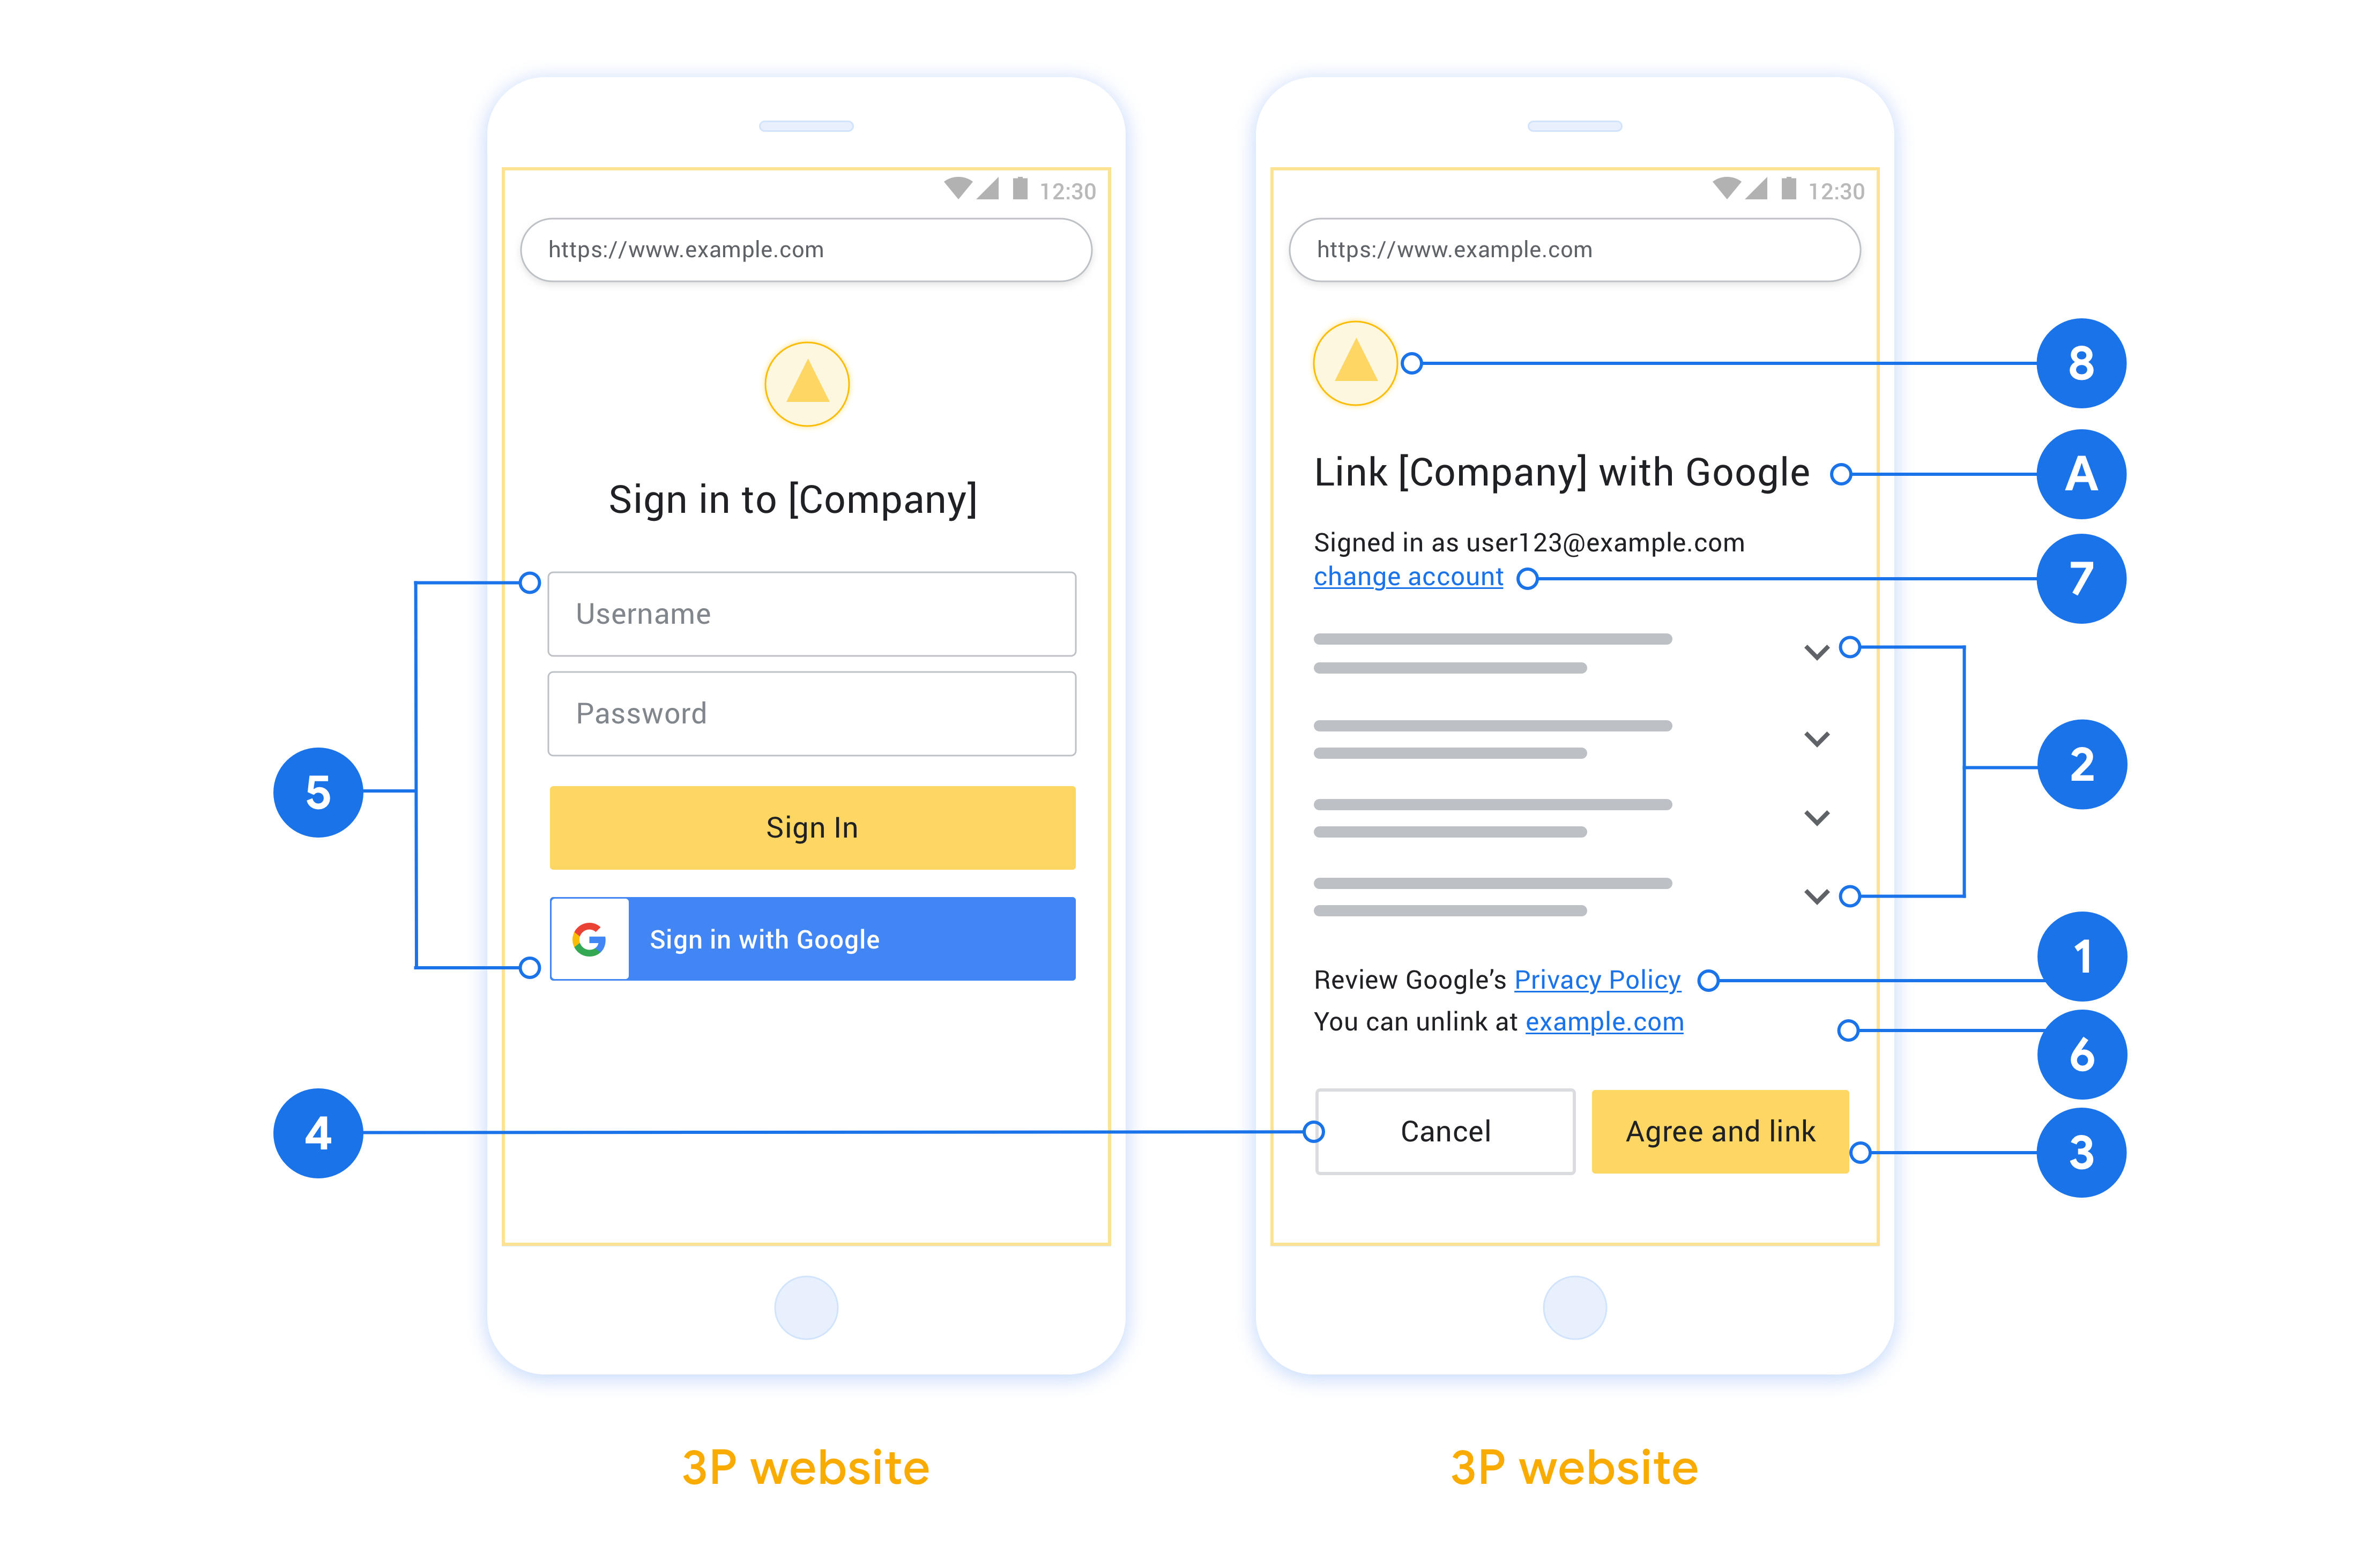
  1. You must communicate that the user’s account will be linked to Google, not a specific Google product like Google Home or Google Assistant.

Recommendations

We recommend that you do the following:

  1. Display Google's Privacy Policy. Include a link to Google’s Privacy Policy on the consent screen.

  2. Data to be shared. Use clear and concise language to tell the user what data of theirs Google requires and why.

  3. Clear call-to-action. State a clear call-to-action on your consent screen, such as “Agree and link.” This is because users need to understand what data they're required to share with Google to link their accounts.

  4. Ability to cancel. Provide a way for users to go back or cancel, if they choose not to link.

  5. Clear sign-in process. Ensure that users have clear method for signing in to their Google account, such as fields for their username and password or Sign in with Google.

  6. Ability to unlink. Offer a mechanism for users to unlink, such as a URL to their account settings on your platform. Alternatively, you can include a link to Google Account where users can manage their linked account.

  7. Ability to change user account. Suggest a method for users to switch their account(s). This is especially beneficial if users tend to have multiple accounts.

    • If a user must close the consent screen to switch accounts, send a recoverable error to Google so the user can sign in to the desired account with OAuth linking and the implicit flow.
  8. Include your logo. Display your company logo on the consent screen. Use your style guidelines to place your logo. If you wish to also display Google's logo, see Logos and trademarks.

Créer le projet

Pour créer votre projet afin d'utiliser l'association de comptes:

Le processus d'association du compte Google comprend un écran de consentement qui indique aux utilisateurs l'application qui demande à accéder à leurs données, le type de données qu'ils demandent et les conditions applicables. Vous devez configurer votre écran de consentement OAuth avant de générer un ID client pour les API Google.

  1. Ouvrez l'écran d'autorisation OAuth dans la console des API Google.
  2. Si vous y êtes invité, sélectionnez le projet que vous venez de créer.
  3. Sur la page "Écran d'autorisation OAuth", remplissez le formulaire, puis cliquez sur le bouton "Enregistrer".

    Nom de l'application:nom de l'application qui demande le consentement. Le nom doit refléter précisément votre application et être cohérent avec celui que les utilisateurs voient ailleurs. Le nom de l'application s'affiche sur l'écran d'autorisation de l'association de comptes.

    Logo de l'application:image affichée sur l'écran de consentement pour aider les utilisateurs à reconnaître votre application. Le logo s'affiche sur l'écran de consentement à l'association de comptes et dans les paramètres du compte.

    Adresse e-mail d'assistance:permet aux utilisateurs de vous contacter s'ils ont des questions concernant leur consentement.

    Champs d'application pour les API Google:les champs d'application permettent à votre application d'accéder aux données Google privées de vos utilisateurs. Pour le cas d'utilisation de l'association de compte Google, le champ d'application par défaut (adresse e-mail, profil, OpenID) est suffisant. Vous n'avez pas besoin d'ajouter de champ d'application sensible. Il est généralement recommandé de demander des portées de manière incrémentielle, au moment où l'accès est requis, plutôt que d'emblée. En savoir plus

    Domaines autorisés:pour vous protéger, vous et vos utilisateurs, Google n'autorise que les applications qui s'authentifient à l'aide d'OAuth à utiliser des domaines autorisés. Les liens de vos applications doivent être hébergés sur des domaines autorisés. En savoir plus

    Lien vers la page d'accueil de l'application:page d'accueil de votre application. Il doit être hébergé sur un domaine autorisé.

    Lien vers les règles de confidentialité de l'application:s'affiche sur l'écran d'autorisation de l'association de comptes Google. Il doit être hébergé sur un domaine autorisé.

    Lien vers les conditions d'utilisation de l'application (facultatif) : doit être hébergé sur un domaine autorisé.

    Figure 1 : Écran de consentement pour l'association d'un compte Google à une application fictive, Tunery

  4. Vérifiez l'état de validation. Si votre application doit être validée, cliquez sur le bouton "Envoyer pour validation". Pour en savoir plus, consultez les Exigences de validation OAuth.

Implémenter votre serveur OAuth

An OAuth 2.0 server implementation of the authorization code flow consists of two endpoints, which your service makes available by HTTPS. The first endpoint is the authorization endpoint, which is responsible for finding or obtaining consent from users for data access. The authorization endpoint presents a sign-in UI to your users that aren't already signed in and records consent to the requested access. The second endpoint is the token exchange endpoint, which is used to obtain encrypted strings, called tokens, that authorize a user to access your service.

When a Google application needs to call one of your service's APIs, Google uses these endpoints together to get permission from your users to call these APIs on their behalf.

An OAuth 2.0 authorization code flow session initiated by Google has the following flow:

  1. Google opens your authorization endpoint in the user's browser. If the flow started on a voice-only device for an Action, Google transfers the execution to a phone.
  2. The user signs in, if not signed in already, and grants Google permission to access their data with your API, if they haven't already granted permission.
  3. Your service creates an authorization code and returns it to Google. To do so, redirect the user's browser back to Google with the authorization code attached to the request.
  4. Google sends the authorization code to your token exchange endpoint, which verifies the authenticity of the code and returns an access token and a refresh token. The access token is a short-lived token that your service accepts as credentials to access APIs. The refresh token is a long-lived token that Google can store and use to acquire new access tokens when they expire.
  5. After the user has completed the account linking flow, every subsequent request sent from Google contains an access token.

Handle authorization requests

When you need to perform account linking using the OAuth 2.0 authorization code flow, Google sends the user to your authorization endpoint with a request that includes the following parameters:

Authorization endpoint parameters
client_id The Client ID you assigned to Google.
redirect_uri The URL to which you send the response to this request.
state A bookkeeping value that is passed back to Google unchanged in the redirect URI.
scope Optional: A space-delimited set of scope strings that specify the data Google is requesting authorization for.
response_type The type of value to return in the response. For the OAuth 2.0 authorization code flow, the response type is always code.
user_locale The Google Account language setting in RFC5646 format, used to localize your content in the user's preferred language.

For example, if your authorization endpoint is available at https://myservice.example.com/auth, a request might look like the following:

GET https://myservice.example.com/auth?client_id=GOOGLE_CLIENT_ID&redirect_uri=REDIRECT_URI&state=STATE_STRING&scope=REQUESTED_SCOPES&response_type=code&user_locale=LOCALE

For your authorization endpoint to handle sign-in requests, do the following steps:

  1. Verify that the client_id matches the Client ID you assigned to Google, and that the redirect_uri matches the redirect URL provided by Google for your service. These checks are important to prevent granting access to unintended or misconfigured client apps. If you support multiple OAuth 2.0 flows, also confirm that the response_type is code.
  2. Check if the user is signed in to your service. If the user isn't signed in, complete your service's sign-in or sign-up flow.
  3. Generate an authorization code for Google to use to access your API. The authorization code can be any string value, but it must uniquely represent the user, the client the token is for, and the code's expiration time, and it must not be guessable. You typically issue authorization codes that expire after approximately 10 minutes.
  4. Confirm that the URL specified by the redirect_uri parameter has the following form:
      https://oauth-redirect.googleusercontent.com/r/YOUR_PROJECT_ID
      https://oauth-redirect-sandbox.googleusercontent.com/r/YOUR_PROJECT_ID
      
  5. Redirect the user's browser to the URL specified by the redirect_uri parameter. Include the authorization code you just generated and the original, unmodified state value when you redirect by appending the code and state parameters. The following is an example of the resulting URL:
    https://oauth-redirect.googleusercontent.com/r/YOUR_PROJECT_ID?code=AUTHORIZATION_CODE&state=STATE_STRING

Handle token exchange requests

Your service's token exchange endpoint is responsible for two kinds of token exchanges:

  • Exchange authorization codes for access tokens and refresh tokens
  • Exchange refresh tokens for access tokens

Token exchange requests include the following parameters:

Token exchange endpoint parameters
client_id A string that identifies the request origin as Google. This string must be registered within your system as Google's unique identifier.
client_secret A secret string that you registered with Google for your service.
grant_type The type of token being exchanged. It's either authorization_code or refresh_token.
code When grant_type=authorization_code, this parameter is the code Google received from either your sign-in or token exchange endpoint.
redirect_uri When grant_type=authorization_code, this parameter is the URL used in the initial authorization request.
refresh_token When grant_type=refresh_token, this parameter is the refresh token Google received from your token exchange endpoint.
Exchange authorization codes for access tokens and refresh tokens

After the user signs in and your authorization endpoint returns a short-lived authorization code to Google, Google sends a request to your token exchange endpoint to exchange the authorization code for an access token and a refresh token.

For these requests, the value of grant_type is authorization_code, and the value of code is the value of the authorization code you previously granted to Google. The following is an example of a request to exchange an authorization code for an access token and a refresh token:

POST /token HTTP/1.1
Host: oauth2.example.com
Content-Type: application/x-www-form-urlencoded

client_id=GOOGLE_CLIENT_ID&client_secret=GOOGLE_CLIENT_SECRET&grant_type=authorization_code&code=AUTHORIZATION_CODE&redirect_uri=REDIRECT_URI

To exchange authorization codes for an access token and a refresh token, your token exchange endpoint responds to POST requests by executing the following steps:

  1. Verify that the client_id identifies the request origin as an authorized origin, and that the client_secret matches the expected value.
  2. Verify that the authorization code is valid and not expired, and that the client ID specified in the request matches the client ID associated with the authorization code.
  3. Confirm that the URL specified by the redirect_uri parameter is identical to the value used in the initial authorization request.
  4. If you can't verify all of the above criteria, return an HTTP 400 Bad Request error with {"error": "invalid_grant"} as the body.
  5. Otherwise, use the user ID from the authorization code to generate a refresh token and an access token. These tokens can be any string value, but they must uniquely represent the user and the client the token is for, and they must not be guessable. For access tokens, also record the expiration time of the token, which is typically an hour after you issue the token. Refresh tokens don't expire.
  6. Return the following JSON object in the body of the HTTPS response:
    {
    "token_type": "Bearer",
    "access_token": "ACCESS_TOKEN",
    "refresh_token": "REFRESH_TOKEN",
    "expires_in": SECONDS_TO_EXPIRATION
    }

Google stores the access token and the refresh token for the user and records the expiration of the access token. When the access token expires, Google uses the refresh token to get a new access token from your token exchange endpoint.

Exchange refresh tokens for access tokens

When an access token expires, Google sends a request to your token exchange endpoint to exchange a refresh token for a new access token.

For these requests, the value of grant_type is refresh_token, and the value of refresh_token is the value of the refresh token you previously granted to Google. The following is an example of a request to exchange a refresh token for an access token:

POST /token HTTP/1.1
Host: oauth2.example.com
Content-Type: application/x-www-form-urlencoded

client_id=GOOGLE_CLIENT_ID&client_secret=GOOGLE_CLIENT_SECRET&grant_type=refresh_token&refresh_token=REFRESH_TOKEN

To exchange a refresh token for an access token, your token exchange endpoint responds to POST requests by executing the following steps:

  1. Verify that the client_id identifies the request origin as Google, and that the client_secret matches the expected value.
  2. Verify that the refresh token is valid, and that the client ID specified in the request matches the client ID associated with the refresh token.
  3. If you can't verify all of the above criteria, return an HTTP 400 Bad Request error with {"error": "invalid_grant"} as the body.
  4. Otherwise, use the user ID from the refresh token to generate an access token. These tokens can be any string value, but they must uniquely represent the user and the client the token is for, and they must not be guessable. For access tokens, also record the expiration time of the token, typically an hour after you issue the token.
  5. Return the following JSON object in the body of the HTTPS response:
    {
    "token_type": "Bearer",
    "access_token": "ACCESS_TOKEN",
    "expires_in": SECONDS_TO_EXPIRATION
    }
Gérer les requêtes userinfo

Le point de terminaison userinfo est une ressource protégée par OAuth 2.0 qui renvoie les revendications concernant l'utilisateur associé. L'implémentation et l'hébergement du point de terminaison userinfo sont facultatifs, sauf dans les cas d'utilisation suivants:

Une fois que le jeton d'accès a été récupéré avec succès à partir du point de terminaison de votre jeton, Google envoie une demande à ce point de terminaison pour récupérer les informations de base du profil sur l'utilisateur associé.

En-têtes de requête du point de terminaison userinfo
Authorization header Jeton d'accès de type Bearer.

Par exemple, si votre point de terminaison userinfo est disponible à l'adresse https://myservice.example.com/userinfo, une requête peut se présenter comme suit:

GET /userinfo HTTP/1.1
Host: myservice.example.com
Authorization: Bearer ACCESS_TOKEN

Pour que votre point de terminaison userinfo traite les requêtes, procédez comme suit:

  1. Extrayez le jeton d'accès de l'en-tête "Authorization" et renvoyez les informations concernant l'utilisateur associé au jeton d'accès.
  2. Si le jeton d'accès n'est pas valide, renvoyez une erreur HTTP 401 Opération non autorisée à l'aide de l'en-tête de réponse WWW-Authenticate. Voici un exemple de réponse d'erreur userinfo:
    HTTP/1.1 401 Unauthorized
    WWW-Authenticate: error="invalid_token",
    error_description="The Access Token expired"
    
    Si une erreur 401 (autorisation non autorisée) ou toute autre erreur est renvoyée pendant le processus d'association, l'erreur ne pourra pas être récupérée, le jeton récupéré sera supprimé et l'utilisateur devra recommencer le processus d'association.
  3. Si le jeton d'accès est valide, renvoyez une réponse HTTP 200 avec l'objet JSON suivant dans le corps de la requête réponse:

    {
    "sub": "USER_UUID",
    "email": "EMAIL_ADDRESS",
    "given_name": "FIRST_NAME",
    "family_name": "LAST_NAME",
    "name": "FULL_NAME",
    "picture": "PROFILE_PICTURE",
    }
    
    Si votre point de terminaison userinfo renvoie une réponse de réussite HTTP 200, le jeton et les revendications récupérés sont enregistrés sur le compte Google de l'utilisateur.

    Réponse du point de terminaison userinfo
    sub Identifiant unique qui identifie l'utilisateur dans votre système.
    email Adresse e-mail de l'utilisateur.
    given_name Facultatif:prénom de l'utilisateur.
    family_name Facultatif:nom de l'utilisateur.
    name Facultatif:nom complet de l'utilisateur.
    picture Facultatif:photo de profil de l'utilisateur.

Valider votre implémentation

Vous pouvez valider votre implémentation à l'aide de l'outil OAuth 2.0 Playground.

Dans l'outil, procédez comme suit:

  1. Cliquez sur Configuration pour ouvrir la fenêtre de configuration OAuth 2.0.
  2. Dans le champ OAuth flow (Flux OAuth), sélectionnez Client-side (Côté client).
  3. Dans le champ Points de terminaison OAuth, sélectionnez Personnalisé.
  4. Indiquez votre point de terminaison OAuth 2.0 et l'ID client que vous avez attribué à Google dans les champs correspondants.
  5. Dans la section Étape 1, ne sélectionnez aucun champ d'application Google. Laissez plutôt ce champ vide ou saisissez une portée valide pour votre serveur (ou une chaîne arbitraire si vous n'utilisez pas de portées OAuth). Lorsque vous avez terminé, cliquez sur Autoriser les API.
  6. Dans les sections Étape 2 et Étape 3, suivez le flux OAuth 2.0 et vérifiez que chaque étape fonctionne comme prévu.

Vous pouvez valider votre implémentation à l'aide de l'outil Démo d'association de comptes Google.

Dans l'outil, procédez comme suit:

  1. Cliquez sur le bouton Se connecter avec Google.
  2. Sélectionnez le compte que vous souhaitez associer.
  3. Saisissez l'ID du service.
  4. Saisissez éventuellement un ou plusieurs champs d'application pour lesquels vous demanderez l'accès.
  5. Cliquez sur Démarrer la démo.
  6. Lorsque vous y êtes invité, confirmez que vous pouvez accepter ou refuser la demande d'association.
  7. Vérifiez que vous êtes redirigé vers votre plate-forme.