खातों को इंडस्ट्री स्टैंडर्ड OAuth 2.0 के इंप्लिसिट और ऑथराइज़ेशन कोड फ़्लो का इस्तेमाल करके लिंक किया जाता है. आपकी सेवा, OAuth 2.0 के मुताबिक काम करने वाले ऑथराइज़ेशन और टोकन एक्सचेंज एंडपॉइंट के साथ काम करनी चाहिए.
इंप्लिसिट फ़्लो में, Google उपयोगकर्ता के ब्राउज़र में आपका ऑथराइज़ेशन एंडपॉइंट खोलता है. साइन इन करने के बाद, आपको Google को लंबे समय तक चलने वाला ऐक्सेस टोकन देना होगा. यह ऐक्सेस टोकन, अब Google से भेजे जाने वाले हर अनुरोध में शामिल होता है.
ऑथराइज़ेशन कोड फ़्लो में, आपको दो एंडपॉइंट की ज़रूरत होती है:
अनुमति एंडपॉइंट, जो आपके उन उपयोगकर्ताओं को साइन-इन यूज़र इंटरफ़ेस दिखाता है जो पहले से साइन इन नहीं हैं. ऑथराइज़ेशन एंडपॉइंट, अनुरोध किए गए ऐक्सेस के लिए उपयोगकर्ताओं की सहमति रिकॉर्ड करने के लिए, कुछ समय के लिए मान्य ऑथराइज़ेशन कोड भी बनाता है.
टोकन एक्सचेंज एंडपॉइंट, जो दो तरह के एक्सचेंज के लिए ज़िम्मेदार होता है:
- यह लंबे समय तक सक्रिय रहने वाले रीफ़्रेश टोकन और कम समय तक चलने वाले ऐक्सेस टोकन के लिए ऑथराइज़ेशन कोड का इस्तेमाल करता है. यह एक्सचेंज तब होता है, जब उपयोगकर्ता खाता लिंक करने के फ़्लो से गुज़रता है.
- यह नीति, कुछ समय के लिए उपलब्ध ऐक्सेस टोकन के लिए, लंबे समय तक चलने वाले रीफ़्रेश टोकन का लेन-देन करती है. यह एक्सचेंज तब होता है, जब Google को नया ऐक्सेस टोकन चाहिए, क्योंकि उसका मौजूदा टोकन खत्म हो गया है.
OAuth 2.0 फ़्लो चुनना
इंप्लिसिट फ़्लो को लागू करना आसान है. हालांकि, Google का सुझाव है कि इंप्लिसिट फ़्लो से जारी किए गए ऐक्सेस टोकन की समयसीमा कभी खत्म न हो. इसकी वजह यह है कि उपयोगकर्ता को अपने खाते को फिर से लिंक करना पड़ता है. ऐसा तब होता है, जब इंप्लिसिट फ़्लो के साथ टोकन की समयसीमा खत्म हो जाती है. अगर आपको सुरक्षा से जुड़ी वजहों से टोकन की समयसीमा तय करनी है, तो हमारा सुझाव है कि आप इसके बजाय ऑथराइज़ेशन कोड फ़्लो का इस्तेमाल करें.
डिज़ाइन से जुड़े दिशा-निर्देश
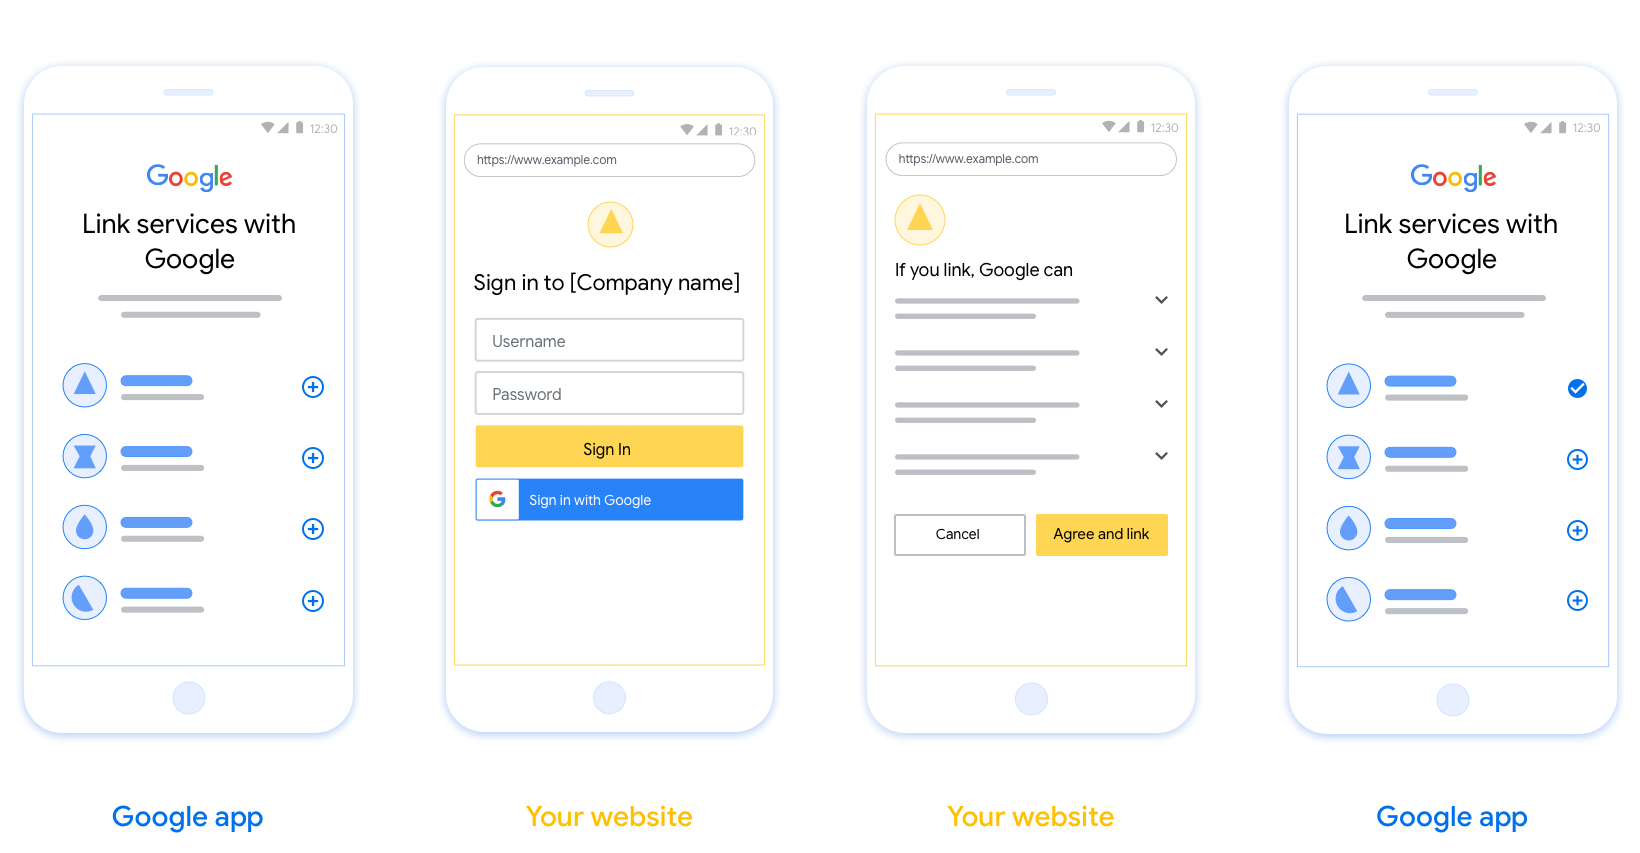
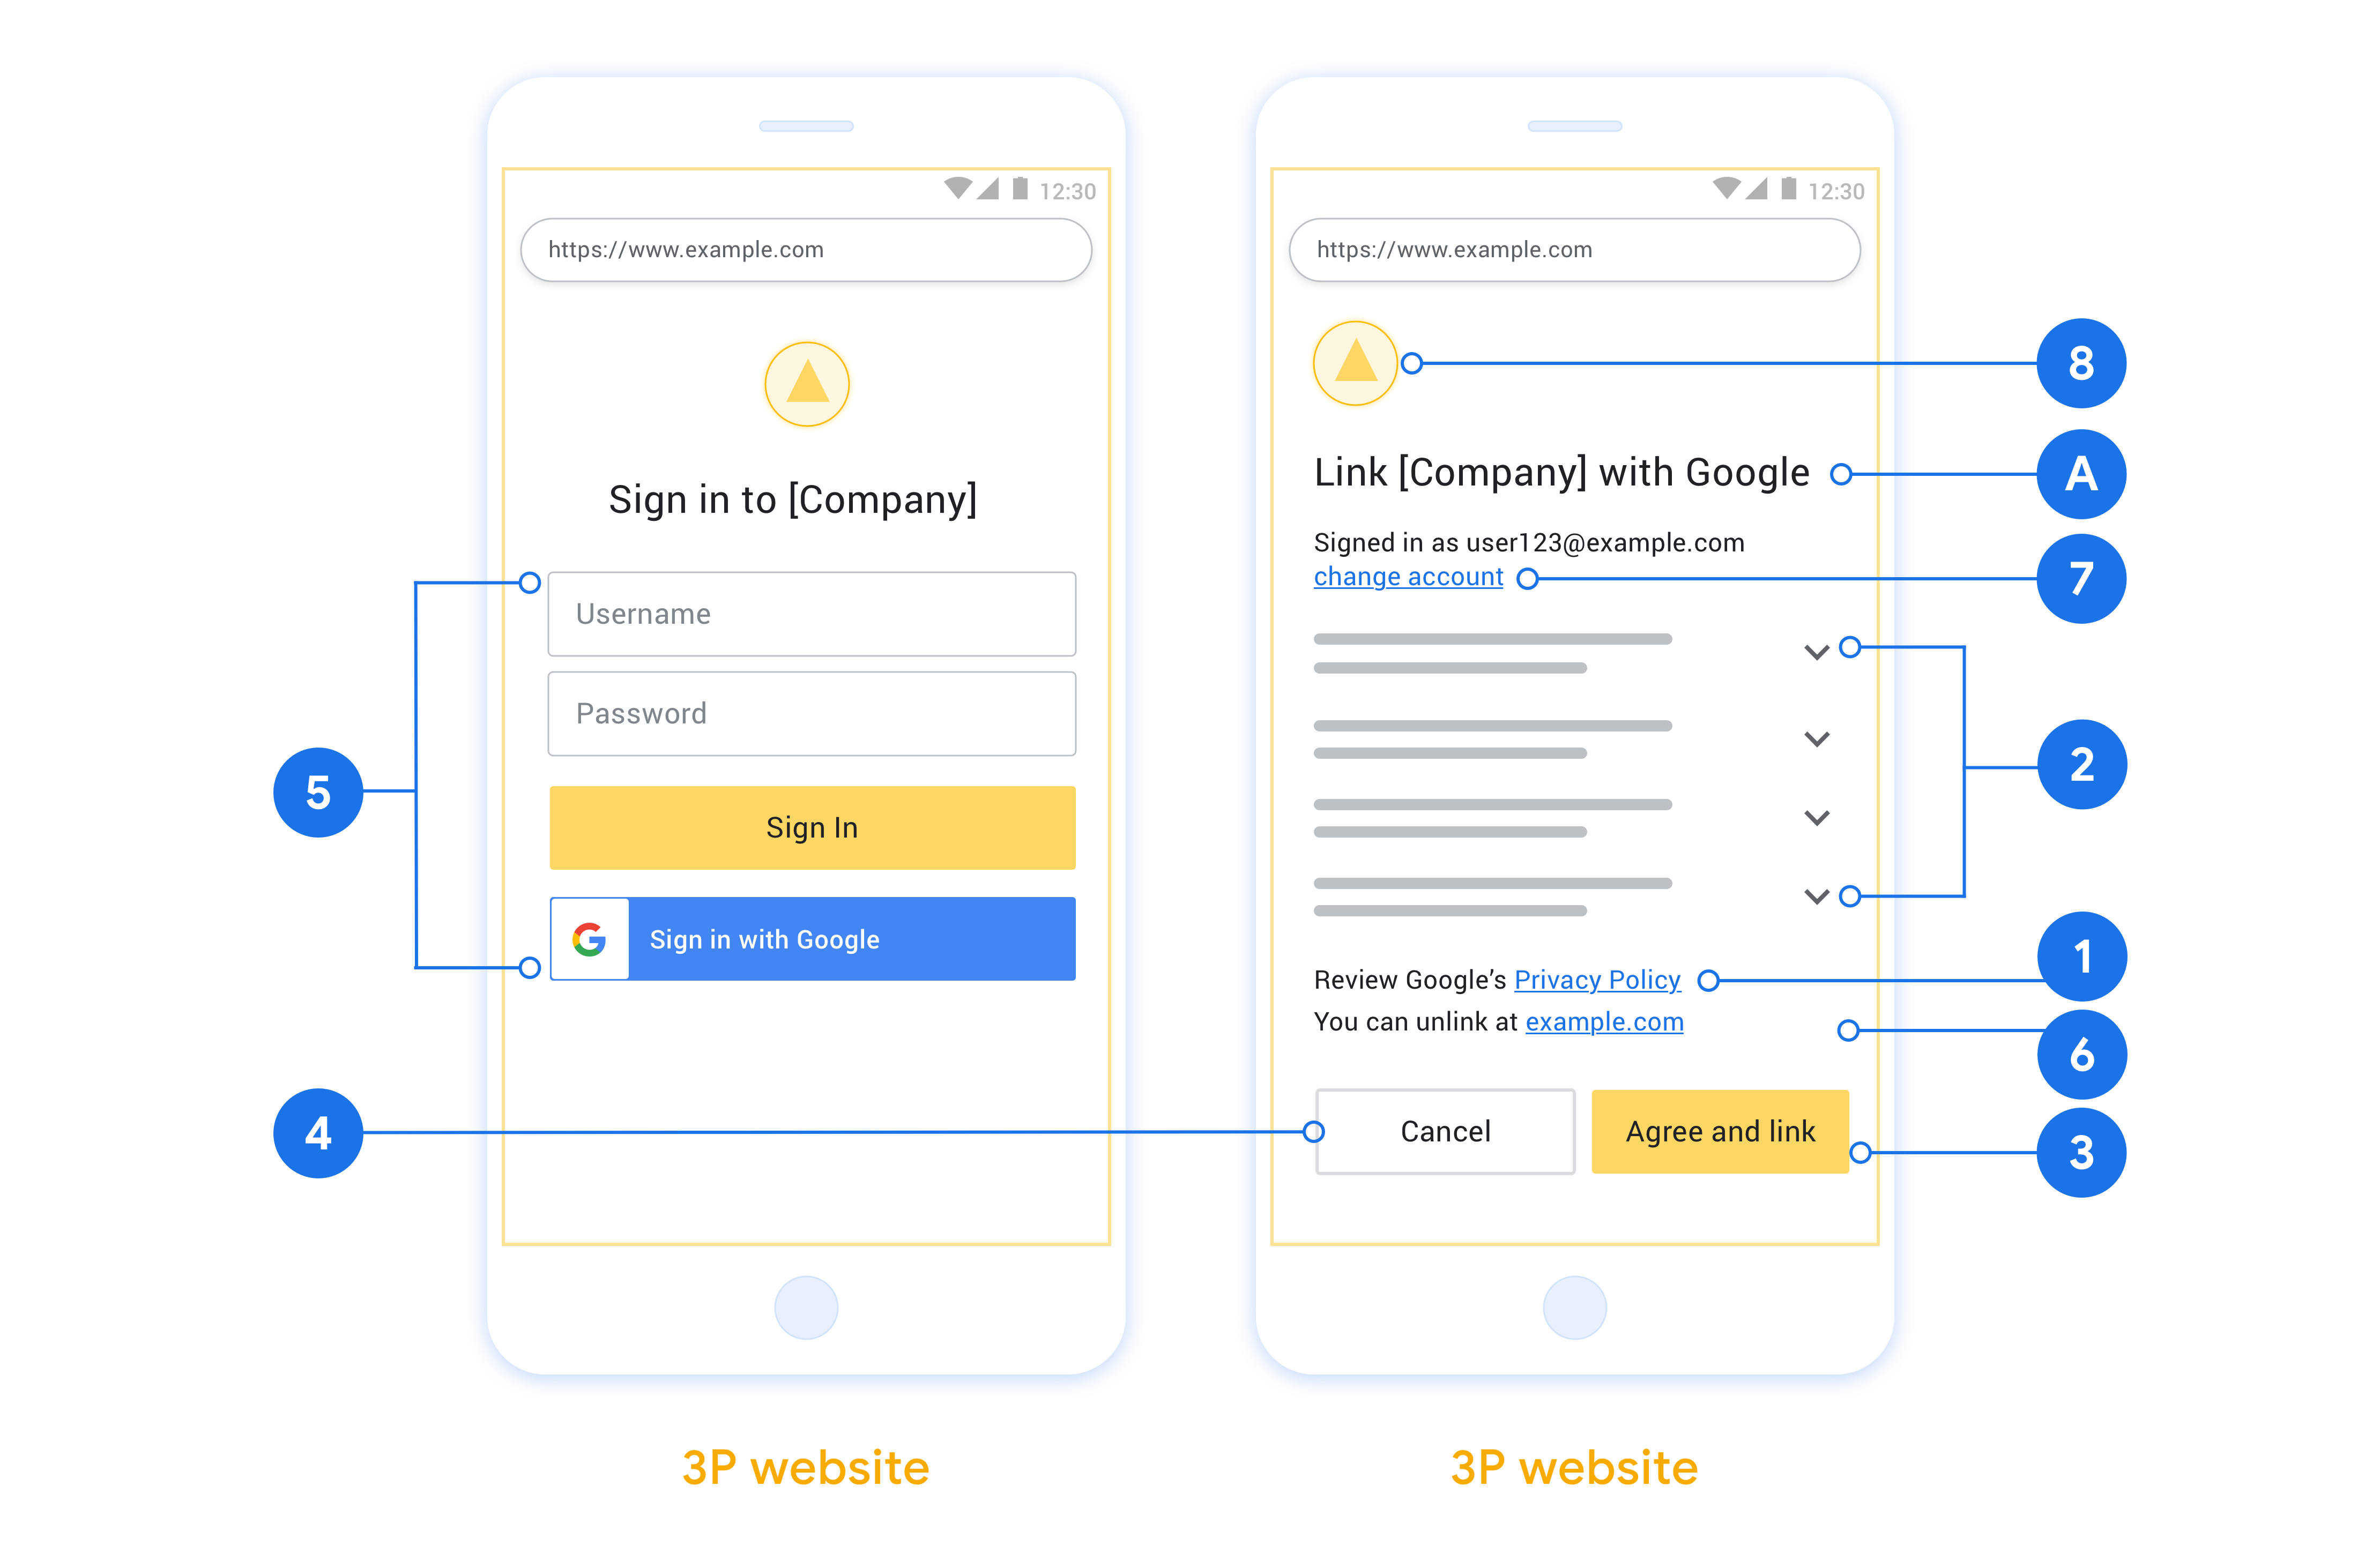
इस सेक्शन में, उपयोगकर्ता की उस स्क्रीन के डिज़ाइन से जुड़ी ज़रूरी शर्तों और सुझावों के बारे में बताया गया है जिसे OAuth लिंक करने के फ़्लो के लिए होस्ट किया जाता है. Google के ऐप्लिकेशन से कॉल करने के बाद, आपका प्लैटफ़ॉर्म उपयोगकर्ता को'Google में साइन इन करें' पेज और खाता लिंक करने की सहमति वाली स्क्रीन दिखाता है. खातों को लिंक करने की सहमति देने के बाद, उपयोगकर्ता को वापस Google के ऐप्लिकेशन पर भेज दिया जाता है.
ज़रूरी शर्तें
- आपको यह बताना होगा कि उपयोगकर्ता का खाता Google से लिंक किया जाएगा, न कि Google के किसी प्रॉडक्ट से, जैसे कि Google Home या Google Assistant.
सुझाव
हमारा सुझाव है कि आप ये काम करें:
Google की निजता नीति दिखाएं. सहमति वाली स्क्रीन पर, Google की निजता नीति का लिंक शामिल करें.
शेयर किया जाने वाला डेटा. साफ़ और कम शब्दों में उपयोगकर्ता को बताएं कि Google को उनके लिए कौनसे डेटा की ज़रूरत है और क्यों.
साफ़ तौर पर कॉल-टू-ऐक्शन दें. सहमति वाली स्क्रीन पर, साफ़ तौर पर कॉल-टू-ऐक्शन दें, जैसे कि “सहमति दें और लिंक करें.” ऐसा इसलिए है, क्योंकि उपयोगकर्ताओं को यह समझना ज़रूरी है कि अपने खाते लिंक करने के लिए, उन्हें Google के साथ कौनसा डेटा शेयर करना होगा.
सदस्यता रद्द करने की सुविधा. अगर उपयोगकर्ता खाता लिंक नहीं करना चाहता है, तो उसे वापस जाने या रद्द करने का विकल्प दें.
साइन इन करने की प्रोसेस साफ़ करें. पक्का करें कि उपयोगकर्ताओं को अपने Google खाते में साइन इन करने का तरीका साफ़ तौर पर पता हो. जैसे, उपयोगकर्ता नाम और पासवर्ड के लिए फ़ील्ड या Google से साइन इन करें.
अनलिंक करने की सुविधा. उपयोगकर्ताओं को अनलिंक करने का तरीका उपलब्ध कराएं, जैसे कि आपके प्लैटफ़ॉर्म पर उनकी खाता सेटिंग का यूआरएल. इसके अलावा, Google खाते का लिंक भी शामिल किया जा सकता है, जहां उपयोगकर्ता अपने लिंक किए गए खाते को मैनेज कर सकते हैं.
उपयोगकर्ता खाता बदलने की सुविधा. उपयोगकर्ताओं को अपने खाते स्विच करने का तरीका बताएं. यह सुविधा खास तौर पर तब फ़ायदेमंद होती है, जब उपयोगकर्ताओं के पास एक से ज़्यादा खाते हों.
- अगर किसी उपयोगकर्ता को खाता स्विच करने के लिए, सहमति वाली स्क्रीन बंद करनी पड़ती है, तो Google को ऐसी गड़बड़ी भेजें जिसे ठीक किया जा सके. इससे उपयोगकर्ता, OAuth लिंकिंग और अनिमिट फ़्लो की मदद से, अपने पसंदीदा खाते में साइन इन कर सकता है.
अपना लोगो शामिल करें. सहमति वाली स्क्रीन पर अपनी कंपनी का लोगो दिखाएं. लोगो डालने के लिए, स्टाइल के दिशा-निर्देशों का इस्तेमाल करें. अगर आपको Google का लोगो भी दिखाना है, तो लोगो और ट्रेडमार्क देखें.
प्रोजेक्ट बनाना
खाता जोड़ने की सुविधा का इस्तेमाल करने के लिए, अपना प्रोजेक्ट बनाएं:
- प्रोजेक्ट बनाएं पर क्लिक करें.
- कोई नाम डालें या जनरेट किए गए सुझाव को स्वीकार करें.
- बचे हुए फ़ील्ड में मौजूद जानकारी की पुष्टि करें या उसमें बदलाव करें.
- बनाएं पर क्लिक करें.
अपना प्रोजेक्ट आईडी देखने के लिए:
- लैंडिंग पेज पर मौजूद टेबल में अपना प्रोजेक्ट ढूंढें. प्रोजेक्ट आईडी, आईडी कॉलम में दिखता है.
OAuth की सहमति वाली स्क्रीन को कॉन्फ़िगर करना
Google खाते को लिंक करने की प्रोसेस में, सहमति वाली एक स्क्रीन शामिल होती है. इसमें लोगों को यह जानकारी मिलती है कि कौन सा ऐप्लिकेशन उनके डेटा को ऐक्सेस करने का अनुरोध कर रहा है, किस तरह का डेटा मांगा जा रहा है, और कौनसी शर्तें लागू होती हैं. Google API क्लाइंट आईडी जनरेट करने से पहले, आपको OAuth की सहमति स्क्रीन को कॉन्फ़िगर करना होगा.
- Google APIs console का OAuth के लिए सहमति देने की स्क्रीन पेज खोलें.
- अगर कहा जाए, तो वह प्रोजेक्ट चुनें जिसे आपने अभी बनाया है.
"OAuth के लिए सहमति वाली स्क्रीन" पेज पर, फ़ॉर्म भरें और “सेव करें” बटन पर क्लिक करें.
ऐप्लिकेशन का नाम: सहमति का अनुरोध करने वाले ऐप्लिकेशन का नाम. नाम से आपके ऐप्लिकेशन के बारे में सही जानकारी मिलनी चाहिए. साथ ही, यह नाम उस नाम से मेल खाना चाहिए जो उपयोगकर्ताओं को ऐप्लिकेशन के अन्य पेजों पर दिखता है. ऐप्लिकेशन का नाम, खाता लिंक करने की सहमति वाली स्क्रीन पर दिखेगा.
ऐप्लिकेशन का लोगो: सहमति स्क्रीन पर मौजूद एक इमेज. इससे उपयोगकर्ताओं को आपके ऐप्लिकेशन की पहचान करने में मदद मिलेगी. यह लोगो, खाता लिंक करने की सहमति स्क्रीन और खाता सेटिंग पर दिखता है
सहायता के लिए ईमेल पता: इससे उपयोगकर्ता, सहमति से जुड़े सवालों के लिए आपसे संपर्क कर सकते हैं.
Google API के लिए स्कोप: स्कोप की मदद से, आपका ऐप्लिकेशन आपके उपयोगकर्ता के निजी Google डेटा को ऐक्सेस कर सकता है. Google खाते को लिंक करने के लिए, डिफ़ॉल्ट स्कोप (ईमेल, प्रोफ़ाइल, openid) काफ़ी है. आपको कोई भी संवेदनशील स्कोप जोड़ने की ज़रूरत नहीं है. आम तौर पर, सबसे सही तरीका यह है कि ऐक्सेस की ज़रूरत पड़ने पर, एक-एक करके स्कोप का अनुरोध किया जाए. ज़्यादा जानें.
अनुमति वाले डोमेन: आपकी और आपके उपयोगकर्ताओं की सुरक्षा के लिए, Google सिर्फ़ उन ऐप्लिकेशन को अनुमति वाले डोमेन का इस्तेमाल करने की अनुमति देता है जो OAuth का इस्तेमाल करके पुष्टि करते हैं. आपके ऐप्लिकेशन के लिंक, आधिकारिक डोमेन पर होस्ट किए जाने चाहिए. ज़्यादा जानें.
ऐप्लिकेशन के होम पेज का लिंक: आपके ऐप्लिकेशन का होम पेज. इसे किसी ऐसे डोमेन पर होस्ट किया जाना चाहिए जिसे अनुमति मिली हो.
ऐप्लिकेशन की निजता नीति का लिंक: यह Google खाते को लिंक करने की सहमति वाली स्क्रीन पर दिखता है. इसे किसी ऐसे डोमेन पर होस्ट किया जाना चाहिए जिसे अनुमति मिली हो.
ऐप्लिकेशन की सेवा की शर्तों का लिंक (ज़रूरी नहीं): इसे किसी आधिकारिक डोमेन पर होस्ट किया जाना चाहिए.
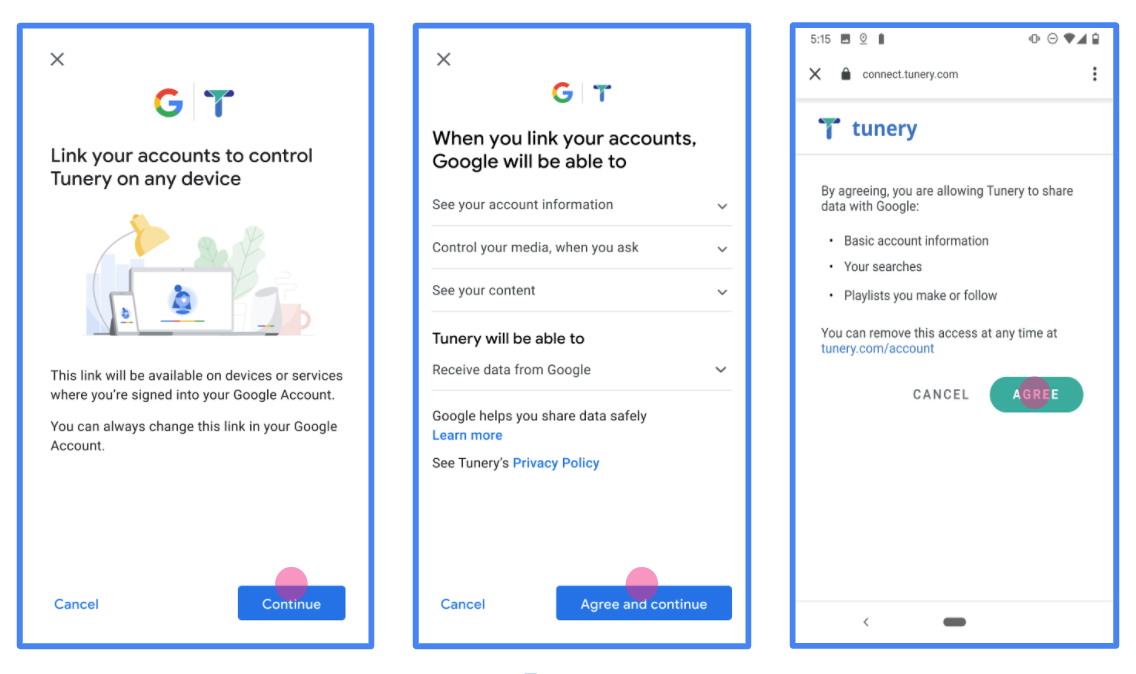
पहली इमेज. Tunery नाम के काल्पनिक ऐप्लिकेशन के लिए, Google खाते को लिंक करने की सहमति वाली स्क्रीन
"पुष्टि की स्थिति" देखें. अगर आपके आवेदन की पुष्टि करना ज़रूरी है, तो "पुष्टि के लिए सबमिट करें" बटन पर क्लिक करके, पुष्टि के लिए अपना आवेदन सबमिट करें. ज़्यादा जानकारी के लिए, OAuth की पुष्टि करने से जुड़ी ज़रूरी शर्तें देखें.
अपना OAuth सर्वर लागू करना
OAuth 2.0 इंप्लिसिट फ़्लो के साथ काम करने के लिए, आपकी सेवा अनुमति देती है एंडपॉइंट, एचटीटीपीएस से उपलब्ध है. यह एंडपॉइंट, पुष्टि करने और डेटा ऐक्सेस करने के लिए उपयोगकर्ताओं की सहमति लेना. ऑथराइज़ेशन एंडपॉइंट यह आपके उन उपयोगकर्ताओं को साइन इन करने का यूज़र इंटरफ़ेस (यूआई) दिखाता है जिन्होंने पहले से साइन इन नहीं किया है. यह यूज़र इंटरफ़ेस (यूआई) दिखाता है. के लिए अनुरोध किया गया है.
जब किसी Google ऐप्लिकेशन को आपकी सेवा के लिए अनुमति वाले किसी एपीआई को कॉल करने की ज़रूरत होती है, Google इस एंडपॉइंट का इस्तेमाल, आपके उपयोगकर्ताओं से इन एपीआई को कॉल करने की अनुमति लेने के लिए करता है को ट्रांसफ़र किया जा सकता है.
Google के शुरू किए गए किसी आम OAuth 2.0 इंप्लिसिट फ़्लो सेशन में नया फ़्लो:
- Google, उपयोगकर्ता के ब्राउज़र में आपका ऑथराइज़ेशन एंडपॉइंट खोलता है. कॉन्टेंट बनाने अगर उपयोगकर्ता पहले से साइन इन नहीं है, तो वह साइन इन करता है और Google को अगर उन्होंने पहले से अनुमति नहीं दी है, तो आपके एपीआई से उनका डेटा ऐक्सेस करना होगा.
- आपकी सेवा एक ऐक्सेस टोकन बनाती है और उसे वापस भेजती है Google. ऐसा करने के लिए, उपयोगकर्ता के ब्राउज़र को Google पर वापस रीडायरेक्ट करें. टोकन को अनुरोध के साथ अटैच किया गया है.
- Google आपकी सेवा के एपीआई को कॉल करता है और ऐक्सेस टोकन को हर अनुरोध के साथ किया जा सकता है. आपकी सेवा इस बात की पुष्टि करती है कि ऐक्सेस टोकन, Google को अनुमति देता है या नहीं की अनुमति देता है और फिर एपीआई कॉल को पूरा करता है.
अनुमति देने के अनुरोधों को मैनेज करना
जब किसी Google ऐप्लिकेशन को OAuth 2.0 के ज़रिए खाता लिंक करने की ज़रूरत हो इंप्लिसिट फ़्लो, तो Google उपयोगकर्ता को अनुरोध किया गया है, जिसमें ये पैरामीटर शामिल हैं:
| ऑथराइज़ेशन एंडपॉइंट पैरामीटर | |
|---|---|
client_id |
वह क्लाइंट आईडी जिसे आपने Google को असाइन किया है. |
redirect_uri |
वह यूआरएल जिस पर आपने इस अनुरोध का जवाब भेजा है. |
state |
हिसाब-किताब की ऐसी वैल्यू जो Google को वापस पास की जाती है. हालांकि, इसमें कोई बदलाव नहीं होता रीडायरेक्ट यूआरआई. |
response_type |
रिस्पॉन्स में दी जाने वाली वैल्यू का टाइप. OAuth 2.0 इंप्लिसिट के लिए
फ़्लो के लिए, रिस्पॉन्स का टाइप हमेशा token होता है. |
user_locale |
इस सेटिंग में मौजूद Google खाते की भाषा सेटिंग RFC5646 आपके कॉन्टेंट को उपयोगकर्ता की पसंदीदा भाषा में दिखाने के लिए इस्तेमाल किया जाता है. |
उदाहरण के लिए, अगर आपका ऑथराइज़ेशन एंडपॉइंट यहां उपलब्ध है
https://myservice.example.com/auth, अनुरोध कुछ ऐसा दिख सकता है:
GET https://myservice.example.com/auth?client_id=GOOGLE_CLIENT_ID&redirect_uri=REDIRECT_URI&state=STATE_STRING&response_type=token&user_locale=LOCALE
अगर आपको साइन-इन करने के अनुरोधों को मैनेज करना है, तो अपने ऑथराइज़ेशन एंडपॉइंट के लिए ये काम करें चरण:
इसके लिए,
client_idऔरredirect_uriवैल्यू की पुष्टि करें अनचाहे या गलत तरीके से कॉन्फ़िगर किए गए क्लाइंट ऐप्लिकेशन का ऐक्सेस देने से रोकें:- पुष्टि करें कि
client_idआपके क्लाइंट आईडी से मेल खाता है असाइन किया गया है. - पुष्टि करें कि
redirect_uriमें बताया गया यूआरएल पैरामीटर का यह रूप होता है:https://oauth-redirect.googleusercontent.com/r/YOUR_PROJECT_ID https://oauth-redirect-sandbox.googleusercontent.com/r/YOUR_PROJECT_ID
- पुष्टि करें कि
देखें कि उपयोगकर्ता ने आपकी सेवा में साइन इन किया है या नहीं. अगर उपयोगकर्ता ने साइन इन नहीं किया है में जाएं, तो अपनी सेवा का साइन-इन या साइन-अप फ़्लो पूरा करें.
Google के लिए ऐक्सेस टोकन जनरेट करें, ताकि वह आपके एपीआई को ऐक्सेस कर सके. कॉन्टेंट बनाने ऐक्सेस टोकन कोई भी स्ट्रिंग वैल्यू हो सकता है, लेकिन यह टोकन जिस उपयोगकर्ता और क्लाइंट के लिए है, वह अनुमान लगाने लायक नहीं होना चाहिए.
ऐसा एचटीटीपी रिस्पॉन्स भेजें जो उपयोगकर्ता के ब्राउज़र को यूआरएल पर रीडायरेक्ट करे
redirect_uriपैरामीटर से तय होता है. सभी को शामिल करें यूआरएल फ़्रैगमेंट में ये पैरामीटर होना चाहिए:access_token: वह ऐक्सेस टोकन जिसे आपने अभी-अभी जनरेट किया हैtoken_type: स्ट्रिंगbearerstate: मूल वैल्यू से, बिना बदलाव वाली स्थिति की वैल्यू अनुरोध
इससे बनने वाले यूआरएल का एक उदाहरण नीचे दिया गया है:
https://oauth-redirect.googleusercontent.com/r/YOUR_PROJECT_ID#access_token=ACCESS_TOKEN&token_type=bearer&state=STATE_STRING
Google के OAuth 2.0 रीडायरेक्ट हैंडलर को ऐक्सेस टोकन मिलता है और वह इसकी पुष्टि करता है
state की वैल्यू में कोई बदलाव नहीं हुआ है. Google के पास
अगर आपको अपनी सेवा का ऐक्सेस टोकन मिलता है, तो Google इस टोकन को अगले कॉल में अटैच कर देता है.
आपके सेवा API में शामिल हो.
उपयोगकर्ता की जानकारी के अनुरोधों को मैनेज करना
userinfo एंडपॉइंट, OAuth 2.0 से सुरक्षित किया गया एक ऐसा संसाधन है जो लिंक किए गए उपयोगकर्ता के बारे में दावे दिखाता है. नीचे दिए गए इस्तेमाल के उदाहरणों को छोड़कर, userinfo एंडपॉइंट को लागू और होस्ट करना ज़रूरी नहीं है:
- Google One Tap की मदद से, लिंक किए गए खाते में साइन इन करें.
- AndroidTV पर बिना किसी रुकावट के सदस्यता.
आपके टोकन एंडपॉइंट से ऐक्सेस टोकन पाने के बाद, Google आपके userinfo एंडपॉइंट पर एक अनुरोध भेजता है, ताकि लिंक किए गए उपयोगकर्ता की प्रोफ़ाइल की बुनियादी जानकारी फिर से मिल सके.
| userinfo एंडपॉइंट अनुरोध के हेडर | |
|---|---|
Authorization header |
बेयरर टाइप का ऐक्सेस टोकन. |
उदाहरण के लिए, अगर आपका userinfo एंडपॉइंट यहां उपलब्ध है
https://myservice.example.com/userinfo, अनुरोध कुछ ऐसा दिख सकता है:
GET /userinfo HTTP/1.1
Host: myservice.example.com
Authorization: Bearer ACCESS_TOKEN
अपने userinfo एंडपॉइंट पर अनुरोधों को मैनेज करने के लिए यह तरीका अपनाएं:
- ऑथराइज़ेशन हेडर से ऐक्सेस टोकन निकालें और ऐक्सेस टोकन से जुड़े उपयोगकर्ता की जानकारी दिखाएं.
- अगर ऐक्सेस टोकन अमान्य है, तो
WWW-Authenticateरिस्पॉन्स हेडर का इस्तेमाल करके, एचटीटीपी 401 बिना अनुमति वाली गड़बड़ी दिखाएं. नीचे userinfo गड़बड़ी के जवाब का एक उदाहरण दिया गया है:HTTP/1.1 401 Unauthorized WWW-Authenticate: error="invalid_token", error_description="The Access Token expired"
अगर ऐक्सेस टोकन मान्य है, तो वापस जाएं और एचटीटीपीएस के मुख्य हिस्से में, यहां दिए गए JSON ऑब्जेक्ट के साथ एचटीटीपी 200 रिस्पॉन्स भेजें जवाब:
{ "sub": "USER_UUID", "email": "EMAIL_ADDRESS", "given_name": "FIRST_NAME", "family_name": "LAST_NAME", "name": "FULL_NAME", "picture": "PROFILE_PICTURE", }userinfo एंडपॉइंट रिस्पॉन्स subएक यूनीक आईडी, जो आपके सिस्टम में उपयोगकर्ता की पहचान करता है. emailउपयोगकर्ता का ईमेल पता. given_nameज़रूरी नहीं: उपयोगकर्ता का नाम. family_nameज़रूरी नहीं: उपयोगकर्ता का सरनेम. nameज़रूरी नहीं: उपयोगकर्ता का पूरा नाम. pictureज़रूरी नहीं: उपयोगकर्ता की प्रोफ़ाइल फ़ोटो.
लागू करने की पुष्टि करना
OAuth 2.0 Playground टूल का इस्तेमाल करके, पुष्टि की जा सकती है कि आपने OAuth 2.0 को सही तरीके से लागू किया है या नहीं.
टूल में, नीचे दिया गया तरीका अपनाएं:
- OAuth 2.0 कॉन्फ़िगरेशन विंडो खोलने के लिए, कॉन्फ़िगरेशन पर क्लिक करें.
- OAuth फ़्लो फ़ील्ड में, क्लाइंट-साइड चुनें.
- OAuth एंडपॉइंट फ़ील्ड में, कस्टम चुनें.
- अपने OAuth 2.0 एंडपॉइंट और उस क्लाइंट आईडी की जानकारी दें जिसे आपने Google को असाइन किया है. इसके लिए, दिए गए फ़ील्ड का इस्तेमाल करें.
- पहला चरण सेक्शन में, Google का कोई स्कोप न चुनें. इसके बजाय, इस फ़ील्ड को खाली छोड़ दें या अपने सर्वर के लिए मान्य स्कोप टाइप करें. अगर OAuth स्कोप का इस्तेमाल नहीं किया जा रहा है, तो कोई भी स्ट्रिंग टाइप करें. इसके बाद, एपीआई को अनुमति दें पर क्लिक करें.
- दूसरे चरण और तीसरा सेक्शन में, OAuth 2.0 फ़्लो देखें और पुष्टि करें कि हर चरण आपके हिसाब से काम कर रहा हो.
Google खाते को लिंक करने के डेमो टूल का इस्तेमाल करके, पुष्टि की जा सकती है कि आपने इसे सही तरीके से लागू किया है या नहीं.
टूल में, नीचे दिया गया तरीका अपनाएं:
- Google से साइन इन करें बटन पर क्लिक करें.
- वह खाता चुनें जिसे आपको लिंक करना है.
- सेवा आईडी डालें.
- इसके अलावा, एक या उससे ज़्यादा ऐसे स्कोप डालें जिनके लिए आपको ऐक्सेस का अनुरोध करना है.
- डेमो शुरू करें पर क्लिक करें.
- जब कहा जाए, तब पुष्टि करें कि आपके पास खाते को लिंक करने के अनुरोध को स्वीकार और अस्वीकार करने का विकल्प है.
- पुष्टि करें कि आपको अपने प्लैटफ़ॉर्म पर रीडायरेक्ट किया गया है.