ภาพรวม
การลิงก์ Google Sign-In ที่ใช้ OAuth ได้รับการปรับปรุงให้มีประสิทธิภาพมากขึ้นจะเพิ่ม Google Sign-In ไว้เหนือการลิงก์ OAuth ซึ่งจะช่วยให้ผู้ใช้ Google ลิงก์บัญชีได้อย่างราบรื่น ทั้งยังเปิดใช้การสร้างบัญชี ซึ่งช่วยให้ผู้ใช้สร้างบัญชีใหม่ในบริการของคุณโดยใช้บัญชี Google ได้
หากต้องการลิงก์บัญชีด้วย OAuth และ Google Sign-In ให้ทําตามขั้นตอนทั่วไปต่อไปนี้
- ก่อนอื่น ให้ขอให้ผู้ใช้ให้ความยินยอมในการเข้าถึงโปรไฟล์ Google
- ใช้ข้อมูลในโปรไฟล์เพื่อตรวจสอบว่าบัญชีผู้ใช้มีอยู่หรือไม่
- สำหรับผู้ใช้เดิม ให้ลิงก์บัญชี
- หากไม่พบผู้ใช้ Google ที่ตรงกันในระบบการตรวจสอบสิทธิ์ ให้ตรวจสอบโทเค็นระบุตัวตนที่ได้รับจาก Google จากนั้นคุณจะสร้างผู้ใช้โดยอิงตามข้อมูลโปรไฟล์ที่อยู่ในโทเค็นระบุตัวตนได้
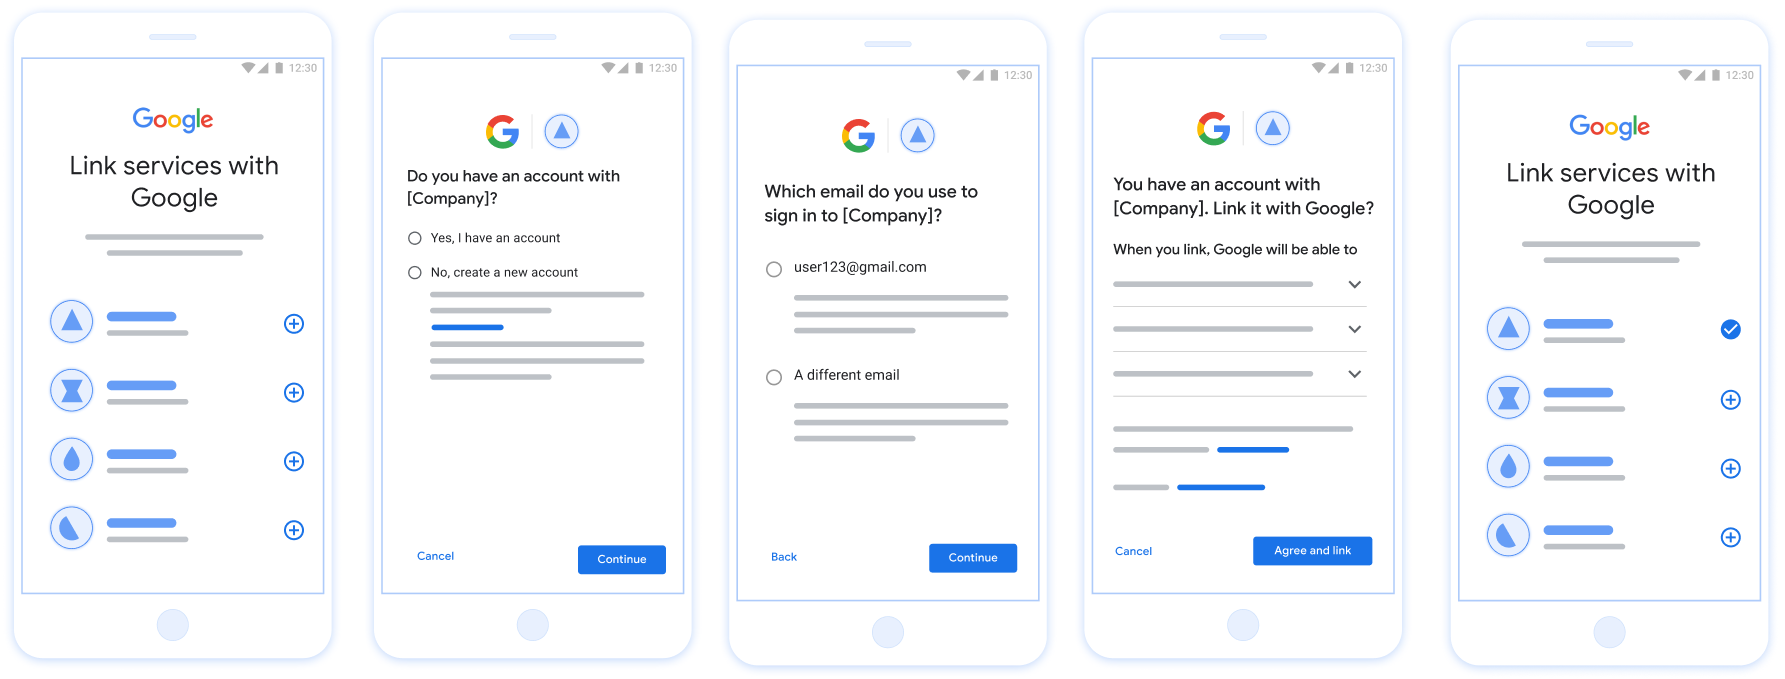
รูปที่ 1 การลิงก์บัญชีในโทรศัพท์ของผู้ใช้ด้วยการลิงก์แบบมีประสิทธิภาพ
ข้อกำหนดสำหรับการลิงก์แบบมีประสิทธิภาพ
- ใช้โฟลว์การลิงก์ OAuth พื้นฐานบนเว็บ บริการของคุณต้องรองรับปลายทางการให้สิทธิ์และการเปลี่ยนโทเค็นที่เป็นไปตามข้อกำหนด OAuth 2.0
- ปลายทางการแลกเปลี่ยนโทเค็นต้องรองรับการยืนยัน JSON Web Token (JWT) และใช้ Intent
check,createและget
ใช้เซิร์ฟเวอร์ OAuth
ปลายทางการแลกเปลี่ยนโทเค็นต้องรองรับ Intent check, create, get ด้านล่างแสดงขั้นตอนที่เสร็จสมบูรณ์ผ่านขั้นตอนการลิงก์บัญชี และระบุเวลาที่เรียกใช้ Intent ต่างๆ
- ผู้ใช้มีบัญชีในระบบการตรวจสอบสิทธิ์หรือไม่ (ผู้ใช้ตัดสินใจโดยเลือก "ใช่" หรือ "ไม่")
- ใช่ : ผู้ใช้ใช้อีเมลที่เชื่อมโยงกับบัญชี Google เพื่อลงชื่อเข้าใช้แพลตฟอร์มของคุณหรือไม่ (ผู้ใช้ตัดสินใจโดยเลือก "ใช่" หรือ "ไม่")
- ใช่ : ผู้ใช้มีบัญชีที่ตรงกันในระบบการตรวจสอบสิทธิ์หรือไม่ (โทรหา
check intentเพื่อยืนยัน)- ใช่ : มีการเรียกใช้
get intentและระบบจะลิงก์บัญชีหาก get intent แสดงผลสําเร็จ - ไม่ : สร้างบัญชีใหม่ (ผู้ใช้ตัดสินใจโดยเลือก "ใช่" หรือ "ไม่")
- ใช่ : มีการเรียกใช้
create intentและลิงก์บัญชีหากสร้าง Intent สำเร็จ - ไม่ : ระบบจะเรียกใช้ขั้นตอนการลงชื่อเข้าใช้ด้วย OAuth บนเว็บ ระบบจะนําผู้ใช้ไปยังเบราว์เซอร์ และผู้ใช้จะมีตัวเลือกให้ลิงก์กับอีเมลอื่น
- ใช่ : มีการเรียกใช้
- ใช่ : มีการเรียกใช้
- ไม่ : ระบบจะเรียกใช้ขั้นตอนการลงชื่อเข้าใช้ด้วย OAuth บนเว็บ ระบบจะนําผู้ใช้ไปยังเบราว์เซอร์ และผู้ใช้จะมีตัวเลือกให้ลิงก์กับอีเมลอื่น
- ใช่ : ผู้ใช้มีบัญชีที่ตรงกันในระบบการตรวจสอบสิทธิ์หรือไม่ (โทรหา
- ไม่ : ผู้ใช้มีบัญชีที่ตรงกันในระบบการตรวจสอบสิทธิ์หรือไม่ (โทรหา
check intentเพื่อยืนยัน)- ใช่ : มีการเรียกใช้
get intentและระบบจะลิงก์บัญชีหาก get intent แสดงผลสําเร็จ - ไม่ : มีการเรียกใช้
create intentและระบบจะลิงก์บัญชีหาก createIntent แสดงผลสำเร็จ
- ใช่ : มีการเรียกใช้
- ใช่ : ผู้ใช้ใช้อีเมลที่เชื่อมโยงกับบัญชี Google เพื่อลงชื่อเข้าใช้แพลตฟอร์มของคุณหรือไม่ (ผู้ใช้ตัดสินใจโดยเลือก "ใช่" หรือ "ไม่")
ตรวจสอบบัญชีผู้ใช้ที่มีอยู่ (ตรวจสอบ Intent)
หลังจากที่ผู้ใช้ให้ความยินยอมในการเข้าถึงโปรไฟล์ Google แล้ว Google จะส่ง คำขอที่มีการยืนยันข้อมูลประจำตัวของผู้ใช้ Google ที่ลงชื่อ การยืนยันจะมีข้อมูลที่มีรหัสบัญชี Google ของผู้ใช้ ชื่อ และที่อยู่อีเมล ปลายทางการแลกเปลี่ยนโทเค็นที่กำหนดค่าไว้สำหรับ โปรเจ็กต์จะจัดการคำขอนั้น
หากมีบัญชี Google ที่เกี่ยวข้องอยู่ในการตรวจสอบสิทธิ์อยู่แล้ว
ปลายทางการแลกเปลี่ยนโทเค็นจะตอบสนองด้วย account_found=true หาก
บัญชี Google ไม่ตรงกับผู้ใช้ที่มีอยู่, ปลายทางการแลกเปลี่ยนโทเค็น
แสดงผลข้อผิดพลาด HTTP 404 Not Found กับ account_found=false
คำขอมีแบบฟอร์มต่อไปนี้
POST /token HTTP/1.1
Host: oauth2.example.com
Content-Type: application/x-www-form-urlencoded

grant_type=urn:ietf:params:oauth:grant-type:jwt-bearer&intent=check&assertion=JWT&scope=SCOPES&client_id=GOOGLE_CLIENT_ID&client_secret=GOOGLE_CLIENT_SECRET
ปลายทางการแลกเปลี่ยนโทเค็นต้องจัดการพารามิเตอร์ต่อไปนี้ได้
| พารามิเตอร์ปลายทางของโทเค็น | |
|---|---|
intent |
สำหรับคำขอเหล่านี้ ค่าของพารามิเตอร์นี้คือ
check |
grant_type |
ประเภทของโทเค็นที่แลกเปลี่ยน สำหรับคำขอเหล่านี้ พารามิเตอร์นี้
มีค่า urn:ietf:params:oauth:grant-type:jwt-bearer |
assertion |
JSON Web Token (JWT) ที่แสดงการยืนยันของ Google ข้อมูลประจำตัวของผู้ใช้ JWT มีข้อมูลที่ประกอบด้วย รหัส ชื่อ และอีเมลของบัญชี Google |
client_id |
รหัสไคลเอ็นต์ที่คุณกำหนดให้กับ Google |
client_secret |
รหัสลับไคลเอ็นต์ที่คุณกำหนดให้กับ Google |
หากต้องการตอบกลับคำขอ Intent check ปลายทางการแลกเปลี่ยนโทเค็นต้องทำตามขั้นตอนต่อไปนี้
- ตรวจสอบและถอดรหัสการยืนยัน JWT
- ตรวจสอบว่ามีบัญชี Google อยู่ในระบบการตรวจสอบสิทธิ์ของคุณแล้วหรือยัง
ตรวจสอบและถอดรหัสการยืนยัน JWT
คุณสามารถตรวจสอบและถอดรหัสการยืนยัน JWT ได้โดยใช้ ไลบรารีการถอดรหัส JWT สำหรับภาษาของคุณ ใช้ คีย์สาธารณะของ Google มีอยู่ใน JWK หรือ PEM เพื่อยืนยัน ลายเซ็นของโทเค็น
เมื่อถอดรหัสแล้ว การยืนยัน JWT จะมีลักษณะดังตัวอย่างต่อไปนี้
{
  "sub": "1234567890",      // The unique ID of the user's Google Account
  "iss": "https://accounts.google.com",        // The assertion's issuer
  "aud": "123-abc.apps.googleusercontent.com", // Your server's client ID
  "iat": 233366400,         // Unix timestamp of the assertion's creation time
  "exp": 233370000,         // Unix timestamp of the assertion's expiration time
  "name": "Jan Jansen",
  "given_name": "Jan",
  "family_name": "Jansen",
  "email": "jan@gmail.com", // If present, the user's email address
  "email_verified": true,   // true, if Google has verified the email address
  "hd": "example.com",      // If present, the host domain of the user's GSuite email address
                            // If present, a URL to user's profile picture
  "picture": "https://lh3.googleusercontent.com/a-/AOh14GjlTnZKHAeb94A-FmEbwZv7uJD986VOF1mJGb2YYQ",
  "locale": "en_US"         // User's locale, from browser or phone settings
}
นอกจากการยืนยันลายเซ็นของโทเค็นแล้ว ให้ตรวจสอบว่าการยืนยัน
ผู้ออกใบรับรอง (ช่อง iss) คือ https://accounts.google.com ซึ่งกลุ่มเป้าหมาย
(ช่อง aud) คือรหัสไคลเอ็นต์ที่กําหนด และโทเค็นยังไม่หมดอายุ
(ช่อง exp)
เมื่อใช้ช่อง email, email_verified และ hd คุณจะทราบได้ว่า
Google โฮสต์และมีสิทธิ์สำหรับอีเมล ในกรณีที่ Google
เชื่อถือได้ ซึ่งผู้ใช้ปัจจุบันเป็นเจ้าของบัญชีที่ถูกต้อง
และคุณก็สามารถข้ามการใช้รหัสผ่านหรือวิธีการพิสูจน์อื่นๆ ได้ มิเช่นนั้น วิธีการเหล่านี้
สามารถใช้ยืนยันบัญชีก่อนลิงก์ได้
กรณีที่ Google เชื่อถือได้
emailมีส่วนต่อท้าย@gmail.comนี่คือบัญชี Gmailemail_verifiedเป็นจริงและตั้งค่าhdแล้ว นี่คือบัญชี G Suite
ผู้ใช้อาจลงทะเบียนบัญชี Google โดยไม่ใช้ Gmail หรือ G Suite ได้ วันและเวลา
email ไม่มีคำต่อท้าย @gmail.com และ hd ไม่มี Google ไม่มี
แนะนำให้ใช้รหัสผ่านหรือวิธีการอื่นๆ ในการพิสูจน์ยืนยัน
ผู้ใช้รายนั้น email_verified ก็อาจเป็นจริงได้ เนื่องจาก Google ได้ยืนยัน
ผู้ใช้เมื่อมีการสร้างบัญชี Google แต่การเป็นเจ้าของของบุคคลที่สาม
บัญชีอีเมลของคุณอาจมีการเปลี่ยนแปลง
ตรวจสอบว่ามีบัญชี Google อยู่ในระบบการตรวจสอบสิทธิ์ของคุณแล้วหรือยัง
ตรวจสอบว่าเงื่อนไขใดเงื่อนไขหนึ่งต่อไปนี้เป็นจริง
- รหัสบัญชี Google ที่พบในช่อง
subของการยืนยันนั้นอยู่ในผู้ใช้ของคุณ ฐานข้อมูล - อีเมลในการยืนยันตรงกับผู้ใช้ในฐานข้อมูลผู้ใช้
หากเงื่อนไขใดเงื่อนไขหนึ่งเป็นจริง แสดงว่าผู้ใช้ได้ลงชื่อสมัครใช้แล้ว ในกรณีดังกล่าว จะแสดงการตอบกลับดังตัวอย่างต่อไปนี้
HTTP/1.1 200 Success
Content-Type: application/json;charset=UTF-8

{
  "account_found":"true",
}
หากทั้งรหัสบัญชี Google และอีเมลที่ระบุไว้ใน
การยืนยันตรงกับผู้ใช้ในฐานข้อมูลของคุณ ซึ่งผู้ใช้ยังไม่ได้ลงชื่อสมัครใช้ ใน
ในกรณีนี้ ปลายทางการแลกเปลี่ยนโทเค็นจะต้องตอบกลับพร้อมข้อผิดพลาด HTTP 404
ที่ระบุ "account_found": "false" ตามตัวอย่างต่อไปนี้
HTTP/1.1 404 Not found
Content-Type: application/json;charset=UTF-8

{
  "account_found":"false",
}
จัดการการลิงก์อัตโนมัติ (รับ Intent)
หลังจากที่ผู้ใช้ให้ความยินยอมในการเข้าถึงโปรไฟล์ Google แล้ว Google จะส่ง คำขอที่มีการยืนยันข้อมูลประจำตัวของผู้ใช้ Google ที่ลงชื่อ การยืนยันจะมีข้อมูลที่มีรหัสบัญชี Google ของผู้ใช้ ชื่อ และที่อยู่อีเมล ปลายทางการแลกเปลี่ยนโทเค็นที่กำหนดค่าไว้สำหรับ โปรเจ็กต์จะจัดการคำขอนั้น
หากมีบัญชี Google ที่เกี่ยวข้องอยู่ในการตรวจสอบสิทธิ์อยู่แล้ว
ปลายทางการแลกเปลี่ยนโทเค็นจะส่งคืนโทเค็นสำหรับผู้ใช้ หาก
บัญชี Google ไม่ตรงกับผู้ใช้ที่มีอยู่, ปลายทางการแลกเปลี่ยนโทเค็น
แสดงผลข้อผิดพลาด linking_error และเลือก login_hint หรือไม่ก็ได้
คำขอมีแบบฟอร์มต่อไปนี้
POST /token HTTP/1.1
Host: oauth2.example.com
Content-Type: application/x-www-form-urlencoded

grant_type=urn:ietf:params:oauth:grant-type:jwt-bearer&intent=get&assertion=JWT&scope=SCOPES&client_id=GOOGLE_CLIENT_ID&client_secret=GOOGLE_CLIENT_SECRET
ปลายทางการแลกเปลี่ยนโทเค็นต้องจัดการพารามิเตอร์ต่อไปนี้ได้
| พารามิเตอร์ปลายทางของโทเค็น | |
|---|---|
intent |
สำหรับคำขอเหล่านี้ ค่าของพารามิเตอร์นี้คือ get |
grant_type |
ประเภทของโทเค็นที่แลกเปลี่ยน สำหรับคำขอเหล่านี้ พารามิเตอร์นี้
มีค่า urn:ietf:params:oauth:grant-type:jwt-bearer |
assertion |
JSON Web Token (JWT) ที่แสดงการยืนยันของ Google ข้อมูลประจำตัวของผู้ใช้ JWT มีข้อมูลที่ประกอบด้วย รหัส ชื่อ และอีเมลของบัญชี Google |
scope |
ไม่บังคับ: ขอบเขตที่คุณกำหนดค่าให้ Google ส่งคำขอ ผู้ใช้ |
client_id |
รหัสไคลเอ็นต์ที่คุณกำหนดให้กับ Google |
client_secret |
รหัสลับไคลเอ็นต์ที่คุณกำหนดให้กับ Google |
หากต้องการตอบกลับคำขอ Intent get ปลายทางการแลกเปลี่ยนโทเค็นต้องทำตามขั้นตอนต่อไปนี้
- ตรวจสอบและถอดรหัสการยืนยัน JWT
- ตรวจสอบว่ามีบัญชี Google อยู่ในระบบการตรวจสอบสิทธิ์ของคุณแล้วหรือยัง
ตรวจสอบและถอดรหัสการยืนยัน JWT
คุณสามารถตรวจสอบและถอดรหัสการยืนยัน JWT ได้โดยใช้ ไลบรารีการถอดรหัส JWT สำหรับภาษาของคุณ ใช้ คีย์สาธารณะของ Google มีอยู่ใน JWK หรือ PEM เพื่อยืนยัน ลายเซ็นของโทเค็น
เมื่อถอดรหัสแล้ว การยืนยัน JWT จะมีลักษณะดังตัวอย่างต่อไปนี้
{
  "sub": "1234567890",      // The unique ID of the user's Google Account
  "iss": "https://accounts.google.com",        // The assertion's issuer
  "aud": "123-abc.apps.googleusercontent.com", // Your server's client ID
  "iat": 233366400,         // Unix timestamp of the assertion's creation time
  "exp": 233370000,         // Unix timestamp of the assertion's expiration time
  "name": "Jan Jansen",
  "given_name": "Jan",
  "family_name": "Jansen",
  "email": "jan@gmail.com", // If present, the user's email address
  "email_verified": true,   // true, if Google has verified the email address
  "hd": "example.com",      // If present, the host domain of the user's GSuite email address
                            // If present, a URL to user's profile picture
  "picture": "https://lh3.googleusercontent.com/a-/AOh14GjlTnZKHAeb94A-FmEbwZv7uJD986VOF1mJGb2YYQ",
  "locale": "en_US"         // User's locale, from browser or phone settings
}
นอกจากการยืนยันลายเซ็นของโทเค็นแล้ว ให้ตรวจสอบว่าการยืนยัน
ผู้ออกใบรับรอง (ช่อง iss) คือ https://accounts.google.com ซึ่งกลุ่มเป้าหมาย
(ช่อง aud) คือรหัสไคลเอ็นต์ที่กําหนด และโทเค็นยังไม่หมดอายุ
(ช่อง exp)
เมื่อใช้ช่อง email, email_verified และ hd คุณจะทราบได้ว่า
Google โฮสต์และมีสิทธิ์สำหรับอีเมล ในกรณีที่ Google
เชื่อถือได้ ซึ่งผู้ใช้ปัจจุบันเป็นเจ้าของบัญชีที่ถูกต้อง
และคุณก็สามารถข้ามการใช้รหัสผ่านหรือวิธีการพิสูจน์อื่นๆ ได้ มิเช่นนั้น วิธีการเหล่านี้
สามารถใช้ยืนยันบัญชีก่อนลิงก์ได้
กรณีที่ Google เชื่อถือได้
emailมีส่วนต่อท้าย@gmail.comนี่คือบัญชี Gmailemail_verifiedเป็นจริงและตั้งค่าhdแล้ว นี่คือบัญชี G Suite
ผู้ใช้อาจลงทะเบียนบัญชี Google โดยไม่ใช้ Gmail หรือ G Suite ได้ วันและเวลา
email ไม่มีคำต่อท้าย @gmail.com และ hd ไม่มี Google ไม่มี
แนะนำให้ใช้รหัสผ่านหรือวิธีการอื่นๆ ในการพิสูจน์ยืนยัน
ผู้ใช้รายนั้น email_verified ก็อาจเป็นจริงได้ เนื่องจาก Google ได้ยืนยัน
ผู้ใช้เมื่อมีการสร้างบัญชี Google แต่การเป็นเจ้าของของบุคคลที่สาม
บัญชีอีเมลของคุณอาจมีการเปลี่ยนแปลง
ตรวจสอบว่ามีบัญชี Google อยู่ในระบบการตรวจสอบสิทธิ์ของคุณแล้วหรือยัง
ตรวจสอบว่าเงื่อนไขใดเงื่อนไขหนึ่งต่อไปนี้เป็นจริง
- รหัสบัญชี Google ที่พบในช่อง
subของการยืนยันนั้นอยู่ในผู้ใช้ของคุณ ฐานข้อมูล - อีเมลในการยืนยันตรงกับผู้ใช้ในฐานข้อมูลผู้ใช้
หากพบบัญชีสำหรับผู้ใช้ ให้ออกโทเค็นเพื่อการเข้าถึงและแสดงผลค่าในออบเจ็กต์ JSON ในส่วนเนื้อหาของการตอบกลับ HTTPS ดังตัวอย่างต่อไปนี้
{
  "token_type": "Bearer",
  "access_token": "ACCESS_TOKEN",
  "refresh_token": "REFRESH_TOKEN",
  "expires_in": SECONDS_TO_EXPIRATION
}
ในบางกรณี การลิงก์บัญชีตามโทเค็นรหัสอาจล้มเหลวสำหรับผู้ใช้ หาก
ไม่ว่าจะด้วยเหตุผลใดก็ตาม ปลายทางการแลกเปลี่ยนโทเค็นของคุณต้องตอบกลับด้วย HTTP
ข้อผิดพลาด 401 ที่ระบุ error=linking_error ตามตัวอย่างต่อไปนี้
HTTP/1.1 401 Unauthorized
Content-Type: application/json;charset=UTF-8

{
  "error":"linking_error",
  "login_hint":"foo@bar.com"
}
เมื่อ Google ได้รับการตอบกลับข้อผิดพลาด 401 ด้วย linking_error ทาง Google จะส่ง
ผู้ใช้ไปยังปลายทางการให้สิทธิ์โดยมี login_hint เป็นพารามิเตอร์
ผู้ใช้ลิงก์บัญชีให้เสร็จสมบูรณ์โดยใช้ขั้นตอนการลิงก์ OAuth ในเบราว์เซอร์
จัดการการสร้างบัญชีผ่าน Google Sign-In (สร้าง Intent)
เมื่อผู้ใช้ต้องการสร้างบัญชีในบริการของคุณ Google จะส่งคำขอ
ไปยังปลายทางการแลกเปลี่ยนโทเค็นที่ระบุ intent=create
คำขอมีแบบฟอร์มต่อไปนี้
POST /token HTTP/1.1
Host: oauth2.example.com
Content-Type: application/x-www-form-urlencoded

response_type=token&grant_type=urn:ietf:params:oauth:grant-type:jwt-bearer&scope=SCOPES&intent=create&assertion=JWT&client_id=GOOGLE_CLIENT_ID&client_secret=GOOGLE_CLIENT_SECRET
ปลายทางการแลกเปลี่ยนโทเค็นต้องจัดการพารามิเตอร์ต่อไปนี้ได้
| พารามิเตอร์ปลายทางของโทเค็น | |
|---|---|
intent |
สำหรับคำขอเหล่านี้ ค่าของพารามิเตอร์นี้คือ create |
grant_type |
ประเภทของโทเค็นที่แลกเปลี่ยน สำหรับคำขอเหล่านี้ พารามิเตอร์นี้
มีค่า urn:ietf:params:oauth:grant-type:jwt-bearer |
assertion |
JSON Web Token (JWT) ที่แสดงการยืนยันของ Google ข้อมูลประจำตัวของผู้ใช้ JWT มีข้อมูลที่ประกอบด้วย รหัส ชื่อ และอีเมลของบัญชี Google |
client_id |
รหัสไคลเอ็นต์ที่คุณกำหนดให้กับ Google |
client_secret |
รหัสลับไคลเอ็นต์ที่คุณกำหนดให้กับ Google |
JWT ภายในพารามิเตอร์ assertion มีรหัสบัญชี Google ของผู้ใช้
และที่อยู่อีเมลซึ่งคุณใช้สร้างบัญชีใหม่ในบัญชี
service.
หากต้องการตอบกลับคำขอ Intent create ปลายทางการแลกเปลี่ยนโทเค็นต้องทำตามขั้นตอนต่อไปนี้
- ตรวจสอบและถอดรหัสการยืนยัน JWT
- ตรวจสอบข้อมูลผู้ใช้และสร้างบัญชีใหม่
ตรวจสอบและถอดรหัสการยืนยัน JWT
คุณสามารถตรวจสอบและถอดรหัสการยืนยัน JWT ได้โดยใช้ ไลบรารีการถอดรหัส JWT สำหรับภาษาของคุณ ใช้ คีย์สาธารณะของ Google มีอยู่ใน JWK หรือ PEM เพื่อยืนยัน ลายเซ็นของโทเค็น
เมื่อถอดรหัสแล้ว การยืนยัน JWT จะมีลักษณะดังตัวอย่างต่อไปนี้
{
  "sub": "1234567890",      // The unique ID of the user's Google Account
  "iss": "https://accounts.google.com",        // The assertion's issuer
  "aud": "123-abc.apps.googleusercontent.com", // Your server's client ID
  "iat": 233366400,         // Unix timestamp of the assertion's creation time
  "exp": 233370000,         // Unix timestamp of the assertion's expiration time
  "name": "Jan Jansen",
  "given_name": "Jan",
  "family_name": "Jansen",
  "email": "jan@gmail.com", // If present, the user's email address
  "email_verified": true,   // true, if Google has verified the email address
  "hd": "example.com",      // If present, the host domain of the user's GSuite email address
                            // If present, a URL to user's profile picture
  "picture": "https://lh3.googleusercontent.com/a-/AOh14GjlTnZKHAeb94A-FmEbwZv7uJD986VOF1mJGb2YYQ",
  "locale": "en_US"         // User's locale, from browser or phone settings
}
นอกจากการยืนยันลายเซ็นของโทเค็นแล้ว ให้ตรวจสอบว่าการยืนยัน
ผู้ออกใบรับรอง (ช่อง iss) คือ https://accounts.google.com ซึ่งกลุ่มเป้าหมาย
(ช่อง aud) คือรหัสไคลเอ็นต์ที่กําหนด และโทเค็นยังไม่หมดอายุ
(ช่อง exp)
เมื่อใช้ช่อง email, email_verified และ hd คุณจะทราบได้ว่า
Google โฮสต์และมีสิทธิ์สำหรับอีเมล ในกรณีที่ Google
เชื่อถือได้ ซึ่งผู้ใช้ปัจจุบันเป็นเจ้าของบัญชีที่ถูกต้อง
และคุณก็สามารถข้ามการใช้รหัสผ่านหรือวิธีการพิสูจน์อื่นๆ ได้ มิเช่นนั้น วิธีการเหล่านี้
สามารถใช้ยืนยันบัญชีก่อนลิงก์ได้
กรณีที่ Google เชื่อถือได้
emailมีส่วนต่อท้าย@gmail.comนี่คือบัญชี Gmailemail_verifiedเป็นจริงและตั้งค่าhdแล้ว นี่คือบัญชี G Suite
ผู้ใช้อาจลงทะเบียนบัญชี Google โดยไม่ใช้ Gmail หรือ G Suite ได้ วันและเวลา
email ไม่มีคำต่อท้าย @gmail.com และ hd ไม่มี Google ไม่มี
แนะนำให้ใช้รหัสผ่านหรือวิธีการอื่นๆ ในการพิสูจน์ยืนยัน
ผู้ใช้รายนั้น email_verified ก็อาจเป็นจริงได้ เนื่องจาก Google ได้ยืนยัน
ผู้ใช้เมื่อมีการสร้างบัญชี Google แต่การเป็นเจ้าของของบุคคลที่สาม
บัญชีอีเมลของคุณอาจมีการเปลี่ยนแปลง
ตรวจสอบข้อมูลผู้ใช้และสร้างบัญชีใหม่
ตรวจสอบว่าเงื่อนไขใดเงื่อนไขหนึ่งต่อไปนี้เป็นจริง
- รหัสบัญชี Google ที่พบในช่อง
subของการยืนยันนั้นอยู่ในผู้ใช้ของคุณ ฐานข้อมูล - อีเมลในการยืนยันตรงกับผู้ใช้ในฐานข้อมูลผู้ใช้
หากเงื่อนไขข้อใดข้อหนึ่งเป็นจริง แจ้งให้ผู้ใช้ลิงก์บัญชีที่มีอยู่
ด้วยบัญชี Google ของตน ในการดำเนินการดังกล่าว ให้ตอบกลับคำขอด้วยข้อผิดพลาด HTTP 401
ที่ระบุ error=linking_error และให้ที่อยู่อีเมลของผู้ใช้เป็น
login_hint ตัวอย่างการตอบกลับมีดังนี้
HTTP/1.1 401 Unauthorized
Content-Type: application/json;charset=UTF-8

{
  "error":"linking_error",
  "login_hint":"foo@bar.com"
}
เมื่อ Google ได้รับการตอบกลับข้อผิดพลาด 401 ด้วย linking_error ทาง Google จะส่ง
ผู้ใช้ไปยังปลายทางการให้สิทธิ์โดยมี login_hint เป็นพารามิเตอร์
ผู้ใช้ลิงก์บัญชีให้เสร็จสมบูรณ์โดยใช้ขั้นตอนการลิงก์ OAuth ในเบราว์เซอร์
หากไม่มีเงื่อนไขใดเป็นจริง ให้สร้างบัญชีผู้ใช้ใหม่พร้อมระบุข้อมูล ที่ให้ไว้ใน JWT โดยทั่วไป บัญชีใหม่จะไม่ตั้งรหัสผ่าน ตอนนี้ ขอแนะนำให้คุณเพิ่ม Google Sign-In ลงในแพลตฟอร์มอื่นๆ เพื่อช่วยให้ผู้ใช้ ให้เข้าสู่ระบบด้วย Google ในแพลตฟอร์มต่างๆ ของแอปพลิเคชัน หรือคุณอาจเลือก สามารถส่งอีเมลลิงก์ที่เริ่มต้นกระบวนการกู้คืนรหัสผ่านให้กับผู้ใช้เพื่ออนุญาต ตั้งรหัสผ่านเพื่อลงชื่อเข้าใช้ในแพลตฟอร์มอื่น
เมื่อสร้างเสร็จแล้ว ให้ออกโทเค็นเพื่อการเข้าถึง จากนั้นแสดงผลค่าในออบเจ็กต์ JSON ใน ส่วนเนื้อหาของการตอบกลับ HTTPS ดังตัวอย่างต่อไปนี้
{
  "token_type": "Bearer",
  "access_token": "ACCESS_TOKEN",
  "refresh_token": "REFRESH_TOKEN",
  "expires_in": SECONDS_TO_EXPIRATION
}
รับรหัสไคลเอ็นต์ Google API
คุณจะต้องระบุรหัสไคลเอ็นต์ Google API ในระหว่างกระบวนการลงทะเบียนการลิงก์บัญชี
วิธีรับรหัสไคลเอ็นต์ API โดยใช้โปรเจ็กต์ที่คุณสร้างขึ้นขณะทำตามขั้นตอนการลิงก์ OAuth โดยทำตามขั้นตอนต่อไปนี้
สร้างหรือเลือกโปรเจ็กต์ Google APIs
หากโปรเจ็กต์ไม่มีรหัสไคลเอ็นต์สำหรับประเภทเว็บแอปพลิเคชัน ให้คลิกสร้างไคลเอ็นต์เพื่อสร้างรหัส อย่าลืมใส่โดเมนของเว็บไซต์ในช่องต้นทางของ JavaScript ที่ได้รับอนุญาต เมื่อทำการทดสอบหรือพัฒนาในเครื่อง คุณต้องเพิ่มทั้ง
http://localhostและhttp://localhost:<port_number>ลงในช่องต้นทาง JavaScript ที่อนุญาต
ตรวจสอบการติดตั้งใช้งาน
คุณตรวจสอบการติดตั้งใช้งานได้โดยใช้เครื่องมือ OAuth 2.0 Playground
ทำตามขั้นตอนต่อไปนี้ในเครื่องมือ
- คลิกการกําหนดค่า เพื่อเปิดหน้าต่างการกําหนดค่า OAuth 2.0
- ในช่องขั้นตอน OAuth ให้เลือกฝั่งไคลเอ็นต์
- ในช่อง OAuth Endpoints ให้เลือก Custom
- ระบุปลายทาง OAuth 2.0 และรหัสไคลเอ็นต์ที่คุณกำหนดให้กับ Google ในช่องที่เกี่ยวข้อง
- ในส่วนขั้นตอนที่ 1 ไม่ต้องเลือกขอบเขตของ Google แต่ให้เว้นช่องนี้ว่างไว้หรือพิมพ์ขอบเขตที่ใช้ได้กับเซิร์ฟเวอร์ของคุณ (หรือสตริงที่กำหนดเองหากคุณไม่ได้ใช้ขอบเขต OAuth) เมื่อดำเนินการเสร็จแล้ว ให้คลิกให้สิทธิ์ API
- ในส่วนขั้นตอนที่ 2 และขั้นตอนที่ 3 ให้ทำตามขั้นตอน OAuth 2.0 และตรวจสอบว่าแต่ละขั้นตอนทำงานตามที่ต้องการ
คุณสามารถตรวจสอบการติดตั้งใช้งานโดยใช้เครื่องมือการสาธิตการลิงก์บัญชี Google
ทำตามขั้นตอนต่อไปนี้ในเครื่องมือ
- คลิกปุ่มลงชื่อเข้าใช้ด้วย Google
- เลือกบัญชีที่ต้องการลิงก์
- ป้อนรหัสบริการ
- (ไม่บังคับ) ป้อนขอบเขตที่จะขอสิทธิ์เข้าถึงอย่างน้อย 1 รายการ
- คลิกเริ่มสาธิต
- เมื่อได้รับข้อความแจ้ง ให้ยืนยันว่าคุณอาจยินยอมและปฏิเสธคำขอลิงก์
- ยืนยันว่าระบบเปลี่ยนเส้นทางคุณไปยังแพลตฟอร์ม