Omówienie
Uproszczone łączenie z Logowaniem przez Google na podstawie protokołu OAuth umożliwia dodanie Logowania przez Google do łączenia OAuth. Dzięki temu użytkownicy Google mogą bezproblemowo łączyć swoje konta. Możesz też umożliwić tworzenie kont, co pozwala użytkownikom tworzyć nowe konta w Twojej usłudze za pomocą ich kont Google.
Aby połączyć konto za pomocą OAuth i logowania w Google, wykonaj te ogólne czynności:
- Najpierw poproś użytkownika o zgodę na dostęp do jego profilu Google.
- Użyj informacji z profilu, aby sprawdzić, czy konto użytkownika istnieje.
- W przypadku dotychczasowych użytkowników połącz konta.
- Jeśli nie możesz znaleźć w systemie uwierzytelniania użytkownika Google, zweryfikuj otrzymany od Google token identyfikacyjny. Następnie możesz utworzyć użytkownika na podstawie informacji o profilu zawartych w tokenie identyfikatora.
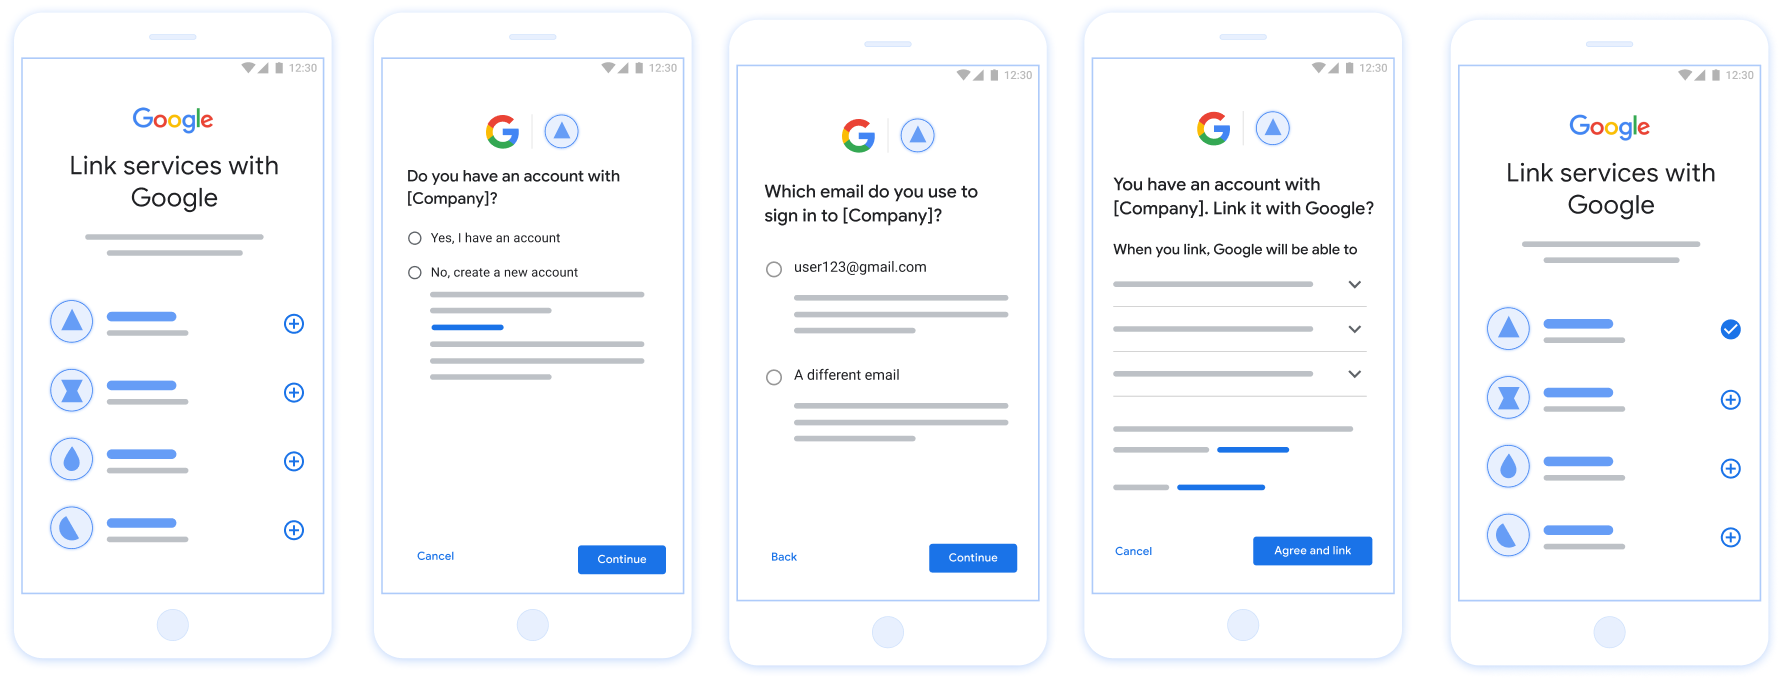
Rysunek 1 Łączenie konta na telefonie użytkownika za pomocą uproszczonego łączenia
Wymagania dotyczące uproszczonego łączenia
- Wdrożyć podstawowy proces łączenia OAuth w internecie. Twoja usługa musi obsługiwać punkty końcowe autoryzacji i wymiany tokenów zgodne z OAuth 2.0.
- Punkt końcowy wymiany tokenów musi obsługiwać oświadczenia tokena internetowego JSON (JWT) i implementować intencje
check,createiget.
Wdrożenie serwera OAuth
Punkt końcowy wymiany tokenów musi obsługiwać intencje check, create i get. Poniżej przedstawiamy czynności wykonywane w ramach procesu łączenia kont oraz wskazujemy, kiedy wywoływane są różne intencje:
- Czy użytkownik ma konto w Twoim systemie uwierzytelniania? (Użytkownik wybiera TAK lub NIE)
- TAK : czy użytkownik używa adresu e-mail powiązanego z jego kontem Google do logowania się na Twoją platformę? (Użytkownik wybiera TAK lub NIE)
- TAK : czy użytkownik ma pasujące konto w Twoim systemie uwierzytelniania? (
check intentjest wywoływany w celu potwierdzenia)- YES : wywołana zostaje funkcja
get intent, a jeśli zwróci ona wartość true, konto zostanie połączone. - NIE : utworzyć nowe konto? (Użytkownik wybiera TAK lub NIE)
- TAK : wywoływana jest funkcja
create intent, a konto jest połączone, jeśli funkcja createIntent zwraca wartość true. - NIE : uruchamia się proces OAuth w internecie, użytkownik jest przekierowywany do przeglądarki i ma możliwość połączenia konta z innym adresem e-mail.
- TAK : wywoływana jest funkcja
- YES : wywołana zostaje funkcja
- NIE : uruchamia się przepływ OAuth w internecie, użytkownik jest przekierowywany do przeglądarki i ma możliwość połączenia konta z innym adresem e-mail.
- TAK : czy użytkownik ma pasujące konto w Twoim systemie uwierzytelniania? (
- NO : Does the user have a matching account in your authentication system? (
check intentjest wywoływany w celu potwierdzenia)- YES : wywołana zostaje funkcja
get intent, a jeśli zwróci ona wartość true, konto zostanie połączone. - NO :
create intentjest wywoływany, a konto jest połączone, jeśli createIntent zwraca wartość true.
- YES : wywołana zostaje funkcja
- TAK : czy użytkownik używa adresu e-mail powiązanego z jego kontem Google do logowania się na Twoją platformę? (Użytkownik wybiera TAK lub NIE)
Sprawdzanie, czy istnieje konto użytkownika (sprawdź intencje)
Gdy użytkownik wyrazi zgodę na dostęp do jego profilu Google, Google wysyła żądania, które zawiera podpisane potwierdzenie tożsamości użytkownika Google. asercja zawiera informacje obejmujące identyfikator konta Google użytkownika, imię i nazwisko oraz adres e-mail. Punkt końcowy wymiany tokenów skonfigurowany dla Twojego które obsługuje projekt.
Jeśli odpowiednie konto Google jest już używane podczas uwierzytelniania
system, punkt końcowy wymiany tokenów zwraca żądanie account_found=true. Jeśli
Konto Google nie pasuje do istniejącego użytkownika lub punktu końcowego wymiany tokenów
zwraca błąd HTTP 404 „Nie znaleziono” z account_found=false.
Prośba ma taki format:
POST /token HTTP/1.1
Host: oauth2.example.com
Content-Type: application/x-www-form-urlencoded

grant_type=urn:ietf:params:oauth:grant-type:jwt-bearer&intent=check&assertion=JWT&scope=SCOPES&client_id=GOOGLE_CLIENT_ID&client_secret=GOOGLE_CLIENT_SECRET
Punkt końcowy wymiany tokenów musi obsługiwać te parametry:
| Parametry punktu końcowego tokena | |
|---|---|
intent |
W przypadku tych żądań wartość tego parametru jest
check |
grant_type |
Typ wymienianego tokena. W przypadku tych żądań
ma wartość urn:ietf:params:oauth:grant-type:jwt-bearer. |
assertion |
Token internetowy JSON (JWT), który stanowi podpisane potwierdzenie uwierzytelniania Google tożsamości użytkownika. Token JWT zawiera informacje o Identyfikator konta Google, imię i nazwisko oraz adres e-mail. |
client_id |
Identyfikator klienta przypisany przez Ciebie do Google. |
client_secret |
Klucz klienta przypisany przez Ciebie do Google. |
Aby odpowiedzieć na żądania intencji check, punkt końcowy wymiany tokenów musi wykonać te czynności:
- Sprawdź i zdekoduj potwierdzenie JWT.
- Sprawdź, czy konto Google znajduje się już w systemie uwierzytelniania.
Weryfikowanie i dekodowanie potwierdzenia JWT
Potwierdzenie JWT możesz zweryfikować i zdekodować za pomocą Biblioteka dekodowania JWT dla Twojego języka Używaj Klucze publiczne Google, dostępne w tych krajach: JWK lub formaty PEM do weryfikacji, podpis tokena.
Po zdekodowaniu potwierdzenie JWT wygląda jak w tym przykładzie:
{
  "sub": "1234567890",      // The unique ID of the user's Google Account
  "iss": "https://accounts.google.com",        // The assertion's issuer
  "aud": "123-abc.apps.googleusercontent.com", // Your server's client ID
  "iat": 233366400,         // Unix timestamp of the assertion's creation time
  "exp": 233370000,         // Unix timestamp of the assertion's expiration time
  "name": "Jan Jansen",
  "given_name": "Jan",
  "family_name": "Jansen",
  "email": "jan@gmail.com", // If present, the user's email address
  "email_verified": true,   // true, if Google has verified the email address
  "hd": "example.com",      // If present, the host domain of the user's GSuite email address
                            // If present, a URL to user's profile picture
  "picture": "https://lh3.googleusercontent.com/a-/AOh14GjlTnZKHAeb94A-FmEbwZv7uJD986VOF1mJGb2YYQ",
  "locale": "en_US"         // User's locale, from browser or phone settings
}
Oprócz weryfikacji podpisu tokena sprawdź, czy
wydawca (pole iss) to https://accounts.google.com, oznacza to, że odbiorcy
(pole aud) to przypisany identyfikator klienta, który nie wygasł.
(pole exp).
Za pomocą pól email, email_verified i hd możesz określić,
Google hostuje dany adres e-mail i jest dla niego autorytatywny. W przypadku, gdy Google
autorytatywny, według którego użytkownik jest obecnie znany jako rzeczywisty właściciel konta
i możesz pominąć hasło i inne testy zabezpieczające. W przeciwnym razie te metody
mogą zostać użyte do zweryfikowania konta przed połączeniem.
Przypadki, w których Google ma wiarygodność:
- To jest konto Gmail, adres
emailma sufiks@gmail.com. - To jest konto G Suite,
email_verifiedma wartość prawda i ustawionohd.
Użytkownicy mogą rejestrować się w Google, nie korzystając z Gmaila lub G Suite. Kiedy
email nie zawiera sufiksu @gmail.com, a hd nie występuje w Google
zalecamy wiarygodność i hasło lub inne metody weryfikujące weryfikację
użytkownika. email_verified może również być prawdziwe, ponieważ wstępnie zweryfikowaliśmy, że
użytkownika przy tworzeniu konta Google, jednak własność firmy zewnętrznej
konto e-mail mogło się od tego czasu zmienić.
Sprawdź, czy konto Google znajduje się już w systemie uwierzytelniania
Sprawdź, czy spełniony jest jeden z tych warunków:
- Identyfikator konta Google znajdujący się w polu
subpotwierdzenia należy do użytkownika w bazie danych. - Adres e-mail podany w potwierdzeniu pasuje do użytkownika w bazie danych użytkowników.
Jeśli którykolwiek z tych warunków jest spełniony, użytkownik już się zarejestrował. W takim przypadku zwraca odpowiedź podobną do tej:
HTTP/1.1 200 Success
Content-Type: application/json;charset=UTF-8

{
  "account_found":"true",
}
Jeśli ani identyfikator konta Google, ani adres e-mail podany w
oznacza, że użytkownik nie zarejestrował się jeszcze w bazie danych. W
w tym przypadku punkt końcowy wymiany tokenów musi odpowiedzieć z błędem HTTP 404
, która określa "account_found": "false", tak jak w tym przykładzie:
HTTP/1.1 404 Not found
Content-Type: application/json;charset=UTF-8

{
  "account_found":"false",
}
Obsługa automatycznego łączenia (pobieranie intencji)
Gdy użytkownik wyrazi zgodę na dostęp do jego profilu Google, Google wysyła żądania, które zawiera podpisane potwierdzenie tożsamości użytkownika Google. asercja zawiera informacje obejmujące identyfikator konta Google użytkownika, imię i nazwisko oraz adres e-mail. Punkt końcowy wymiany tokenów skonfigurowany dla Twojego które obsługuje projekt.
Jeśli odpowiednie konto Google jest już używane podczas uwierzytelniania
system, punkt końcowy wymiany tokenów zwraca token użytkownika. Jeśli
Konto Google nie pasuje do istniejącego użytkownika lub punktu końcowego wymiany tokenów
zwraca błąd linking_error i opcjonalny login_hint.
Prośba ma taki format:
POST /token HTTP/1.1
Host: oauth2.example.com
Content-Type: application/x-www-form-urlencoded

grant_type=urn:ietf:params:oauth:grant-type:jwt-bearer&intent=get&assertion=JWT&scope=SCOPES&client_id=GOOGLE_CLIENT_ID&client_secret=GOOGLE_CLIENT_SECRET
Punkt końcowy wymiany tokenów musi obsługiwać te parametry:
| Parametry punktu końcowego tokena | |
|---|---|
intent |
W przypadku tych żądań wartość tego parametru wynosi get. |
grant_type |
Typ wymienianego tokena. W przypadku tych żądań
ma wartość urn:ietf:params:oauth:grant-type:jwt-bearer. |
assertion |
Token internetowy JSON (JWT), który stanowi podpisane potwierdzenie uwierzytelniania Google tożsamości użytkownika. Token JWT zawiera informacje o Identyfikator konta Google, imię i nazwisko oraz adres e-mail. |
scope |
Opcjonalne: wszystkie zakresy skonfigurowane przez Google, których ma żądać. użytkowników. |
client_id |
Identyfikator klienta przypisany przez Ciebie do Google. |
client_secret |
Klucz klienta przypisany przez Ciebie do Google. |
Aby odpowiedzieć na żądania intencji get, punkt końcowy wymiany tokenów musi wykonać te czynności:
- Sprawdź i zdekoduj potwierdzenie JWT.
- Sprawdź, czy konto Google znajduje się już w systemie uwierzytelniania.
Weryfikowanie i dekodowanie potwierdzenia JWT
Potwierdzenie JWT możesz zweryfikować i zdekodować za pomocą Biblioteka dekodowania JWT dla Twojego języka Używaj Klucze publiczne Google, dostępne w tych krajach: JWK lub formaty PEM do weryfikacji, podpis tokena.
Po zdekodowaniu potwierdzenie JWT wygląda jak w tym przykładzie:
{
  "sub": "1234567890",      // The unique ID of the user's Google Account
  "iss": "https://accounts.google.com",        // The assertion's issuer
  "aud": "123-abc.apps.googleusercontent.com", // Your server's client ID
  "iat": 233366400,         // Unix timestamp of the assertion's creation time
  "exp": 233370000,         // Unix timestamp of the assertion's expiration time
  "name": "Jan Jansen",
  "given_name": "Jan",
  "family_name": "Jansen",
  "email": "jan@gmail.com", // If present, the user's email address
  "email_verified": true,   // true, if Google has verified the email address
  "hd": "example.com",      // If present, the host domain of the user's GSuite email address
                            // If present, a URL to user's profile picture
  "picture": "https://lh3.googleusercontent.com/a-/AOh14GjlTnZKHAeb94A-FmEbwZv7uJD986VOF1mJGb2YYQ",
  "locale": "en_US"         // User's locale, from browser or phone settings
}
Oprócz weryfikacji podpisu tokena sprawdź, czy
wydawca (pole iss) to https://accounts.google.com, oznacza to, że odbiorcy
(pole aud) to przypisany identyfikator klienta, który nie wygasł.
(pole exp).
Za pomocą pól email, email_verified i hd możesz określić,
Google hostuje dany adres e-mail i jest dla niego autorytatywny. W przypadku, gdy Google
autorytatywny, według którego użytkownik jest obecnie znany jako rzeczywisty właściciel konta
i możesz pominąć hasło i inne testy zabezpieczające. W przeciwnym razie te metody
mogą zostać użyte do zweryfikowania konta przed połączeniem.
Przypadki, w których Google ma wiarygodność:
- To jest konto Gmail, adres
emailma sufiks@gmail.com. - To jest konto G Suite,
email_verifiedma wartość prawda i ustawionohd.
Użytkownicy mogą rejestrować się w Google, nie korzystając z Gmaila lub G Suite. Kiedy
email nie zawiera sufiksu @gmail.com, a hd nie występuje w Google
zalecamy wiarygodność i hasło lub inne metody weryfikujące weryfikację
użytkownika. email_verified może również być prawdziwe, ponieważ wstępnie zweryfikowaliśmy, że
użytkownika przy tworzeniu konta Google, jednak własność firmy zewnętrznej
konto e-mail mogło się od tego czasu zmienić.
Sprawdź, czy konto Google znajduje się już w systemie uwierzytelniania
Sprawdź, czy spełniony jest jeden z tych warunków:
- Identyfikator konta Google znajdujący się w polu
subpotwierdzenia należy do użytkownika w bazie danych. - Adres e-mail podany w potwierdzeniu pasuje do użytkownika w bazie danych użytkowników.
Jeśli konto użytkownika zostanie znalezione, wydawaj token dostępu i zwracaj wartości w obiekcie JSON w treści odpowiedzi HTTPS, jak w tym przykładzie:
{
  "token_type": "Bearer",
  "access_token": "ACCESS_TOKEN",
  "refresh_token": "REFRESH_TOKEN",
  "expires_in": SECONDS_TO_EXPIRATION
}
W niektórych przypadkach połączenie kont na podstawie tokena tożsamości może się nie udać w przypadku użytkownika. Jeśli
zrobi to z jakiegokolwiek powodu, punkt końcowy wymiany tokenów musi odpowiedzieć z kodem
Błąd 401, który określa error=linking_error, tak jak w tym przykładzie:
HTTP/1.1 401 Unauthorized
Content-Type: application/json;charset=UTF-8

{
  "error":"linking_error",
  "login_hint":"foo@bar.com"
}
Gdy Google otrzymuje odpowiedź o błędzie 401 z kodem linking_error, wysyła
użytkownika do punktu końcowego autoryzacji z parametrem login_hint.
użytkownik realizuje proces łączenia kont w przeglądarce za pomocą protokołu OAuth.
Obsługa tworzenia kont przez Logowanie przez Google (intencja tworzenia)
Gdy użytkownik musi utworzyć konto w Twojej usłudze, Google wysyła odpowiednie żądanie.
do punktu końcowego wymiany tokenów, który wskazuje intent=create.
Prośba ma taki format:
POST /token HTTP/1.1
Host: oauth2.example.com
Content-Type: application/x-www-form-urlencoded

response_type=token&grant_type=urn:ietf:params:oauth:grant-type:jwt-bearer&scope=SCOPES&intent=create&assertion=JWT&client_id=GOOGLE_CLIENT_ID&client_secret=GOOGLE_CLIENT_SECRET
Punkt końcowy wymiany tokenów musi obsługiwać te parametry:
| Parametry punktu końcowego tokena | |
|---|---|
intent |
W przypadku tych żądań wartość tego parametru wynosi create. |
grant_type |
Typ wymienianego tokena. W przypadku tych żądań
ma wartość urn:ietf:params:oauth:grant-type:jwt-bearer. |
assertion |
Token internetowy JSON (JWT), który stanowi podpisane potwierdzenie uwierzytelniania Google tożsamości użytkownika. Token JWT zawiera informacje o Identyfikator konta Google, imię i nazwisko oraz adres e-mail. |
client_id |
Identyfikator klienta przypisany przez Ciebie do Google. |
client_secret |
Klucz klienta przypisany przez Ciebie do Google. |
Token JWT w parametrze assertion zawiera identyfikator konta Google użytkownika.
imię i nazwisko oraz adres e-mail, których możesz użyć do utworzenia nowego konta
posprzedażna.
Aby odpowiedzieć na żądania intencji create, punkt końcowy wymiany tokenów musi wykonać te czynności:
- Sprawdź i zdekoduj potwierdzenie JWT.
- Sprawdź informacje o użytkowniku i utwórz nowe konto.
Weryfikowanie i dekodowanie potwierdzenia JWT
Potwierdzenie JWT możesz zweryfikować i zdekodować za pomocą Biblioteka dekodowania JWT dla Twojego języka Używaj Klucze publiczne Google, dostępne w tych krajach: JWK lub formaty PEM do weryfikacji, podpis tokena.
Po zdekodowaniu potwierdzenie JWT wygląda jak w tym przykładzie:
{
  "sub": "1234567890",      // The unique ID of the user's Google Account
  "iss": "https://accounts.google.com",        // The assertion's issuer
  "aud": "123-abc.apps.googleusercontent.com", // Your server's client ID
  "iat": 233366400,         // Unix timestamp of the assertion's creation time
  "exp": 233370000,         // Unix timestamp of the assertion's expiration time
  "name": "Jan Jansen",
  "given_name": "Jan",
  "family_name": "Jansen",
  "email": "jan@gmail.com", // If present, the user's email address
  "email_verified": true,   // true, if Google has verified the email address
  "hd": "example.com",      // If present, the host domain of the user's GSuite email address
                            // If present, a URL to user's profile picture
  "picture": "https://lh3.googleusercontent.com/a-/AOh14GjlTnZKHAeb94A-FmEbwZv7uJD986VOF1mJGb2YYQ",
  "locale": "en_US"         // User's locale, from browser or phone settings
}
Oprócz weryfikacji podpisu tokena sprawdź, czy
wydawca (pole iss) to https://accounts.google.com, oznacza to, że odbiorcy
(pole aud) to przypisany identyfikator klienta, który nie wygasł.
(pole exp).
Za pomocą pól email, email_verified i hd możesz określić,
Google hostuje dany adres e-mail i jest dla niego autorytatywny. W przypadku, gdy Google
autorytatywny, według którego użytkownik jest obecnie znany jako rzeczywisty właściciel konta
i możesz pominąć hasło i inne testy zabezpieczające. W przeciwnym razie te metody
mogą zostać użyte do zweryfikowania konta przed połączeniem.
Przypadki, w których Google ma wiarygodność:
- To jest konto Gmail, adres
emailma sufiks@gmail.com. - To jest konto G Suite,
email_verifiedma wartość prawda i ustawionohd.
Użytkownicy mogą rejestrować się w Google, nie korzystając z Gmaila lub G Suite. Kiedy
email nie zawiera sufiksu @gmail.com, a hd nie występuje w Google
zalecamy wiarygodność i hasło lub inne metody weryfikujące weryfikację
użytkownika. email_verified może również być prawdziwe, ponieważ wstępnie zweryfikowaliśmy, że
użytkownika przy tworzeniu konta Google, jednak własność firmy zewnętrznej
konto e-mail mogło się od tego czasu zmienić.
Zweryfikuj informacje o użytkowniku i utwórz nowe konto
Sprawdź, czy spełniony jest jeden z tych warunków:
- Identyfikator konta Google znajdujący się w polu
subpotwierdzenia należy do użytkownika w bazie danych. - Adres e-mail podany w potwierdzeniu pasuje do użytkownika w bazie danych użytkowników.
Jeśli którykolwiek z tych warunków jest spełniony, poproś użytkownika o połączenie istniejącego konta
za pomocą swojego konta Google. W tym celu odpowiedz na żądanie, przesyłając błąd HTTP 401.
określający error=linking_error, a jako adres e-mail użytkownika
login_hint Oto przykładowa odpowiedź:
HTTP/1.1 401 Unauthorized
Content-Type: application/json;charset=UTF-8

{
  "error":"linking_error",
  "login_hint":"foo@bar.com"
}
Gdy Google otrzymuje odpowiedź o błędzie 401 z kodem linking_error, wysyła
użytkownika do punktu końcowego autoryzacji z parametrem login_hint.
użytkownik realizuje proces łączenia kont w przeglądarce za pomocą protokołu OAuth.
Jeśli żaden z tych warunków nie jest spełniony, utwórz nowe konto użytkownika z tymi informacjami podane w tokenie JWT. Nowe konta zwykle nie mają ustawionego hasła. Jest zalecamy dodanie Logowania przez Google na innych platformach, aby umożliwić użytkownikom logować się przy użyciu konta Google w różnych miejscach aplikacji. Ewentualnie może wysłać do użytkownika e-maila z linkiem rozpoczynającym proces odzyskiwania hasła, który zezwoli na użytkownik musi ustawić hasło używane do logowania się na innych platformach.
Po zakończeniu tworzenia wydaj token dostępu i odśwież token, i zwracają wartości w obiekcie JSON w treść odpowiedzi HTTPS, jak w tym przykładzie:
{
  "token_type": "Bearer",
  "access_token": "ACCESS_TOKEN",
  "refresh_token": "REFRESH_TOKEN",
  "expires_in": SECONDS_TO_EXPIRATION
}
Uzyskiwanie identyfikatora klienta Google API
Podczas rejestracji na potrzeby łączenia kont musisz podać identyfikator klienta interfejsu Google API.
Aby uzyskać identyfikator klienta API za pomocą projektu utworzonego podczas wykonywania czynności Łączenie z OAuth. Aby to zrobić:
Utwórz lub wybierz projekt interfejsów API Google.
Jeśli w Twoim projekcie nie ma identyfikatora klienta dla typu aplikacji internetowej, kliknij Utwórz klienta, aby go utworzyć. Pamiętaj, aby w polu Autoryzowane źródła JavaScriptu podać domenę swojej witryny. Podczas testów lokalnych lub rozwoju musisz dodać zarówno
http://localhost, jak ihttp://localhost:<port_number>do pola Autoryzowane źródła JavaScript.
Weryfikowanie implementacji
Własną implementację możesz sprawdzić za pomocą narzędzia OAuth 2.0 Playground.
W narzędziu wykonaj te czynności:
- Kliknij Konfiguracja , aby otworzyć okno konfiguracji OAuth 2.0.
- W polu Procedura OAuth wybierz Po stronie klienta.
- W polu Punkty końcowe OAuth wybierz Niestandardowe.
- W odpowiednich polach podaj punkt końcowy OAuth 2.0 i identyfikator klienta przypisany do Google.
- W sekcji Krok 1 nie wybieraj żadnych zakresów uprawnień Google. Zamiast tego pozostaw to pole puste lub wpisz zakres prawidłowy dla Twojego serwera (lub dowolny ciąg znaków, jeśli nie używasz zakresów OAuth). Gdy skończysz, kliknij Autoryzuj interfejsy API.
- W sekcji Krok 2 i Krok 3 przejdź przez proces OAuth 2.0 i sprawdź, czy każdy krok działa prawidłowo.
Implementację możesz zweryfikować za pomocą narzędzia Demo łączenia kont Google.
W narzędziu wykonaj te czynności:
- Kliknij przycisk Zaloguj się przez Google.
- Wybierz konto, które chcesz połączyć.
- Wpisz identyfikator usługi.
- Opcjonalnie wpisz co najmniej 1 zakres, do którego chcesz uzyskać dostęp.
- Kliknij Uruchom wersję pokazową.
- Gdy pojawi się odpowiedni komunikat, potwierdź, że możesz wyrazić zgodę lub odrzucić prośbę o połączenie.
- Sprawdź, czy nastąpiło przekierowanie na Twoją platformę.