總覽
以 OAuth 為基礎的 Google 登入簡化連結會在 OAuth 連結上方加入 Google 登入功能。這可為 Google 使用者提供無縫連結體驗,並啟用帳戶建立功能,讓使用者可透過 Google 帳戶在您的服務中建立新帳戶。
如要使用 OAuth 和 Google 登入功能執行帳戶連結,請按照下列一般步驟操作:
- 首先,請使用者同意存取其 Google 個人資料。
- 使用設定檔中的資訊,確認使用者帳戶是否存在。
- 如果是現有使用者,請連結帳戶。
- 如果您在驗證系統中找不到 Google 使用者,請驗證從 Google 收到的 ID 權杖。接著,您可以根據 ID 權杖中包含的個人資料資訊建立使用者。
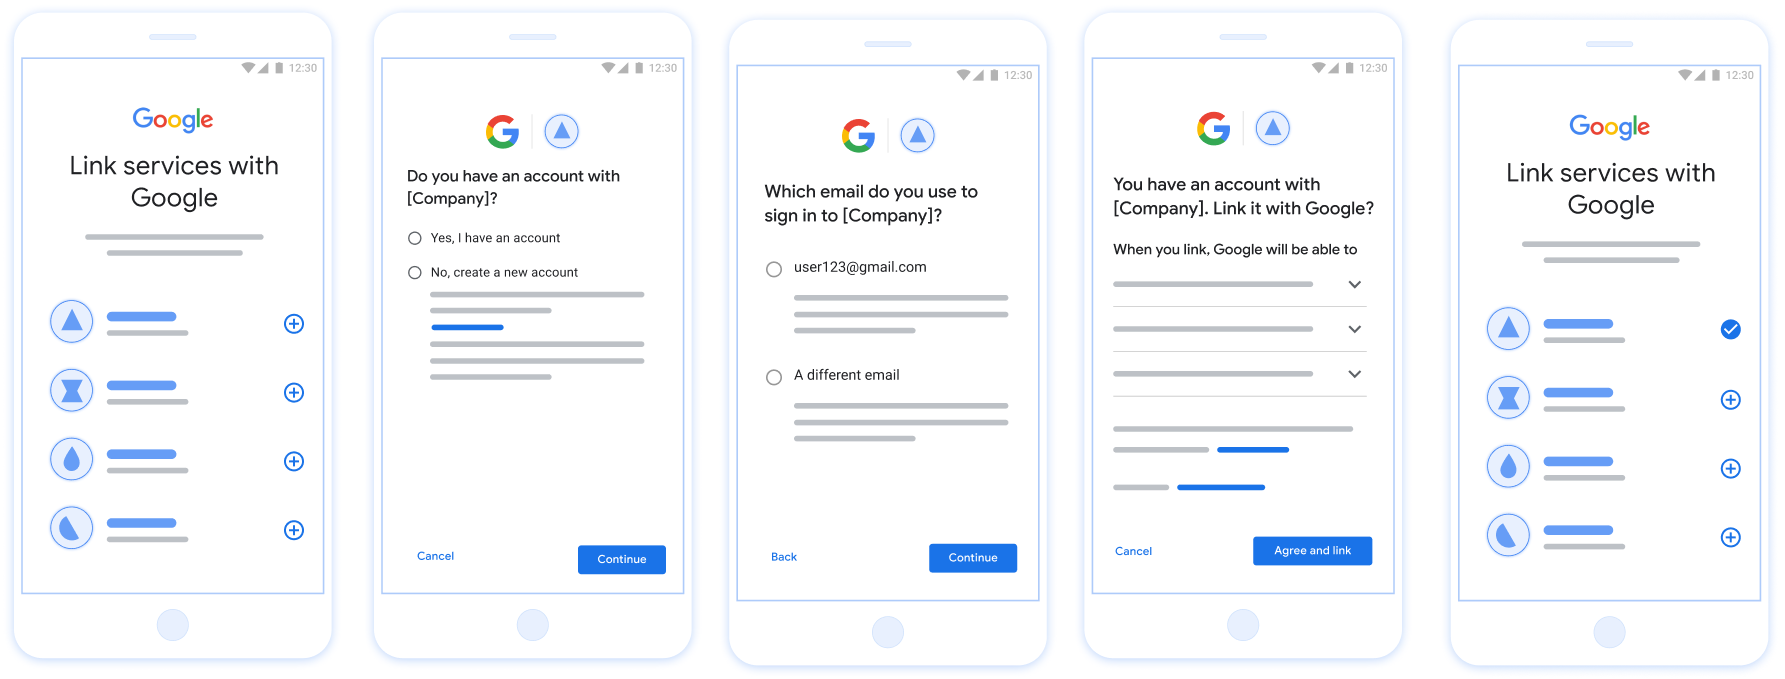
圖 1. 使用簡化連結功能在使用者手機上連結帳戶
簡化連結功能的相關規定
- 實作基本網路 OAuth 連結流程。您的服務必須支援符合 OAuth 2.0 標準的授權和權杖交換端點。
- 權杖交換端點必須支援 JSON Web Token (JWT) 斷言,並實作
check、create和get意圖。
實作 OAuth 伺服器
您的 權杖交換端點必須支援 check、create、get 意圖。下方顯示透過帳戶連結流程完成的步驟,並指出不同意圖的呼叫時機:
- 使用者是否在您的驗證系統中擁有帳戶?(使用者可選取「是」或「否」決定是否同意)
- 是:使用者是否會使用與 Google 帳戶相關聯的電子郵件地址登入平台?(使用者可選取「是」或「否」決定是否同意)
- 是:使用者是否在您的驗證系統中擁有相符的帳戶?(系統會呼叫
check intent進行確認)- 是:如果 getIntent 成功傳回,系統會呼叫
get intent,並連結帳戶。 - 否:建立新帳戶?(使用者可選取「是」或「否」決定是否同意)
- 是:如果建立意圖的傳回值成功,系統會呼叫
create intent,並連結帳戶。 - 否:觸發 Web OAuth 流程,使用者會被導向瀏覽器,並提供連結其他電子郵件的選項。
- 是:如果建立意圖的傳回值成功,系統會呼叫
- 是:如果 getIntent 成功傳回,系統會呼叫
- 否:系統會觸發 網路 OAuth 流程,將使用者導向瀏覽器,並提供連結其他電子郵件地址的選項。
- 是:使用者是否在您的驗證系統中擁有相符的帳戶?(系統會呼叫
- 否:使用者是否在您的驗證系統中擁有相符的帳戶?(系統會呼叫
check intent進行確認)- 是:如果 getIntent 成功傳回,系統會呼叫
get intent,並連結帳戶。 - 否:如果建立意圖的傳回值為成功,系統會呼叫
create intent,並連結帳戶。
- 是:如果 getIntent 成功傳回,系統會呼叫
- 是:使用者是否會使用與 Google 帳戶相關聯的電子郵件地址登入平台?(使用者可選取「是」或「否」決定是否同意)
檢查現有的使用者帳戶 (檢查意圖)
使用者同意存取自己的 Google 個人資料後,Google 會傳送 要求,包含已簽署的 Google 使用者身分識別資訊。 聲明包含使用者的 Google 帳戶 ID、 姓名、姓名和電子郵件地址為叢集設定的憑證交換端點 就會處理該要求
如果驗證資訊中已有對應的 Google 帳戶
系統,權杖交換端點會以 account_found=true 回應。如果
Google 帳戶與現有使用者不相符,您的權杖交換端點
會傳回 account_found=false 的 HTTP 404 找不到錯誤。
這項要求的格式如下:
POST /token HTTP/1.1
Host: oauth2.example.com
Content-Type: application/x-www-form-urlencoded

grant_type=urn:ietf:params:oauth:grant-type:jwt-bearer&intent=check&assertion=JWT&scope=SCOPES&client_id=GOOGLE_CLIENT_ID&client_secret=GOOGLE_CLIENT_SECRET
您的權杖交換端點必須能處理下列參數:
| 權杖端點參數 | |
|---|---|
intent |
在這些要求中,這個參數的值為
check。 |
grant_type |
要交換的權杖類型。對於這些要求,這個
參數值為 urn:ietf:params:oauth:grant-type:jwt-bearer。 |
assertion |
JSON Web Token (JWT),提供已簽署 識別使用者的身分JWT 所含資訊包括使用者的 Google 帳戶 ID、名稱和電子郵件地址。 |
client_id |
您指派給 Google 的用戶端 ID。 |
client_secret |
您指派給 Google 的用戶端密鑰。 |
如要回應 check 意圖要求,您的權杖交換端點必須執行下列步驟:
- 驗證並解碼 JWT 斷言。
- 檢查驗證系統是否已有 Google 帳戶。
驗證並解碼 JWT 斷言
您可以使用 適用於您語言的 JWT 解碼程式庫。使用 Google 的公開金鑰,位於 JWK 或 使用 PEM 格式進行驗證 憑證的簽章
解碼後的 JWT 斷言會如下所示:
{
  "sub": "1234567890",      // The unique ID of the user's Google Account
  "iss": "https://accounts.google.com",        // The assertion's issuer
  "aud": "123-abc.apps.googleusercontent.com", // Your server's client ID
  "iat": 233366400,         // Unix timestamp of the assertion's creation time
  "exp": 233370000,         // Unix timestamp of the assertion's expiration time
  "name": "Jan Jansen",
  "given_name": "Jan",
  "family_name": "Jansen",
  "email": "jan@gmail.com", // If present, the user's email address
  "email_verified": true,   // true, if Google has verified the email address
  "hd": "example.com",      // If present, the host domain of the user's GSuite email address
                            // If present, a URL to user's profile picture
  "picture": "https://lh3.googleusercontent.com/a-/AOh14GjlTnZKHAeb94A-FmEbwZv7uJD986VOF1mJGb2YYQ",
  "locale": "en_US"         // User's locale, from browser or phone settings
}
除了驗證權杖的簽章外,也請驗證斷言
核發者 (iss 欄位) 為 https://accounts.google.com,目標對象為
(aud 欄位) 是您指派的用戶端 ID,且權杖尚未過期
(exp 欄位)。
您可以使用 email、email_verified 和 hd 欄位判斷
Google 代管且具公信力的電子郵件地址。如果 Google
權威使用者目前是合法帳戶擁有者
可以略過密碼或其他驗證方式此外,這些方法
可用於驗證帳戶再建立連結。
Google 具有公信力的案例:
email的尾碼是@gmail.com,這是 Gmail 帳戶。- 「
email_verified」為 true,且已設定「hd」,代表這是 G Suite 帳戶。
使用者註冊 Google 帳戶時,不必使用 Gmail 或 G Suite。時間
email 未包含 @gmail.com 後置字串,且 hd 不是 Google
建議使用權威性密碼、密碼或其他驗證方法
使用者。email_verified 也可能是 true,因為 Google 一開始就驗證過
使用者就是 Google 帳戶建立時的使用者,但第三方的擁有權
電子郵件帳戶可能會有所變更。
檢查驗證系統是否已有 Google 帳戶
確認是否符合下列任一條件:
- 在聲明的「
sub」欄位中,有 Google 帳戶 ID 代表您的使用者 資料庫 - 斷言中的電子郵件地址與您使用者資料庫中的使用者相符。
如果其中一個條件為 true,使用者已經註冊。在此情況下 會傳回類似以下的回應:
HTTP/1.1 200 Success
Content-Type: application/json;charset=UTF-8

{
  "account_found":"true",
}
如果 Google 帳戶 ID 和
斷言與資料庫中的使用者相符,表示使用者尚未註冊。於
在此情況下,您的權杖交換端點必須回覆 HTTP 404 錯誤
指定 "account_found": "false",如以下範例所示:
HTTP/1.1 404 Not found
Content-Type: application/json;charset=UTF-8

{
  "account_found":"false",
}
处理自动链接(获取 intent)
在用户同意访问其 Google 个人资料后,Google 会发送 请求,其中包含 Google 用户身份的已签名断言。通过 断言包含的信息包括用户的 Google 账号 ID、 姓名和电子邮件地址为您的 Google Cloud 控制台配置的令牌交换端点 项目处理该请求。
如果您的身份验证中已有相应的 Google 账号
系统,您的令牌交换端点将为用户返回一个令牌。如果
Google 账号与现有用户不匹配,您的令牌交换端点
返回 linking_error 错误和可选的 login_hint。
请求的格式如下:
POST /token HTTP/1.1
Host: oauth2.example.com
Content-Type: application/x-www-form-urlencoded

grant_type=urn:ietf:params:oauth:grant-type:jwt-bearer&intent=get&assertion=JWT&scope=SCOPES&client_id=GOOGLE_CLIENT_ID&client_secret=GOOGLE_CLIENT_SECRET
您的令牌交换端点必须能够处理以下参数:
| 令牌端点参数 | |
|---|---|
intent |
对于这些请求,此参数的值为 get。 |
grant_type |
所交换的令牌的类型。对于这类请求
参数的值为 urn:ietf:params:oauth:grant-type:jwt-bearer。 |
assertion |
一个 JSON Web 令牌 (JWT),提供 Google 用户身份。JWT 包含的信息包括用户 Google 账号 ID、姓名和电子邮件地址。 |
scope |
可选:您已将 Google 配置为向其请求访问权限的任何范围 用户。 |
client_id |
您分配给 Google 的客户 ID。 |
client_secret |
您分配给 Google 的客户端密钥。 |
如需响应 get intent 请求,您的令牌交换端点必须执行以下步骤:
- 验证和解码 JWT 断言。
- 检查您的身份验证系统中是否已存在该 Google 账号。
驗證並解碼 JWT 斷言
您可以使用 適用於您語言的 JWT 解碼程式庫。使用 Google 的公開金鑰,位於 JWK 或 使用 PEM 格式進行驗證 憑證的簽章
解碼後的 JWT 斷言會如下所示:
{
  "sub": "1234567890",      // The unique ID of the user's Google Account
  "iss": "https://accounts.google.com",        // The assertion's issuer
  "aud": "123-abc.apps.googleusercontent.com", // Your server's client ID
  "iat": 233366400,         // Unix timestamp of the assertion's creation time
  "exp": 233370000,         // Unix timestamp of the assertion's expiration time
  "name": "Jan Jansen",
  "given_name": "Jan",
  "family_name": "Jansen",
  "email": "jan@gmail.com", // If present, the user's email address
  "email_verified": true,   // true, if Google has verified the email address
  "hd": "example.com",      // If present, the host domain of the user's GSuite email address
                            // If present, a URL to user's profile picture
  "picture": "https://lh3.googleusercontent.com/a-/AOh14GjlTnZKHAeb94A-FmEbwZv7uJD986VOF1mJGb2YYQ",
  "locale": "en_US"         // User's locale, from browser or phone settings
}
除了驗證權杖的簽章外,也請驗證斷言
核發者 (iss 欄位) 為 https://accounts.google.com,目標對象為
(aud 欄位) 是您指派的用戶端 ID,且權杖尚未過期
(exp 欄位)。
您可以使用 email、email_verified 和 hd 欄位判斷
Google 代管且具公信力的電子郵件地址。如果 Google
權威使用者目前是合法帳戶擁有者
可以略過密碼或其他驗證方式此外,這些方法
可用於驗證帳戶再建立連結。
Google 具有公信力的案例:
email的尾碼是@gmail.com,這是 Gmail 帳戶。- 「
email_verified」為 true,且已設定「hd」,代表這是 G Suite 帳戶。
使用者註冊 Google 帳戶時,不必使用 Gmail 或 G Suite。時間
email 未包含 @gmail.com 後置字串,且 hd 不是 Google
建議使用權威性密碼、密碼或其他驗證方法
使用者。email_verified 也可能是 true,因為 Google 一開始就驗證過
使用者就是 Google 帳戶建立時的使用者,但第三方的擁有權
電子郵件帳戶可能會有所變更。
检查您的身份验证系统中是否已存在该 Google 账号
请检查以下任一条件是否成立:
- Google 账号 ID(可在断言的
sub字段中找到)位于您的用户中 数据库。 - 断言中的电子邮件地址与用户数据库中的用户匹配。
如果找到了用户的账号,请发出访问令牌,并在 HTTPS 响应正文的 JSON 对象中返回相应值,如以下示例所示:
{
  "token_type": "Bearer",
  "access_token": "ACCESS_TOKEN",
  "refresh_token": "REFRESH_TOKEN",
  "expires_in": SECONDS_TO_EXPIRATION
}
在某些情况下,基于 ID 令牌的账号关联可能会失败。如果
因为任何原因,您的令牌交换端点都需要以 HTTP 响应
指定 error=linking_error 的 401 错误,如以下示例所示:
HTTP/1.1 401 Unauthorized
Content-Type: application/json;charset=UTF-8

{
  "error":"linking_error",
  "login_hint":"foo@bar.com"
}
当 Google 收到包含 linking_error 的 401 错误响应时,会发送
使用 login_hint 作为参数将用户发送到您的授权端点。通过
用户在浏览器中使用 OAuth 关联流程完成账号关联。
通过 Google 登录功能处理账号创建(创建 intent)
当用户需要在您的服务中创建账号时,Google 会发出请求
发送到指定 intent=create 的令牌交换端点。
请求的格式如下:
POST /token HTTP/1.1
Host: oauth2.example.com
Content-Type: application/x-www-form-urlencoded

response_type=token&grant_type=urn:ietf:params:oauth:grant-type:jwt-bearer&scope=SCOPES&intent=create&assertion=JWT&client_id=GOOGLE_CLIENT_ID&client_secret=GOOGLE_CLIENT_SECRET
您的令牌交换端点必须能够处理以下参数:
| 令牌端点参数 | |
|---|---|
intent |
对于这些请求,此参数的值为 create。 |
grant_type |
所交换的令牌的类型。对于这类请求
参数的值为 urn:ietf:params:oauth:grant-type:jwt-bearer。 |
assertion |
一个 JSON Web 令牌 (JWT),提供 Google 用户身份。JWT 包含的信息包括用户 Google 账号 ID、姓名和电子邮件地址。 |
client_id |
您分配给 Google 的客户 ID。 |
client_secret |
您分配给 Google 的客户端密钥。 |
assertion 参数中的 JWT 包含用户的 Google 账号 ID。
姓名和电子邮件地址,可用于在 Gmail 中创建新账号
服务。
如需响应 create intent 请求,您的令牌交换端点必须执行以下步骤:
- 验证和解码 JWT 断言。
- 验证用户信息并创建新账号。
驗證並解碼 JWT 斷言
您可以使用 適用於您語言的 JWT 解碼程式庫。使用 Google 的公開金鑰,位於 JWK 或 使用 PEM 格式進行驗證 憑證的簽章
解碼後的 JWT 斷言會如下所示:
{
  "sub": "1234567890",      // The unique ID of the user's Google Account
  "iss": "https://accounts.google.com",        // The assertion's issuer
  "aud": "123-abc.apps.googleusercontent.com", // Your server's client ID
  "iat": 233366400,         // Unix timestamp of the assertion's creation time
  "exp": 233370000,         // Unix timestamp of the assertion's expiration time
  "name": "Jan Jansen",
  "given_name": "Jan",
  "family_name": "Jansen",
  "email": "jan@gmail.com", // If present, the user's email address
  "email_verified": true,   // true, if Google has verified the email address
  "hd": "example.com",      // If present, the host domain of the user's GSuite email address
                            // If present, a URL to user's profile picture
  "picture": "https://lh3.googleusercontent.com/a-/AOh14GjlTnZKHAeb94A-FmEbwZv7uJD986VOF1mJGb2YYQ",
  "locale": "en_US"         // User's locale, from browser or phone settings
}
除了驗證權杖的簽章外,也請驗證斷言
核發者 (iss 欄位) 為 https://accounts.google.com,目標對象為
(aud 欄位) 是您指派的用戶端 ID,且權杖尚未過期
(exp 欄位)。
您可以使用 email、email_verified 和 hd 欄位判斷
Google 代管且具公信力的電子郵件地址。如果 Google
權威使用者目前是合法帳戶擁有者
可以略過密碼或其他驗證方式此外,這些方法
可用於驗證帳戶再建立連結。
Google 具有公信力的案例:
email的尾碼是@gmail.com,這是 Gmail 帳戶。- 「
email_verified」為 true,且已設定「hd」,代表這是 G Suite 帳戶。
使用者註冊 Google 帳戶時,不必使用 Gmail 或 G Suite。時間
email 未包含 @gmail.com 後置字串,且 hd 不是 Google
建議使用權威性密碼、密碼或其他驗證方法
使用者。email_verified 也可能是 true,因為 Google 一開始就驗證過
使用者就是 Google 帳戶建立時的使用者,但第三方的擁有權
電子郵件帳戶可能會有所變更。
验证用户信息并创建新账号
请检查以下任一条件是否成立:
- Google 账号 ID(可在断言的
sub字段中找到)位于您的用户中 数据库。 - 断言中的电子邮件地址与用户数据库中的用户匹配。
如果满足上述任一条件,请提示用户关联其现有账号
与其 Google 账号关联。为此,请使用 HTTP 401 错误响应请求
该参数指定 error=linking_error 并将用户的电子邮件地址作为
login_hint。以下是示例响应:
HTTP/1.1 401 Unauthorized
Content-Type: application/json;charset=UTF-8

{
  "error":"linking_error",
  "login_hint":"foo@bar.com"
}
当 Google 收到包含 linking_error 的 401 错误响应时,会发送
使用 login_hint 作为参数将用户发送到您的授权端点。通过
用户在浏览器中使用 OAuth 关联流程完成账号关联。
如果以上两个条件都不满足,请使用相应信息创建一个新的用户账号 。新账号通常不会设置密码。时间是 建议您将 Google 登录功能添加到其他平台,以便用户 使用 Google 账号登录。或者 可以通过电子邮件向用户发送链接,启动密码恢复流程,以允许 用户设置密码,以便在其他平台上登录。
创建完成后,发出一个访问令牌 并在 HTTPS 响应的正文,如以下示例所示:
{
  "token_type": "Bearer",
  "access_token": "ACCESS_TOKEN",
  "refresh_token": "REFRESH_TOKEN",
  "expires_in": SECONDS_TO_EXPIRATION
}
取得 Google API 用戶端 ID
您必須在帳戶連結註冊程序中提供 Google API 用戶端 ID。
如要使用完成 OAuth 連結步驟時建立的專案取得 API 用戶端 ID,若要這樣做,請完成下列步驟:
建立或選取 Google API 專案。
如果專案沒有網路應用程式類型的用戶端 ID,請按一下「Create Client」建立用戶端 ID。請務必在「已授權的 JavaScript 來源」方塊中加入網站的網域。執行本機測試或開發時,您必須將
http://localhost和http://localhost:<port_number>都新增至「已授權的 JavaScript 來源」欄位。
驗證實作
您可以使用 OAuth 2.0 Playground 工具驗證實作結果。
請在工具中按照下列步驟操作:
- 點選「Configuration」圖示 ,開啟 OAuth 2.0 設定視窗。
- 在「OAuth 流程」欄位中,選取「用戶端」。
- 在「OAuth 端點」欄位中,選取「自訂」。
- 在對應的欄位中指定 OAuth 2.0 端點,以及您指派給 Google 的用戶端 ID。
- 在「步驟 1」部分中,請勿選取任何 Google 範圍。請改為將這個欄位留空,或輸入有效的伺服器範圍 (如果您不使用 OAuth 範圍,則輸入任意字串)。完成後,按一下「授權 API」。
- 在「步驟 2」和「步驟 3」部分,請完成 OAuth 2.0 流程,並確認每個步驟都能正常運作。
您可以使用 Google 帳戶連結示範工具驗證實作成果。
在工具中執行下列步驟:
- 按一下「使用 Google 帳戶登入」按鈕。
- 選擇要連結的帳戶。
- 輸入服務 ID。
- 您可以選擇輸入一或多個要申請存取權的範圍。
- 按一下「開始試用」。
- 系統顯示提示時,請確認您可以同意或拒絕連結要求。
- 確認系統是否會將你重新導向至平台。