खास जानकारी
OAuth पर आधारित 'Google साइन इन' को आसानी से लिंक करने की सुविधा, OAuth लिंकिंग के साथ-साथ 'Google साइन इन' को भी जोड़ती है. इससे, Google के उपयोगकर्ताओं को खाता लिंक करने का आसान अनुभव मिलता है. साथ ही, खाता बनाने की सुविधा भी चालू होती है. इससे उपयोगकर्ता, अपने Google खाते का इस्तेमाल करके आपकी सेवा पर नया खाता बना सकता है.
OAuth और Google Sign-In की मदद से खाता लिंक करने के लिए, ये सामान्य तरीके अपनाएं:
- सबसे पहले, उपयोगकर्ता से उसकी Google प्रोफ़ाइल को ऐक्सेस करने की सहमति मांगें.
- उपयोगकर्ता की प्रोफ़ाइल में मौजूद जानकारी का इस्तेमाल करके, यह देखें कि उसका खाता मौजूद है या नहीं.
- मौजूदा उपयोगकर्ताओं के लिए, खातों को लिंक करें.
- अगर आपको पुष्टि करने वाले अपने सिस्टम में, Google उपयोगकर्ता से मैच होने वाला कोई उपयोगकर्ता नहीं मिलता है, तो Google से मिले आईडी टोकन की पुष्टि करें. इसके बाद, आईडी टोकन में मौजूद प्रोफ़ाइल की जानकारी के आधार पर उपयोगकर्ता बनाया जा सकता है.
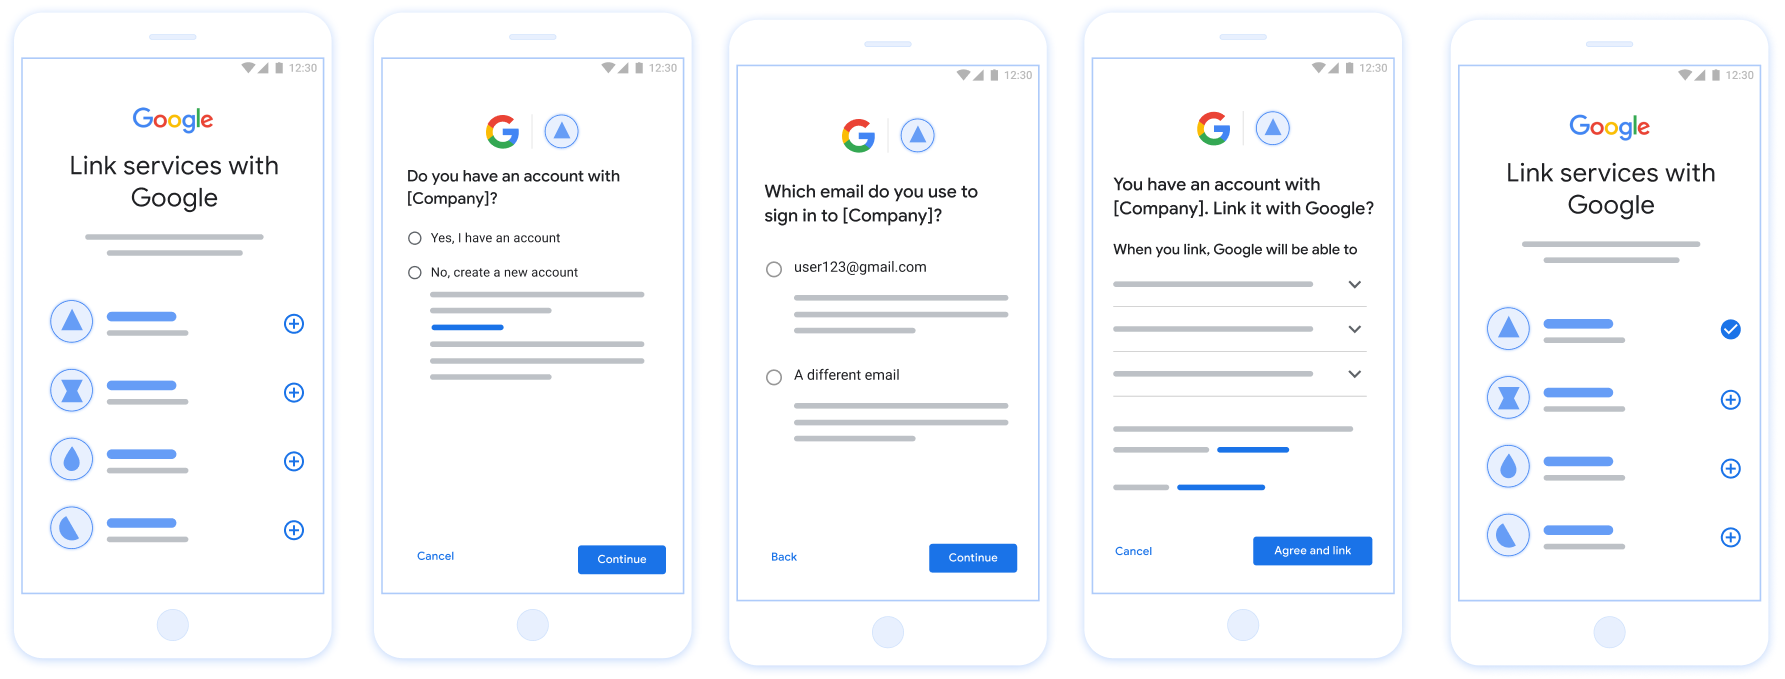
पहली इमेज. आसानी से लिंक करने की सुविधा की मदद से, उपयोगकर्ता के फ़ोन पर खाता लिंक करना
आसानी से लिंक करने की सुविधा के लिए ज़रूरी शर्तें
- वेब पर OAuth लिंक करने का बुनियादी तरीका लागू करें. आपकी सेवा, OAuth 2.0 के मुताबिक काम करने वाले ऑथराइज़ेशन और टोकन एक्सचेंज एंडपॉइंट के साथ काम करनी चाहिए.
- आपका टोकन एक्सचेंज एंडपॉइंट, JSON वेब टोकन (JWT) के दावों के साथ काम करना चाहिए. साथ ही,
check,create, औरgetइंटेंट लागू करना चाहिए.
अपना OAuth सर्वर लागू करना
आपके टोकन एक्सचेंज एंडपॉइंट में check, create, get इंटेंट काम करने चाहिए. यहां खाता लिंक करने के फ़्लो के दौरान पूरे किए गए चरणों को दिखाया गया है. साथ ही, यह भी बताया गया है कि अलग-अलग इंटेंट कब कॉल किए जाते हैं:
- क्या उपयोगकर्ता के पास आपके पुष्टि करने वाले सिस्टम में खाता है? (उपयोगकर्ता हां या नहीं चुनकर तय करता है)
- हां : क्या उपयोगकर्ता आपके प्लैटफ़ॉर्म में साइन इन करने के लिए, अपने Google खाते से जुड़े ईमेल पते का इस्तेमाल करता है? (उपयोगकर्ता हां या नहीं चुनकर तय करता है)
- हां : क्या उपयोगकर्ता के पास पुष्टि करने वाले आपके सिस्टम में मैच होने वाला खाता है? (पुष्टि करने के लिए
check intentको कॉल किया जाता है)- हां :
get intentको कॉल किया जाता है और अगर get intent सही तरीके से काम करता है, तो खाता लिंक हो जाता है. - नहीं : नया खाता बनाना? (उपयोगकर्ता हां या नहीं चुनकर तय करता है)
- हां :
create intentको कॉल किया जाता है और खाता लिंक हो जाता है. ऐसा तब होता है, जब create intent फ़ंक्शन सही तरीके से काम करता है. - नहीं : वेब OAuth फ़्लो ट्रिगर होता है, उपयोगकर्ता को उसके ब्राउज़र पर भेजा जाता है, और उपयोगकर्ता को किसी दूसरे ईमेल से लिंक करने का विकल्प दिया जाता है.
- हां :
- हां :
- नहीं : वेब OAuth फ़्लो ट्रिगर होता है. इसके बाद, उपयोगकर्ता को उसके ब्राउज़र पर भेजा जाता है और उसे किसी दूसरे ईमेल पते से लिंक करने का विकल्प दिया जाता है.
- हां : क्या उपयोगकर्ता के पास पुष्टि करने वाले आपके सिस्टम में मैच होने वाला खाता है? (पुष्टि करने के लिए
- नहीं : क्या उपयोगकर्ता के पास पुष्टि करने वाले आपके सिस्टम में मैच होने वाला खाता है? (पुष्टि करने के लिए
check intentको कॉल किया जाता है)- हां :
get intentको कॉल किया जाता है और अगर get intent सही तरीके से काम करता है, तो खाता लिंक हो जाता है. - नहीं :
create intentको कॉल किया जाता है और खाता लिंक हो जाता है, अगर create intent सही तरीके से काम करता है.
- हां :
- हां : क्या उपयोगकर्ता आपके प्लैटफ़ॉर्म में साइन इन करने के लिए, अपने Google खाते से जुड़े ईमेल पते का इस्तेमाल करता है? (उपयोगकर्ता हां या नहीं चुनकर तय करता है)
Check for an existing user account (check intent)
After the user gives consent to access their Google profile, Google sends a request that contains a signed assertion of the Google user's identity. The assertion contains information that includes the user's Google Account ID, name, and email address. The token exchange endpoint configured for your project handles that request.
If the corresponding Google account is already present in your authentication
system, your token exchange endpoint responds with account_found=true. If the
Google account doesn't match an existing user, your token exchange endpoint
returns an HTTP 404 Not Found error with account_found=false.
The request has the following form:
POST /token HTTP/1.1
Host: oauth2.example.com
Content-Type: application/x-www-form-urlencoded

grant_type=urn:ietf:params:oauth:grant-type:jwt-bearer&intent=check&assertion=JWT&scope=SCOPES&client_id=GOOGLE_CLIENT_ID&client_secret=GOOGLE_CLIENT_SECRET
Your token exchange endpoint must be able to handle the following parameters:
| Token endpoint parameters | |
|---|---|
intent |
For these requests, the value of this parameter is
check. |
grant_type |
The type of token being exchanged. For these requests, this
parameter has the value urn:ietf:params:oauth:grant-type:jwt-bearer. |
assertion |
A JSON Web Token (JWT) that provides a signed assertion of the Google user's identity. The JWT contains information that includes the user's Google Account ID, name, and email address. |
client_id |
The client ID you assigned to Google. |
client_secret |
The client secret you assigned to Google. |
To respond to the check intent requests, your token exchange endpoint must perform the following steps:
- Validate and decode the JWT assertion.
- Check if the Google account is already present in your authentication system.
Validate and decode the JWT assertion
You can validate and decode the JWT assertion by using a JWT-decoding library for your language. Use Google's public keys, available in JWK or PEM formats, to verify the token's signature.
When decoded, the JWT assertion looks like the following example:
{
  "sub": "1234567890",      // The unique ID of the user's Google Account
  "iss": "https://accounts.google.com",        // The assertion's issuer
  "aud": "123-abc.apps.googleusercontent.com", // Your server's client ID
  "iat": 233366400,         // Unix timestamp of the assertion's creation time
  "exp": 233370000,         // Unix timestamp of the assertion's expiration time
  "name": "Jan Jansen",
  "given_name": "Jan",
  "family_name": "Jansen",
  "email": "jan@gmail.com", // If present, the user's email address
  "email_verified": true,   // true, if Google has verified the email address
  "hd": "example.com",      // If present, the host domain of the user's GSuite email address
                            // If present, a URL to user's profile picture
  "picture": "https://lh3.googleusercontent.com/a-/AOh14GjlTnZKHAeb94A-FmEbwZv7uJD986VOF1mJGb2YYQ",
  "locale": "en_US"         // User's locale, from browser or phone settings
}
In addition to verifying the token's signature, verify that the assertion's
issuer (iss field) is https://accounts.google.com, that the audience
(aud field) is your assigned client ID, and that the token has not expired
(exp field).
Using the email, email_verified and hd fields you can determine if
Google hosts and is authoritative for an email address. In cases where Google is
authoritative the user is currently known to be the legitimate account owner
and you may skip password or other challenges methods. Otherwise, these methods
can be used to verify the account prior to linking.
Cases where Google is authoritative:
emailhas a@gmail.comsuffix, this is a Gmail account.email_verifiedis true andhdis set, this is a G Suite account.
Users may register for Google Accounts without using Gmail or G Suite. When
email does not contain a @gmail.com suffix and hd is absent Google is not
authoritative and password or other challenge methods are recommended to verify
the user. email_verified can also be true as Google initially verified the
user when the Google account was created, however ownership of the third party
email account may have since changed.
Check if the Google account is already present in your authentication system
Check whether either of the following conditions are true:
- The Google Account ID, found in the assertion's
subfield, is in your user database. - The email address in the assertion matches a user in your user database.
If either condition is true, the user has already signed up. In that case, return a response like the following:
HTTP/1.1 200 Success
Content-Type: application/json;charset=UTF-8

{
  "account_found":"true",
}
If neither the Google Account ID nor the email address specified in the
assertion matches a user in your database, the user hasn't signed up yet. In
this case, your token exchange endpoint needs to reply with a HTTP 404 error
that specifies "account_found": "false", as in the following example:
HTTP/1.1 404 Not found
Content-Type: application/json;charset=UTF-8

{
  "account_found":"false",
}
处理自动链接(获取 intent)
在用户同意访问其 Google 个人资料后,Google 会发送 请求,其中包含 Google 用户身份的已签名断言。通过 断言包含的信息包括用户的 Google 账号 ID、 姓名和电子邮件地址为您的 Google Cloud 控制台配置的令牌交换端点 项目处理该请求。
如果您的身份验证中已有相应的 Google 账号
系统,您的令牌交换端点将为用户返回一个令牌。如果
Google 账号与现有用户不匹配,您的令牌交换端点
返回 linking_error 错误和可选的 login_hint。
请求的格式如下:
POST /token HTTP/1.1
Host: oauth2.example.com
Content-Type: application/x-www-form-urlencoded

grant_type=urn:ietf:params:oauth:grant-type:jwt-bearer&intent=get&assertion=JWT&scope=SCOPES&client_id=GOOGLE_CLIENT_ID&client_secret=GOOGLE_CLIENT_SECRET
您的令牌交换端点必须能够处理以下参数:
| 令牌端点参数 | |
|---|---|
intent |
对于这些请求,此参数的值为 get。 |
grant_type |
所交换的令牌的类型。对于这类请求
参数的值为 urn:ietf:params:oauth:grant-type:jwt-bearer。 |
assertion |
一个 JSON Web 令牌 (JWT),提供 Google 用户身份。JWT 包含的信息包括用户 Google 账号 ID、姓名和电子邮件地址。 |
scope |
可选:您已将 Google 配置为向其请求访问权限的任何范围 用户。 |
client_id |
您分配给 Google 的客户 ID。 |
client_secret |
您分配给 Google 的客户端密钥。 |
如需响应 get intent 请求,您的令牌交换端点必须执行以下步骤:
- 验证和解码 JWT 断言。
- 检查您的身份验证系统中是否已存在该 Google 账号。
Validate and decode the JWT assertion
You can validate and decode the JWT assertion by using a JWT-decoding library for your language. Use Google's public keys, available in JWK or PEM formats, to verify the token's signature.
When decoded, the JWT assertion looks like the following example:
{
  "sub": "1234567890",      // The unique ID of the user's Google Account
  "iss": "https://accounts.google.com",        // The assertion's issuer
  "aud": "123-abc.apps.googleusercontent.com", // Your server's client ID
  "iat": 233366400,         // Unix timestamp of the assertion's creation time
  "exp": 233370000,         // Unix timestamp of the assertion's expiration time
  "name": "Jan Jansen",
  "given_name": "Jan",
  "family_name": "Jansen",
  "email": "jan@gmail.com", // If present, the user's email address
  "email_verified": true,   // true, if Google has verified the email address
  "hd": "example.com",      // If present, the host domain of the user's GSuite email address
                            // If present, a URL to user's profile picture
  "picture": "https://lh3.googleusercontent.com/a-/AOh14GjlTnZKHAeb94A-FmEbwZv7uJD986VOF1mJGb2YYQ",
  "locale": "en_US"         // User's locale, from browser or phone settings
}
In addition to verifying the token's signature, verify that the assertion's
issuer (iss field) is https://accounts.google.com, that the audience
(aud field) is your assigned client ID, and that the token has not expired
(exp field).
Using the email, email_verified and hd fields you can determine if
Google hosts and is authoritative for an email address. In cases where Google is
authoritative the user is currently known to be the legitimate account owner
and you may skip password or other challenges methods. Otherwise, these methods
can be used to verify the account prior to linking.
Cases where Google is authoritative:
emailhas a@gmail.comsuffix, this is a Gmail account.email_verifiedis true andhdis set, this is a G Suite account.
Users may register for Google Accounts without using Gmail or G Suite. When
email does not contain a @gmail.com suffix and hd is absent Google is not
authoritative and password or other challenge methods are recommended to verify
the user. email_verified can also be true as Google initially verified the
user when the Google account was created, however ownership of the third party
email account may have since changed.
检查您的身份验证系统中是否已存在该 Google 账号
请检查以下任一条件是否成立:
- Google 账号 ID(可在断言的
sub字段中找到)位于您的用户中 数据库。 - 断言中的电子邮件地址与用户数据库中的用户匹配。
如果找到了用户的账号,请发出访问令牌,并在 HTTPS 响应正文的 JSON 对象中返回相应值,如以下示例所示:
{
  "token_type": "Bearer",
  "access_token": "ACCESS_TOKEN",

  "expires_in": SECONDS_TO_EXPIRATION
}
在某些情况下,基于 ID 令牌的账号关联可能会失败。如果
因为任何原因,您的令牌交换端点都需要以 HTTP 响应
指定 error=linking_error 的 401 错误,如以下示例所示:
HTTP/1.1 401 Unauthorized
Content-Type: application/json;charset=UTF-8

{
  "error":"linking_error",
  "login_hint":"foo@bar.com"
}
当 Google 收到包含 linking_error 的 401 错误响应时,会发送
使用 login_hint 作为参数将用户发送到您的授权端点。通过
用户在浏览器中使用 OAuth 关联流程完成账号关联。
通过 Google 登录功能处理账号创建(创建 intent)
当用户需要在您的服务中创建账号时,Google 会发出请求
发送到指定 intent=create 的令牌交换端点。
请求的格式如下:
POST /token HTTP/1.1
Host: oauth2.example.com
Content-Type: application/x-www-form-urlencoded

response_type=token&grant_type=urn:ietf:params:oauth:grant-type:jwt-bearer&scope=SCOPES&intent=create&assertion=JWT&client_id=GOOGLE_CLIENT_ID&client_secret=GOOGLE_CLIENT_SECRET
您的令牌交换端点必须能够处理以下参数:
| 令牌端点参数 | |
|---|---|
intent |
对于这些请求,此参数的值为 create。 |
grant_type |
所交换的令牌的类型。对于这类请求
参数的值为 urn:ietf:params:oauth:grant-type:jwt-bearer。 |
assertion |
一个 JSON Web 令牌 (JWT),提供 Google 用户身份。JWT 包含的信息包括用户 Google 账号 ID、姓名和电子邮件地址。 |
client_id |
您分配给 Google 的客户 ID。 |
client_secret |
您分配给 Google 的客户端密钥。 |
assertion 参数中的 JWT 包含用户的 Google 账号 ID。
姓名和电子邮件地址,可用于在 Gmail 中创建新账号
服务。
如需响应 create intent 请求,您的令牌交换端点必须执行以下步骤:
- 验证和解码 JWT 断言。
- 验证用户信息并创建新账号。
Validate and decode the JWT assertion
You can validate and decode the JWT assertion by using a JWT-decoding library for your language. Use Google's public keys, available in JWK or PEM formats, to verify the token's signature.
When decoded, the JWT assertion looks like the following example:
{
  "sub": "1234567890",      // The unique ID of the user's Google Account
  "iss": "https://accounts.google.com",        // The assertion's issuer
  "aud": "123-abc.apps.googleusercontent.com", // Your server's client ID
  "iat": 233366400,         // Unix timestamp of the assertion's creation time
  "exp": 233370000,         // Unix timestamp of the assertion's expiration time
  "name": "Jan Jansen",
  "given_name": "Jan",
  "family_name": "Jansen",
  "email": "jan@gmail.com", // If present, the user's email address
  "email_verified": true,   // true, if Google has verified the email address
  "hd": "example.com",      // If present, the host domain of the user's GSuite email address
                            // If present, a URL to user's profile picture
  "picture": "https://lh3.googleusercontent.com/a-/AOh14GjlTnZKHAeb94A-FmEbwZv7uJD986VOF1mJGb2YYQ",
  "locale": "en_US"         // User's locale, from browser or phone settings
}
In addition to verifying the token's signature, verify that the assertion's
issuer (iss field) is https://accounts.google.com, that the audience
(aud field) is your assigned client ID, and that the token has not expired
(exp field).
Using the email, email_verified and hd fields you can determine if
Google hosts and is authoritative for an email address. In cases where Google is
authoritative the user is currently known to be the legitimate account owner
and you may skip password or other challenges methods. Otherwise, these methods
can be used to verify the account prior to linking.
Cases where Google is authoritative:
emailhas a@gmail.comsuffix, this is a Gmail account.email_verifiedis true andhdis set, this is a G Suite account.
Users may register for Google Accounts without using Gmail or G Suite. When
email does not contain a @gmail.com suffix and hd is absent Google is not
authoritative and password or other challenge methods are recommended to verify
the user. email_verified can also be true as Google initially verified the
user when the Google account was created, however ownership of the third party
email account may have since changed.
验证用户信息并创建新账号
请检查以下任一条件是否成立:
- Google 账号 ID(可在断言的
sub字段中找到)位于您的用户中 数据库。 - 断言中的电子邮件地址与用户数据库中的用户匹配。
如果满足上述任一条件,请提示用户关联其现有账号
与其 Google 账号关联。为此,请使用 HTTP 401 错误响应请求
该参数指定 error=linking_error 并将用户的电子邮件地址作为
login_hint。以下是示例响应:
HTTP/1.1 401 Unauthorized
Content-Type: application/json;charset=UTF-8

{
  "error":"linking_error",
  "login_hint":"foo@bar.com"
}
当 Google 收到包含 linking_error 的 401 错误响应时,会发送
使用 login_hint 作为参数将用户发送到您的授权端点。通过
用户在浏览器中使用 OAuth 关联流程完成账号关联。
如果以上两个条件都不满足,请使用相应信息创建一个新的用户账号 。新账号通常不会设置密码。时间是 建议您将 Google 登录功能添加到其他平台,以便用户 使用 Google 账号登录。或者 可以通过电子邮件向用户发送链接,启动密码恢复流程,以允许 用户设置密码,以便在其他平台上登录。
创建完成后,发出一个访问令牌 并在 HTTPS 响应的正文,如以下示例所示:
{
  "token_type": "Bearer",
  "access_token": "ACCESS_TOKEN",

  "expires_in": SECONDS_TO_EXPIRATION
}
अपना Google API क्लाइंट आईडी पाना
खाता लिंक करने के रजिस्ट्रेशन की प्रोसेस के दौरान, आपको अपना Google API क्लाइंट आईडी देना होगा.
OAuth लिंक करने के लिए, आपने जो प्रोजेक्ट बनाया है उसका इस्तेमाल करके अपना एपीआई क्लाइंट आईडी पाने के लिए. ऐसा करने के लिए, यह तरीका अपनाएं:
Google API प्रोजेक्ट बनाएं या कोई मौजूदा प्रोजेक्ट चुनें.
अगर आपके प्रोजेक्ट में वेब ऐप्लिकेशन टाइप के लिए क्लाइंट आईडी नहीं है, तो एक बनाने के लिए क्लाइंट बनाएं पर क्लिक करें. अनुमति वाले JavaScript ऑरिजिन बॉक्स में, अपनी साइट का डोमेन ज़रूर शामिल करें. लोकल टेस्ट या डेवलपमेंट करते समय, आपको अनुमति वाले JavaScript ऑरिजिन फ़ील्ड में
http://localhostऔरhttp://localhost:<port_number>, दोनों को जोड़ना होगा.
लागू करने की पुष्टि करना
OAuth 2.0 Playground टूल का इस्तेमाल करके, पुष्टि की जा सकती है कि आपने OAuth 2.0 को सही तरीके से लागू किया है या नहीं.
टूल में, नीचे दिया गया तरीका अपनाएं:
- OAuth 2.0 कॉन्फ़िगरेशन विंडो खोलने के लिए, कॉन्फ़िगरेशन पर क्लिक करें.
- OAuth फ़्लो फ़ील्ड में, क्लाइंट-साइड चुनें.
- OAuth एंडपॉइंट फ़ील्ड में, कस्टम चुनें.
- अपने OAuth 2.0 एंडपॉइंट और उस क्लाइंट आईडी की जानकारी दें जिसे आपने Google को असाइन किया है. इसके लिए, दिए गए फ़ील्ड का इस्तेमाल करें.
- पहला चरण सेक्शन में, Google का कोई स्कोप न चुनें. इसके बजाय, इस फ़ील्ड को खाली छोड़ दें या अपने सर्वर के लिए मान्य स्कोप टाइप करें. अगर OAuth स्कोप का इस्तेमाल नहीं किया जा रहा है, तो कोई भी स्ट्रिंग टाइप करें. इसके बाद, एपीआई को अनुमति दें पर क्लिक करें.
- दूसरे चरण और तीसरा सेक्शन में, OAuth 2.0 फ़्लो देखें और पुष्टि करें कि हर चरण आपके हिसाब से काम कर रहा हो.
Google खाते को लिंक करने के डेमो टूल का इस्तेमाल करके, पुष्टि की जा सकती है कि आपने इसे सही तरीके से लागू किया है या नहीं.
टूल में, नीचे दिया गया तरीका अपनाएं:
- Google से साइन इन करें बटन पर क्लिक करें.
- वह खाता चुनें जिसे आपको लिंक करना है.
- सेवा आईडी डालें.
- इसके अलावा, एक या उससे ज़्यादा ऐसे स्कोप डालें जिनके लिए आपको ऐक्सेस का अनुरोध करना है.
- डेमो शुरू करें पर क्लिक करें.
- जब कहा जाए, तब पुष्टि करें कि आपके पास खाते को लिंक करने के अनुरोध को स्वीकार और अस्वीकार करने का विकल्प है.
- पुष्टि करें कि आपको अपने प्लैटफ़ॉर्म पर रीडायरेक्ट किया गया है.