개요
OAuth 기반 Google 로그인 간소화된 연결은 OAuth 연결 위에 Google 로그인을 추가합니다. 이렇게 하면 Google 사용자에게 원활한 연결 환경이 제공되고 계정 생성도 가능해 사용자가 Google 계정을 사용하여 서비스에서 새 계정을 만들 수 있습니다.
OAuth 및 Google 로그인을 사용하여 계정 연결을 실행하려면 다음과 같은 일반적인 단계를 따르세요.
- 먼저 사용자에게 Google 프로필에 액세스할 수 있도록 동의해 달라고 요청합니다.
- 프로필의 정보를 사용하여 사용자 계정이 있는지 확인합니다.
- 기존 사용자의 경우 계정을 연결합니다.
- 인증 시스템에서 일치하는 Google 사용자를 찾을 수 없는 경우 Google에서 수신한 ID 토큰의 유효성을 검사합니다. 그런 다음 ID 토큰에 포함된 프로필 정보를 기반으로 사용자를 만들 수 있습니다.
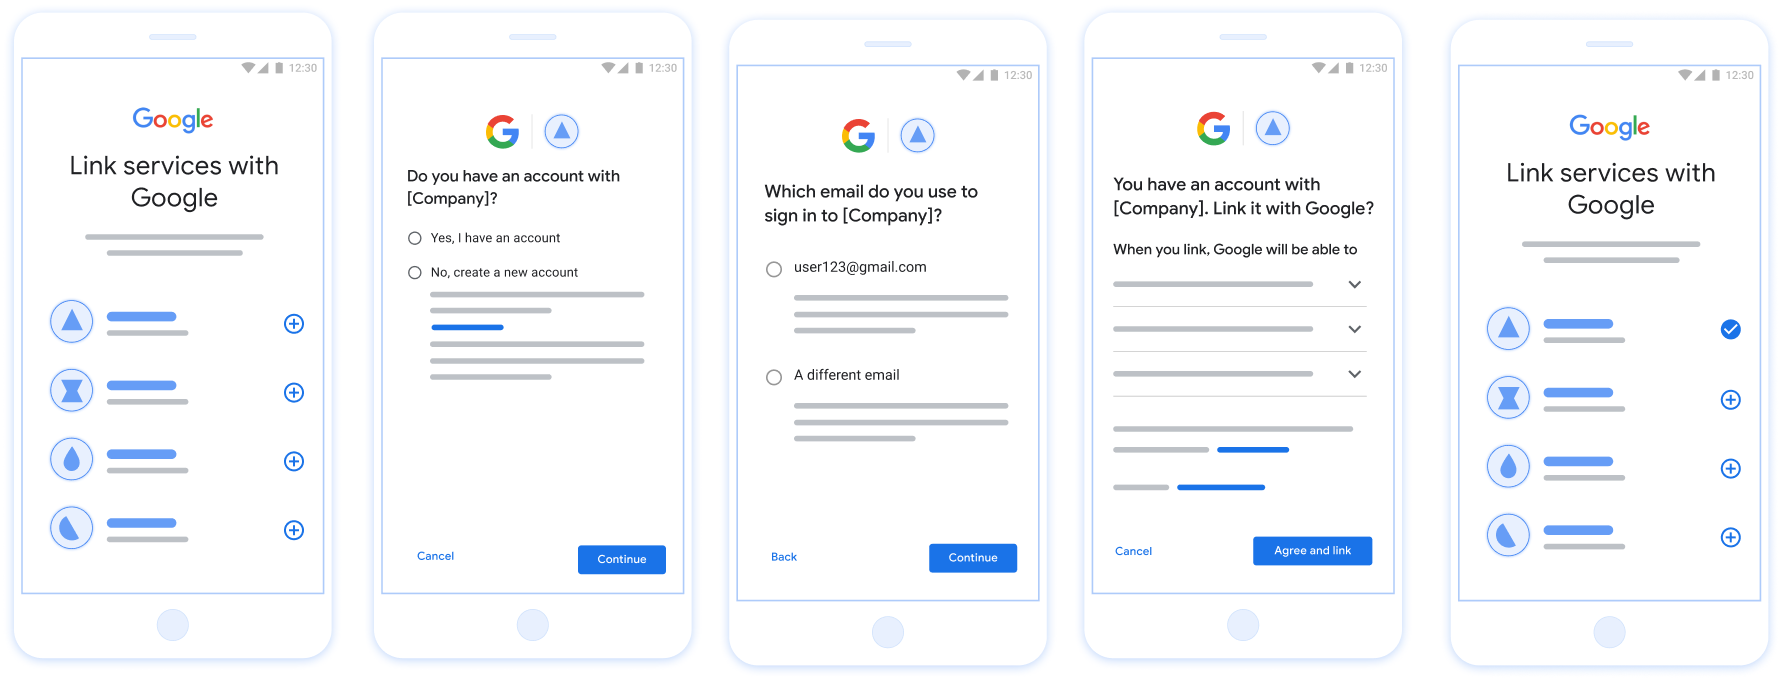
그림 1. 간소화된 연결을 사용하여 사용자 휴대전화에서 계정 연결
간소화된 연결의 요구사항
- 기본 웹 OAuth 연결 흐름을 구현합니다. 서비스는 OAuth 2.0을 준수하는 승인 및 토큰 교환 엔드포인트를 지원해야 합니다.
- 토큰 교환 엔드포인트는 JSON 웹 토큰 (JWT) 어설션을 지원하고
check,create,get인텐트를 구현해야 합니다.
OAuth 서버 구현
토큰 교환 엔드포인트는 check, create, get 인텐트를 지원해야 합니다. 아래는 계정 연결 흐름을 통해 완료된 단계를 보여주고 다양한 인텐트가 호출되는 시점을 나타냅니다.
- 사용자에게 인증 시스템에 계정이 있나요? (사용자가 예 또는 아니요를 선택하여 결정)
- 예 : 사용자가 Google 계정과 연결된 이메일을 사용하여 플랫폼에 로그인하나요? (사용자가 예 또는 아니요를 선택하여 결정)
- 예 : 사용자의 인증 시스템에 일치하는 계정이 있나요? (확인을 위해
check intent이 호출됨)- 예 : getIntent가 성공적으로 반환되면
get intent이 호출되고 계정이 연결됩니다. - 아니요 : 새 계정 만들기 (사용자가 예 또는 아니요를 선택하여 결정)
- 예 : create 인텐트가 성공적으로 반환되면
create intent이 호출되고 계정이 연결됩니다. - 아니요 : 웹 OAuth 흐름이 트리거되고 사용자는 브라우저로 이동하며 다른 이메일로 연결할 수 있는 옵션이 제공됩니다.
- 예 : create 인텐트가 성공적으로 반환되면
- 예 : getIntent가 성공적으로 반환되면
- 아니요 : 웹 OAuth 흐름이 트리거되고 사용자는 브라우저로 이동하며 다른 이메일로 연결할 수 있는 옵션이 제공됩니다.
- 예 : 사용자의 인증 시스템에 일치하는 계정이 있나요? (확인을 위해
- 아니요 : 사용자에게 인증 시스템에 일치하는 계정이 있나요? (확인을 위해
check intent이 호출됨)- 예 : getIntent가 성공적으로 반환되면
get intent이 호출되고 계정이 연결됩니다. - 아니요 :
create intent가 호출되고 create 인텐트가 성공적으로 반환되면 계정이 연결됩니다.
- 예 : getIntent가 성공적으로 반환되면
- 예 : 사용자가 Google 계정과 연결된 이메일을 사용하여 플랫폼에 로그인하나요? (사용자가 예 또는 아니요를 선택하여 결정)
기존 사용자 계정 확인 (인텐트 확인)
사용자가 Google 프로필 액세스에 동의하면 Google에서는 Google 사용자 ID의 서명된 어설션이 포함된 요청입니다. 이 어설션에는 사용자의 Google 계정 ID, 사용자 이름, 이메일 주소 등이 포함되어 있습니다 해당 요청을 처리합니다
해당 Google 계정이 이미 인증에 있는 경우
토큰 교환 엔드포인트는 account_found=true로 응답합니다. 만약
Google 계정이 기존 사용자와 일치하지 않습니다. 토큰 교환 엔드포인트입니다.
account_found=false와 함께 HTTP 404 Not Found 오류를 반환합니다.
요청의 형식은 다음과 같습니다.
POST /token HTTP/1.1
Host: oauth2.example.com
Content-Type: application/x-www-form-urlencoded

grant_type=urn:ietf:params:oauth:grant-type:jwt-bearer&intent=check&assertion=JWT&scope=SCOPES&client_id=GOOGLE_CLIENT_ID&client_secret=GOOGLE_CLIENT_SECRET
토큰 교환 엔드포인트는 다음 매개변수를 처리할 수 있어야 합니다.
| 토큰 엔드포인트 매개변수 | |
|---|---|
intent |
이러한 요청에서 이 매개변수의 값은
check |
grant_type |
교환되는 토큰의 유형입니다. 이러한 요청의 경우
매개변수의 값은 urn:ietf:params:oauth:grant-type:jwt-bearer입니다. |
assertion |
Google API의 서명된 어설션을 제공하는 JSON 웹 토큰 (JWT)입니다. 사용자 ID입니다. JWT에는 사용자의 Google 계정 ID, 이름, 이메일 주소 |
client_id |
Google에 할당한 클라이언트 ID입니다. |
client_secret |
Google에 할당한 클라이언트 비밀번호입니다. |
check 인텐트 요청에 응답하려면 토큰 교환 엔드포인트가 다음 단계를 수행해야 합니다.
- JWT 어설션을 검증하고 디코딩합니다.
- 해당 Google 계정이 인증 시스템에 이미 있는지 확인합니다.
JWT 어설션 검증 및 디코딩
다음을 사용하여 JWT 어설션을 검증하고 디코딩할 수 있습니다. 해당 언어의 JWT-디코딩 라이브러리를 참조하세요. 사용 Google의 공개 키( JWK 또는 PEM 형식을 사용하여 토큰의 서명을 받습니다.
JWT 어설션은 디코딩될 때 다음 예시와 같이 표시됩니다.
{
  "sub": "1234567890",      // The unique ID of the user's Google Account
  "iss": "https://accounts.google.com",        // The assertion's issuer
  "aud": "123-abc.apps.googleusercontent.com", // Your server's client ID
  "iat": 233366400,         // Unix timestamp of the assertion's creation time
  "exp": 233370000,         // Unix timestamp of the assertion's expiration time
  "name": "Jan Jansen",
  "given_name": "Jan",
  "family_name": "Jansen",
  "email": "jan@gmail.com", // If present, the user's email address
  "email_verified": true,   // true, if Google has verified the email address
  "hd": "example.com",      // If present, the host domain of the user's GSuite email address
                            // If present, a URL to user's profile picture
  "picture": "https://lh3.googleusercontent.com/a-/AOh14GjlTnZKHAeb94A-FmEbwZv7uJD986VOF1mJGb2YYQ",
  "locale": "en_US"         // User's locale, from browser or phone settings
}
토큰의 서명을 확인하는 것 외에도 어설션의
발급기관 (iss 필드)이 https://accounts.google.com이므로
(aud 필드)는 할당된 클라이언트 ID이며 토큰이 만료되지 않았음을 의미합니다.
(exp 필드)
email, email_verified, hd 필드를 사용하면
Google은 이메일 주소를 호스팅하고 이에 대한 권한이 있습니다. Google이
사용자가 현재 합법적인 계정 소유자로 알려진 권한
비밀번호나 다른 본인 확인 요청을 건너뛸 수 있습니다. 그렇지 않으면
연결하기 전에 계정을 확인하는 데 사용할 수 있습니다.
Google이 신뢰할 수 있는 케이스:
email의 접미사는@gmail.com입니다. 이 계정은 Gmail 계정입니다.email_verified이(가) true이고hd이(가) 설정되어 있습니다. 이는 G Suite 계정입니다.
사용자는 Gmail 또는 G Suite를 사용하지 않고도 Google 계정에 등록할 수 있습니다. 날짜
email에 @gmail.com 서픽스가 포함되어 있지 않고 hd이(가) 없습니다. Google은 포함되지 않습니다.
신뢰할 수 있는 비밀번호나 다른 본인 확인 방법을 사용하여
있습니다. Google에서 처음에 확인했으므로 email_verified도 true일 수 있습니다.
사용자에게 양도할 수 있지만 제3자의 소유권은
이메일 계정이 변경되었을 수 있습니다.
Google 계정이 인증 시스템에 이미 있는지 확인
다음 조건 중 하나가 충족되는지 확인합니다.
- 어설션의
sub필드에서 찾을 수 있는 Google 계정 ID는 사용자에 있습니다. 데이터베이스입니다. - 어설션의 이메일 주소가 사용자 데이터베이스의 사용자와 일치합니다.
두 조건 중 하나라도 충족되면 사용자가 이미 가입한 것입니다. 이 경우 다음과 같은 응답을 반환합니다.
HTTP/1.1 200 Success
Content-Type: application/json;charset=UTF-8

{
  "account_found":"true",
}
어설션이 데이터베이스의 사용자와 일치하지만 사용자가 아직 가입하지 않았습니다. 포함
이 경우 토큰 교환 엔드포인트가 HTTP 404 오류로 응답해야 합니다.
다음 예와 같이 "account_found": "false"를 지정합니다.
HTTP/1.1 404 Not found
Content-Type: application/json;charset=UTF-8

{
  "account_found":"false",
}
자동 연결 처리 (인텐트 가져오기)
사용자가 Google 프로필 액세스에 동의하면 Google에서는 Google 사용자 ID의 서명된 어설션이 포함된 요청입니다. 이 어설션에는 사용자의 Google 계정 ID, 사용자 이름, 이메일 주소 등이 포함되어 있습니다 해당 요청을 처리합니다
해당 Google 계정이 이미 인증에 있는 경우
토큰 교환 엔드포인트가 사용자의 토큰을 반환합니다. 만약
Google 계정이 기존 사용자와 일치하지 않습니다(토큰 교환 엔드포인트).
linking_error 오류와 선택적 login_hint를 반환합니다.
요청의 형식은 다음과 같습니다.
POST /token HTTP/1.1
Host: oauth2.example.com
Content-Type: application/x-www-form-urlencoded

grant_type=urn:ietf:params:oauth:grant-type:jwt-bearer&intent=get&assertion=JWT&scope=SCOPES&client_id=GOOGLE_CLIENT_ID&client_secret=GOOGLE_CLIENT_SECRET
토큰 교환 엔드포인트는 다음 매개변수를 처리할 수 있어야 합니다.
| 토큰 엔드포인트 매개변수 | |
|---|---|
intent |
이러한 요청에서 이 매개변수의 값은 get입니다. |
grant_type |
교환되는 토큰의 유형입니다. 이러한 요청의 경우
매개변수의 값은 urn:ietf:params:oauth:grant-type:jwt-bearer입니다. |
assertion |
Google API의 서명된 어설션을 제공하는 JSON 웹 토큰 (JWT)입니다. 사용자 ID입니다. JWT에는 사용자의 Google 계정 ID, 이름, 이메일 주소 |
scope |
선택사항: Google이 요청하도록 구성한 모든 범위 있습니다. |
client_id |
Google에 할당한 클라이언트 ID입니다. |
client_secret |
Google에 할당한 클라이언트 비밀번호입니다. |
get 인텐트 요청에 응답하려면 토큰 교환 엔드포인트가 다음 단계를 실행해야 합니다.
- JWT 어설션을 검증하고 디코딩합니다.
- Google 계정이 인증 시스템에 이미 있는지 확인합니다.
JWT 어설션 검증 및 디코딩
다음을 사용하여 JWT 어설션을 검증하고 디코딩할 수 있습니다. 해당 언어의 JWT-디코딩 라이브러리를 참조하세요. 사용 Google의 공개 키( JWK 또는 PEM 형식을 사용하여 토큰의 서명을 받습니다.
JWT 어설션은 디코딩될 때 다음 예시와 같이 표시됩니다.
{
  "sub": "1234567890",      // The unique ID of the user's Google Account
  "iss": "https://accounts.google.com",        // The assertion's issuer
  "aud": "123-abc.apps.googleusercontent.com", // Your server's client ID
  "iat": 233366400,         // Unix timestamp of the assertion's creation time
  "exp": 233370000,         // Unix timestamp of the assertion's expiration time
  "name": "Jan Jansen",
  "given_name": "Jan",
  "family_name": "Jansen",
  "email": "jan@gmail.com", // If present, the user's email address
  "email_verified": true,   // true, if Google has verified the email address
  "hd": "example.com",      // If present, the host domain of the user's GSuite email address
                            // If present, a URL to user's profile picture
  "picture": "https://lh3.googleusercontent.com/a-/AOh14GjlTnZKHAeb94A-FmEbwZv7uJD986VOF1mJGb2YYQ",
  "locale": "en_US"         // User's locale, from browser or phone settings
}
토큰의 서명을 확인하는 것 외에도 어설션의
발급기관 (iss 필드)이 https://accounts.google.com이므로
(aud 필드)는 할당된 클라이언트 ID이며 토큰이 만료되지 않았음을 의미합니다.
(exp 필드)
email, email_verified, hd 필드를 사용하면
Google은 이메일 주소를 호스팅하고 이에 대한 권한이 있습니다. Google이
사용자가 현재 합법적인 계정 소유자로 알려진 권한
비밀번호나 다른 본인 확인 요청을 건너뛸 수 있습니다. 그렇지 않으면
연결하기 전에 계정을 확인하는 데 사용할 수 있습니다.
Google이 신뢰할 수 있는 케이스:
email의 접미사는@gmail.com입니다. 이 계정은 Gmail 계정입니다.email_verified이(가) true이고hd이(가) 설정되어 있습니다. 이는 G Suite 계정입니다.
사용자는 Gmail 또는 G Suite를 사용하지 않고도 Google 계정에 등록할 수 있습니다. 날짜
email에 @gmail.com 서픽스가 포함되어 있지 않고 hd이(가) 없습니다. Google은 포함되지 않습니다.
신뢰할 수 있는 비밀번호나 다른 본인 확인 방법을 사용하여
있습니다. Google에서 처음에 확인했으므로 email_verified도 true일 수 있습니다.
사용자에게 양도할 수 있지만 제3자의 소유권은
이메일 계정이 변경되었을 수 있습니다.
Google 계정이 인증 시스템에 이미 있는지 확인
다음 조건 중 하나가 충족되는지 확인합니다.
- 어설션의
sub필드에서 찾을 수 있는 Google 계정 ID는 사용자에 있습니다. 데이터베이스입니다. - 어설션의 이메일 주소가 사용자 데이터베이스의 사용자와 일치합니다.
사용자의 계정이 발견되면 액세스 토큰을 발급하고 다음 예와 같이 HTTPS 응답 본문에 JSON 객체로 값을 반환합니다.
{
  "token_type": "Bearer",
  "access_token": "ACCESS_TOKEN",
  "refresh_token": "REFRESH_TOKEN",
  "expires_in": SECONDS_TO_EXPIRATION
}
경우에 따라 사용자가 ID 토큰을 기반으로 한 계정 연결에 실패할 수 있습니다. 만약
그렇게 하면 토큰 교환 엔드포인트는
다음 예와 같이 error=linking_error를 지정하는 401 오류
HTTP/1.1 401 Unauthorized
Content-Type: application/json;charset=UTF-8

{
  "error":"linking_error",
  "login_hint":"foo@bar.com"
}
Google이 linking_error와 함께 401 오류 응답을 수신하면
login_hint를 매개변수로 사용하여 사용자를 승인 엔드포인트에 보냅니다. 이
사용자가 브라우저에서 OAuth 연결 흐름을 사용하여 계정 연결을 완료합니다.
Google 로그인을 통한 계정 생성 처리 (인텐트 만들기)
사용자가 서비스에서 계정을 만들어야 하는 경우 Google에서 요청을 합니다.
intent=create를 지정하는 토큰 교환 엔드포인트에 추가해야 합니다.
요청의 형식은 다음과 같습니다.
POST /token HTTP/1.1
Host: oauth2.example.com
Content-Type: application/x-www-form-urlencoded

response_type=token&grant_type=urn:ietf:params:oauth:grant-type:jwt-bearer&scope=SCOPES&intent=create&assertion=JWT&client_id=GOOGLE_CLIENT_ID&client_secret=GOOGLE_CLIENT_SECRET
토큰 교환 엔드포인트는 다음 매개변수를 처리할 수 있어야 합니다.
| 토큰 엔드포인트 매개변수 | |
|---|---|
intent |
이러한 요청에서 이 매개변수의 값은 create입니다. |
grant_type |
교환되는 토큰의 유형입니다. 이러한 요청의 경우
매개변수의 값은 urn:ietf:params:oauth:grant-type:jwt-bearer입니다. |
assertion |
Google API의 서명된 어설션을 제공하는 JSON 웹 토큰 (JWT)입니다. 사용자 ID입니다. JWT에는 사용자의 Google 계정 ID, 이름, 이메일 주소 |
client_id |
Google에 할당한 클라이언트 ID입니다. |
client_secret |
Google에 할당한 클라이언트 비밀번호입니다. |
assertion 매개변수 내 JWT에는 사용자의 Google 계정 ID가 포함됩니다.
새 계정을 만드는 데 사용할 수 있는 이름, 이메일 주소
있습니다.
create 인텐트 요청에 응답하려면 토큰 교환 엔드포인트가 다음 단계를 수행해야 합니다.
- JWT 어설션을 검증하고 디코딩합니다.
- 사용자 정보를 확인하고 새 계정을 만듭니다.
JWT 어설션 검증 및 디코딩
다음을 사용하여 JWT 어설션을 검증하고 디코딩할 수 있습니다. 해당 언어의 JWT-디코딩 라이브러리를 참조하세요. 사용 Google의 공개 키( JWK 또는 PEM 형식을 사용하여 토큰의 서명을 받습니다.
JWT 어설션은 디코딩될 때 다음 예시와 같이 표시됩니다.
{
  "sub": "1234567890",      // The unique ID of the user's Google Account
  "iss": "https://accounts.google.com",        // The assertion's issuer
  "aud": "123-abc.apps.googleusercontent.com", // Your server's client ID
  "iat": 233366400,         // Unix timestamp of the assertion's creation time
  "exp": 233370000,         // Unix timestamp of the assertion's expiration time
  "name": "Jan Jansen",
  "given_name": "Jan",
  "family_name": "Jansen",
  "email": "jan@gmail.com", // If present, the user's email address
  "email_verified": true,   // true, if Google has verified the email address
  "hd": "example.com",      // If present, the host domain of the user's GSuite email address
                            // If present, a URL to user's profile picture
  "picture": "https://lh3.googleusercontent.com/a-/AOh14GjlTnZKHAeb94A-FmEbwZv7uJD986VOF1mJGb2YYQ",
  "locale": "en_US"         // User's locale, from browser or phone settings
}
토큰의 서명을 확인하는 것 외에도 어설션의
발급기관 (iss 필드)이 https://accounts.google.com이므로
(aud 필드)는 할당된 클라이언트 ID이며 토큰이 만료되지 않았음을 의미합니다.
(exp 필드)
email, email_verified, hd 필드를 사용하면
Google은 이메일 주소를 호스팅하고 이에 대한 권한이 있습니다. Google이
사용자가 현재 합법적인 계정 소유자로 알려진 권한
비밀번호나 다른 본인 확인 요청을 건너뛸 수 있습니다. 그렇지 않으면
연결하기 전에 계정을 확인하는 데 사용할 수 있습니다.
Google이 신뢰할 수 있는 케이스:
email의 접미사는@gmail.com입니다. 이 계정은 Gmail 계정입니다.email_verified이(가) true이고hd이(가) 설정되어 있습니다. 이는 G Suite 계정입니다.
사용자는 Gmail 또는 G Suite를 사용하지 않고도 Google 계정에 등록할 수 있습니다. 날짜
email에 @gmail.com 서픽스가 포함되어 있지 않고 hd이(가) 없습니다. Google은 포함되지 않습니다.
신뢰할 수 있는 비밀번호나 다른 본인 확인 방법을 사용하여
있습니다. Google에서 처음에 확인했으므로 email_verified도 true일 수 있습니다.
사용자에게 양도할 수 있지만 제3자의 소유권은
이메일 계정이 변경되었을 수 있습니다.
사용자 정보 확인 및 새 계정 만들기
다음 조건 중 하나가 충족되는지 확인합니다.
- 어설션의
sub필드에서 찾을 수 있는 Google 계정 ID는 사용자에 있습니다. 데이터베이스입니다. - 어설션의 이메일 주소가 사용자 데이터베이스의 사용자와 일치합니다.
두 조건 중 하나라도 충족되면 사용자에게 기존 계정을 연결하라는 메시지를 표시합니다.
로그인 이렇게 하려면 HTTP 401 오류로 요청에 응답합니다.
- error=linking_error를 지정하고 사용자의 이메일 주소를
login_hint입니다. 다음은 샘플 응답입니다.
HTTP/1.1 401 Unauthorized
Content-Type: application/json;charset=UTF-8

{
  "error":"linking_error",
  "login_hint":"foo@bar.com"
}
Google이 linking_error와 함께 401 오류 응답을 수신하면
login_hint를 매개변수로 사용하여 사용자를 승인 엔드포인트에 보냅니다. 이
사용자가 브라우저에서 OAuth 연결 흐름을 사용하여 계정 연결을 완료합니다.
두 조건이 모두 충족되지 않는 경우 다음 정보를 사용하여 새 사용자 계정을 만듭니다. 확인할 수 있습니다 일반적으로 새 계정에는 비밀번호가 설정되지 않습니다. 그것은 다른 플랫폼에 Google 로그인을 추가하여 Google 계정으로 로그인할 수 있습니다. 또는 사용자에게 비밀번호 복구 절차를 시작하는 링크를 이메일로 전송하여 사용자가 다른 플랫폼에서 로그인하기 위한 비밀번호를 설정하도록 요청할 수 있습니다.
생성이 완료되면 액세스 토큰을 발급합니다. JSON 객체의 값을 반환하며 HTTP 응답의 본문을 입력하세요.
{
  "token_type": "Bearer",
  "access_token": "ACCESS_TOKEN",
  "refresh_token": "REFRESH_TOKEN",
  "expires_in": SECONDS_TO_EXPIRATION
}
Google API 클라이언트 ID 가져오기
계정 연결 등록 과정에서 Google API 클라이언트 ID를 제공해야 합니다.
OAuth 연결 단계를 완료하는 동안 만든 프로젝트를 사용하여 API 클라이언트 ID를 가져옵니다. 그러려면 다음 단계를 완료하세요.
Google API 프로젝트를 만들거나 선택합니다.
프로젝트에 웹 애플리케이션 유형의 클라이언트 ID가 없는 경우 클라이언트 만들기를 클릭하여 클라이언트 ID를 만듭니다. 승인된 JavaScript 원본 상자에 사이트의 도메인을 포함해야 합니다. 로컬 테스트 또는 개발을 실행할 때는 승인된 JavaScript 출처 필드에
http://localhost와http://localhost:<port_number>를 모두 추가해야 합니다.
구현 확인
OAuth 2.0 플레이그라운드 도구를 사용하여 구현을 검증할 수 있습니다.
도구에서 다음 단계를 수행합니다.
- 구성 을 클릭하여 OAuth 2.0 구성 창을 엽니다.
- OAuth 흐름 입력란에서 클라이언트 측을 선택합니다.
- OAuth 엔드포인트 필드에서 맞춤을 선택합니다.
- 해당 필드에 OAuth 2.0 엔드포인트와 Google에 할당한 클라이언트 ID를 지정합니다.
- 1단계 섹션에서 Google 범위를 선택하지 않습니다. 대신 이 필드를 비워 두거나 서버에 유효한 범위 (또는 OAuth 범위를 사용하지 않는 경우 임의의 문자열)를 입력합니다. 완료되면 API 승인을 클릭합니다.
- 2단계 및 3단계 섹션에서 OAuth 2.0 흐름을 진행하고 각 단계가 의도한 대로 작동하는지 확인합니다.
Google 계정 연결 데모 도구를 사용하여 구현을 확인할 수 있습니다.
도구에서 다음 단계를 수행합니다.
- Google 계정으로 로그인 버튼을 클릭합니다.
- 연결할 계정을 선택합니다.
- 서비스 ID를 입력합니다.
- 원하는 경우 액세스를 요청할 범위를 하나 이상 입력합니다.
- 데모 시작을 클릭합니다.
- 메시지가 표시되면 연결 요청에 동의하고 거부할 수 있음을 확인합니다.
- 플랫폼으로 리디렉션되는지 확인합니다.