Panoramica
Il collegamento semplificato di Accedi con Google basato su OAuth aggiunge Accedi con Google al collegamento OAuth. In questo modo, gli utenti Google possono collegare facilmente il proprio Account Google al tuo servizio e creare un nuovo account.
Per eseguire il collegamento dell'account con OAuth e Accedi con Google, segui questi passaggi generali:
- Per prima cosa, chiedi all'utente di dare il consenso per accedere al suo profilo Google.
- Utilizza le informazioni nel profilo per verificare se l'account utente esiste.
- Per gli utenti esistenti, collega gli account.
- Se non riesci a trovare una corrispondenza per l'utente Google nel tuo sistema di autenticazione, convalida il token ID ricevuto da Google. Puoi quindi creare un utente in base alle informazioni del profilo contenute nel token ID.
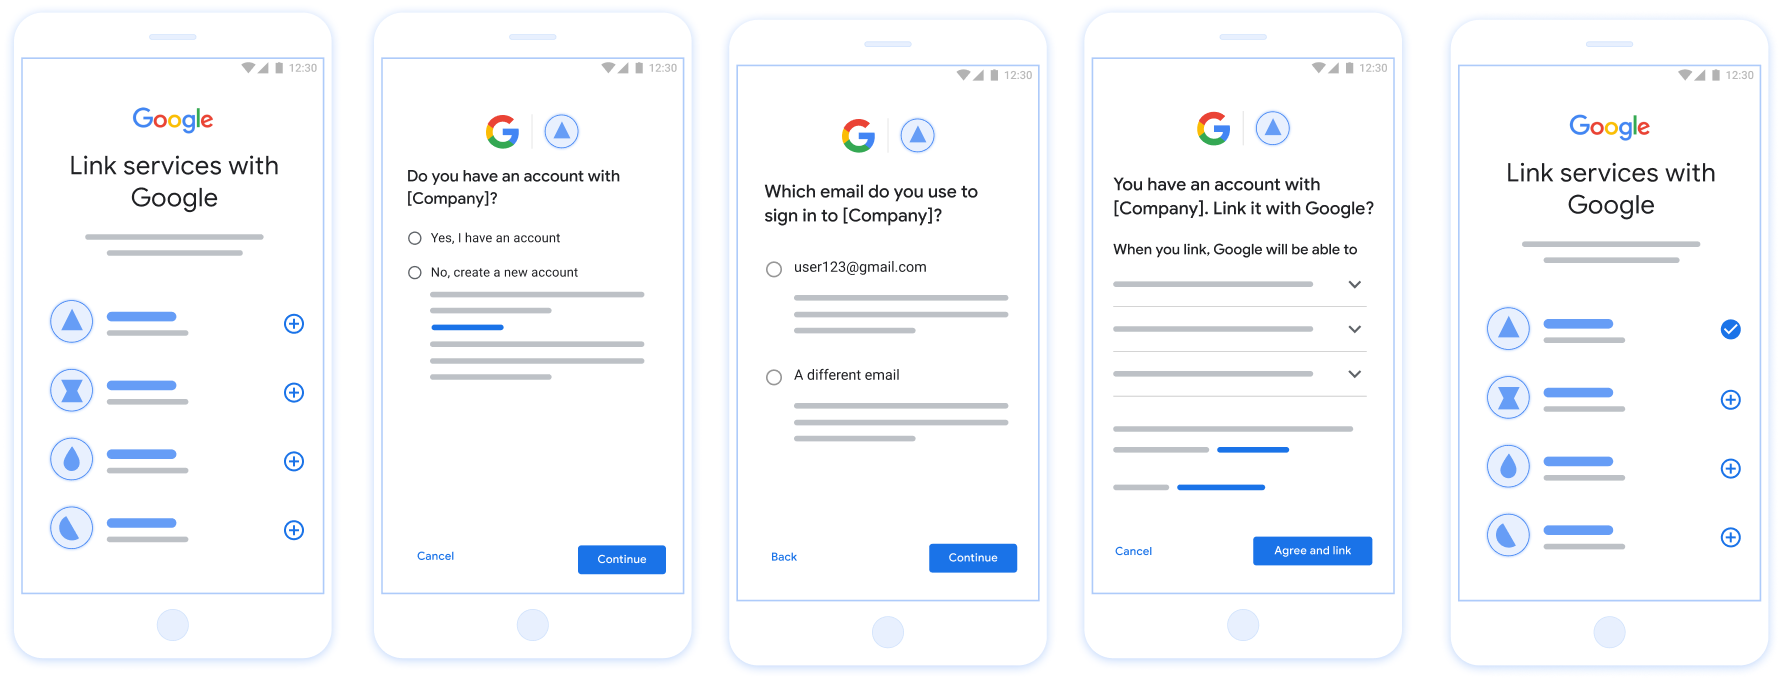
Figura 1. Collegamento dell'account sullo smartphone di un utente con il collegamento semplificato
Requisiti per il collegamento semplificato
- Implementa il flusso di collegamento OAuth web di base. Il servizio deve supportare gli endpoint di autorizzazione e di scambio di token conformi a OAuth 2.0.
- L'endpoint di scambio di token deve supportare le asserzioni JSON Web Token (JWT) e implementare gli intent
check,createeget.
Implementa il server OAuth
L'endpoint di scambio di token deve supportare gli intent check, create e get. Di seguito sono riportati i passaggi completati nel flusso di collegamento dell'account e viene indicato quando vengono chiamati i diversi intent:
- L'utente ha un account nel tuo sistema di autenticazione? (L'utente decide selezionando SÌ o NO)
- SÌ : l'utente utilizza l'indirizzo email associato al suo Account Google per accedere alla tua piattaforma? (L'utente decide selezionando SÌ o NO)
- SÌ : l'utente ha un account corrispondente nel tuo sistema di autenticazione? (viene chiamato
check intentper conferma)- SÌ : viene chiamato
get intente l'account viene collegato se getIntent restituisce un risultato positivo. - NO : Crea nuovo account? (L'utente decide selezionando SÌ o NO)
- SÌ : viene chiamato
create intente l'account viene collegato se la chiamata create intent restituisce un risultato positivo. - NO : viene attivato il flusso OAuth web, l'utente viene indirizzato al browser e gli viene offerta la possibilità di eseguire il collegamento con un'email diversa.
- SÌ : viene chiamato
- SÌ : viene chiamato
- NO : viene attivato il flusso OAuth web, l'utente viene reindirizzato al browser e gli viene offerta la possibilità di eseguire il collegamento con un'email diversa.
- SÌ : l'utente ha un account corrispondente nel tuo sistema di autenticazione? (viene chiamato
- NO : l'utente ha un account corrispondente nel tuo sistema di autenticazione? (viene chiamato
check intentper conferma)- SÌ : viene chiamato
get intente l'account viene collegato se getIntent restituisce un risultato positivo. - NO :
create intentviene chiamato e l'account viene collegato se la creazione dell'intent restituisce un risultato positivo.
- SÌ : viene chiamato
- SÌ : l'utente utilizza l'indirizzo email associato al suo Account Google per accedere alla tua piattaforma? (L'utente decide selezionando SÌ o NO)
Verificare la presenza di un account utente esistente (check intent)
Dopo che l'utente acconsente ad accedere al proprio profilo Google, Google invia una contenente un'asserzione firmata dell'identità dell'utente Google. La l'asserzione contiene informazioni che includono l'ID dell'Account Google dell'utente, nome e indirizzo email. L'endpoint di scambio di token configurato per il progetto gestisce la richiesta.
Se l'Account Google corrispondente è già presente nella tua autenticazione
di sistema, il tuo endpoint di scambio di token risponde con account_found=true. Se
L'Account Google non corrisponde a un utente esistente, il tuo endpoint di scambio di token
restituisce un errore HTTP 404 - Non trovato con account_found=false.
La richiesta ha il seguente modulo:
POST /token HTTP/1.1
Host: oauth2.example.com
Content-Type: application/x-www-form-urlencoded

grant_type=urn:ietf:params:oauth:grant-type:jwt-bearer&intent=check&assertion=JWT&scope=SCOPES&client_id=GOOGLE_CLIENT_ID&client_secret=GOOGLE_CLIENT_SECRET
L'endpoint di scambio di token deve essere in grado di gestire i seguenti parametri:
| Parametri endpoint token | |
|---|---|
intent |
Per queste richieste, il valore di questo parametro è
check. |
grant_type |
Il tipo di token che viene scambiato. Per queste richieste,
ha il valore urn:ietf:params:oauth:grant-type:jwt-bearer. |
assertion |
un token JWT (JSON Web Token) che fornisce un'asserzione firmata dei l'identità dell'utente. Il JWT contiene informazioni che includono il ID dell'Account Google, nome e indirizzo email. |
client_id |
L'ID client che hai assegnato a Google. |
client_secret |
Il client secret che hai assegnato a Google. |
Per rispondere alle richieste di intent check, l'endpoint dello scambio di token deve eseguire i seguenti passaggi:
- Convalida e decodifica l'asserzione JWT.
- Verifica se l'Account Google è già presente nel sistema di autenticazione.
convalida e decodifica l'asserzione JWT
Puoi convalidare e decodificare l'asserzione JWT utilizzando un Libreria di decodifica JWT per la tua lingua. Utilizza le funzionalità di Chiavi pubbliche di Google, disponibili in JWK o formati PEM, per verificare la firma del token.
Una volta decodificata, l'asserzione JWT è simile all'esempio seguente:
{
  "sub": "1234567890",      // The unique ID of the user's Google Account
  "iss": "https://accounts.google.com",        // The assertion's issuer
  "aud": "123-abc.apps.googleusercontent.com", // Your server's client ID
  "iat": 233366400,         // Unix timestamp of the assertion's creation time
  "exp": 233370000,         // Unix timestamp of the assertion's expiration time
  "name": "Jan Jansen",
  "given_name": "Jan",
  "family_name": "Jansen",
  "email": "jan@gmail.com", // If present, the user's email address
  "email_verified": true,   // true, if Google has verified the email address
  "hd": "example.com",      // If present, the host domain of the user's GSuite email address
                            // If present, a URL to user's profile picture
  "picture": "https://lh3.googleusercontent.com/a-/AOh14GjlTnZKHAeb94A-FmEbwZv7uJD986VOF1mJGb2YYQ",
  "locale": "en_US"         // User's locale, from browser or phone settings
}
Oltre a verificare la firma del token, verifica che l'asserzione
l'emittente (campo iss) è https://accounts.google.com, che il pubblico
(campo aud) è l'ID cliente che ti è stato assegnato e che il token non è scaduto
(campo exp).
Utilizzando i campi email, email_verified e hd puoi determinare se
Google ospita un indirizzo email ed è autorevole. Nei casi in cui Google
ufficiale che l'utente sia attualmente noto per essere il legittimo proprietario dell'account
e puoi saltare l'uso della password o altri metodi di verifica. In caso contrario, questi metodi
può essere utilizzato per verificare l'account prima del collegamento.
Casi in cui Google è autorevole:
emailha un suffisso@gmail.com, questo è un account Gmail.email_verifiedè true ehdè impostato, questo è un account G Suite.
Gli utenti possono registrarsi per creare Account Google senza utilizzare Gmail o G Suite. Quando
email non contiene un suffisso @gmail.com e hd non è presente
autoritativi e con password o altri metodi di verifica per verificare
per l'utente. Il valore email_verified può anche essere vero perché Google ha verificato inizialmente il valore
all'utente quando è stato creato l'account Google, ma la proprietà della terza parte
l'account email potrebbe essere cambiato da allora.
Controllare se l'Account Google è già presente nel sistema di autenticazione
Controlla se è vera una delle seguenti condizioni:
- L'ID Account Google, che si trova nel campo
subdell'asserzione, è nel tuo utente per configurare un database. - L'indirizzo email nell'asserzione corrisponde a un utente nel tuo database utenti.
Se una delle condizioni è vera, l'utente ha già effettuato la registrazione. In questo caso, restituiscono una risposta simile alla seguente:
HTTP/1.1 200 Success
Content-Type: application/json;charset=UTF-8

{
  "account_found":"true",
}
Se né l'ID Account Google né l'indirizzo email specificato nella
asserzione corrisponde a un utente presente nel tuo database, l'utente non si è ancora registrato. Nella
In questo caso, l'endpoint di scambio di token deve rispondere con un errore HTTP 404.
che specifica "account_found": "false", come nell'esempio seguente:
HTTP/1.1 404 Not found
Content-Type: application/json;charset=UTF-8

{
  "account_found":"false",
}
Gestire il collegamento automatico (ottenere l'intenzione)
Dopo che l'utente acconsente ad accedere al proprio profilo Google, Google invia una contenente un'asserzione firmata dell'identità dell'utente Google. La l'asserzione contiene informazioni che includono l'ID dell'Account Google dell'utente, nome e indirizzo email. L'endpoint di scambio di token configurato per il progetto gestisce la richiesta.
Se l'Account Google corrispondente è già presente nell'autenticazione
il tuo endpoint di scambio di token restituisce un token per l'utente. Se
L'Account Google non corrisponde a un utente esistente, il tuo endpoint di scambio di token
restituisce un errore linking_error e un valore facoltativo per il campo login_hint.
La richiesta ha il seguente modulo:
POST /token HTTP/1.1
Host: oauth2.example.com
Content-Type: application/x-www-form-urlencoded

grant_type=urn:ietf:params:oauth:grant-type:jwt-bearer&intent=get&assertion=JWT&scope=SCOPES&client_id=GOOGLE_CLIENT_ID&client_secret=GOOGLE_CLIENT_SECRET
L'endpoint di scambio di token deve essere in grado di gestire i seguenti parametri:
| Parametri endpoint token | |
|---|---|
intent |
Per queste richieste, il valore di questo parametro è get. |
grant_type |
Il tipo di token che viene scambiato. Per queste richieste,
ha il valore urn:ietf:params:oauth:grant-type:jwt-bearer. |
assertion |
un token JWT (JSON Web Token) che fornisce un'asserzione firmata dei l'identità dell'utente. Il JWT contiene informazioni che includono il ID dell'Account Google, nome e indirizzo email. |
scope |
Facoltativo:tutti gli ambiti che hai configurato per le richieste da parte di Google utenti. |
client_id |
L'ID client che hai assegnato a Google. |
client_secret |
Il client secret che hai assegnato a Google. |
Per rispondere alle richieste di intent get, l'endpoint dello scambio di token deve eseguire i seguenti passaggi:
- Convalida e decodifica l'asserzione JWT.
- Verifica se l'Account Google è già presente nel sistema di autenticazione.
convalida e decodifica l'asserzione JWT
Puoi convalidare e decodificare l'asserzione JWT utilizzando un Libreria di decodifica JWT per la tua lingua. Utilizza le funzionalità di Chiavi pubbliche di Google, disponibili in JWK o formati PEM, per verificare la firma del token.
Una volta decodificata, l'asserzione JWT è simile all'esempio seguente:
{
  "sub": "1234567890",      // The unique ID of the user's Google Account
  "iss": "https://accounts.google.com",        // The assertion's issuer
  "aud": "123-abc.apps.googleusercontent.com", // Your server's client ID
  "iat": 233366400,         // Unix timestamp of the assertion's creation time
  "exp": 233370000,         // Unix timestamp of the assertion's expiration time
  "name": "Jan Jansen",
  "given_name": "Jan",
  "family_name": "Jansen",
  "email": "jan@gmail.com", // If present, the user's email address
  "email_verified": true,   // true, if Google has verified the email address
  "hd": "example.com",      // If present, the host domain of the user's GSuite email address
                            // If present, a URL to user's profile picture
  "picture": "https://lh3.googleusercontent.com/a-/AOh14GjlTnZKHAeb94A-FmEbwZv7uJD986VOF1mJGb2YYQ",
  "locale": "en_US"         // User's locale, from browser or phone settings
}
Oltre a verificare la firma del token, verifica che l'asserzione
l'emittente (campo iss) è https://accounts.google.com, che il pubblico
(campo aud) è l'ID cliente che ti è stato assegnato e che il token non è scaduto
(campo exp).
Utilizzando i campi email, email_verified e hd puoi determinare se
Google ospita un indirizzo email ed è autorevole. Nei casi in cui Google
ufficiale che l'utente sia attualmente noto per essere il legittimo proprietario dell'account
e puoi saltare l'uso della password o altri metodi di verifica. In caso contrario, questi metodi
può essere utilizzato per verificare l'account prima del collegamento.
Casi in cui Google è autorevole:
emailha un suffisso@gmail.com, questo è un account Gmail.email_verifiedè true ehdè impostato, questo è un account G Suite.
Gli utenti possono registrarsi per creare Account Google senza utilizzare Gmail o G Suite. Quando
email non contiene un suffisso @gmail.com e hd non è presente
autoritativi e con password o altri metodi di verifica per verificare
per l'utente. Il valore email_verified può anche essere vero perché Google ha verificato inizialmente il valore
all'utente quando è stato creato l'account Google, ma la proprietà della terza parte
l'account email potrebbe essere cambiato da allora.
Controllare se l'Account Google è già presente nel sistema di autenticazione
Controlla se è vera una delle seguenti condizioni:
- L'ID Account Google, che si trova nel campo
subdell'asserzione, è nel tuo utente per configurare un database. - L'indirizzo email nell'asserzione corrisponde a un utente nel tuo database utenti.
Se viene trovato un account per l'utente, invia un token di accesso e restituisci i valori in un oggetto JSON nel corpo della risposta HTTPS, come nell'esempio seguente:
{
  "token_type": "Bearer",
  "access_token": "ACCESS_TOKEN",
  "refresh_token": "REFRESH_TOKEN",
  "expires_in": SECONDS_TO_EXPIRATION
}
In alcuni casi, il collegamento dell'account basato sul token ID potrebbe non riuscire per l'utente. Se
lo fa per qualsiasi motivo, l'endpoint di scambio di token deve rispondere con un
Errore 401 che specifica error=linking_error, come mostrato nell'esempio seguente:
HTTP/1.1 401 Unauthorized
Content-Type: application/json;charset=UTF-8

{
  "error":"linking_error",
  "login_hint":"foo@bar.com"
}
Quando Google riceve una risposta di errore 401 con linking_error, invia
l'utente all'endpoint di autorizzazione con login_hint come parametro. La
l'utente completa il collegamento dell'account utilizzando il flusso di collegamento OAuth nel proprio browser.
Gestire la creazione di account tramite Accedi con Google (creazione di un intent)
Quando un utente deve creare un account nel tuo servizio, Google effettua una richiesta
all'endpoint di scambio di token che specifica intent=create.
La richiesta ha il seguente modulo:
POST /token HTTP/1.1
Host: oauth2.example.com
Content-Type: application/x-www-form-urlencoded

response_type=token&grant_type=urn:ietf:params:oauth:grant-type:jwt-bearer&scope=SCOPES&intent=create&assertion=JWT&client_id=GOOGLE_CLIENT_ID&client_secret=GOOGLE_CLIENT_SECRET
L'endpoint di scambio di token deve essere in grado di gestire i seguenti parametri:
| Parametri endpoint token | |
|---|---|
intent |
Per queste richieste, il valore di questo parametro è create. |
grant_type |
Il tipo di token che viene scambiato. Per queste richieste,
ha il valore urn:ietf:params:oauth:grant-type:jwt-bearer. |
assertion |
un token JWT (JSON Web Token) che fornisce un'asserzione firmata dei l'identità dell'utente. Il JWT contiene informazioni che includono il ID dell'Account Google, nome e indirizzo email. |
client_id |
L'ID client che hai assegnato a Google. |
client_secret |
Il client secret che hai assegnato a Google. |
Il JWT all'interno del parametro assertion contiene l'ID dell'Account Google dell'utente,
nome e indirizzo email che potrai utilizzare per creare un nuovo account sul tuo
completamente gestito di Google Cloud.
Per rispondere alle richieste di intent create, l'endpoint dello scambio di token deve eseguire i seguenti passaggi:
- Convalida e decodifica l'asserzione JWT.
- Convalida le informazioni dell'utente e crea un nuovo account.
convalida e decodifica l'asserzione JWT
Puoi convalidare e decodificare l'asserzione JWT utilizzando un Libreria di decodifica JWT per la tua lingua. Utilizza le funzionalità di Chiavi pubbliche di Google, disponibili in JWK o formati PEM, per verificare la firma del token.
Una volta decodificata, l'asserzione JWT è simile all'esempio seguente:
{
  "sub": "1234567890",      // The unique ID of the user's Google Account
  "iss": "https://accounts.google.com",        // The assertion's issuer
  "aud": "123-abc.apps.googleusercontent.com", // Your server's client ID
  "iat": 233366400,         // Unix timestamp of the assertion's creation time
  "exp": 233370000,         // Unix timestamp of the assertion's expiration time
  "name": "Jan Jansen",
  "given_name": "Jan",
  "family_name": "Jansen",
  "email": "jan@gmail.com", // If present, the user's email address
  "email_verified": true,   // true, if Google has verified the email address
  "hd": "example.com",      // If present, the host domain of the user's GSuite email address
                            // If present, a URL to user's profile picture
  "picture": "https://lh3.googleusercontent.com/a-/AOh14GjlTnZKHAeb94A-FmEbwZv7uJD986VOF1mJGb2YYQ",
  "locale": "en_US"         // User's locale, from browser or phone settings
}
Oltre a verificare la firma del token, verifica che l'asserzione
l'emittente (campo iss) è https://accounts.google.com, che il pubblico
(campo aud) è l'ID cliente che ti è stato assegnato e che il token non è scaduto
(campo exp).
Utilizzando i campi email, email_verified e hd puoi determinare se
Google ospita un indirizzo email ed è autorevole. Nei casi in cui Google
ufficiale che l'utente sia attualmente noto per essere il legittimo proprietario dell'account
e puoi saltare l'uso della password o altri metodi di verifica. In caso contrario, questi metodi
può essere utilizzato per verificare l'account prima del collegamento.
Casi in cui Google è autorevole:
emailha un suffisso@gmail.com, questo è un account Gmail.email_verifiedè true ehdè impostato, questo è un account G Suite.
Gli utenti possono registrarsi per creare Account Google senza utilizzare Gmail o G Suite. Quando
email non contiene un suffisso @gmail.com e hd non è presente
autoritativi e con password o altri metodi di verifica per verificare
per l'utente. Il valore email_verified può anche essere vero perché Google ha verificato inizialmente il valore
all'utente quando è stato creato l'account Google, ma la proprietà della terza parte
l'account email potrebbe essere cambiato da allora.
Convalida le informazioni dell'utente e crea un nuovo account
Controlla se è vera una delle seguenti condizioni:
- L'ID Account Google, che si trova nel campo
subdell'asserzione, è nel tuo utente per configurare un database. - L'indirizzo email nell'asserzione corrisponde a un utente nel tuo database utenti.
Se una delle condizioni è vera, chiedi all'utente di collegare il suo account esistente
con il proprio Account Google. Per farlo, rispondi alla richiesta con un errore HTTP 401
che specifica error=linking_error e fornisce l'indirizzo email dell'utente come
login_hint. Di seguito è riportato un esempio di risposta:
HTTP/1.1 401 Unauthorized
Content-Type: application/json;charset=UTF-8

{
  "error":"linking_error",
  "login_hint":"foo@bar.com"
}
Quando Google riceve una risposta di errore 401 con linking_error, invia
l'utente all'endpoint di autorizzazione con login_hint come parametro. La
l'utente completa il collegamento dell'account utilizzando il flusso di collegamento OAuth nel proprio browser.
Se nessuna delle due condizioni è vera, crea un nuovo account utente con le informazioni forniti nel JWT. In genere per i nuovi account non è impostata una password. È ti consigliamo di aggiungere Accedi con Google ad altre piattaforme per consentire agli utenti di accedere con Google sulle piattaforme della tua applicazione. In alternativa, puoi inviare all'utente via email un link che avvia la procedura di recupero della password per consentire di impostare una password per accedere su altre piattaforme.
Al termine della creazione, invia un token di accesso e restituisce i valori in un oggetto JSON in il corpo della risposta HTTPS, come nell'esempio seguente:
{
  "token_type": "Bearer",
  "access_token": "ACCESS_TOKEN",
  "refresh_token": "REFRESH_TOKEN",
  "expires_in": SECONDS_TO_EXPIRATION
}
Ottenere l'ID client API di Google
Ti verrà chiesto di fornire il tuo ID client API Google durante la procedura di registrazione del collegamento dell'account.
Per ottenere l'ID client API utilizzando il progetto che hai creato durante la procedura di collegamento OAuth. Per farlo, segui questa procedura.
Crea o seleziona un progetto API di Google.
Se il progetto non ha un ID client per il tipo di applicazione web, fai clic su Crea client per crearne uno. Assicurati di includere il dominio del tuo sito nella casella Origini JavaScript autorizzate. Quando esegui sviluppi o test locali, devi aggiungere sia
http://localhostchehttp://localhost:<port_number>al campo Origini JavaScript autorizzate.
Convalidare l'implementazione
Puoi convalidare l'implementazione utilizzando lo strumento OAuth 2.0 Playground.
Nello strumento:
- Fai clic su Configurazione per aprire la finestra di configurazione di OAuth 2.0.
- Nel campo Flusso OAuth, seleziona Lato client.
- Nel campo Endpoint OAuth, seleziona Personalizzato.
- Specifica il tuo endpoint OAuth 2.0 e l'ID client che hai assegnato a Google nei campi corrispondenti.
- Nella sezione Passaggio 1, non selezionare alcun ambito Google. Lascia invece vuoto questo campo o digita un ambito valido per il tuo server (o una stringa arbitraria se non utilizzi gli ambiti OAuth). Al termine, fai clic su Autorizza API.
- Nelle sezioni Passaggio 2 e Passaggio 3, segui il flusso OAuth 2.0 e verifica che ogni passaggio funzioni come previsto.
Puoi convalidare l'implementazione utilizzando lo strumento Demo di collegamento dell'Account Google.
Nello strumento:
- Fai clic sul pulsante Accedi con Google.
- Scegli l'account che vuoi collegare.
- Inserisci l'ID servizio.
- (Facoltativo) Inserisci uno o più ambiti per i quali richiederai l'accesso.
- Fai clic su Avvia demo.
- Quando richiesto, conferma di poter acconsentire e rifiutare la richiesta di collegamento.
- Verifica di essere reindirizzato alla tua piattaforma.