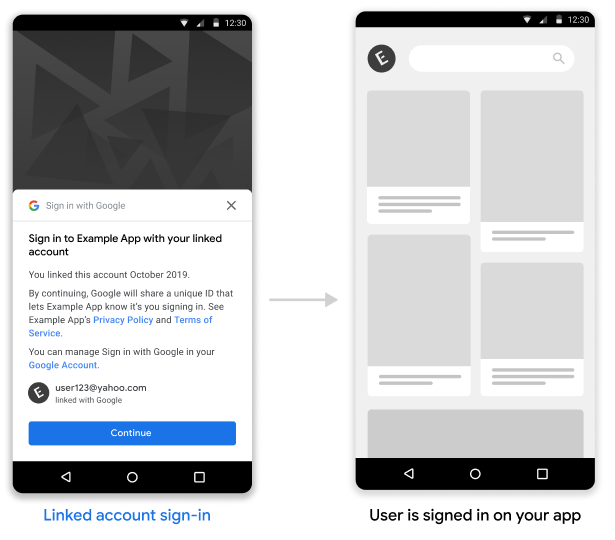
Google アカウントのリンクを利用すると、Google アカウント所有者は、サービスをすばやく、シームレス、安全に接続し、Google とデータを共有できます。
リンクされたアカウントでログインすると、すでに Google アカウントをサービスにリンクしたユーザーは、Google でワンタップでログインできるようになります。これにより、ユーザーはユーザー名とパスワードを再入力することなくワンクリックでログインできるようになるため、ユーザー エクスペリエンスが向上します。また、ユーザーがサービスで重複するアカウントを作成する可能性も低くなります。
要件
リンクされたアカウントでのログインを実装するには、次の要件を満たす必要があります。
- OAuth 2.0 認証コードフローをサポートする Google アカウントの OAuth リンクを実装している。OAuth の実装には、次のエンドポイントを含める必要があります。
<ph type="x-smartling-placeholder">
- </ph>
- 認可エンドポイント: 認可リクエストを処理します。
- アクセス トークンと更新トークンのリクエストを処理するためのトークン エンドポイント。
- userinfo エンドポイント: リンクされたアカウントのログイン プロセス中にユーザーに表示される、リンクされたユーザーに関する基本的なアカウント情報を取得します。
- あなたは Android アプリを持っているので、
仕組み
前提条件 : ユーザーが以前に Google アカウントをサービスのアカウントにリンクしていること。
- ワンタップによるログインフローでリンクされたアカウントの表示にオプトインします。
- ユーザーには、リンクされたアカウントでサービスにログインするオプションとともに、ワンタップでのログインを求めるメッセージが表示されます。
- ユーザーがリンクされたアカウントで続行することを選択した場合、Google は認証コードを保存するためのリクエストをトークン エンドポイントに送信します。このリクエストには、サービスによって発行されたユーザーのアクセス トークンと Google の認証コードが含まれます。
- デベロッパーは、Google 認証コードを、ユーザーの Google アカウントに関する情報を含む Google ID トークンと交換します。
- また、フロー完了時にアプリは ID トークンを受け取り、これをサーバーが受信した ID トークンのユーザー ID と照合して、ユーザーがアプリにログインできるようにします。
 <ph type="x-smartling-placeholder">
リンクされたアカウントのログインを Android アプリに実装する
リンクされたアカウントでの Android アプリでのログインをサポートするには、Android 実装ガイドの手順に沿って操作します。
Google からの認証コード リクエストを処理する
Google はユーザーの ID トークンと引き換える認証コードを保存するために、ユーザーのトークン エンドポイントに POST リクエストを行います。このリクエストには、ユーザーのアクセス トークンと Google が発行した OAuth2 認証コードが含まれます。
認証コードを保存する前に、client_id で識別されるアクセス トークンが Google に付与されていることを検証する必要があります。
HTTP リクエスト
リクエストの例
POST /token HTTP/1.1
Host: server.example.com
Content-Type: application/x-www-form-urlencoded

code=GOOGLE_AUTHORIZATION_CODE
&grant_type=urn:ietf:params:oauth:grant-type:reciprocal
&client_id=CLIENT_ID
&client_secret=CLIENT_SECRET
&access_token=ACCESS_TOKEN
トークン交換エンドポイントは、次のリクエスト パラメータを処理できる必要があります。
| トークン交換エンドポイントのパラメータ | |
|---|---|
code |
必要な Google OAuth2 認証コード |
client_id |
Google に発行した必須のクライアント ID |
client_secret |
必須: Google に発行したクライアント シークレット |
access_token |
必須: Google に発行したアクセス トークン。これを使用して、ユーザーのコンテキストを取得します。 |
grant_type |
必須の値は urn:ietf:params:oauth:grant-type:reciprocal に設定する必要があります。 |
トークン交換エンドポイントは、次の手順で POST リクエストに応答する必要があります。
client_idによって識別されるaccess_tokenが Google に付与されていることを確認します。- リクエストが有効で認証コードが Google ID トークンと正常に交換された場合は HTTP 200(OK)レスポンスを返し、リクエストが無効な場合は HTTP エラーコードを返す。
HTTP レスポンス
成功
HTTP ステータス コード 200 OK を返す
成功レスポンスの例
HTTP/1.1 200 OK
Content-Type: application/json
Cache-Control: no-store
Pragma: no-cache
{}
エラー
無効な HTTP リクエストの場合は、次のいずれかの HTTP エラーコードを返します。
| HTTP ステータス コード | 本文 | 説明 |
|---|---|---|
| 400 | {"error": "invalid_request"} |
リクエストにパラメータがないため、サーバーはリクエストを続行できません。また、リクエストにサポートされていないパラメータが含まれているか、パラメータが繰り返されている場合にも返されることがあります。 |
| 401 | {"error": "invalid_request"} |
クライアント認証に失敗しました(リクエストに無効なクライアント ID またはクライアント シークレットが含まれている場合など) |
| 401 | {"error": "invalid_token"}
「WWW-Authentication: Bearer」という表現を含めるレスポンス ヘッダーの認証チャレンジ |
パートナー アクセス トークンが無効です。 |
| 403 | {"error": "insufficient_permission"}
「WWW-Authentication: Bearer」という表現を含めるレスポンス ヘッダーの認証チャレンジ |
パートナー アクセス トークンに、Reciprocal OAuth の実行に必要なスコープが含まれていません |
| 500 | {"error": "internal_error"} |
サーバーエラー |
エラー レスポンスには次のフィールドが含まれます。
| エラー レスポンスのフィールド | |
|---|---|
error |
必須 エラー文字列 |
error_description |
人が読める形式のエラーの説明 |
error_uri |
エラーの詳細を示す URI |
エラー 400 レスポンスの例
HTTP/1.1 400 Bad Request
Content-Type: application/json;charset=UTF-8
Cache-Control: no-store
Pragma: no-cache

{
  "error": "invalid_request",
  "error_description": "Request was missing the 'access_token' parameter."
}
ID トークンの認証コードを交換
受け取った認証コードを、ユーザーの Google アカウントに関する情報を含む Google ID トークンと交換する必要があります。
認証コードを Google ID トークンと交換するには、https://oauth2.googleapis.com/token エンドポイントを呼び出して次のパラメータを設定します。
| リクエスト フィールド | |
|---|---|
client_id |
必須。API Console の [認証情報] ページから取得したクライアント ID。これは通常、New Actions on Google App という名前の認証情報です。 |
client_secret |
必須: API Console の [認証情報] ページから取得したクライアント シークレット |
code |
必須。最初のリクエストで送信される認証コード |
grant_type |
必須。OAuth 2.0 仕様で定義されている、このフィールドの値は authorization_code に設定する必要があります。 |
リクエストの例
POST /oauth2/v4/token HTTP/1.1
Host: www.googleapis.com
Content-Type: application/x-www-form-urlencoded

code=GOOGLE_AUTHORIZATION_CODE
&grant_type=authorization_code
&client_id=GOOGLE_CLIENT_ID
&client_secret=GOOGLE_CLIENT_SECRET
Google はこのリクエストに対して、有効期間の短いアクセス トークンと更新トークンを含む JSON オブジェクトを返します。
レスポンスには、次のフィールドが含まれます。
| レスポンスのフィールド | |
|---|---|
access_token |
Google が発行したアクセス トークン(アプリケーションが Google API リクエストを認可するために送信する) |
id_token |
ID トークンには、ユーザーの Google アカウント情報が含まれています。レスポンスの検証セクションには、ID トークンのレスポンスをデコードして検証する方法が記載されています。 |
expires_in |
アクセス トークンの残りの存続期間(秒) |
refresh_token |
新しいアクセス トークンの取得に使用できるトークン。更新トークンは、ユーザーがアクセス権を取り消すまで有効です |
scope |
「リンクされたアカウント」ログインのユースケースでは、このフィールドの値が常に openid に設定されます |
token_type |
返されるトークンのタイプ。現時点では、このフィールドの値は常に Bearer に設定されています。 |
レスポンスの例
HTTP/1.1 200 OK
Content-type: application/json; charset=utf-8

{
  "access_token": "Google-access-token",
  "id_token": "Google-ID-token",
  "expires_in": 3599,
  "token_type": "Bearer",
  "scope": "openid",
  "refresh_token": "Google-refresh-token"
}


POST /oauth2/v4/token HTTP/1.1
Host: www.googleapis.com
Content-Type: application/x-www-form-urlencoded

code=Google authorization code
&grant_type=authorization_code
&client_id=Google client id
&client_secret=Google client secret
ID トークンのレスポンスを検証する
Validate and decode the JWT assertion
You can validate and decode the JWT assertion by using a JWT-decoding library for your language. Use Google's public keys, available in JWK or PEM formats, to verify the token's signature.
When decoded, the JWT assertion looks like the following example:
{
  "sub": "1234567890",      // The unique ID of the user's Google Account
  "iss": "https://accounts.google.com",        // The assertion's issuer
  "aud": "123-abc.apps.googleusercontent.com", // Your server's client ID
  "iat": 233366400,         // Unix timestamp of the assertion's creation time
  "exp": 233370000,         // Unix timestamp of the assertion's expiration time
  "name": "Jan Jansen",
  "given_name": "Jan",
  "family_name": "Jansen",
  "email": "jan@gmail.com", // If present, the user's email address
  "email_verified": true,   // true, if Google has verified the email address
  "hd": "example.com",      // If present, the host domain of the user's GSuite email address
                            // If present, a URL to user's profile picture
  "picture": "https://lh3.googleusercontent.com/a-/AOh14GjlTnZKHAeb94A-FmEbwZv7uJD986VOF1mJGb2YYQ",
  "locale": "en_US"         // User's locale, from browser or phone settings
}
In addition to verifying the token's signature, verify that the assertion's
issuer (iss field) is https://accounts.google.com, that the audience
(aud field) is your assigned client ID, and that the token has not expired
(exp field).
Using the email, email_verified and hd fields you can determine if
Google hosts and is authoritative for an email address. In cases where Google is
authoritative the user is currently known to be the legitimate account owner
and you may skip password or other challenges methods. Otherwise, these methods
can be used to verify the account prior to linking.
Cases where Google is authoritative:
emailhas a@gmail.comsuffix, this is a Gmail account.email_verifiedis true andhdis set, this is a G Suite account.
Users may register for Google Accounts without using Gmail or G Suite. When
email does not contain a @gmail.com suffix and hd is absent Google is not
authoritative and password or other challenge methods are recommended to verify
the user. email_verified can also be true as Google initially verified the
user when the Google account was created, however ownership of the third party
email account may have since changed.
