Giới thiệu
Google Mashup Editor (GME) là một trong những công cụ hữu ích và được chờ đợi nhất đối với các nhà phát triển ứng dụng kết hợp. GME giúp nhà phát triển tạo và chỉnh sửa các thành phần động trong trang web, chẳng hạn như bản đồ, bảng, danh sách và các phần tử khác, dựa trên các mối kết nối với dữ liệu bên ngoài. Sau đó, bạn có thể thêm các phần tử này vào các trang web và blog bằng cách sử dụng iframe.Hướng dẫn này sẽ hướng dẫn bạn cách kết hợp một tệp KML vào một Bản đồ được tạo bằng GME.
Ấn tượng đầu tiên của tôi về Google Mashup Editor
- Ứng dụng này có giao diện đơn giản, rõ ràng và riêng biệt, giống như hầu hết các sản phẩm của Google.
- Thư viện này có một chỉ mục dự án thuận tiện với một bộ sưu tập các ví dụ về mã không ngừng tăng lên, cũng như mã của tác giả.
- Thư mục này giúp bạn dễ dàng lưu trữ các tài nguyên bổ sung cho dự án (chẳng hạn như tệp hình ảnh).
- Công cụ này có trình gỡ lỗi XML dễ sử dụng.
- Nền tảng này có nhiều ứng dụng mẫu dễ sử dụng.
GME dành cho nhà phát triển KML
Trước khi có Internet, dữ liệu không gian thường khó chia sẻ. Tuy nhiên, với sự phát triển của Internet, các ứng dụng lập bản đồ đã trở thành một phương thức tiêu chuẩn để dễ dàng chia sẻ dữ liệu Hệ thống thông tin địa lý (GIS) với thế giới. KML đang trở thành một tiêu chuẩn để trình bày và trao đổi dữ liệu GIS vì có kích thước nhỏ gọn, dễ phát triển và được hỗ trợ bởi các ứng dụng phổ biến như Google Earth và Google Maps.
Cho đến gần đây, quy trình tạo và chỉnh sửa các trang dựa trên JavaScript là một vấn đề lớn đối với các nhà phát triển KML. Bạn cần thực hiện thêm nhiều bước để tạo và gỡ lỗi một bản kết hợp. GME cho phép tạo một ứng dụng kết hợp dựa trên KML rất nhanh chóng từ một số thành phần cơ bản. Quá trình tạo không yêu cầu kiến thức đặc biệt về HTML hoặc JavaScript. Các dự án mẫu GME cung cấp đủ thông tin để bạn bắt đầu.
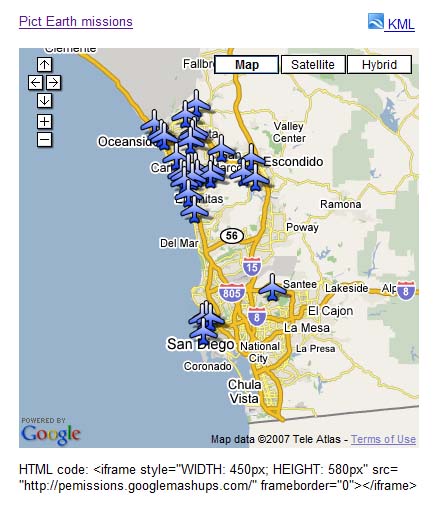
Trong ví dụ sau, tôi sẽ sử dụng một tệp KML trỏ đến bộ sưu tập ảnh chụp trong các chuyến bay Pict Earth USA.
Đây là ảnh chụp nhanh ứng dụng kết hợp dữ liệu bản đồ Pict Earth:
Sau đây là các bước để tích hợp tệp KML vào một dự án GME bằng Google Maps API:
Bước 1: Chọn tệp KML
Bước 2: Tạo một dự án GME mới
Bước 3: Tạo một hàm để thêm KML
Bước 4: Thêm bản đồ
Bước 5: Kiểm thử bản kết hợp
Bước 6: Xuất bản bản kết hợp
Bước 7: Thêm bản kết hợp vào một trang web
Bước 8: Đưa bản kết hợp vào thư viện GME
Bước 1: Chọn tệp KML
Chọn tệp KML mà bạn muốn thêm vào Bản đồ. Đây có thể là bất cứ thứ gì có các tính năng được hỗ trợ trong Google Maps. Tệp này phải được lưu trữ trên một máy chủ công khai.
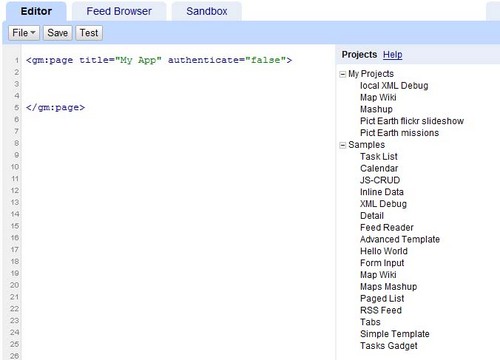
Bước 2: Tạo một dự án GME mới
Tạo một dự án GME trống mới.
Đây là giao diện của một dự án GME trống:
Thêm tiêu đề và tên cho hàm của bạn.
<gm:page title="Pict Earth missions" authenticate="false" onload="kmlPE()"></gm:page>
Bước 3: Tạo một hàm để thêm KML
Tạo một hàm JavaScript có đường dẫn đến tệp KML cần thêm vào Bản đồ.
<script>
  function kmlPE()
  {
    <!-- Get map -->
    var myMap = google.mashups.getObjectById('map').getMap();
    <!-- Get KML -->
    var geoXml = new GGeoXml("http://pictearthusa.com/kml/missions.kml");
    <!--Place KML on Map -->
    myMap.addOverlay(geoXml);
    <!--Set zoom on double click -->
    myMap.enableDoubleClickZoom();
  }
</script>
Bước 4: Thêm bản đồ
Thêm bản đồ và các tham số.
<gm:map id="map" height="400px" width="400px" lat="32.9393" lng="-117.206" zoom="9" maptypes="true"/>
Bước 5: Kiểm thử bản kết hợp.
Nhấn nút Kiểm thử (F4).
Đây là hình ảnh về bản kết hợp Pict Earth được thử nghiệm trong Hộp cát.
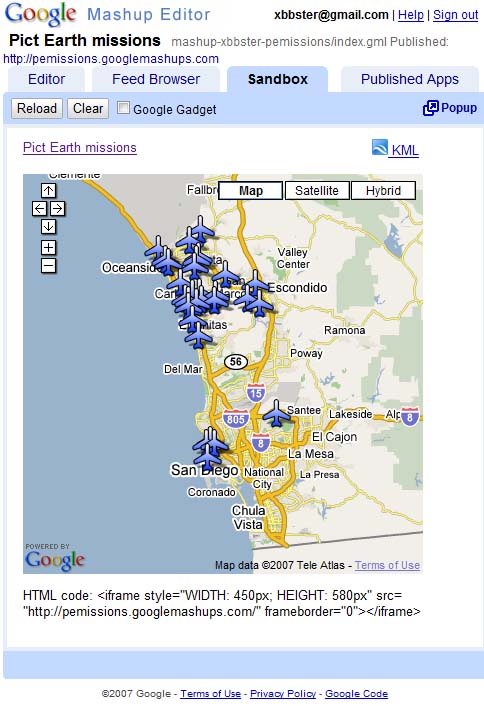
Giờ đây, chúng ta có thể xác minh văn bản của ứng dụng và xem kết quả đầu tiên. Chúng ta có thể thêm tiêu đề và đường liên kết rồi kiểm tra lại.
Bước 6: Xuất bản bản kết hợp
Đặt tên cho dự án rồi xuất bản dự án đó. Thao tác này sẽ tạo cho bạn một đường liên kết cố định đến bản kết hợp. Bạn có thể dùng đường liên kết này để đưa bản kết hợp vào các trang web. Theo ví dụ của tôi, đây là đường liên kết đến trang chủ của dự án GME. Bạn cũng có thể xem mã nguồn của dự án.
Bước 7: Thêm bản kết hợp vào một trang web
Thêm bản kết hợp vào một trang web bằng iframe. Ví dụ: để chèn dự án mẫu, hãy thêm nội dung sau:
<iframe style="WIDTH: 439px; HEIGHT: 491px" src="http://pemissions.googlemashups.com/" frameborder="0"></iframe>
Sau đây là ví dụ về bản kết hợp trong một trang web và một blog.
Bạn cũng có thể thêm mã Google Analytics vào dự án. Mã này sẽ cho phép bạn theo dõi số liệu thống kê về những người đang xem trang của bạn. Sau đây là tập lệnh đơn giản để thêm:
<script src="http://www.google-analytics.com/urchin.js" type="text/javascript"></script>
<script type="text/javascript">uacct = "youraccountnumber";urchinTracker();</script>
Bước 8: Đưa vào Thư viện GME
Xuất bản bản kết hợp của bạn lên Thư viện bản kết hợp của GME. Thao tác này sẽ cho phép những người dùng khác xem bản kết hợp của bạn.
Để biết thêm thông tin:
Hãy xem Hướng dẫn bắt đầu sử dụng Google Mashup Editor. Hướng dẫn này trình bày chi tiết quy trình tạo các ứng dụng kết hợp. Ngoài ra, hãy xem danh sách thẻ để biết nội dung mô tả ngắn về tất cả các thẻ gm kèm theo ví dụ.
Mã:
Sau đây là toàn bộ mã để sử dụng KML của Pict Earth trong GME:
<gm:page title="Pict Earth missions" authenticate="false" onload="kmlPE()>

<!-- Map definition -->
<gm:mapid="map" height="400px" width="400px" lat="32.9393" lng="-117.206" zoom="9" maptypes="true"/>

<script>
  function kmlPE(){

    <!-- Get map -->
    var myMap = google.mashups.getObjectById('map').getMap();

    <!-- Get KML -->
    var geoXml = new GGeoXml("http://pictearthusa.com/kml/missions.kml");

    <!-- Place KML on Map -->
    myMap.addOverlay(geoXml);

    <!-- Set zoom on double click -->
    myMap.enableDoubleClickZoom();
  }
</script>
</gm:page>
Tiếp theo là gì?
Sau khi xuất bản bản kết hợp, bạn có thể sử dụng tệp KML trong đó làm một tham số để đưa vào một ứng dụng khác hoặc tải trực tiếp dưới dạng bản đồ. Ví dụ: trang này:
http://param.googlemashups.com là một ứng dụng kết hợp dữ liệu GME. Bạn có thể tham chiếu trực tiếp một tệp KML đến ứng dụng kết hợp dữ liệu bằng cách thêm kml= làm tham số trong URL, như sau: http://param.googlemashups.com/?kml=http://mapgadgets.googlepages.com/cta.kmlBạn cũng có thể tạo một Tiện ích trong dự án của mình. Sau khi bạn gửi tệp, hãy chuyển đến trình đơn tệp rồi nhấp vào Gửi tiện ích và làm theo hướng dẫn. Nhờ đó, bạn có thể dễ dàng thêm ứng dụng của mình vào trang chủ được cá nhân hoá trên Google, trên các trang web khác và chia sẻ ứng dụng đó với người khác.