Как добавить карту с маркером
Оптимизируйте свои подборки
Сохраняйте и классифицируйте контент в соответствии со своими настройками.
Введение

В этом руководстве рассказывается, как добавить карту Google в приложение Flutter. Карта содержит маркер, которым обозначается определенное место.
Как получить код
Клонируйте или скачайте репозиторий с примерами Flutter. Пример кода размещен в каталоге google_maps
.
Как настроить проект для разработки
Обязательно выполните все шаги из руководства Как настроить проект Flutter, прежде чем выполнять инструкции из этой статьи.
1. Импортируйте пакет Google Maps for Flutter
- Откройте файл
main.dart
в любой интегрированной среде разработки.
- Убедитесь, что в нем есть следующая строка:
import 'package:google_maps_flutter/google_maps_flutter.dart';
2. Добавьте Google Карты в приложение Flutter
Внутри виджета Scaffold
добавьте виджет GoogleMap
в раздел body.
GoogleMap(
initialCameraPosition: CameraPosition(
target: _center,
zoom: 11.0,
),
markers: {
const Marker(
markerId: MarkerId('Sydney'),
position: LatLng(-33.86, 151.20),
)
},
)
- Параметр
markerId
добавляет метку к маркеру.
- Параметр
position
указывает, в каком месте карты будет установлен маркер.
3. Соберите и запустите приложение
Запустите приложение Flutter любым из следующих способов:
- Нажмите кнопку
Run
в интегрированной среде разработки
- Выполните команду
flutter run
в командной строке.
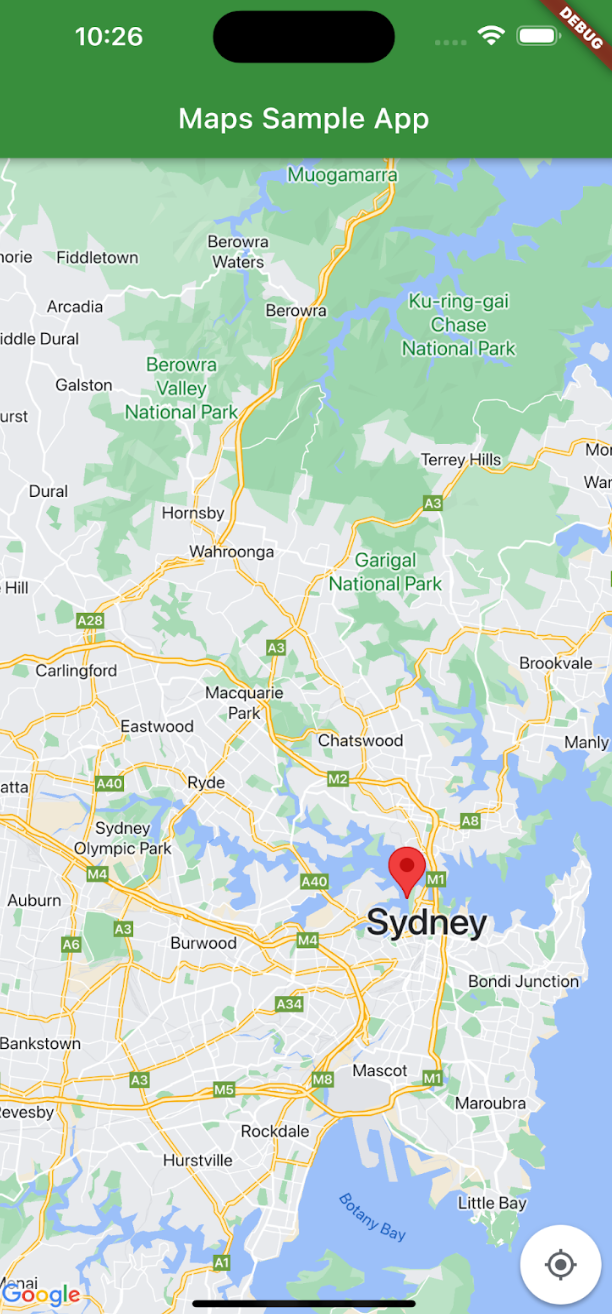
Вы должны увидеть карту с маркером, указывающим на город Сидней на восточном берегу Австралии, как показано на этой странице.
Устранение неполадок
- Если карта не видна, убедитесь, что вы получили ключ API и добавили его в приложение.
- Если для ключа API настроены ограничения по идентификатору пакета iOS, добавьте этот идентификатор в новое приложение:
com.google.examples.map-with-marker
.
- Убедитесь, что подключение WiFi или GPS работает хорошо.
- Проверьте журналы и выполните отладку приложения с помощью средств разработки Flutter DevTools.
- Подробнее о запуске приложений Flutter…
4. Как работает код
Этот пример кода размещен на сайте GitHub.
- Импортируйте нужные пакеты и инициализируйте приложение.
import 'package:flutter/material.dart';
import 'package:google_maps_flutter/google_maps_flutter.dart';
void main() => runApp(const MyApp());
class MyApp extends StatefulWidget {
const MyApp({super.key});
@override
State<MyApp> createState() => _MyAppState();
}
- Создайте карту и отцентруйте её по городу Сидней (Австралия).
class _MyAppState extends State<MyApp> {
late GoogleMapController mapController;
final LatLng _center = const LatLng(-33.86, 151.20);
void _onMapCreated(GoogleMapController controller) {
mapController = controller;
}
- Добавьте все виджеты, которые нужны для показа Google Карт в приложении.
@override
Widget build(BuildContext context) {
return MaterialApp(
home: Scaffold(
appBar: AppBar(
title: const Text('Maps Sample App'),
backgroundColor: Colors.green[700],
),
body: GoogleMap(
onMapCreated: _onMapCreated,
initialCameraPosition: CameraPosition(
target: _center,
zoom: 11.0,
), // CameraPosition
), // GoogleMap
), // Scaffold
); // MaterialApp
}
}
- Добавьте виджеты маркеров.
body: GoogleMap(
onMapCreated: _onMapCreated,
initialCameraPosition: CameraPosition(
target: _center,
zoom: 11.0,
),
markers: {
const Marker(
markerId: const MarkerId("Sydney"),
position: LatLng(-33.86, 151.20),
), // Marker
}, // markers
), // GoogleMap
...
- Добавьте для маркера информационное окно.
const Marker(
markerId: const MarkerId("Sydney"),
position: LatLng(-33.86, 151.20),
infoWindow: InfoWindow(
title: "Sydney",
snippet: "Capital of New South Wales",
), // InfoWindow
), //Marker
...
По умолчанию пакет Google Maps for Flutter показывает содержимое информационного окна, когда пользователь нажимает на маркер. Если вас устраивает поведение по умолчанию, прослушиватель кликов для маркера можно не добавлять.
Поздравляем! Вы создали приложение Flutter, которое показывает карту с маркером места и окно с дополнительной информацией. Вы также научились работать с пакетом Google Maps для Flutter.
Если не указано иное, контент на этой странице предоставляется по лицензии Creative Commons "С указанием авторства 4.0", а примеры кода – по лицензии Apache 2.0. Подробнее об этом написано в правилах сайта. Java – это зарегистрированный товарный знак корпорации Oracle и ее аффилированных лиц.
Последнее обновление: 2023-12-12 UTC.
[null,null,["Последнее обновление: 2023-12-12 UTC."],[[["\u003cp\u003eThis tutorial provides a step-by-step guide on integrating a Google map with a marker into your Flutter application.\u003c/p\u003e\n"],["\u003cp\u003eYou will learn how to import the necessary package, add the Google Map widget, and position a marker using latitude and longitude coordinates.\u003c/p\u003e\n"],["\u003cp\u003eThe tutorial covers troubleshooting common issues like API key setup, connectivity problems, and debugging techniques.\u003c/p\u003e\n"],["\u003cp\u003eIt also includes a detailed explanation of the code, breaking down the process of initializing the map, adding markers, and displaying information windows.\u003c/p\u003e\n"],["\u003cp\u003eYou can find the complete source code on GitHub for easy reference and implementation in your projects.\u003c/p\u003e\n"]]],["To add a Google Map to a Flutter app, first, import the `google_maps_flutter` package. Within the `Scaffold` widget, add a `GoogleMap` widget, setting the `initialCameraPosition` and `markers`. Each marker requires a `markerId` and `position`. Run the app using the IDE or command line (`flutter run`). To add information to a marker use `infoWindow`. Debugging involves checking for an API key, connection issues, and using Flutter DevTools. The code is also available on Github.\n"],null,["# Adding a Map with Marker\n\nIntroduction\n------------\n\nThis tutorial shows you how to add a Google map to your Flutter app. The map\nincludes a marker, also called a pin, to indicate a specific location.\n\nGetting the code\n----------------\n\nClone or download the [Flutter samples\nrepository](https://github.com/flutter/samples/). The [sample\ncode](https://github.com/flutter/samples/tree/main/google_maps) can be found in\nthe `google_maps` directory.\n\nSetting up your development project\n-----------------------------------\n\nBe sure you've completed the steps outlined in the [Set up a Flutter project](/maps/flutter-package/config)\nguide before continuing with this topic.\n\n1. Import the Google Maps for Flutter package\n---------------------------------------------\n\n1. Open your `main.dart` file in your preferred IDE.\n2. Verify that following import statement has been added to the file:\n\n```python\nimport 'package:google_maps_flutter/google_maps_flutter.dart';\n```\n\n2. Add Google Maps to your Flutter app\n--------------------------------------\n\nWithin the `Scaffold` widget, add a `GoogleMap` widget as\nthe body. \n\n```gdscript\nGoogleMap(\n initialCameraPosition: CameraPosition(\n target: _center,\n zoom: 11.0,\n ),\n markers: {\n const Marker(\n markerId: MarkerId('Sydney'),\n position: LatLng(-33.86, 151.20),\n )\n },\n)\n```\n\n\u003cbr /\u003e\n\n- The `markerId` option labels your marker.\n- The `position` option sets where the marker appears on your map.\n\n3. Building and running your app\n--------------------------------\n\nStart the Flutter app using one of the following options:\n\n1. From your IDE, click the `Run` button\n2. From the command line, run `flutter run`.\n\nYou should see a map with a marker centered on Sydney on the east coast of\nAustralia, similar to the image on this page.\n\n### Troubleshooting\n\n- If you don't see a map, check that you've obtained an [API key](https://developers.google.com/maps/documentation/ios-sdk/config#get-key) and added it to the app.\n- If you used the iOS bundle identifier to restrict the API key, edit the key to add the bundle identifier for the app: `com.google.examples.map-with-marker`.\n- Ensure that you have a good WiFi or GPS connection.\n- Use the [Flutter DevTools](https://docs.flutter.dev/tools/devtools/overview) to view logs and debug the app.\n- You can learn more about [Running a Flutter](/maps/flutter-package/(https:/docs.flutter.dev/get-started/test-drive?tab=vscode) app.\n\n4. Understanding the code\n-------------------------\n\nThis code can be found on\n[GitHub](https://github.com/flutter/samples/tree/main/google_maps).\n\n1. Import the necessary packages and initialize the app. \n\n ```python\n import 'package:flutter/material.dart';\n import 'package:google_maps_flutter/google_maps_flutter.dart';\n\n void main() =\u003e runApp(const MyApp());\n\n class MyApp extends StatefulWidget {\n const MyApp({super.key});\n\n @override\n State\u003cMyApp\u003e createState() =\u003e _MyAppState();\n }\n ```\n2. Create a map centered on Sydney, Australia. \n\n ```gdscript\n class _MyAppState extends State\u003cMyApp\u003e {\n \r\n late GoogleMapController mapController;\n \r\n final LatLng _center = const LatLng(-33.86, 151.20);\n \r\n void _onMapCreated(GoogleMapController controller) {\n mapController = controller;\n }\n ```\n3. Add the widgets needed to display a Map in an app. \n\n ```gdscript\n @override\n Widget build(BuildContext context) {\n return MaterialApp(\n home: Scaffold(\n appBar: AppBar(\n title: const Text('Maps Sample App'),\n backgroundColor: Colors.green[700],\n ),\n body: GoogleMap(\n onMapCreated: _onMapCreated,\n initialCameraPosition: CameraPosition(\n target: _center,\n zoom: 11.0,\n ), // CameraPosition\n ), // GoogleMap\n ), // Scaffold\n ); // MaterialApp\n }\n }\n ```\n4. Add the markers widgets to add the widget to your app. \n\n ```gdscript\n body: GoogleMap(\n onMapCreated: _onMapCreated,\n initialCameraPosition: CameraPosition(\n target: _center,\n zoom: 11.0,\n ),\n markers: {\n const Marker(\n markerId: const MarkerId(\"Sydney\"),\n position: LatLng(-33.86, 151.20),\n ), // Marker\n }, // markers\n ), // GoogleMap\n ...\n ```\n5. Add an info window to the marker. \n\n ```gdscript\n const Marker(\n markerId: const MarkerId(\"Sydney\"),\n position: LatLng(-33.86, 151.20),\n infoWindow: InfoWindow(\n title: \"Sydney\",\n snippet: \"Capital of New South Wales\",\n ), // InfoWindow\n ), //Marker\n ...\n ```\n By default, the Google Maps for Flutter package displays the content of the info window when the user taps a marker. There's no need to add a click listener for the marker if you're happy to use the default behavior.\n\nCongratulations! You've built an Flutter app that displays a Google map with a\nmarker to indicate a particular location and provide additional information in\nan info window. You've also learned how to use the Google Maps for Flutter package."]]